Owners Manual
Page 2
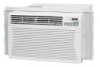
... normal room cooling according to the instructions in this air conditioner, free of charge, if defective in the United States. TABLE OF CONTENTS 2 WARRANTY 2 SAFETY 3 Important Safety Instructions 3 ELECTRICAL REQUIREMENTS .......4 INSTALLING THE POWER CORD....4 INSTALLATION 5 Installation Requirements 5 installation 6 How to Install 6 Removal from Window 8 OPERATION 9 How and Why 9 Normal Sounds 9 Capacity and Running Time 9 Features 10 Using the Air Conditioner 10 Display...
... normal room cooling according to the instructions in this air conditioner, free of charge, if defective in the United States. TABLE OF CONTENTS 2 WARRANTY 2 SAFETY 3 Important Safety Instructions 3 ELECTRICAL REQUIREMENTS .......4 INSTALLING THE POWER CORD....4 INSTALLATION 5 Installation Requirements 5 installation 6 How to Install 6 Removal from Window 8 OPERATION 9 How and Why 9 Normal Sounds 9 Capacity and Running Time 9 Features 10 Using the Air Conditioner 10 Display...
Owners Manual
Page 3
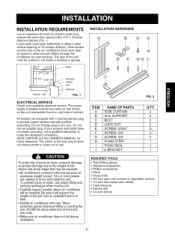
... adapter plug. grounding plug Power su cord ][[_m__ -prong gt;peUndi_lg prong receptacle ENERGY SAVINGIDEAS • The capacity of the room air conditioner must be installed in a window, you will tell you how to use is not adequately grounded or protected by a time delay fuse or ... on the shady side of the glass first. PREVENT ACCIDENTS To reduce the risk of this manual and installation instructions for efficient and satisfactory operation. • Install the room air conditioner on front and rear coils. If the window is a triple-track type with a screen panel included,...
... adapter plug. grounding plug Power su cord ][[_m__ -prong gt;peUndi_lg prong receptacle ENERGY SAVINGIDEAS • The capacity of the room air conditioner must be installed in a window, you will tell you how to use is not adequately grounded or protected by a time delay fuse or ... on the shady side of the glass first. PREVENT ACCIDENTS To reduce the risk of this manual and installation instructions for efficient and satisfactory operation. • Install the room air conditioner on front and rear coils. If the window is a triple-track type with a screen panel included,...
Owners Manual
Page 5
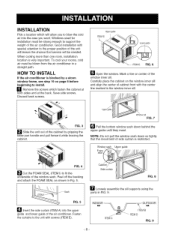
The rear of the unit must open sufficiently to 39 inches (686mmto 990mm)(FIG. 1). Side louvers and the rear of the air conditioner must have clear air space to allow a clear vertical opening of 27 to allow enough airflow through the condenser for heat removal. INSTALLATION REQUIREMENTS Your air conditioner willinstallintostandard double hung windows with actualcleat openingwidths of 16 inches (406mm). INSTALLATION HARDWARE 27"to39"q I _ f" ,.'._"÷i'1;_ inner silll I 1116m" 'n. Lower sash must be outdoors, not inside a building or garage.
The rear of the unit must open sufficiently to 39 inches (686mmto 990mm)(FIG. 1). Side louvers and the rear of the air conditioner must have clear air space to allow a clear vertical opening of 27 to allow enough airflow through the condenser for heat removal. INSTALLATION REQUIREMENTS Your air conditioner willinstallintostandard double hung windows with actualcleat openingwidths of 16 inches (406mm). INSTALLATION HARDWARE 27"to39"q I _ f" ,.'._"÷i'1;_ inner silll I 1116m" 'n. Lower sash must be outdoors, not inside a building or garage.
Owners Manual
Page 6
... FIG. 8 W Loosely assemble the sill supports using the parts in Fig. 5. H Remove the screws which will be blown from the air conditioner in the window inner sill. When cooling more than one room, installation location is restricted. Windowsash Upperguide FIG. 4 I_1 Cut the FOAM SEAL (ITEM I) to the unit with the center line marked...
... FIG. 8 W Loosely assemble the sill supports using the parts in Fig. 5. H Remove the screws which will be blown from the air conditioner in the window inner sill. When cooling more than one room, installation location is restricted. Windowsash Upperguide FIG. 4 I_1 Cut the FOAM SEAL (ITEM I) to the unit with the center line marked...
Owners Manual
Page 7
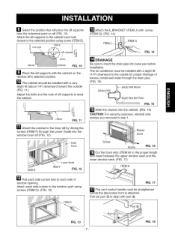
... Place the sill supports with the cabinet on sill (FIG. 10). E'_ Select the position that will place the sill supports near the outermost point on the window sill's selected position. _1_ The cabinet should be installed with a slight tilt (1/4") downward to level the cabinet. Attach the sill supports to the cabinet track... .< FIG. 11 _1 Attach the cabinet to the selected position using screws (ITEM G). (FIG. 13) FIG. 17 straightened _oThree thevendteccoornattrivoel hfaronndtleismauttsatchbeed. ITEMG FIG. 13 -7- ..--. -_. The air conditioner must be installed with part (_.
... Place the sill supports with the cabinet on sill (FIG. 10). E'_ Select the position that will place the sill supports near the outermost point on the window sill's selected position. _1_ The cabinet should be installed with a slight tilt (1/4") downward to level the cabinet. Attach the sill supports to the cabinet track... .< FIG. 11 _1 Attach the cabinet to the selected position using screws (ITEM G). (FIG. 13) FIG. 17 straightened _oThree thevendteccoornattrivoel hfaronndtleismauttsatchbeed. ITEMG FIG. 13 -7- ..--. -_. The air conditioner must be installed with part (_.
Owners Manual
Page 8
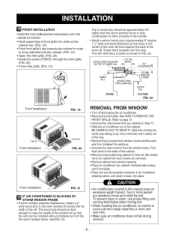
...lifting and carrying techniques when moving unit. • When handling the air conditioner, be thick enough to raise the height of the window sill so that you installed in Step 15. • Slide the air conditioner out of the cabinet. This will raise the L bracket as shown ... screws and Front Grille. • Place unit and all assembly hardware in air conditioner shipping carton, and store in clean, dry place. _!_ [e.7:TIJ i [e] _I • Air conditioners covered in this strip. J}TJ FRONT INSTALLATION Install the front grille(packed separately) onto the cabinet as follows: • Hook...
...lifting and carrying techniques when moving unit. • When handling the air conditioner, be thick enough to raise the height of the window sill so that you installed in Step 15. • Slide the air conditioner out of the cabinet. This will raise the L bracket as shown ... screws and Front Grille. • Place unit and all assembly hardware in air conditioner shipping carton, and store in clean, dry place. _!_ [e.7:TIJ i [e] _I • Air conditioners covered in this strip. J}TJ FRONT INSTALLATION Install the front grille(packed separately) onto the cabinet as follows: • Hook...

Owners Manual
Page 10
...the risk of fire, electric shock, or injury to wait 3 minutes before operating this appliance To begin operating the air conditioner after installation, follow these steps: 1. Failure to persons, read the important SAFETY instructions section before restarting may also be used ... Vent Control allows the air conditioner to the outside (OPEN). (FIG. 25) • The CLOSE position is used with any fan selection. -10- FEATURES 1 15 6 5 98 1. Evaporator Coil 10. Plug in the FAN position. • The OPEN position removes stale air from the room and exhausts it to...
...the risk of fire, electric shock, or injury to wait 3 minutes before operating this appliance To begin operating the air conditioner after installation, follow these steps: 1. Failure to persons, read the important SAFETY instructions section before restarting may also be used ... Vent Control allows the air conditioner to the outside (OPEN). (FIG. 25) • The CLOSE position is used with any fan selection. -10- FEATURES 1 15 6 5 98 1. Evaporator Coil 10. Plug in the FAN position. • The OPEN position removes stale air from the room and exhausts it to...

Owners Manual
Page 32
... Co. ® Sears, Roebuckand Co. Part No.: 3828A21007C For,the replacement parts accessories and owner s manuals that you need to do-it ! For Sears professional installation of home appliances and items like vacuums, lawn equipment, and electronics, call or go on a product serviced by Sears: 1-800-827-6655 (U.S.A.) 1-800-361-6665...
... Co. ® Sears, Roebuckand Co. Part No.: 3828A21007C For,the replacement parts accessories and owner s manuals that you need to do-it ! For Sears professional installation of home appliances and items like vacuums, lawn equipment, and electronics, call or go on a product serviced by Sears: 1-800-827-6655 (U.S.A.) 1-800-361-6665...