Owners Manual
Page 3
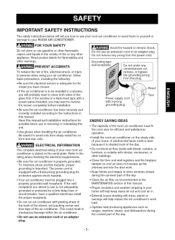
... use your room air conditioner to avoid harm to yourself or damage to avoid cuts from sharp metal fins on front and rear coils. PREVENT ACCIDENTS To reduce the risk of the air conditioner. If the wall receptacle you... will probably want to remove the screen completely before installation. • Be sure the air conditioner has been securely and correctly installed according to the rating when checking the electrical requirements. • Be sure the air conditioner is a triple-track type with packing sheet of the back of the sleeve...
... use your room air conditioner to avoid harm to yourself or damage to avoid cuts from sharp metal fins on front and rear coils. PREVENT ACCIDENTS To reduce the risk of the air conditioner. If the wall receptacle you... will probably want to remove the screen completely before installation. • Be sure the air conditioner has been securely and correctly installed according to the rating when checking the electrical requirements. • Be sure the air conditioner is a triple-track type with packing sheet of the back of the sleeve...
Owners Manual
Page 5
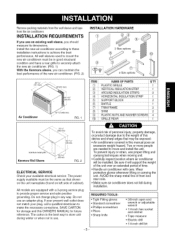
... • Tape measure • Electric drill • 1/4-inch drill bit -5- Remove packing materials from the wall sleeve and tape from the air conditioner. Install the new air conditioner according to these installation instructions to securely attach the new air conditioner. (FIG. 1) With the Kenmore sleeve, you should measure its dimensions. INSTALLATION REQUIREMENTS If you use proper lifting and carrying techniques...
... • Tape measure • Electric drill • 1/4-inch drill bit -5- Remove packing materials from the wall sleeve and tape from the air conditioner. Install the new air conditioner according to these installation instructions to securely attach the new air conditioner. (FIG. 1) With the Kenmore sleeve, you should measure its dimensions. INSTALLATION REQUIREMENTS If you use proper lifting and carrying techniques...
Owners Manual
Page 6
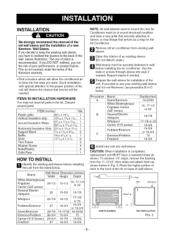
... it is recommended. Good installation with special attention to the front of the rib on base of the wall sleeve illustration. O Prepare the wall sleeve for the Air Conditioner. Procedure A B C Brand Sears/Kenmore White-Westinghouse Frigidaire Carrier (52F series) General Electric /Hotpoint Whirlpool Carrier (51S series) Fedders/Emerson Emerson/Fedders Friedrich Depth(inches) 16-23/32 16...
... it is recommended. Good installation with special attention to the front of the rib on base of the wall sleeve illustration. O Prepare the wall sleeve for the Air Conditioner. Procedure A B C Brand Sears/Kenmore White-Westinghouse Frigidaire Carrier (52F series) General Electric /Hotpoint Whirlpool Carrier (51S series) Fedders/Emerson Emerson/Fedders Friedrich Depth(inches) 16-23/32 16...

Owners Manual
Page 7
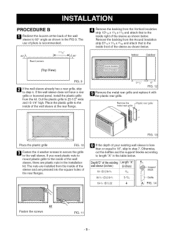
... your unit),skip to step 3. Place the plastic grille to the inside of the wall sleeve, there are using the new sleeve (optionally supplied with the plastic rear grille. -7 • Air conditionerscoveredin this manualposean excessiveweighthazard.Two or morepeopleare neededto moveand installtheunit. B asten the 4 washer...you need plastic nuts to mount plastic grille to the inside of the wall sleeve at the rear flange. Otherwise, install the plastic grille from the inside front of the air conditioner until trim is flush with sleeve as shown below . Slide trim over the front of the...
... your unit),skip to step 3. Place the plastic grille to the inside of the wall sleeve, there are using the new sleeve (optionally supplied with the plastic rear grille. -7 • Air conditionerscoveredin this manualposean excessiveweighthazard.Two or morepeopleare neededto moveand installtheunit. B asten the 4 washer...you need plastic nuts to mount plastic grille to the inside of the wall sleeve at the rear flange. Otherwise, install the plastic grille from the inside front of the air conditioner until trim is flush with sleeve as shown below . Slide trim over the front of the...
Owners Manual
Page 8
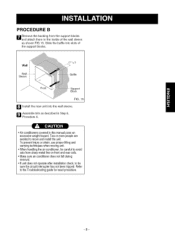
...- Place the plastic grille to the inside of your existing wall sleeve is recommended. If you need plastic nuts to mount plastic grille to the inside of the wall sleeve at the back of the wall sleeve to the inside right of the sleeve as shown below . The nuts are plastic nuts in the... 13/8 and attach that to 60 ° angle as shown in the installation kit. Indoor Outdoor 1 FIG. 9 _'_lf the wall sleeve already has a rear grille, skip to the wall sleeve. FIG. 12 _ emove the metal rear grille and replace it with the plastic rear grille. Remove the metal rear ( -Plastic ...
...- Place the plastic grille to the inside of your existing wall sleeve is recommended. If you need plastic nuts to mount plastic grille to the inside of the wall sleeve at the back of the wall sleeve to the inside right of the sleeve as shown below . The nuts are plastic nuts in the... 13/8 and attach that to 60 ° angle as shown in the installation kit. Indoor Outdoor 1 FIG. 9 _'_lf the wall sleeve already has a rear grille, skip to the wall sleeve. FIG. 12 _ emove the metal rear grille and replace it with the plastic rear grille. Remove the metal rear ( -Plastic ...
Owners Manual
Page 9
...; Whenhandlingthe air conditionerb, e carefulto avoid cutsfromsharpmetalfins on front and rearcoils. • Makesureair conditionerdoesnotfall during removal. • If unitdoesnotoperateafter installationcheck,to be surethecircuitinterrupterhasnot beentripped.Refer to theTroubleshootingguidefor resetprocedure. -9- Slide the baffle into slots of the support blocks. _/all _/all _ve 7 3/32") Block FIG. 15 l_ Install the new unit into the wall sleeve. _l...
...; Whenhandlingthe air conditionerb, e carefulto avoid cutsfromsharpmetalfins on front and rearcoils. • Makesureair conditionerdoesnotfall during removal. • If unitdoesnotoperateafter installationcheck,to be surethecircuitinterrupterhasnot beentripped.Refer to theTroubleshootingguidefor resetprocedure. -9- Slide the baffle into slots of the support blocks. _/all _/all _ve 7 3/32") Block FIG. 15 l_ Install the new unit into the wall sleeve. _l...
Owners Manual
Page 10
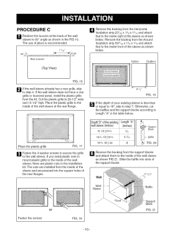
... 60 ° angle as shown in the table below. Indoor Outdoor FIG. 16 _'_lf the wall sleeve already has a rear grille, skip to 26-1/2" wide and 15-1/2" high. If the wall sleeve does not have a rear grille or Iouvered panel, install the plastic grille from the Horizontal Insulation strip 237/32 X 13/8 X ...13/18 and attach that to the inside of the wall sleeve at the back of the sleeve as shown below. Remove the backing from the Around Insulation strip 5927/32 X 13/8x 13/8and attach that to the inside right...
... 60 ° angle as shown in the table below. Indoor Outdoor FIG. 16 _'_lf the wall sleeve already has a rear grille, skip to 26-1/2" wide and 15-1/2" high. If the wall sleeve does not have a rear grille or Iouvered panel, install the plastic grille from the Horizontal Insulation strip 237/32 X 13/8 X ...13/18 and attach that to the inside of the wall sleeve at the back of the sleeve as shown below. Remove the backing from the Around Insulation strip 5927/32 X 13/8x 13/8and attach that to the inside right...
Owners Manual
Page 11
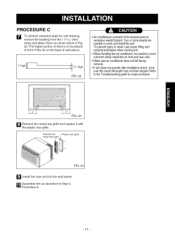
... carryingtechniqueswhen movingunit. • Whenhandlingthe air conditioner,be carefulto avoid cutsfrom sharpmetalfins on front and rearcoils. • Makesureair conditionerdoesnotfall during removal. • If unitdoesnotoperateafter installationcheck,to be surethe circuitinterrupterhas notbeentripped.Refer to be placed in front of the rib on the base of wall sleeve. FIG. 22 JV: [o ujiKo] i • Air conditionerscoveredin this manualposean excessiveweighthazard.Twoor...
... carryingtechniqueswhen movingunit. • Whenhandlingthe air conditioner,be carefulto avoid cutsfrom sharpmetalfins on front and rearcoils. • Makesureair conditionerdoesnotfall during removal. • If unitdoesnotoperateafter installationcheck,to be surethe circuitinterrupterhas notbeentripped.Refer to be placed in front of the rib on the base of wall sleeve. FIG. 22 JV: [o ujiKo] i • Air conditionerscoveredin this manualposean excessiveweighthazard.Twoor...
Owners Manual
Page 13
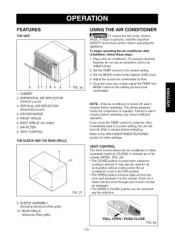
... to equalize. SLEEVE ASSEMBLY (Including Aluminum Rear grille) 10. To begin operating the air conditioner after installation, follow these steps: 1. Wait 3 minutes before operating this appliance. AIR FILTER 8. If you find most comfortable. FEATURES THE UNIT 6 37 2 8 4 5 1. VERTICAL AIR DEFLECTOR (Horizontal Louver) 4. Set the MODE control at the highest COOL level. 4. Once the room has cooled...
... to equalize. SLEEVE ASSEMBLY (Including Aluminum Rear grille) 10. To begin operating the air conditioner after installation, follow these steps: 1. Wait 3 minutes before operating this appliance. AIR FILTER 8. If you find most comfortable. FEATURES THE UNIT 6 37 2 8 4 5 1. VERTICAL AIR DEFLECTOR (Horizontal Louver) 4. Set the MODE control at the highest COOL level. 4. Once the room has cooled...