Owners Manual
Page 2
... Using the Air Conditioner 13 Control Panel 14 Remote Control 15 MAINTENANCE 17 Air Filter Cleaning 17 Air Conditioner Cleaning 17 How to Remove the Front Grille 17 How to Replace the Front Grille 17 TROUBLESHOOTING 18 Before Calling for Service 18 ESPAI_IOL 20 MASTER PROTECTION AGREEMENTS 39 SERVICE NUMBERS Back Cover FULL ONE YEAR WARRANTY ON THROUGH-THE-WALL AIR CONDITIONER For one year from the date of purchase, when this air conditioner is operated and maintained for normal room cooling according to instructions...
... Using the Air Conditioner 13 Control Panel 14 Remote Control 15 MAINTENANCE 17 Air Filter Cleaning 17 Air Conditioner Cleaning 17 How to Remove the Front Grille 17 How to Replace the Front Grille 17 TROUBLESHOOTING 18 Before Calling for Service 18 ESPAI_IOL 20 MASTER PROTECTION AGREEMENTS 39 SERVICE NUMBERS Back Cover FULL ONE YEAR WARRANTY ON THROUGH-THE-WALL AIR CONDITIONER For one year from the date of purchase, when this air conditioner is operated and maintained for normal room cooling according to instructions...
Owners Manual
Page 3
... MAINTENANCE section of this manual. • Proper insulation and weather stripping in your home will help reduce the air conditioner's work . • Keep blinds and drapes in other windows closed during the sunniest part of the day. • Clean the air filter as ranges, washers, dryers, and dishwashers during the coolest part of this unit. • Use gloves when handling the air conditioner. ELECTRICAL INFORMATION The complete electrical rating...
... MAINTENANCE section of this manual. • Proper insulation and weather stripping in your home will help reduce the air conditioner's work . • Keep blinds and drapes in other windows closed during the sunniest part of the day. • Clean the air filter as ranges, washers, dryers, and dishwashers during the coolest part of this unit. • Use gloves when handling the air conditioner. ELECTRICAL INFORMATION The complete electrical rating...
Owners Manual
Page 4
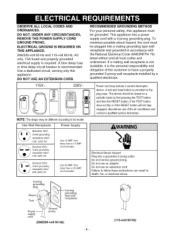
... codes and ordinances. Power cord may be grounded. The device should be plugged into a grounded 3 prong outlet. time delay fuse or 20 AMP. Do not remove ground prong. Do not use of the customer to have a properly grounded 3-prong wall receptacle installed by first pressing the TEST button and then the RESET button. Use a dedicated circuit, serving only this appliance must be tested on the plug case. circuit breaker. 3-wire...
... codes and ordinances. Power cord may be grounded. The device should be plugged into a grounded 3 prong outlet. time delay fuse or 20 AMP. Do not remove ground prong. Do not use of the customer to have a properly grounded 3-prong wall receptacle installed by first pressing the TEST button and then the RESET button. Use a dedicated circuit, serving only this appliance must be tested on the plug case. circuit breaker. 3-wire...
Owners Manual
Page 5
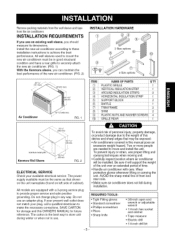
... present wall outlet does not match your available electrical service. To prevent injury or strain, use . To avoid risk of personal injury, property damage, or product damage due to store unit during installation. Wear protective gloves whenever lifting or carrying the unit. INSTALLATION REQUIREMENTS If you use an adapter plug. Do not change plug in this OWNER'S MANUAL for future reference. Install the new air conditioner according to these installation instructions to...
... present wall outlet does not match your available electrical service. To prevent injury or strain, use . To avoid risk of personal injury, property damage, or product damage due to store unit during installation. Wear protective gloves whenever lifting or carrying the unit. INSTALLATION REQUIREMENTS If you use an adapter plug. Do not change plug in this OWNER'S MANUAL for future reference. Install the new air conditioner according to these installation instructions to...
Owners Manual
Page 6
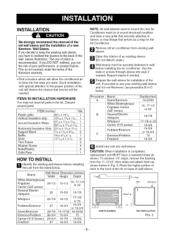
...-23/32 15 18-5/8 16-3/4 NOTE: All wall sleeves used to mount the new Air Conditioner must be needed. To achieve 1/4" slope, remove the backing from existing wall sleeve. II 3/4" High UNIT Wall Sleeve I___j 16_j SHIM PLACEMENT UNIT INSTALLATION FIG. 3 -6- Clean the interior of an existing sleeve. (Do not disturb seals.) Q Wall sleeve must be in sound structural condition and have a rear grille that securely attaches to the proper position of...
...-23/32 15 18-5/8 16-3/4 NOTE: All wall sleeves used to mount the new Air Conditioner must be needed. To achieve 1/4" slope, remove the backing from existing wall sleeve. II 3/4" High UNIT Wall Sleeve I___j 16_j SHIM PLACEMENT UNIT INSTALLATION FIG. 3 -6- Clean the interior of an existing sleeve. (Do not disturb seals.) Q Wall sleeve must be in sound structural condition and have a rear grille that securely attaches to the proper position of...

Owners Manual
Page 7
... . Indoor Outdoor Wall -[ Ir: [,]Etljii[o] I FIG. 8 9 1/2" -_ _- 6" -_ FIG. 6 L_-I_Remove the metal rear grille and replace it with your unit),skip to step 3. Remove the backing from the Vertical Insulation strip 159/16X 13/8x 13/8and attach that to the inside of the sleeve and are plastic nuts in the installation kit. The nuts are installed from the kit. PROCEDURE A li]l If you need...
... . Indoor Outdoor Wall -[ Ir: [,]Etljii[o] I FIG. 8 9 1/2" -_ _- 6" -_ FIG. 6 L_-I_Remove the metal rear grille and replace it with your unit),skip to step 3. Remove the backing from the Vertical Insulation strip 159/16X 13/8x 13/8and attach that to the inside of the sleeve and are plastic nuts in the installation kit. The nuts are installed from the kit. PROCEDURE A li]l If you need...
Owners Manual
Page 8
... plastic grille to the inside front of the wall sleeve to 60 ° angle as shown below. If you need plastic nuts to mount plastic grille to the inside right of the wall sleeve, there are plastic nuts in the table below . Indoor Outdoor 1 FIG. 9 _'_lf the wall sleeve already has a rear grille, skip to length "A" in the installation kit. Rear Louvers 7 3/32" 60 o (Top View) L_ Remove...
... plastic grille to the inside front of the wall sleeve to 60 ° angle as shown below. If you need plastic nuts to mount plastic grille to the inside right of the wall sleeve, there are plastic nuts in the table below . Indoor Outdoor 1 FIG. 9 _'_lf the wall sleeve already has a rear grille, skip to length "A" in the installation kit. Rear Louvers 7 3/32" 60 o (Top View) L_ Remove...
Owners Manual
Page 9
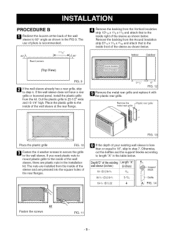
... be surethecircuitinterrupterhasnot beentripped.Refer to theTroubleshootingguidefor resetprocedure. -9- PROCEDURE B W anedmaotvteachthethebmacktiongthefroimnsitdhee osfutphpeorwt ablllosclkeseve as described in Step 6, pvt_ E_o] _I • Air conditionerscoveredin this manualposean excessiveweighthazard.Twoor morepeopleare neededto moveand installthe unit. Slide the baffle into slots of the support blocks. _/all _/all _ve 7 3/32") Block FIG. 15 l_ Install the new unit into the wall sleeve. _l APsrosceemdbulree tArim.
... be surethecircuitinterrupterhasnot beentripped.Refer to theTroubleshootingguidefor resetprocedure. -9- PROCEDURE B W anedmaotvteachthethebmacktiongthefroimnsitdhee osfutphpeorwt ablllosclkeseve as described in Step 6, pvt_ E_o] _I • Air conditionerscoveredin this manualposean excessiveweighthazard.Twoor morepeopleare neededto moveand installthe unit. Slide the baffle into slots of the support blocks. _/all _/all _ve 7 3/32") Block FIG. 15 l_ Install the new unit into the wall sleeve. _l APsrosceemdbulree tArim.
Owners Manual
Page 10
...use of the sleeve as shown in the table below. Indoor Outdoor FIG. 16 _'_lf the wall sleeve already has a rear grille, skip to 26-1/2" wide and 15-1/2" high. If the wall sleeve does not have a rear grille or Iouvered panel, install the plastic grille from the Around Insulation strip 5927/32 X 13/8x 13/8and attach that to the inside of the wall sleeve... s7l.eOevtheeriws islees,s tchuatn the baffles and the support blocks according to Length "A" in the FIG 16. Place the plastic grille to the inside right of pliers is recommended. Remove the backing from the kit.
...use of the sleeve as shown in the table below. Indoor Outdoor FIG. 16 _'_lf the wall sleeve already has a rear grille, skip to 26-1/2" wide and 15-1/2" high. If the wall sleeve does not have a rear grille or Iouvered panel, install the plastic grille from the Around Insulation strip 5927/32 X 13/8x 13/8and attach that to the inside of the wall sleeve... s7l.eOevtheeriws islees,s tchuatn the baffles and the support blocks according to Length "A" in the FIG 16. Place the plastic grille to the inside right of pliers is recommended. Remove the backing from the kit.
Owners Manual
Page 11
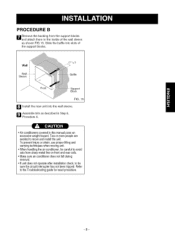
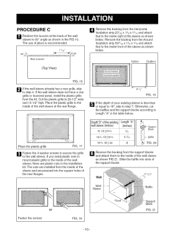
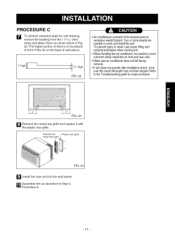
... on the base of wall sleeve. as shown below in Fig. 23. To preventinjuryor strain,useproperliftingand carryingtechniqueswhen movingunit. • Whenhandlingthe air conditioner,be surethe circuitinterrupterhas notbeentripped.Refer to the Troubleshootinguidefor resetprocedure. 16,,i 16,,i FIG. 23 _J Remove the metal rear grille and replace it with the plastic rear grille. PROCEDURE C W To achieve rearward slope for unit draining, remove the backing from...
... on the base of wall sleeve. as shown below in Fig. 23. To preventinjuryor strain,useproperliftingand carryingtechniqueswhen movingunit. • Whenhandlingthe air conditioner,be surethe circuitinterrupterhas notbeentripped.Refer to the Troubleshootinguidefor resetprocedure. 16,,i 16,,i FIG. 23 _J Remove the metal rear grille and replace it with the plastic rear grille. PROCEDURE C W To achieve rearward slope for unit draining, remove the backing from...
Owners Manual
Page 12
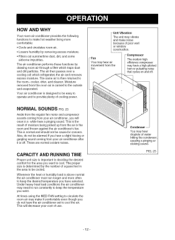
... Proper unit size is above normal the air conditioner must run constantly to cool. Whenever the heat or humidity load is important in the room and thrown against the air conditioner's fan. Condenser -- The air conditioner performs these functions by removing excess moisture. • Filters out summertime dust, dirt, and some airborne impurities. NORMAL SOUNDS FIG2. 5 Aside from the regular fan motor and compressor sounds coming from the air in...
... Proper unit size is above normal the air conditioner must run constantly to cool. Whenever the heat or humidity load is important in the room and thrown against the air conditioner's fan. Condenser -- The air conditioner performs these functions by removing excess moisture. • Filters out summertime dust, dirt, and some airborne impurities. NORMAL SOUNDS FIG2. 5 Aside from the regular fan motor and compressor sounds coming from the air in...
Owners Manual
Page 13
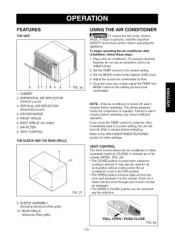
... other settings. This allows pressure inside air (CLOSE) or exhaust air to the outside (OPEN). (FIG. 28) • The CLOSE position is used for air recirculation without cooling when the air conditioner is desired. Wait 3 minutes before restarting may also be used with any fan selection. 9. To begin operating the air conditioner after installation, follow these steps: 1. VENT CONTROL The Vent Control allows the air conditioner to either recirculate inside the compressor to the AIR CONDITIONER FEATURES...
... other settings. This allows pressure inside air (CLOSE) or exhaust air to the outside (OPEN). (FIG. 28) • The CLOSE position is used for air recirculation without cooling when the air conditioner is desired. Wait 3 minutes before restarting may also be used with any fan selection. 9. To begin operating the air conditioner after installation, follow these steps: 1. VENT CONTROL The Vent Control allows the air conditioner to either recirculate inside the compressor to the AIR CONDITIONER FEATURES...
Owners Manual
Page 14
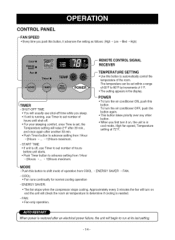
... last setting. -14- Push this button to shift mode of hours before unit starts. • Push Timer button to advance setting from COOL _ ENERGY SAVER _ FAN. - CONTROL PANEL -FAN SPEED • Every time you push this button, it on and the unit will check the room air temperature to determine if cooling is needed. - TEMPERATURE SETTING • Use this button. ENERGY SAVER: • The fan stops when the compressor stops cooling. When power is off . • For your sleeping comfort, once Time is set number of operation from...
... last setting. -14- Push this button to shift mode of hours before unit starts. • Push Timer button to advance setting from COOL _ ENERGY SAVER _ FAN. - CONTROL PANEL -FAN SPEED • Every time you push this button, it on and the unit will check the room air temperature to determine if cooling is needed. - TEMPERATURE SETTING • Use this button. ENERGY SAVER: • The fan stops when the compressor stops cooling. When power is off . • For your sleeping comfort, once Time is set number of operation from...
Owners Manual
Page 15
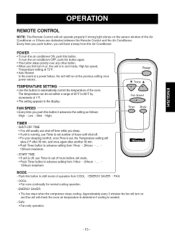
... between the Remote Control and the Air Conditioner. MODE - COOL: • Fan runs continually for normal cooling operation - FAN: • Fan-only operation. -15- ENERGY SAVER: • The fan stops when the compressor stops cooling. Every time you push button, you first turn it advances the setting as follows: (High _Low _Ned _ High) TIMER - POWER • To turn on , the unit is needed. - START TIME • If unit is off time while you push this button. TEMPERATURE SETTING • Use this button to set within...
... between the Remote Control and the Air Conditioner. MODE - COOL: • Fan runs continually for normal cooling operation - FAN: • Fan-only operation. -15- ENERGY SAVER: • The fan stops when the compressor stops cooling. Every time you push button, you first turn it advances the setting as follows: (High _Low _Ned _ High) TIMER - POWER • To turn on , the unit is needed. - START TIME • If unit is off time while you push this button. TEMPERATURE SETTING • Use this button to set within...
Owners Manual
Page 16
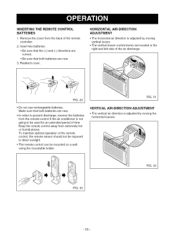
... use rechargeable batteries. Make sure that both batteries are new. • In order to prevent discharge, remove the batteries from the remote control if the air conditioner is not going to direct sunlight. • The remote control can be used for an extended period of time Keep the remote control away from the back of the remote control, the remote sensor should not be exposed to be mounted on a wall using...
... use rechargeable batteries. Make sure that both batteries are new. • In order to prevent discharge, remove the batteries from the remote control if the air conditioner is not going to direct sunlight. • The remote control can be used for an extended period of time Keep the remote control away from the back of the remote control, the remote sensor should not be exposed to be mounted on a wall using...
Owners Manual
Page 17
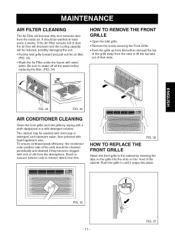
... dampened in until it removes dust from fins. It should be washed at least every 2 weeks. FIG. 33 FIG. 34 I FIG. 36 HOW TO REPLACE THE FRONT GRILLE Attach the front grille to remove debris from the inside air. To ensure continued peak efficiency, the condenser coils (outdoor side of their slots. I AIR CONDITIONER CLEANING Clean the front grille and inlet grille by inserting the tabs...
... dampened in until it removes dust from fins. It should be washed at least every 2 weeks. FIG. 33 FIG. 34 I FIG. 36 HOW TO REPLACE THE FRONT GRILLE Attach the front grille to remove debris from the inside air. To ensure continued peak efficiency, the condenser coils (outdoor side of their slots. I AIR CONDITIONER CLEANING Clean the front grille and inlet grille by inserting the tabs...

Owners Manual
Page 18
... Check if... TEMP Control set the MODEto FAN,FANspeedto High. Then... THEAIRCONDITIONECROOLINGB, UTROOMISTOOWARM- Dirtyair filter- BEFORE CALLING FOR SERVICE Check the following list to a lower number. Air distributionis restricted. Set FANSPEEDon HIto minimizethe coolingload. WATER DRIPPING INSIDE ROOM WHEN UNIT IS COOLING. Replace fuse with time delay type or reset circuit breaker. Check if... THEAIRCONDITIONECROOLINGB, UTROOMISTOOWARM Check if... Doors,windows,registers,etc.open. Cleanair filter.Referto Maintenancesectionof owner'smanual...
... Check if... TEMP Control set the MODEto FAN,FANspeedto High. Then... THEAIRCONDITIONECROOLINGB, UTROOMISTOOWARM- Dirtyair filter- BEFORE CALLING FOR SERVICE Check the following list to a lower number. Air distributionis restricted. Set FANSPEEDon HIto minimizethe coolingload. WATER DRIPPING INSIDE ROOM WHEN UNIT IS COOLING. Replace fuse with time delay type or reset circuit breaker. Check if... THEAIRCONDITIONECROOLINGB, UTROOMISTOOWARM Check if... Doors,windows,registers,etc.open. Cleanair filter.Referto Maintenancesectionof owner'smanual...

Owners Manual
Page 40
... Brands, LLC © Sears Brands, LLC Part No.: MFL38155501 For the replacement parts, accessories and owner's manuals that you need to do-it ! For Sears professional installation of home appliances and items like garage door openers and water heaters. 1-800-4-MY-HOME ® (1-800-469...Parts & Repair Service Center 1-800-488-1222 (U.S.A.) 1-800-469-4663 (Canada) Call anytime, day or night www.sears.com www.sears.ca To purchase a protection agreement on a product serviced by Sears: 1-800-827-6655 (U.S.A.) 1-800-361-6665 (Canada) Para pedir servicio de reparaci6n a domicilio, y para...
... Brands, LLC © Sears Brands, LLC Part No.: MFL38155501 For the replacement parts, accessories and owner's manuals that you need to do-it ! For Sears professional installation of home appliances and items like garage door openers and water heaters. 1-800-4-MY-HOME ® (1-800-469...Parts & Repair Service Center 1-800-488-1222 (U.S.A.) 1-800-469-4663 (Canada) Call anytime, day or night www.sears.com www.sears.ca To purchase a protection agreement on a product serviced by Sears: 1-800-827-6655 (U.S.A.) 1-800-361-6665 (Canada) Para pedir servicio de reparaci6n a domicilio, y para...

