
Owners Manual
Page 2
... Sliding Window Installation "-"6 Casement Window Installation 8 Removal From Window 8 OPERATION 9 How and Why 9 Normal Sounds 9 Capacity and Running Time 9 Features 10 Using the Air Conditioner 10 Display 11 Air Direction Adjustment 11 Remote Control 12 How To Insert Batteries Into Remote Control ...12 MAINTENANCE 13 Air Filter Cleaning 13 Air Conditioner Cleaning 13 How to Remove the Front Grille 13 How to Replace the Front Grille 13 TROUBLESHOOTING 14 Before Calling for Service 14 ESPANOL 16 SERVICE NUMBERS Back Cover FULL ONE YEAR WARRANTY ON ROOM AIR...
... Sliding Window Installation "-"6 Casement Window Installation 8 Removal From Window 8 OPERATION 9 How and Why 9 Normal Sounds 9 Capacity and Running Time 9 Features 10 Using the Air Conditioner 10 Display 11 Air Direction Adjustment 11 Remote Control 12 How To Insert Batteries Into Remote Control ...12 MAINTENANCE 13 Air Filter Cleaning 13 Air Conditioner Cleaning 13 How to Remove the Front Grille 13 How to Replace the Front Grille 13 TROUBLESHOOTING 14 Before Calling for Service 14 ESPANOL 16 SERVICE NUMBERS Back Cover FULL ONE YEAR WARRANTY ON ROOM AIR...
Owners Manual
Page 3
... delay fuse or circuit breaker, have chosen. • If the air conditioner is to be plugged into the duct work load. • Operate heat producing appliances such as ranges, washers, dryers, and dishwashers during the sunniest part of the day. • Clean the air filter as recommended in a properly grounded wall receptacle. Read product labels for the model you intend to your ROOM AIR CONDITIONER. Save this manual and installation instructions for...
... delay fuse or circuit breaker, have chosen. • If the air conditioner is to be plugged into the duct work load. • Operate heat producing appliances such as ranges, washers, dryers, and dishwashers during the sunniest part of the day. • Clean the air filter as recommended in a properly grounded wall receptacle. Read product labels for the model you intend to your ROOM AIR CONDITIONER. Save this manual and installation instructions for...
Owners Manual
Page 4
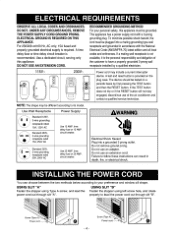
... 15 AMP, circuit breaker. Electrical Shock Hazard Plug into a grounded 3 prong outlet. Do not remove ground prong. Failure to lead the power cord out through slit "B'L Screw(Type A -4- Do not use of the air conditioner and contact a qualified service technician. The device should be different according to your preference and window sill shape. Use 20 AMP, time delay fuse or 20 AMP, circuit breaker. OBSERVEALL LOCAL CODES AND ORDINANCES. A test and reset button...
... 15 AMP, circuit breaker. Electrical Shock Hazard Plug into a grounded 3 prong outlet. Do not remove ground prong. Failure to lead the power cord out through slit "B'L Screw(Type A -4- Do not use of the air conditioner and contact a qualified service technician. The device should be different according to your preference and window sill shape. Use 20 AMP, time delay fuse or 20 AMP, circuit breaker. OBSERVEALL LOCAL CODES AND ORDINANCES. A test and reset button...
Owners Manual
Page 5
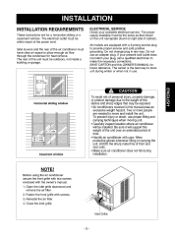
..., property damage, or product damage due to allow enough air flow through the condenser for future reference. Do not change plug in this OWNER'S MANUAL for heat remove. Reinstall the air filter. 4. Horizontal sliding window Casement window To avoid risk of the air conditioner must be the same as that may be outdoors, not inside a building or garage. The electrical outlet must be exposed: • Air conditioners covered in any way. Inlet Grille -5-
..., property damage, or product damage due to allow enough air flow through the condenser for future reference. Do not change plug in this OWNER'S MANUAL for heat remove. Reinstall the air filter. 4. Horizontal sliding window Casement window To avoid risk of the air conditioner must be the same as that may be outdoors, not inside a building or garage. The electrical outlet must be exposed: • Air conditioners covered in any way. Inlet Grille -5-
Owners Manual
Page 6
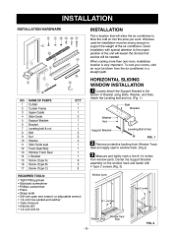
... attention to blow the cold air into the area you want. HORIZONTAL SLIDING WINDOW INSTALLATION _1 Loosely attach the Support Bracket to the bottom of the unit will lessen the chance that will be needed. JWin_owTrack i" Seal FIG. 2 INSTALLATION HARDWARE NO. When cooling more than one room, installation location is very important. Good installation with 4 Type C screws.(Fig. 2) WindowJamb fjj -6- NAMEOF PARTS 1 Curtain 2 Curtain Frame 3 Upper Guide 4 Side Guide 5 Support Bracket 6 Bracket 7 Leveling...
... attention to blow the cold air into the area you want. HORIZONTAL SLIDING WINDOW INSTALLATION _1 Loosely attach the Support Bracket to the bottom of the unit will lessen the chance that will be needed. JWin_owTrack i" Seal FIG. 2 INSTALLATION HARDWARE NO. When cooling more than one room, installation location is very important. Good installation with 4 Type C screws.(Fig. 2) WindowJamb fjj -6- NAMEOF PARTS 1 Curtain 2 Curtain Frame 3 Upper Guide 4 Side Guide 5 Support Bracket 6 Bracket 7 Leveling...
Owners Manual
Page 7
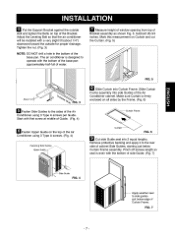
... drainage. I_1 Measure height of window opening from top of the Bracket. Subtract 20-3/4 inches. Remove protective backing and apply it to operate with a very slight tilt (about 1/4") downward toward the outside wall and tighten the Bolts on top of Bracket assembly as shown Fig. 5. Slide Curtain Frame assembly into side Guides of cabinet Side Guides, starting just below edge of the Air Conditioner using 3 Type...
... drainage. I_1 Measure height of window opening from top of the Bracket. Subtract 20-3/4 inches. Remove protective backing and apply it to operate with a very slight tilt (about 1/4") downward toward the outside wall and tighten the Bolts on top of Bracket assembly as shown Fig. 5. Slide Curtain Frame assembly into side Guides of cabinet Side Guides, starting just below edge of the Air Conditioner using 3 Type...
Owners Manual
Page 8
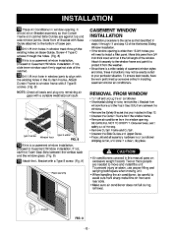
... window styles and sizes, these instructions rosy not be careful to installa filler panel. Ma_e this manual pose an excessive weight hazard. REMOVAL FROM WINDOW * Turn off and unplug the air conditioner. * If horizontalslidrng window=removethe L Bracket from window frame and the Foam Seal Strip from betweenthe windows. * Remove the Safety Bracket that Curtain Frame and cabinet Side Guides are needed to move and install the unit To prevent injury or strain, use...
... window styles and sizes, these instructions rosy not be careful to installa filler panel. Ma_e this manual pose an excessive weight hazard. REMOVAL FROM WINDOW * Turn off and unplug the air conditioner. * If horizontalslidrng window=removethe L Bracket from window frame and the Foam Seal Strip from betweenthe windows. * Remove the Safety Bracket that Curtain Frame and cabinet Side Guides are needed to move and install the unit To prevent injury or strain, use...
Owners Manual
Page 9
... the number of cooling power, i ompreasor The modern high efficiency compressor may vibrate and make it is above normal the air conditioner must run constantly to keep the desired temperature you have selected, Under heavy heat load conditions the air conditioner may need to run longer and more comfortable: ,*Cools and circulates room air. ,*Lowers humidity by removing excess moisture. ,*Filters out summertime dust. The proper size is...
... the number of cooling power, i ompreasor The modern high efficiency compressor may vibrate and make it is above normal the air conditioner must run constantly to keep the desired temperature you have selected, Under heavy heat load conditions the air conditioner may need to run longer and more comfortable: ,*Cools and circulates room air. ,*Lowers humidity by removing excess moisture. ,*Filters out summertime dust. The proper size is...
Owners Manual
Page 10
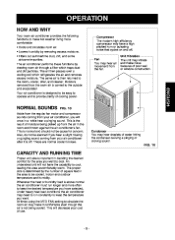
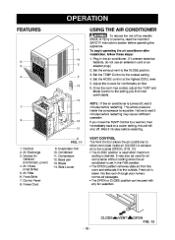
...) 4, Air Intake (inlet Grille) 5, Air Filter 6, Front Grille 7, Control Panel 8, Power Cord 8 FIG. 1 1 g. Brace 14. To begin operating the air conditioner after installation, follow these steps: 1. Plug in the FAN position. * The OPEN position removes stale air from the room and exhausts it to the outside . Adjust the louvers for air recirculation without cooling when the air conditioner is drawn into the room through your home's normal air passages. * The OPEN or CLOSE position can be used for...
...) 4, Air Intake (inlet Grille) 5, Air Filter 6, Front Grille 7, Control Panel 8, Power Cord 8 FIG. 1 1 g. Brace 14. To begin operating the air conditioner after installation, follow these steps: 1. Plug in the FAN position. * The OPEN position removes stale air from the room and exhausts it to the outside . Adjust the louvers for air recirculation without cooling when the air conditioner is drawn into the room through your home's normal air passages. * The OPEN or CLOSE position can be used for...
Owners Manual
Page 11
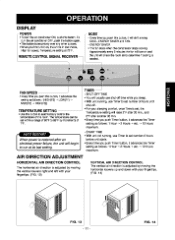
... Timer settingss follows: 1 Hour e 2 Hours _- ENERGY SAVER * The'an stops when the compressor stopscooling, Approximately every 3 minutes the fan will turn _ on and the unit will shi"_among COOL, ENERGY SAVER and FAN. - electrical power failure, the unit will raise 2°F sfter 30 rain., and 2°F after an ] TIMER - START TIME • With unit nor running, use Timer to set numberof hours until shuf-off time while you sleep. • With unit running, use...
... Timer settingss follows: 1 Hour e 2 Hours _- ENERGY SAVER * The'an stops when the compressor stopscooling, Approximately every 3 minutes the fan will turn _ on and the unit will shi"_among COOL, ENERGY SAVER and FAN. - electrical power failure, the unit will raise 2°F sfter 30 rain., and 2°F after an ] TIMER - START TIME • With unit nor running, use Timer to set numberof hours until shuf-off time while you sleep. • With unit running, use...
Owners Manual
Page 12
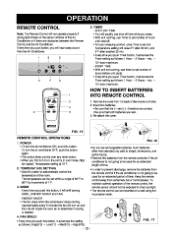
... stendard dry cells in ccol mode, High fan speed, Temperature se_ing at 72'F. 2. MODE - Every time you push Timer burton, it on a wall using the mountable holder. - To maintain optimal operationof the remote control, the remote sensor should not be exposedto dtteot sunlight. • The remote control can be mounted on , the unit is in shape, dimensions, and performance. • Remove the batteries from the remote controller if the air conditioner is...
... stendard dry cells in ccol mode, High fan speed, Temperature se_ing at 72'F. 2. MODE - Every time you push Timer burton, it on a wall using the mountable holder. - To maintain optimal operationof the remote control, the remote sensor should not be exposedto dtteot sunlight. • The remote control can be mounted on , the unit is in shape, dimensions, and performance. • Remove the batteries from the remote controller if the air conditioner is...
Owners Manual
Page 13
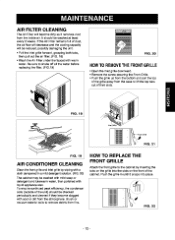
... grille and inlet grille by inserting the tabs on the grille into place. AIR FILTER CLEANING The Air Filter will be reduced, possibly damaging the unit, • Pull the inlet grille forward, grasping both tabs, then pull out the air filter. (FIG. 18) • Wash the Air Filter under the faucet with warm water. HOW TO REPLACE THE FRONT GRILLE Attach the front grille to remove debris from the inside air...
... grille and inlet grille by inserting the tabs on the grille into place. AIR FILTER CLEANING The Air Filter will be reduced, possibly damaging the unit, • Pull the inlet grille forward, grasping both tabs, then pull out the air filter. (FIG. 18) • Wash the Air Filter under the faucet with warm water. HOW TO REPLACE THE FRONT GRILLE Attach the front grille to remove debris from the inside air...
Owners Manual
Page 14
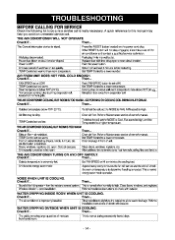
...;C). TEMPCost_l s_ too low. TEMPC_3ntroclot too warm. open.Coldai_e" co_poc. Unit_n_ turnodon inhot rocrrl. WATER DRIPPING INSIDE ROOM WHEN UNIT IS COOLING. I Tr_eair ocndiConeirsirnpmberliynstallod. THE AIR CONDITIONER WILL NOT OPERATE Check if,,, Then... Pushplugfimdy int_.w_aitoutlot. "TEMPCenb'osl _ too warm. Tember_aturc_onsingtuhoteuchingovape_terocil, Iocotedbehindfront g[itle. Air_ltermay bedirty. C[oanair filtor.RoTotro Maii_Lon_ sectionofownor'srrlanocl. Di_yair filter- SetFANSPEEDonHI to anorg!/ssvorrrlodo Approx'rretolyc'_ rt...
...;C). TEMPCost_l s_ too low. TEMPC_3ntroclot too warm. open.Coldai_e" co_poc. Unit_n_ turnodon inhot rocrrl. WATER DRIPPING INSIDE ROOM WHEN UNIT IS COOLING. I Tr_eair ocndiConeirsirnpmberliynstallod. THE AIR CONDITIONER WILL NOT OPERATE Check if,,, Then... Pushplugfimdy int_.w_aitoutlot. "TEMPCenb'osl _ too warm. Tember_aturc_onsingtuhoteuchingovape_terocil, Iocotedbehindfront g[itle. Air_ltermay bedirty. C[oanair filtor.RoTotro Maii_Lon_ sectionofownor'srrlanocl. Di_yair filter- SetFANSPEEDonHI to anorg!/ssvorrrlodo Approx'rretolyc'_ rt...

Owners Manual
Page 32
... openers and water heaters. 1-800-4-MY-HOME _ (1-800-469-4663) Call anytime,day or night(U.S.A. and Canada) www.sears.com www.sears.ca Our Home For repair of all major brand appliances, lawn and garden equipment, or heating and cooling systems, no matter who made it, no matter who sold it -yourself. For the replacement parts, accessories and owner's manuals...
... openers and water heaters. 1-800-4-MY-HOME _ (1-800-469-4663) Call anytime,day or night(U.S.A. and Canada) www.sears.com www.sears.ca Our Home For repair of all major brand appliances, lawn and garden equipment, or heating and cooling systems, no matter who made it, no matter who sold it -yourself. For the replacement parts, accessories and owner's manuals...


