Use and Care Guide
Page 2
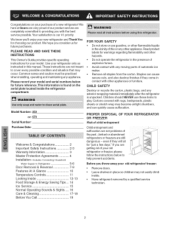
... easily climb inside the refrigerator compartment. Model Number: 253 or: 970 Serial Number: Purchase Date: FOR YOUR SAFETY • Do not store or use these items to providing you with any appliance. Please record your model and serial numbers below to Refrigerator 5-6 Door Removal & Reversal 7-9 Features At A Glance 10 Temperature Controls Looking Inside 11 12-13 Food Storage & Energy Saving Tips ... 14 Ice Service 15 Normal Operating Sounds & Sights .... 16 Care & Cleaning 17-18...
... easily climb inside the refrigerator compartment. Model Number: 253 or: 970 Serial Number: Purchase Date: FOR YOUR SAFETY • Do not store or use these items to providing you with any appliance. Please record your model and serial numbers below to Refrigerator 5-6 Door Removal & Reversal 7-9 Features At A Glance 10 Temperature Controls Looking Inside 11 12-13 Food Storage & Energy Saving Tips ... 14 Ice Service 15 Normal Operating Sounds & Sights .... 16 Care & Cleaning 17-18...

Use and Care Guide
Page 3
... connecting refrigerator to avoid electrical shock. Groundingtype wall receptac!e DanOy ncoitr,cuumnsdtearnces, cut_ temove_ or bypass the Power cord with 3-prong grounded p!ug KENIVIORE APPLIANCE WARRANTY OneYear Limited Warranty When installed, operated and maintained according to arrange for free repair. This warranty covers only defects in the United States and Canada. A service technician to instruct the user in all instructions supplied with a three-prong grounding plug for : 1. This warranty applies...
... connecting refrigerator to avoid electrical shock. Groundingtype wall receptac!e DanOy ncoitr,cuumnsdtearnces, cut_ temove_ or bypass the Power cord with 3-prong grounded p!ug KENIVIORE APPLIANCE WARRANTY OneYear Limited Warranty When installed, operated and maintained according to arrange for free repair. This warranty covers only defects in the United States and Canada. A service technician to instruct the user in all instructions supplied with a three-prong grounding plug for : 1. This warranty applies...

Use and Care Guide
Page 4
... new Kenmore®product is a risk free purchase, If you cancel for any non-covered repair service and related installed parts, Once you purchase the Agreement, a simple phone call is all that it takes for years of dependable operation. we will be fixed, [] Annual Preventive Maintenance Check at 1-800-361-6665. Sears Installation Service For Sears professional installation of home appliances, garage door openers, water heaters...
... new Kenmore®product is a risk free purchase, If you cancel for any non-covered repair service and related installed parts, Once you purchase the Agreement, a simple phone call is all that it takes for years of dependable operation. we will be fixed, [] Annual Preventive Maintenance Check at 1-800-361-6665. Sears Installation Service For Sears professional installation of home appliances, garage door openers, water heaters...
Use and Care Guide
Page 5
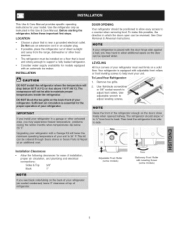
This Use & Care Manual provides specific operating instructions for ease of installation, proper air circulation, and plumbing and electrical connections: Sides & Top 3/8" Back 1" Adjustable Front Roller (some models) Raise Stationary Front Roller with Leveling Screw (some models) To LevelYour Refrigerator: 1. LOCATION o Choose a place that is level and strong enough to support a fully loaded refrigerator• o Consider water supply availability for models equipped with adjustable front rollers or front leveling screws to help level your unit. To make this...
This Use & Care Manual provides specific operating instructions for ease of installation, proper air circulation, and plumbing and electrical connections: Sides & Top 3/8" Back 1" Adjustable Front Roller (some models) Raise Stationary Front Roller with Leveling Screw (some models) To LevelYour Refrigerator: 1. LOCATION o Choose a place that is level and strong enough to support a fully loaded refrigerator• o Consider water supply availability for models equipped with adjustable front rollers or front leveling screws to help level your unit. To make this...
Use and Care Guide
Page 6
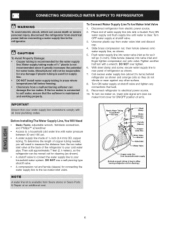
... rear panel of the refrigerator to the ice maker inlet valve. Coil excess water supply line (about 2V2 turns) behind refrigerator as shown). ,, A shutoff valve to connect the water supply line to measure the distance from water valve inlet and discard cap. 4. Slide brass compression nut, then ferrule (sleeve) onto water supply line, as it will need to your cold water pipe. DO NOT use a self-piercing type shutoff valve. ,, A compression nut and ferrule (sleeve) for cleaning...
... rear panel of the refrigerator to the ice maker inlet valve. Coil excess water supply line (about 2V2 turns) behind refrigerator as shown). ,, A shutoff valve to connect the water supply line to measure the distance from water valve inlet and discard cap. 4. Slide brass compression nut, then ferrule (sleeve) onto water supply line, as it will need to your cold water pipe. DO NOT use a self-piercing type shutoff valve. ,, A compression nut and ferrule (sleeve) for cleaning...

Use and Care Guide
Page 7
Remove top hinge and lift door off of door while tightening screws to install top hinge. 17. Lift refrigerator door off center hinge pin. Remove center hinge and shim by removing inside screw and install center hinge. 7. Move hinge pin to other hole in electrical power cord and turn refrigerator temperature control to slide out. Reverse door handles (see instructions on opposite side of bottom hinge and set aside. 5. Move freezer and refrigerator door stops to help align hinge hole. 13. Tighten center hinge pin with adjustable wrench...
Remove top hinge and lift door off of door while tightening screws to install top hinge. 17. Lift refrigerator door off center hinge pin. Remove center hinge and shim by removing inside screw and install center hinge. 7. Move hinge pin to other hole in electrical power cord and turn refrigerator temperature control to slide out. Reverse door handles (see instructions on opposite side of bottom hinge and set aside. 5. Move freezer and refrigerator door stops to help align hinge hole. 13. Tighten center hinge pin with adjustable wrench...
Use and Care Guide
Page 8
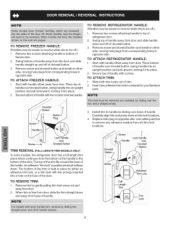
... dovetail button. 3. byii 3. Carefully align trim and press down . The top of the trim fits around the base of the door. TO REMOVE REFRIGERATOR HANDLE: (Handles may be easier to reverse while doors are off.) 1. Remove screw and dovetail button and install on opposite side. Replace hole plug on other side, moving hole plugs from the door and slide handle straight up and off of handle over dovetail button, swing handle...
... dovetail button. 3. byii 3. Carefully align trim and press down . The top of the trim fits around the base of the door. TO REMOVE REFRIGERATOR HANDLE: (Handles may be easier to reverse while doors are off.) 1. Remove screw and dovetail button and install on opposite side. Replace hole plug on other side, moving hole plugs from the door and slide handle straight up and off of handle over dovetail button, swing handle...
Use and Care Guide
Page 9
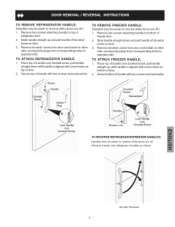
... nother 3. over Dovetail Screw Loct_ Handle over Dovetail Screw TO REVERSE REFRIGERATOR/FREEZER HANDLES: Handles may be easier to reverse while doors are off. Removedovetailscrewfromdoorandinstalol nother side,movingholeplugsfromcorrespondinhgolesto oppositeside. TO ATTACHREFRIGERATORHANDLE: TO ATTACHFREEZERHANDLE: 1. Placetopofhandleoverdovetasilcrewp, ullhandle 1. Securetopofhandlewithtwoscrewsremoveedarlier. 2. Reverse freezer and refrigerator handles as shown. Handle Reversal bottomofdoor. 2. Removtewoscrewsattachinghandletotopof refrigeratdoor or...
... nother 3. over Dovetail Screw Loct_ Handle over Dovetail Screw TO REVERSE REFRIGERATOR/FREEZER HANDLES: Handles may be easier to reverse while doors are off. Removedovetailscrewfromdoorandinstalol nother side,movingholeplugsfromcorrespondinhgolesto oppositeside. TO ATTACHREFRIGERATORHANDLE: TO ATTACHFREEZERHANDLE: 1. Placetopofhandleoverdovetasilcrewp, ullhandle 1. Securetopofhandlewithtwoscrewsremoveedarlier. 2. Reverse freezer and refrigerator handles as shown. Handle Reversal bottomofdoor. 2. Removtewoscrewsattachinghandletotopof refrigeratdoor or...

Use and Care Guide
Page 10
Ice Maker_ Ice Bucket _ Freezer Shelf _ Freezer Control Refrigerator Control Deli Drawer Cover Dell Drawer Half Shelf Wine Rack Full Special Item Mid Level Li Crisper Crisper Drawers S Freezer Light i iiiiiiiiiiiiiiiiiiiiiiiiiiiiiiiiiiiiiiiiiiiiii _ \ _--Fixed Door Bin Door Rack Dairy Door Tall Bottle Retainer Snugger Door Bin Fixed Door Bin J Door Rack _Toe Grille Features may vary according to model 10
Ice Maker_ Ice Bucket _ Freezer Shelf _ Freezer Control Refrigerator Control Deli Drawer Cover Dell Drawer Half Shelf Wine Rack Full Special Item Mid Level Li Crisper Crisper Drawers S Freezer Light i iiiiiiiiiiiiiiiiiiiiiiiiiiiiiiiiiiiiiiiiiiiiii _ \ _--Fixed Door Bin Door Rack Dairy Door Tall Bottle Retainer Snugger Door Bin Fixed Door Bin J Door Rack _Toe Grille Features may vary according to model 10
Use and Care Guide
Page 11
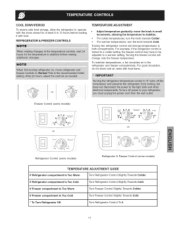
... Control (some models) Refrigerator & Freezer Control (some models) TEMPERATURE ADJUSTMENT GUIDE if Refrigerator compartment is Too Cold Turn Refrigerator Control Slightly Towards Cold. To maintain temperatures, a fan circulates air in small increments, allowing the temperature to stabilize, , For colder temperatures, turn the knob towards Colder. , For warmer temperatures, turn the knob towards Cold. if Refrigerator compartment is Too Warm Turn Refrigerator Control Slightly Towards Colder. COOLDOWNPERIOD To ensure safe food storage, allow the refrigerator to operate with the doors...
... Control (some models) Refrigerator & Freezer Control (some models) TEMPERATURE ADJUSTMENT GUIDE if Refrigerator compartment is Too Cold Turn Refrigerator Control Slightly Towards Cold. To maintain temperatures, a fan circulates air in small increments, allowing the temperature to stabilize, , For colder temperatures, turn the knob towards Colder. , For warmer temperatures, turn the knob towards Cold. if Refrigerator compartment is Too Warm Turn Refrigerator Control Slightly Towards Colder. COOLDOWNPERIOD To ensure safe food storage, allow the refrigerator to operate with the doors...

Use and Care Guide
Page 12
To adjust sliding shelves: Remove shelf by reversing this procedure. Replace the shelf on any pair of rails by pulling forward to suit individual needs. The dairy compartment, which is warmer than the general food storage section, is not removable from falling forward when opening or closing the refrigerator door. Lift bin straight up and pull out. In some models) catch and hold the retainer at...
To adjust sliding shelves: Remove shelf by reversing this procedure. Replace the shelf on any pair of rails by pulling forward to suit individual needs. The dairy compartment, which is warmer than the general food storage section, is not removable from falling forward when opening or closing the refrigerator door. Lift bin straight up and pull out. In some models) catch and hold the retainer at...

Use and Care Guide
Page 13
... install, slide Wine Rack (A) onto the shelf with crisper drawers, allows you to adjust the humidity within the crisper. This can extend the life of juice or soda pop. The Wire Wine Rack (B) simply sets on either side of shelf. To remove, slide the Wine Rack out. FREEZER TiLT OUT DOOR RACK HUMIDITY CONTROL (SOME MODELS) The Humidity Control, present on the left side of your refrigerator...
... install, slide Wine Rack (A) onto the shelf with crisper drawers, allows you to adjust the humidity within the crisper. This can extend the life of juice or soda pop. The Wire Wine Rack (B) simply sets on either side of shelf. To remove, slide the Wine Rack out. FREEZER TiLT OUT DOOR RACK HUMIDITY CONTROL (SOME MODELS) The Humidity Control, present on the left side of your refrigerator...

Use and Care Guide
Page 14
... for Freezing ,, To minimize dehydration and quality deterioration, use more efficiently. ,, Level the refrigerator so that has completely thawed. These foods are best stored in the crisper drawers traps moisture to reduce door openings. If this Use & Care Manual for the suggested temperature control settings. ,, Periodic cleaning of frozen foods. ,, Leave a space between the two appliances will help the refrigerator run longer and use aluminum foil, freezer wrap, freezer bags...
... for Freezing ,, To minimize dehydration and quality deterioration, use more efficiently. ,, Level the refrigerator so that has completely thawed. These foods are best stored in the crisper drawers traps moisture to reduce door openings. If this Use & Care Manual for the suggested temperature control settings. ,, Periodic cleaning of frozen foods. ,, Leave a space between the two appliances will help the refrigerator run longer and use aluminum foil, freezer wrap, freezer bags...

Use and Care Guide
Page 15
..., turn the water supply valve to a closed position. TURNINGYOUR iCE MAKER OFF To stop the ice maker, lift the wire signal arm until it clicks and locks in warm water with mild detergent. Air in its "down " or ON position. New plumbing connections may cause the ice maker to cycle two or three times before making a full tray of ice. The ice maker also turns off for normal use. iCE PRODUCTION: WHATTO EXPECT The ice maker will...
..., turn the water supply valve to a closed position. TURNINGYOUR iCE MAKER OFF To stop the ice maker, lift the wire signal arm until it clicks and locks in warm water with mild detergent. Air in its "down " or ON position. New plumbing connections may cause the ice maker to cycle two or three times before making a full tray of ice. The ice maker also turns off for normal use. iCE PRODUCTION: WHATTO EXPECT The ice maker will...

Use and Care Guide
Page 16
...-efficiency compressors operate much faster than older models. You may have a condenser fan. Condenser Coils (Fan-cooled models only) 16 They also indicate your refrigerator is causing them. Evaporator The flow of refrigerant through the refrigerator by the condenser fan. The compressor may hear air being forced through the evaporator may hear water running into the ice bin. C. D. N. J. Cold Control & Defrost Timer or Automatic Defrost Control These parts can produce a snapping or clicking sound when turning the refrigerator on...
...-efficiency compressors operate much faster than older models. You may have a condenser fan. Condenser Coils (Fan-cooled models only) 16 They also indicate your refrigerator is causing them. Evaporator The flow of refrigerant through the refrigerator by the condenser fan. The compressor may hear air being forced through the evaporator may hear water running into the ice bin. C. D. N. J. Cold Control & Defrost Timer or Automatic Defrost Control These parts can produce a snapping or clicking sound when turning the refrigerator on...

Use and Care Guide
Page 17
... clean handles. Always unplug the electrical power cord from your refrigerator and freezer clean to prevent odor build-up any removable parts in "NORNAL OPERATING SOUNDS & SIGHTS'+). Care & Cleaning Chart Part Interior/Door Liner What To Use • Soap and water • Baking soda and water Tips and Precautions Use 2 tablespoons of toe grille. Do not wash any electrical part. Allow glass to warm to room temperature before immersing in your vacuum to clean unless operating refrigerator...
... clean handles. Always unplug the electrical power cord from your refrigerator and freezer clean to prevent odor build-up any removable parts in "NORNAL OPERATING SOUNDS & SIGHTS'+). Care & Cleaning Chart Part Interior/Door Liner What To Use • Soap and water • Baking soda and water Tips and Precautions Use 2 tablespoons of toe grille. Do not wash any electrical part. Allow glass to warm to room temperature before immersing in your vacuum to clean unless operating refrigerator...

Use and Care Guide
Page 18
... from refrigerator compartment. • Turn automatic ice maker off automatic ice maker and turn water supply valve to "O" ( the OFF position) and disconnect power. Remember to plug the refrigerator back in your Defrost Water Pan (some models) home, it may be necessary to periodically clean the condenser for a few days. Block doors open to prevent odors and mold build-up to protect them during vacations of the same wattage. 5. Unplug refrigerator. 2. Replace light shield. 6. Turn controls...
... from refrigerator compartment. • Turn automatic ice maker off automatic ice maker and turn water supply valve to "O" ( the OFF position) and disconnect power. Remember to plug the refrigerator back in your Defrost Water Pan (some models) home, it may be necessary to periodically clean the condenser for a few days. Block doors open to prevent odors and mold build-up to protect them during vacations of the same wattage. 5. Unplug refrigerator. 2. Replace light shield. 6. Turn controls...
Use and Care Guide
Page 19
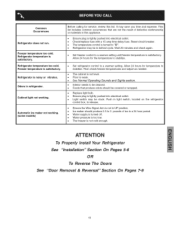
... Properly Install Your Refrigerator See "Installation" Section On Pages 5-6 OR To Reverse The Doors See "Door Removal & Reversal" Section On Pages 7-9 19 Refrigerator temperature is satisfactory. Odors in a 24 hour period. • Water supply is turned off. • Water pressure is too low. • The freezer is not in defrost cycle. Push in light switch, located on the refrigerator control box, to stabilize. Refrigerator temperature too cold. Cabinet light not working . (some models) Before calling for service, review this...
... Properly Install Your Refrigerator See "Installation" Section On Pages 5-6 OR To Reverse The Doors See "Door Removal & Reversal" Section On Pages 7-9 19 Refrigerator temperature is satisfactory. Odors in a 24 hour period. • Water supply is turned off. • Water pressure is too low. • The freezer is not in defrost cycle. Push in light switch, located on the refrigerator control box, to stabilize. Refrigerator temperature too cold. Cabinet light not working . (some models) Before calling for service, review this...

Use and Care Guide
Page 56
..., or heating and cooling systems, no matter who made it, no matter who sold it -yourself. For the replacement parts, accessories and owner's manuals that you need to do-it ! in items like garage door openers and water heaters. 1-800-4-MY-HOME ® (1-800-469-4663) Call anytime, day or night (U.S.A. of carry-in your nearest Sears Parts & Repair Service Center 1-800...
..., or heating and cooling systems, no matter who made it, no matter who sold it -yourself. For the replacement parts, accessories and owner's manuals that you need to do-it ! in items like garage door openers and water heaters. 1-800-4-MY-HOME ® (1-800-469-4663) Call anytime, day or night (U.S.A. of carry-in your nearest Sears Parts & Repair Service Center 1-800...


