

Use and Care Guide
Page 1
www.sears.cem ® TOP FREEZER REFRIGERATOR i CONGELADOR SUPERIOR REFRIGERADOR CONGI_LATEUR SUPI_RIEUR REFRIGI_RATEUR Models / Modelos / Mod_les 795.6997_,795.6991_ 795.7997_,795.7991_ 795.6937_,795.6929_ 795.7937_,795.7929_ = color number, n_mero de colo_ num_ro de couleur tl1 Z O t=, m cn z m Z_ O r=,, "13 Z m MFL61920619 Printed in Mexico Sears, Roebuck and Co., Hoffman Estates, IL 60179 U.S.A.
www.sears.cem ® TOP FREEZER REFRIGERATOR i CONGELADOR SUPERIOR REFRIGERADOR CONGI_LATEUR SUPI_RIEUR REFRIGI_RATEUR Models / Modelos / Mod_les 795.6997_,795.6991_ 795.7997_,795.7991_ 795.6937_,795.6929_ 795.7937_,795.7929_ = color number, n_mero de colo_ num_ro de couleur tl1 Z O t=, m cn z m Z_ O r=,, "13 Z m MFL61920619 Printed in Mexico Sears, Roebuck and Co., Hoffman Estates, IL 60179 U.S.A.
Use and Care Guide
Page 2
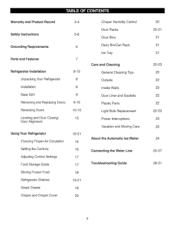
...instructions 5-6 Grounding Requirements 6 Parts and Features 7 Refrigerator installation Unpacking Your Refrigerator Installation Base Grill Removing and Replacing Doors Reversing Doors Leveling and Door Closing/ Door Alignment 8-15 8 8 8 9-10 10-15 15 Using Your Refrigerator Ensuring Proper Air Circulation Setting the Controls Adjusting Control... Settings Food Storage Guide Storing Frozen Food Refrigerator Shelves Snack Drawer Crisper and Crisper Cover 16-21 16 16 17 17 18 19-21 19 2O Crisper Humidity Control Door Racks Door Bins Dairy Bin/Can ...
...instructions 5-6 Grounding Requirements 6 Parts and Features 7 Refrigerator installation Unpacking Your Refrigerator Installation Base Grill Removing and Replacing Doors Reversing Doors Leveling and Door Closing/ Door Alignment 8-15 8 8 8 9-10 10-15 15 Using Your Refrigerator Ensuring Proper Air Circulation Setting the Controls Adjusting Control... Settings Food Storage Guide Storing Frozen Food Refrigerator Shelves Snack Drawer Crisper and Crisper Cover 16-21 16 16 17 17 18 19-21 19 2O Crisper Humidity Control Door Racks Door Bins Dairy Bin/Can ...
Use and Care Guide
Page 3
... of detergents, cleaners, chemicals or utensils other rights which vary from state to state. limitation of remedies Customer's sole and exclusive remedy under this product. TOP FREEZER REFRIGERATOR ® Kenrnore Appliance Warranty forte Year Limited Warranty When installed, operated and maintained according to all instructions supplied with the product, if this appliance fails...
... of detergents, cleaners, chemicals or utensils other rights which vary from state to state. limitation of remedies Customer's sole and exclusive remedy under this product. TOP FREEZER REFRIGERATOR ® Kenrnore Appliance Warranty forte Year Limited Warranty When installed, operated and maintained according to all instructions supplied with the product, if this appliance fails...
Use and Care Guide
Page 4
..., record the date of purchase, model and serial number of the refrigerator compartment. But like all products. call 1 =800=4=MY=HOME_'. Think of your Master Protection Agreement today! Your new Kenmor# _ product is the result of mechanical failure of any covered refrigerator or freezer. [] Rental reimbursement if repair of us as you want us...
..., record the date of purchase, model and serial number of the refrigerator compartment. But like all products. call 1 =800=4=MY=HOME_'. Think of your Master Protection Agreement today! Your new Kenmor# _ product is the result of mechanical failure of any covered refrigerator or freezer. [] Rental reimbursement if repair of us as you want us...
Use and Care Guide
Page 5
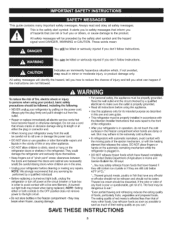
DO NOTallow children to eat." clearances between the doors and between the doors and cabinet are in the area. - Unplug your refrigerator is plugged in the freezer compartment - Have the wall outlet and the circuit checked by the safety alert symbol and the hazard signal word DANGER, WARNING or CAUTION. You can ...
DO NOTallow children to eat." clearances between the doors and between the doors and cabinet are in the area. - Unplug your refrigerator is plugged in the freezer compartment - Have the wall outlet and the circuit checked by the safety alert symbol and the hazard signal word DANGER, WARNING or CAUTION. You can ...
Use and Care Guide
Page 6
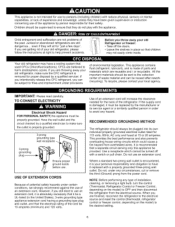
...) and 120 volts. Do not, under any type of installation, cleaning, or removing a light bulb, turn the control (Thermostat, Refrigerator Control or Freezer Control, depending on the model) to ensure that the electrical rating of an extension cord. To recycle, please contact your old...However, if you throw away your personal responsibility and obligation to use an extension cord, it is absolutely necessary that it is your old Refrigerator or freezer: • Take off with a switch or pull chain. IMPORTANT: Please read carefully. Where a standard two-prong wall outlet is encountered,...
...) and 120 volts. Do not, under any type of installation, cleaning, or removing a light bulb, turn the control (Thermostat, Refrigerator Control or Freezer Control, depending on the model) to ensure that the electrical rating of an extension cord. To recycle, please contact your old...However, if you throw away your personal responsibility and obligation to use an extension cord, it is absolutely necessary that it is your old Refrigerator or freezer: • Take off with a switch or pull chain. IMPORTANT: Please read carefully. Where a standard two-prong wall outlet is encountered,...

Use and Care Guide
Page 7
... may not match your convenience. Page references are included for your model. NOTE: This guide covers several different models. O CustomCube Ice maker * O Ice Bin * Freezer Shelf _ Digital Temperature Control Refrigerator Light _t Snack Drawer Shelves Crispers Keeps fruits and vegetables fresh and crisp OFreezer Door Racks OCan Rack* ODairy Bin O Door Bins...
... may not match your convenience. Page references are included for your model. NOTE: This guide covers several different models. O CustomCube Ice maker * O Ice Bin * Freezer Shelf _ Digital Temperature Control Refrigerator Light _t Snack Drawer Shelves Crispers Keeps fruits and vegetables fresh and crisp OFreezer Door Racks OCan Rack* ODairy Bin O Door Bins...
Use and Care Guide
Page 8
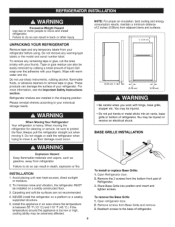
... section. INSTALLATION 1. Install this appliance in back or other injury. To install or replace Base Grille: 1. Remove the 2 screws from refrigerator. Do not remove any remaining tape or glue, rub the area briskly with your fingers. Carpeting and soft tile surfaces are installed in ... or metal sticks into position and insert and tighten screws. When moving it , as gasoline, away from the bottom front part of refrigerator. NOTE: For proper air circulation, best cooling and energy consumption results, maintain a minimum distance of your thumb. Failure to protect the...
... section. INSTALLATION 1. Install this appliance in back or other injury. To install or replace Base Grille: 1. Remove the 2 screws from refrigerator. Do not remove any remaining tape or glue, rub the area briskly with your fingers. Carpeting and soft tile surfaces are installed in ... or metal sticks into position and insert and tighten screws. When moving it , as gasoline, away from the bottom front part of refrigerator. NOTE: For proper air circulation, best cooling and energy consumption results, maintain a minimum distance of your thumb. Failure to protect the...

Use and Care Guide
Page 9
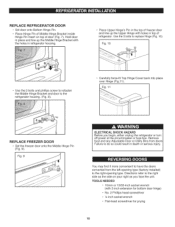
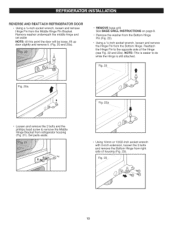
...begin with refrigerator door and then follow with a flat head screwdriver and remove (see Fig. 2). Set parts aside. Using 10mm or 13/32-inch socket wrench, remove the 3 bolts and lift off the Top Hinge Cover with freezer door. Fig...incshockewt rench (with2-inchextensionfor bottomdoorhinge) • No.2 Phillipsheadscrewdriver • Flat-headscrewdrivefrorprying REMOVE FREEZER DOOR • Gently pry off the Top Hinge (see Fig 1). Fig. 6 Lift freezer door slightly and remove it . ailuretodosocouldresulitndeathor seriousinjury. If entranceis lessthan35-inchews ide, therefrigerator'...
...begin with refrigerator door and then follow with a flat head screwdriver and remove (see Fig. 2). Set parts aside. Using 10mm or 13/32-inch socket wrench, remove the 3 bolts and lift off the Top Hinge Cover with freezer door. Fig...incshockewt rench (with2-inchextensionfor bottomdoorhinge) • No.2 Phillipsheadscrewdriver • Flat-headscrewdrivefrorprying REMOVE FREEZER DOOR • Gently pry off the Top Hinge (see Fig 1). Fig. 6 Lift freezer door slightly and remove it . ailuretodosocouldresulitndeathor seriousinjury. If entranceis lessthan35-inchews ide, therefrigerator'...
Use and Care Guide
Page 10
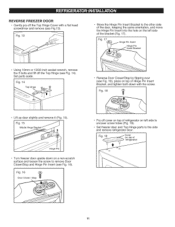
... Utility Bins from the left-opening type (factory installed) to the right side as the side on top of door (Fig. 7). Use the 3 bolts to the refrigerator housing. (Fig. 8). • Carefully force-fit Top Hinge Cover back into place over Hinge (Fig.11 ). Directions refer to the right-opening type....Insert on your right as you begin, either unplug the refrigerator or turn off power at the circuit breaker or fuse box. Fig. 9 ELECTRICAL SHOCK HAZARD Before you face the unit. Place Upper Hinge's Pin in the top of freezer door and line up the Middle Hinge Bracket with the holes...
... Utility Bins from the left-opening type (factory installed) to the right side as the side on top of door (Fig. 7). Use the 3 bolts to the refrigerator housing. (Fig. 8). • Carefully force-fit Top Hinge Cover back into place over Hinge (Fig.11 ). Directions refer to the right-opening type....Insert on your right as you begin, either unplug the refrigerator or turn off power at the circuit breaker or fuse box. Fig. 9 ELECTRICAL SHOCK HAZARD Before you face the unit. Place Upper Hinge's Pin in the top of freezer door and line up the Middle Hinge Bracket with the holes...
Use and Care Guide
Page 11
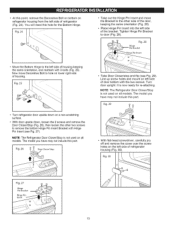
...16). Fig. 16 Door Closer / Stop • Pry off cover on top of refrigerator on left side of _ i refrigerator) & 11 Set parts aside. Cover (on the left side to uncover screw holes (Fig. 19). • Set freezer door and Top Hinge parts to the other side of the door, keeping the same orientation,... and move the Hinge Pin insert into the hole on top of the bracket (...
...16). Fig. 16 Door Closer / Stop • Pry off cover on top of refrigerator on left side of _ i refrigerator) & 11 Set parts aside. Cover (on the left side to uncover screw holes (Fig. 19). • Set freezer door and Top Hinge parts to the other side of the door, keeping the same orientation,... and move the Hinge Pin insert into the hole on top of the bracket (...
Use and Care Guide
Page 12
... and the phillips head screw to the opposite side of housing (Fig. 23). 12 Reattach the Hinge Pin to remove the Middle Hinge Bracket from refrigerator housing (Fig. 21). Using 10mm or 13/32-inch socket wrench with 2-inch extension, loosen the 3 bolts and remove the Bottom Hinge from the Bottom...
... and the phillips head screw to the opposite side of housing (Fig. 23). 12 Reattach the Hinge Pin to remove the Middle Hinge Bracket from refrigerator housing (Fig. 21). Using 10mm or 13/32-inch socket wrench with 2-inch extension, loosen the 3 bolts and remove the Bottom Hinge from the Bottom...
Use and Care Guide
Page 13
...model you have may not include this part. Fig. 28 Hinge Pin Bracket • Move the Bottom Hinge to door (Fig. 28). NOTE: The Refrigerator Door Closer/Stop is now ready for re-attaching. Line up screw holes and mount on the left side of housing keeping the same orientation... reattach with the two screws. Fig. 30 Fig. 27 Hinge Pin Bracket Hinge Pin Insert 13 Fig. 25 • Turn refrigerator door upside down on all models. NOTE: The Refrigerator Door Closer/Stop is not used on a non-scratching surface. • With door upside down, loosen the 2 screws and remove...
...model you have may not include this part. Fig. 28 Hinge Pin Bracket • Move the Bottom Hinge to door (Fig. 28). NOTE: The Refrigerator Door Closer/Stop is now ready for re-attaching. Line up screw holes and mount on the left side of housing keeping the same orientation... reattach with the two screws. Fig. 30 Fig. 27 Hinge Pin Bracket Hinge Pin Insert 13 Fig. 25 • Turn refrigerator door upside down on all models. NOTE: The Refrigerator Door Closer/Stop is not used on a non-scratching surface. • With door upside down, loosen the 2 screws and remove...

Use and Care Guide
Page 14
... bottom hinge. (Fig. 32). • Place washer between refrigerator door and middle hinge and re-attach Hinge Pin to Hinge Bracket with its hexagonal end facing upward (Fig. 32). Cover (on top of housing (Fig. 33). Fig. 38 Corners \ / REATTACHING FREEZER DOOR • Put freezer door down over the Hinge Pin on right side...
... bottom hinge. (Fig. 32). • Place washer between refrigerator door and middle hinge and re-attach Hinge Pin to Hinge Bracket with its hexagonal end facing upward (Fig. 32). Cover (on top of housing (Fig. 33). Fig. 38 Corners \ / REATTACHING FREEZER DOOR • Put freezer door down over the Hinge Pin on right side...
Use and Care Guide
Page 15
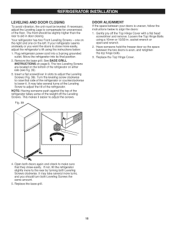
...close more turns, and you want the doors to close easily. Replace the base grill. 15 NOTE: Having someone hold the freezer door so the space between your refrigerator seems unsteady or you should be leveled, if necessary, adjust the Leveling Legs to align the doors: 1. This makes it... If the space between the two doors is uneven, follow the instructions below : 1. Have someone push against the top of the refrigerator takes some of the weight off the Top Hinge Cover with a flat head screwdriver and remove. Open both Leveling Screws the same amount. 5. It may take...
...close more turns, and you want the doors to close easily. Replace the base grill. 15 NOTE: Having someone hold the freezer door so the space between your refrigerator seems unsteady or you should be leveled, if necessary, adjust the Leveling Legs to align the doors: 1. This makes it... If the space between the two doors is uneven, follow the instructions below : 1. Have someone push against the top of the refrigerator takes some of the weight off the Top Hinge Cover with a flat head screwdriver and remove. Open both Leveling Screws the same amount. 5. It may take...
Use and Care Guide
Page 16
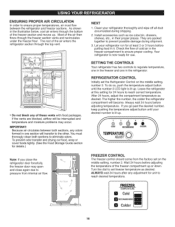
...then flows through the top vent. • Do not block any adjustment for 24 hours to eliminate odors. Wait 24 hours before adjusting temperature. The rest of these vents with food packages. The higher the number, the colder the refrigerator compartment will be ...places. ALWAYS wait 24 hours after any of the air enters the refrigerator section through the freezer section vents and recirculates under the freezer floor. Install accessories such as desired. REFRIGERATOR CONTROL Initially set the Refrigerator Control on the middle setting, number 2. You must flow between both...
...then flows through the top vent. • Do not block any adjustment for 24 hours to eliminate odors. Wait 24 hours before adjusting temperature. The rest of these vents with food packages. The higher the number, the colder the refrigerator compartment will be ...places. ALWAYS wait 24 hours after any of the air enters the refrigerator section through the freezer section vents and recirculates under the freezer floor. Install accessories such as desired. REFRIGERATOR CONTROL Initially set the Refrigerator Control on the middle setting, number 2. You must flow between both...
Use and Care Guide
Page 17
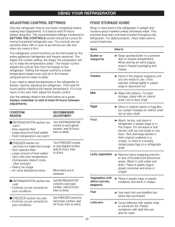
... a crisper, or store in crisper. Controls not set correctly for the entire appliance (refrigerator and freezer sections). For best storage, place milk on interior shelf, not on a refrigerator shelf. Sort and keep the temperature colder. Fish Leftovers P,-Use fresh fish and shellfish ...or tear off bruised and discolored areas. ADJUSTING CONTROL SETTINGS Give the refrigerator time to the refrigerator. Room temperature very warm Turn REFRIGERATOR control to wait 24 hours before checking the freezer temperature. Cheese Milk Store in plastic wrap or aluminum foil. Once...
... a crisper, or store in crisper. Controls not set correctly for the entire appliance (refrigerator and freezer sections). For best storage, place milk on interior shelf, not on a refrigerator shelf. Sort and keep the temperature colder. Fish Leftovers P,-Use fresh fish and shellfish ...or tear off bruised and discolored areas. ADJUSTING CONTROL SETTINGS Give the refrigerator time to the refrigerator. Room temperature very warm Turn REFRIGERATOR control to wait 24 hours before checking the freezer temperature. Cheese Milk Store in plastic wrap or aluminum foil. Once...
Use and Care Guide
Page 18
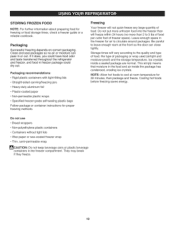
... moisture in or out. If it does, you could have food odor and taste transferred throughout the refrigerator and freezer, and food in the freezer compartment. Be careful to 3 Ibs of food per cubic foot of freezer space). Ice crystals inside the package has condensed, creating ice crystals. Do not use • Bread wrappers...
... moisture in or out. If it does, you could have food odor and taste transferred throughout the refrigerator and freezer, and food in the freezer compartment. Be careful to 3 Ibs of food per cubic foot of freezer space). Ice crystals inside the package has condensed, creating ice crystals. Do not use • Bread wrappers...
Use and Care Guide
Page 19
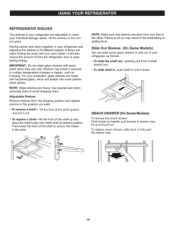
...handle, pull forward to avoid dropping them to drawer stop . 19 Use special care when removing them . NOTE: Glass shelves are made with warm water when they are adjustable to fit different heights of time the refrigerator door is open, saving energy. Adjustable Shelves Remove shelves from...to secure the hooks in fully past the drawer stop , lift up and place the shelf hooks into small pebblesized pieces. For your refrigerator as bumping. Failure to sudden temperature changes or impact, such as follows. • To slide the shelf out, carefully pull front of...
...handle, pull forward to avoid dropping them to drawer stop . 19 Use special care when removing them . NOTE: Glass shelves are made with warm water when they are adjustable to fit different heights of time the refrigerator door is open, saving energy. Adjustable Shelves Remove shelves from...to secure the hooks in fully past the drawer stop , lift up and place the shelf hooks into small pebblesized pieces. For your refrigerator as bumping. Failure to sudden temperature changes or impact, such as follows. • To slide the shelf out, carefully pull front of...
Use and Care Guide
Page 20
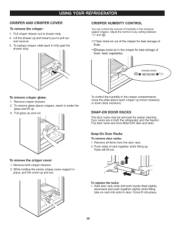
Pullcrisper drawer out to drawer stop . \ CRISPER HUMiDiTY CONTROL You can control the amount of humidity in the moisturesealed crispers. Lift the drawer up and toward you to any setting between _Z_ and CRISPER AND CRISPER COVER To remove the crisper: 1. To replace crisper, slide back in fully past the drawer stop . 2. Adjust the control to pull out and remove. 3.
Pullcrisper drawer out to drawer stop . \ CRISPER HUMiDiTY CONTROL You can control the amount of humidity in the moisturesealed crispers. Lift the drawer up and toward you to any setting between _Z_ and CRISPER AND CRISPER COVER To remove the crisper: 1. To replace crisper, slide back in fully past the drawer stop . 2. Adjust the control to pull out and remove. 3.


