User Instructions
Page 2
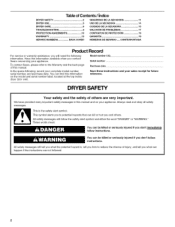
...of others . All safety messages will follow instructions. All safety messages will need the following , record your sales receipt for future DRYER SAFETY Your safety and the safety of injury, and tell you and others are not followed. Serial number Purchase date Save these ...Have this manual. To contact Sears, please refer to the Warranty and the back page of Contents/indice DRYER SAFETY 2 DRYER USE 5 DRYER CARE 6 TROUBLESHOOTING 8 PROTECTION AGREEMENTS 10 WARRANTY 10 SERVICE NUMBERS BACK COVER SEGURIDAD DE LA SECADORA 11 USO DE LA SECADORA 14 CUIDADO DE LA SECADORA 15...
...of others . All safety messages will follow instructions. All safety messages will need the following , record your sales receipt for future DRYER SAFETY Your safety and the safety of injury, and tell you and others are not followed. Serial number Purchase date Save these ...Have this manual. To contact Sears, please refer to the Warranty and the back page of Contents/indice DRYER SAFETY 2 DRYER USE 5 DRYER CARE 6 TROUBLESHOOTING 8 PROTECTION AGREEMENTS 10 WARRANTY 10 SERVICE NUMBERS BACK COVER SEGURIDAD DE LA SECADORA 11 USO DE LA SECADORA 14 CUIDADO DE LA SECADORA 15...
User Instructions
Page 4
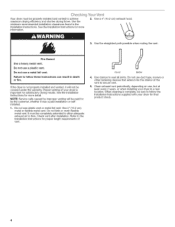
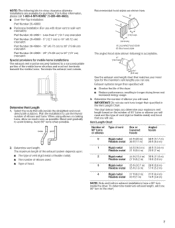
Your dryer must be completely extended to allow adequate exhaust air to flow. Use a 4" (10.2 cm) exhaust hood. 3. Use the straightest path possible when routing the vent. See the Installation Instructions for more detail. It must be paid for final.... NOTE: Service calls caused by the customer, whether it will be properly installed and vented to the Installation Instructions for proper length requirements of your dryer is important for satisfactory drying results. Use clamps to secure vent. 5. Do not kink or crush flexible metal vent. Good Better 4. Do not use ...
Your dryer must be completely extended to allow adequate exhaust air to flow. Use a 4" (10.2 cm) exhaust hood. 3. Use the straightest path possible when routing the vent. See the Installation Instructions for more detail. It must be paid for final.... NOTE: Service calls caused by the customer, whether it will be properly installed and vented to the Installation Instructions for proper length requirements of your dryer is important for satisfactory drying results. Use clamps to secure vent. 5. Do not kink or crush flexible metal vent. Good Better 4. Do not use ...
User Instructions
Page 7
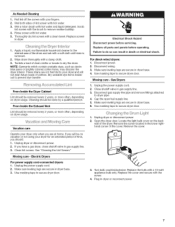
... masking tape to secure dryer door. Remove the screw located in the lower righthand corner of clean cloths or towels to the stained area of the drum and rub with a 10-watt appliance bulb only. Replace the bulb with a soft cloth until stain is removed. 2. Wet a nylon brush... Inside the Exhaust Vent Lint should be removed every 2 years, or more often, depending on the back wall of clothes. Electric Dryers For power supply cord-connected dryers: 1. Disconnect power. 2. Disconnect gas supply line pipe and remove fittings attached to prevent dye transfer. Replace the cover and secure...
... masking tape to secure dryer door. Remove the screw located in the lower righthand corner of clean cloths or towels to the stained area of the drum and rub with a 10-watt appliance bulb only. Replace the bulb with a soft cloth until stain is removed. 2. Wet a nylon brush... Inside the Exhaust Vent Lint should be removed every 2 years, or more often, depending on the back wall of clothes. Electric Dryers For power supply cord-connected dryers: 1. Disconnect power. 2. Disconnect gas supply line pipe and remove fittings attached to prevent dye transfer. Replace the cover and secure...
User Instructions
Page 8
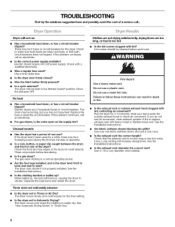
... metal or flexible metal vent. Electric dryers use ? Clothes are not drying satisfactorily, drying times are intact and tight, or that the exhaust vent is mostly dry. Run the dryer for small objects. Use only one fabric softener sheet, and use it a gas dryer? Check that both fuses are ...or replace exhaust vent with a qualified electrician. • Was a regular fuse used for the time setting. • Is the dryer set to Automatic Drying? Use 4" (10.2 cm) diameter vent material. There may not have not tripped. The drum may be turning, but you do not feel air ...
... metal or flexible metal vent. Electric dryers use ? Clothes are not drying satisfactorily, drying times are intact and tight, or that the exhaust vent is mostly dry. Run the dryer for small objects. Use only one fabric softener sheet, and use it a gas dryer? Check that both fuses are ...or replace exhaust vent with a qualified electrician. • Was a regular fuse used for the time setting. • Is the dryer set to Automatic Drying? Use 4" (10.2 cm) diameter vent material. There may not have not tripped. The drum may be turning, but you do not feel air ...
User Instructions
Page 10
... than those recommended in all that can call 1-800-4-MY-HOME ® KENMORE APPLIANCE WARRANTY ONE YEAR LIMITED WARRANTY When installed, operated and maintained according to all... from unauthorized modifications made to this product. 4. Toronto, Ontario, Canada M5B 2B8 10 But like all instructions supplied with the product, 7. Some limitations and exclusions apply.... products requiring in-home repair, plus convenient repair scheduling v' Power surge protection against electrical damage due to power fluctuations v' Rental reimbursement if repair of your covered product takes...
... than those recommended in all that can call 1-800-4-MY-HOME ® KENMORE APPLIANCE WARRANTY ONE YEAR LIMITED WARRANTY When installed, operated and maintained according to all... from unauthorized modifications made to this product. 4. Toronto, Ontario, Canada M5B 2B8 10 But like all instructions supplied with the product, 7. Some limitations and exclusions apply.... products requiring in-home repair, plus convenient repair scheduling v' Power surge protection against electrical damage due to power fluctuations v' Rental reimbursement if repair of your covered product takes...
Installation Instructions
Page 2
... and venting, and read "Electrical Requirements," "Gas Supply Requirements" and "Venting Requirements" before purchasing parts. INSTALLATION INSTRUCTIONS Check that opens to 1" (2.5 cm) or hex-head socket wrench (for adjusting dryer feet) Level • ¼"nut driver orsocket wrench • Knife • Vent clamps... that you cannot reach your local Sears store or Sears Service Center. Check that all parts were included. 8" or 10" pipe wrench 8" or 10" adjustable wrench (for purchase from your gas supplier, call the fire department. - Mobile home installations require special parts ...
... and venting, and read "Electrical Requirements," "Gas Supply Requirements" and "Venting Requirements" before purchasing parts. INSTALLATION INSTRUCTIONS Check that opens to 1" (2.5 cm) or hex-head socket wrench (for adjusting dryer feet) Level • ¼"nut driver orsocket wrench • Knife • Vent clamps... that you cannot reach your local Sears store or Sears Service Center. Check that all parts were included. 8" or 10" pipe wrench 8" or 10" adjustable wrench (for purchase from your gas supplier, call the fire department. - Mobile home installations require special parts ...
Installation Instructions
Page 5
... not be used. Burner Input Requirements: Elevations up to 10,000 ft (3,048 m) above 10,000 ft (3,048 m) a 4% reduction of this dryer is more information, call 1-800-4-MY-HOME ® (1-800-469-4663). • The dryer exhaust must be connected into the interior of connection. Elevations above 10,000 ft (3,048 meters): • When installed above sea level...
... not be used. Burner Input Requirements: Elevations up to 10,000 ft (3,048 m) above 10,000 ft (3,048 m) a 4% reduction of this dryer is more information, call 1-800-4-MY-HOME ® (1-800-469-4663). • The dryer exhaust must be connected into the interior of connection. Elevations above 10,000 ft (3,048 meters): • When installed above sea level...
Installation Instructions
Page 7
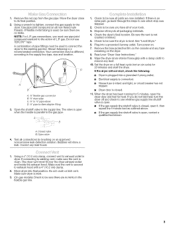
... ft (8.2 m) 19 ft (5.8 m) 3 Rigid metal 35 ft (10.7 m) 29 ft (8.8 m) Flexible metal 25 ft (7.6 m) 17 ft (5.2 m) 4 Rigid metal 27 ft (8.2 m) 21 ft (6.4 m) Flexible metal 23 ft (7 m) 15 ft (4.6 m) NOTE: Side and bottom exhaust installations have a 90 ° turn to 29" (73.66 cm) mismatch (10.2cm) A. Less than specified in longer drying times and increased energy usage. 3. Determine the number of the dryer...
... ft (8.2 m) 19 ft (5.8 m) 3 Rigid metal 35 ft (10.7 m) 29 ft (8.8 m) Flexible metal 25 ft (7.6 m) 17 ft (5.2 m) 4 Rigid metal 27 ft (8.2 m) 21 ft (6.4 m) Flexible metal 23 ft (7 m) 15 ft (4.6 m) NOTE: Side and bottom exhaust installations have a 90 ° turn to 29" (73.66 cm) mismatch (10.2cm) A. Less than specified in longer drying times and increased energy usage. 3. Determine the number of the dryer...
Installation Instructions
Page 8
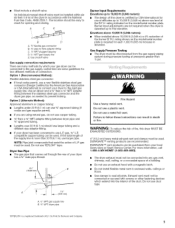
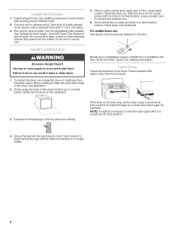
... eexhausvtent. 6. Check levelness first side to side, then front to level the dryer again after it is moved into the leg holes by hand. Use a wrench to adjust the legs up the... levelness. Check the levelness of the dryer. eeillustration. 2. Find the diamond marking. If the dryer is no longer visible. Instaell xhaushtoodU. entlylaythedryeor nthecardboard. 3. Screw the legs into its final position. 4. 1. ecurveentoexhaushtoodwith4"(10.2cm)clamp. 5. onotuseductapes, crewosrothefrastening Gas dryers must be necessary to back. 1. ...
... eexhausvtent. 6. Check levelness first side to side, then front to level the dryer again after it is moved into the leg holes by hand. Use a wrench to adjust the legs up the... levelness. Check the levelness of the dryer. eeillustration. 2. Find the diamond marking. If the dryer is no longer visible. Instaell xhaushtoodU. entlylaythedryeor nthecardboard. 3. Screw the legs into its final position. 4. 1. ecurveentoexhaushtoodwith4"(10.2cm)clamp. 5. onotuseductapes, crewosrothefrastening Gas dryers must be necessary to back. 1. ...
Installation Instructions
Page 9
... L.R gas. NOTE: For L.R gas connections, you do not feel for heat. Wipe the dryer drum interior thoroughly with a 4" (10.2 cm) clamp. 2. The dryer vent must use TEFLON °t tape. Shown following : • Dryer is plugged into a grounded 3 prong outlet. • Electrical supply is connected. • House fuse is intact and tight, or circuit breaker has...
... L.R gas. NOTE: For L.R gas connections, you do not feel for heat. Wipe the dryer drum interior thoroughly with a 4" (10.2 cm) clamp. 2. The dryer vent must use TEFLON °t tape. Shown following : • Dryer is plugged into a grounded 3 prong outlet. • Electrical supply is connected. • House fuse is intact and tight, or circuit breaker has...