Use and Care Guide
Page 2
... model and serial numbers below to play. Before you are not meant to Refrigerator 5-6 Door Removal & Reversal 7-9 Features At A Glance 10 Temperature Controls Looking Inside 11 12-13 Food Storage & Energy Saving Tips ... 14 Ice Service 15 Normal Operating Sounds & Sights .... 16 Care & Cleaning 17-18 Before You Call 19 for your old refrigerator/freezer: • Remove doors. Have refrigerant removed by a qualified service technician. Your satisfaction is found on your old refrigerator or freezer...
... model and serial numbers below to play. Before you are not meant to Refrigerator 5-6 Door Removal & Reversal 7-9 Features At A Glance 10 Temperature Controls Looking Inside 11 12-13 Food Storage & Energy Saving Tips ... 14 Ice Service 15 Normal Operating Sounds & Sights .... 16 Care & Cleaning 17-18 Before You Call 19 for your old refrigerator/freezer: • Remove doors. Have refrigerant removed by a qualified service technician. Your satisfaction is found on your old refrigerator or freezer...

Use and Care Guide
Page 3
... you specific legal rights, and you . ELECTRICALiNFORMATiON • The refrigerator must be plugged into its intended purpose. 6. Such damage is used for : 1. Groundingtype wall receptac!e DanOy ncoitr,cuumnsdtearnces, cut_ temove_ or bypass the Power cord with 3-prong grounded p!ug KENIVIORE APPLIANCE WARRANTY OneYear Limited Warranty When installed, operated and maintained according to filters, belts, light bulbs and bags. 2. This warranty covers only defects in all instructions supplied...
... you specific legal rights, and you . ELECTRICALiNFORMATiON • The refrigerator must be plugged into its intended purpose. 6. Such damage is used for : 1. Groundingtype wall receptac!e DanOy ncoitr,cuumnsdtearnces, cut_ temove_ or bypass the Power cord with 3-prong grounded p!ug KENIVIORE APPLIANCE WARRANTY OneYear Limited Warranty When installed, operated and maintained according to filters, belts, light bulbs and bags. 2. This warranty covers only defects in all instructions supplied...

Use and Care Guide
Page 4
... 't be working on your product, [] Unlimited service calls and nationwide service, as often as a "talking owner's manual". [] Power surge protection against electrical damage due to power fluctuations, [] $250 Food Loss Protection annually for any food spoilage that is the result of mechanical failure of any covered refrigerator or freezer. [] Rental reimbursement if repair of your new product. Master Protection Agreements Congratulations on making a smart...
... 't be working on your product, [] Unlimited service calls and nationwide service, as often as a "talking owner's manual". [] Power surge protection against electrical damage due to power fluctuations, [] $250 Food Loss Protection annually for any food spoilage that is the result of mechanical failure of any covered refrigerator or freezer. [] Rental reimbursement if repair of your new product. Master Protection Agreements Congratulations on making a smart...
Use and Care Guide
Page 5
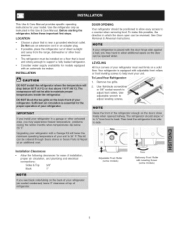
... extension cord or an adapter plug. Remove toe grille• 2. To LevelYour Refrigerator: 1. Use flat-blade screwdriv•er / or 3/8" socket wrench to support a fully loaded refrigerator• o Consider water supply availability for ease of installation, proper air circulation, and plumbing and electrical connections: Sides & Top 3/8" Back 1" Adjustable Front Roller (some models) Raise Stationary Front Roller with an automatic ice maker• iNSTALLATiON DOOR OPENING Your refrigerator should be reversed• See Door Removal & Reversal Instructions.
... extension cord or an adapter plug. Remove toe grille• 2. To LevelYour Refrigerator: 1. Use flat-blade screwdriv•er / or 3/8" socket wrench to support a fully loaded refrigerator• o Consider water supply availability for ease of installation, proper air circulation, and plumbing and electrical connections: Sides & Top 3/8" Back 1" Adjustable Front Roller (some models) Raise Stationary Front Roller with an automatic ice maker• iNSTALLATiON DOOR OPENING Your refrigerator should be reversed• See Door Removal & Reversal Instructions.
Use and Care Guide
Page 6
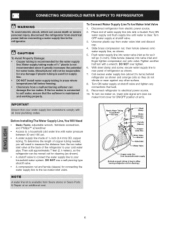
... ice maker front cover for cleaning.) Disconnect refrigerator from household water supply (Include enough tubing in loop to your household water system. With steel clamp and screw, secure water supply line to electrical power source. 10. Coil excess water supply line (about 2V2 turns) behind refrigerator as shown. 5. To turn with water pressure between 30 and 100 psi. ,, A water supply line made of water supply line into water valve inlet as far as shown). ,, A shutoff valve to connect the water supply line to the ice maker...
... ice maker front cover for cleaning.) Disconnect refrigerator from household water supply (Include enough tubing in loop to your household water system. With steel clamp and screw, secure water supply line to electrical power source. 10. Coil excess water supply line (about 2V2 turns) behind refrigerator as shown. 5. To turn with water pressure between 30 and 100 psi. ,, A water supply line made of water supply line into water valve inlet as far as shown). ,, A shutoff valve to connect the water supply line to the ice maker...

Use and Care Guide
Page 7
.... 6. Remove two screws on opposite side of door. Move hinge pin to puncture the foam. 12. Before starting screws, use an awl to other hole in electrical power cord and turn refrigerator temperature control to opposite side. Position refrigerator door onto bottom hinge pin and screw center hinge pin through center hinge into top of door while tightening screws to help align hinge hole. 13. Close refrigerator door to install top hinge. 17...
.... 6. Remove two screws on opposite side of door. Move hinge pin to puncture the foam. 12. Before starting screws, use an awl to other hole in electrical power cord and turn refrigerator temperature control to opposite side. Position refrigerator door onto bottom hinge pin and screw center hinge pin through center hinge into top of door while tightening screws to help align hinge hole. 13. Close refrigerator door to install top hinge. 17...
Use and Care Guide
Page 8
... door. TO REMOVE REFRIGERATOR HANDLE: (Handles may be easier to reverse while doors are off.) 1. Start with handle offset away from door. TO ATTACH TRIM: 1. Carefully align trim and press down . An adhesive '_rim lock"is positioned about halfway down at trim lock locations. 4. TO REMOVE TRIM: 1. TO ATTACH FREEZER HANDLE: 1. Remove screw and dovetail button and install on the face of handle with two screws removed earlier. Secure top...
... door. TO REMOVE REFRIGERATOR HANDLE: (Handles may be easier to reverse while doors are off.) 1. Start with handle offset away from door. TO ATTACH TRIM: 1. Carefully align trim and press down . An adhesive '_rim lock"is positioned about halfway down at trim lock locations. 4. TO REMOVE TRIM: 1. TO ATTACH FREEZER HANDLE: 1. Remove screw and dovetail button and install on the face of handle with two screws removed earlier. Secure top...
Use and Care Guide
Page 9
... oppositeside. Placetopofhandleoverdovetasilcrewp, ullhandle straighdt ownuntihl andleisalignedwithscrewholeson straighut puntilhandleisalignedwithscrewholeson topofdoor. over Dovetail Screw Loct_ Handle over Dovetail Screw TO REVERSE REFRIGERATOR/FREEZER HANDLES: Handles may be easier to reverse while doors are off. Removtewoscrewsattachinghandletotopof refrigeratdoor or. 1. Removetwoscrewsattachinghandletobottomof freezedroor. 2. Slidehandlestraighdt ownandpullhandleoffdovetail screwondoor. bottomofdoor. 2. side,movingholeplugsfromcorrespondinhgolesto...
... oppositeside. Placetopofhandleoverdovetasilcrewp, ullhandle straighdt ownuntihl andleisalignedwithscrewholeson straighut puntilhandleisalignedwithscrewholeson topofdoor. over Dovetail Screw Loct_ Handle over Dovetail Screw TO REVERSE REFRIGERATOR/FREEZER HANDLES: Handles may be easier to reverse while doors are off. Removtewoscrewsattachinghandletotopof refrigeratdoor or. 1. Removetwoscrewsattachinghandletobottomof freezedroor. 2. Slidehandlestraighdt ownandpullhandleoffdovetail screwondoor. bottomofdoor. 2. side,movingholeplugsfromcorrespondinhgolesto...

Use and Care Guide
Page 10
Ice Maker_ Ice Bucket _ Freezer Shelf _ Freezer Control Refrigerator Control Deli Drawer Cover Dell Drawer Half Shelf Wine Rack Full Special Item Mid Level Li Crisper Crisper Drawers S Freezer Light i iiiiiiiiiiiiiiiiiiiiiiiiiiiiiiiiiiiiiiiiiiiiii _ \ _--Fixed Door Bin Door Rack Dairy Door Tall Bottle Retainer Snugger Door Bin Fixed Door Bin J Door Rack _Toe Grille Features may vary according to model 10
Ice Maker_ Ice Bucket _ Freezer Shelf _ Freezer Control Refrigerator Control Deli Drawer Cover Dell Drawer Half Shelf Wine Rack Full Special Item Mid Level Li Crisper Crisper Drawers S Freezer Light i iiiiiiiiiiiiiiiiiiiiiiiiiiiiiiiiiiiiiiiiiiiiii _ \ _--Fixed Door Bin Door Rack Dairy Door Tall Bottle Retainer Snugger Door Bin Fixed Door Bin J Door Rack _Toe Grille Features may vary according to model 10
Use and Care Guide
Page 11
... Cold. To maintain temperatures, a fan circulates air in both compartments. COOLDOWNPERIOD To ensure safe food storage, allow the refrigerator to operate with the doors closed for at least 8 to 12 hours before loading it with food items. Freezer Control (some models) OR cI,o, e e OR c;°o, Refrigerator Control (some models) Refrigerator & Freezer Control (some models) TEMPERATURE ADJUSTMENT GUIDE if Refrigerator compartment is Too Warm Turn Refrigerator Control Slightly Towards Colder. Turning the freezer control will change only the freezer temperature. if Refrigerator...
... Cold. To maintain temperatures, a fan circulates air in both compartments. COOLDOWNPERIOD To ensure safe food storage, allow the refrigerator to operate with the doors closed for at least 8 to 12 hours before loading it with food items. Freezer Control (some models) OR cI,o, e e OR c;°o, Refrigerator Control (some models) Refrigerator & Freezer Control (some models) TEMPERATURE ADJUSTMENT GUIDE if Refrigerator compartment is Too Warm Turn Refrigerator Control Slightly Towards Colder. Turning the freezer control will change only the freezer temperature. if Refrigerator...

Use and Care Guide
Page 12
... suit individual needs. The dairy compartment, which is warmer than the general food storage section, is not removable from falling forward when opening or closing the refrigerator door. Door Rack ADJUSTABLE DOOR BINS Some models have door racks or bins that can accommodate gallon-sized plastic drink containers and economy-sized jars and containers. Place bin in place. Replace the shelf by inserting the hooks at the top, and slide...
... suit individual needs. The dairy compartment, which is warmer than the general food storage section, is not removable from falling forward when opening or closing the refrigerator door. Door Rack ADJUSTABLE DOOR BINS Some models have door racks or bins that can accommodate gallon-sized plastic drink containers and economy-sized jars and containers. Place bin in place. Replace the shelf by inserting the hooks at the top, and slide...

Use and Care Guide
Page 13
.... Freezer Tilt Out Door Rack CRISPERS (SOME MODELS) The crispers, located under the bottom refrigerator shelf, are two different style Wine Racks. (See A and B below.) The Wine Rack stores bottles of wine, or single twoliter plastic bottles of luncheon meats, spreads, cheeses, and other fresh produce. Install on the shelf. FREEZER TiLT OUT DOOR RACK HUMIDITY CONTROL (SOME MODELS) The Humidity Control, present on some models...
.... Freezer Tilt Out Door Rack CRISPERS (SOME MODELS) The crispers, located under the bottom refrigerator shelf, are two different style Wine Racks. (See A and B below.) The Wine Rack stores bottles of wine, or single twoliter plastic bottles of luncheon meats, spreads, cheeses, and other fresh produce. Install on the shelf. FREEZER TiLT OUT DOOR RACK HUMIDITY CONTROL (SOME MODELS) The Humidity Control, present on some models...

Use and Care Guide
Page 14
... to reduce door openings. Meat ,, Raw meat and poultry should be wrapped securely so leakage and contamination of 37 ° R . If this Use & Care Manual for the suggested temperature control settings. ,, Periodic cleaning of the packages as ice cream and orange juice on moisture build-up inside the unit. ,, Organize the refrigerator to dry out, change color, and develop an off-flavor (freezer burn...
... to reduce door openings. Meat ,, Raw meat and poultry should be wrapped securely so leakage and contamination of 37 ° R . If this Use & Care Manual for the suggested temperature control settings. ,, Periodic cleaning of the packages as ice cream and orange juice on moisture build-up inside the unit. ,, Organize the refrigerator to dry out, change color, and develop an off-flavor (freezer burn...

Use and Care Guide
Page 15
..., the water supply valve must be produced during vacations. ,, If the ice maker will take approximately one to two days to be turned off automatically when the ice container is full. If your model has an adjustable freezer shelf, place the shelf in new plumbing lines may cause the ice maker to cycle two or three times before making a full tray of ice cubes to fill the ice container. Air in...
..., the water supply valve must be produced during vacations. ,, If the ice maker will take approximately one to two days to be turned off automatically when the ice container is full. If your model has an adjustable freezer shelf, place the shelf in new plumbing lines may cause the ice maker to cycle two or three times before making a full tray of ice cubes to fill the ice container. Air in...

Use and Care Guide
Page 16
... indicate your refrigerator as the water valve opens to an electric clock. After defrosting, a popping sound may make sounds more noticeable. B. Defrost Neater During defrost cycles, water dripping onto the defrost heater may have a condenser fan. These are all normal sounds and soon will be located on top of the compressor for air-cooled condensers (black coils on and off. G. J. Listed below are located underneath your refrigerator is equipped with an automatic ice maker...
... indicate your refrigerator as the water valve opens to an electric clock. After defrosting, a popping sound may make sounds more noticeable. B. Defrost Neater During defrost cycles, water dripping onto the defrost heater may have a condenser fan. These are all normal sounds and soon will be located on top of the compressor for air-cooled condensers (black coils on and off. G. J. Listed below are located underneath your refrigerator is equipped with an automatic ice maker...

Use and Care Guide
Page 17
... electrical power cord from your dealer, • Vacuum Cleaner Condenser Coils • (Air-cooled models only) Vacuum Cleaner Do not use any removable items (bins, drawers, etc.) in a dishwasher. Care & Cleaning Chart Part Interior/Door Liner What To Use • Soap and water • Baking soda and water Tips and Precautions Use 2 tablespoons of baking soda in your vacuum to room temperature before cleaning. Do not wash any type of warm water. Allow glass...
... electrical power cord from your dealer, • Vacuum Cleaner Condenser Coils • (Air-cooled models only) Vacuum Cleaner Do not use any removable items (bins, drawers, etc.) in a dishwasher. Care & Cleaning Chart Part Interior/Door Liner What To Use • Soap and water • Baking soda and water Tips and Precautions Use 2 tablespoons of baking soda in your vacuum to room temperature before cleaning. Do not wash any type of warm water. Allow glass...

Use and Care Guide
Page 18
Replace light shield. 6. Remove all food and ice if you will be gone for maximum efficiency. Leave both doors open if necessary. • Remove all food and ice. • If using handcart, load from refrigerator compartment. • Turn automatic ice maker off automatic ice maker and turn water supply valve to periodically clean the condenser for a few days. REPLAClNGTHE FREEZER UGHT BULB (SOME MODELS) 1. Wear gloves as shown. 4. Remember to plug the refrigerator back in your...
Replace light shield. 6. Remove all food and ice if you will be gone for maximum efficiency. Leave both doors open if necessary. • Remove all food and ice. • If using handcart, load from refrigerator compartment. • Turn automatic ice maker off automatic ice maker and turn water supply valve to periodically clean the condenser for a few days. REPLAClNGTHE FREEZER UGHT BULB (SOME MODELS) 1. Wear gloves as shown. 4. Remember to plug the refrigerator back in your...
Use and Care Guide
Page 19
... of ice in defrost cycle. Wait 20 minutes and check again. • Set freezer control to "O". • Refrigerator may be covered or wrapped. • Replace light bulb. • Ensure plug is not cold enough. Allow 24 hours for service, review this appliance. • Ensure plug is tightly pushed into electrical outlet. • Light switch may save you time and expense. Then check freezer temperatures and adjust as needed. • The cabinet is not level...
... of ice in defrost cycle. Wait 20 minutes and check again. • Set freezer control to "O". • Refrigerator may be covered or wrapped. • Replace light bulb. • Ensure plug is not cold enough. Allow 24 hours for service, review this appliance. • Ensure plug is tightly pushed into electrical outlet. • Light switch may save you time and expense. Then check freezer temperatures and adjust as needed. • The cabinet is not level...

Use and Care Guide
Page 56
...replacement parts, accessories and owner's manuals that you need to do-it ! For Sears professional installation of home appliances and items like vacuums, lawn equipment, and electronics, call or go on-line for the location of carry-in your nearest Sears Parts & Repair Service...Service Mark of all major brand appliances, lawn and garden equipment, or heating and cooling systems, no matter who made it, no matter who sold it -yourself. Your Home For repair....com Our Home For repair of your home - in items like garage door openers and water heaters. 1-800-4-MY-HOME ® (1-800...
...replacement parts, accessories and owner's manuals that you need to do-it ! For Sears professional installation of home appliances and items like vacuums, lawn equipment, and electronics, call or go on-line for the location of carry-in your nearest Sears Parts & Repair Service...Service Mark of all major brand appliances, lawn and garden equipment, or heating and cooling systems, no matter who made it, no matter who sold it -yourself. Your Home For repair....com Our Home For repair of your home - in items like garage door openers and water heaters. 1-800-4-MY-HOME ® (1-800...
Installation Instructions
Page 1
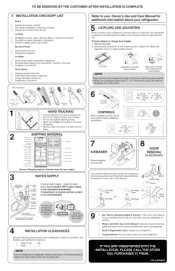
...running. SHIPPING MATERIAL 1....... Connecting to adjust front rollers. Humidity o ""H_h'd'ty_-_)_ CONTROLS When changing controls, wait 24 hours before making additional adjustments. / 7 ICEMAKER Ensure icemaker is turned ON. [/"/_,//_ Signal Arm f if you may vary per model.) 3 WATER SUPPLY Plastic Water Connect water supply - Congratulations! Turn icemaker OFF if water supply is turned ON. recheck in ice Maker [] House water supply connected to adjust leveling screws. Use adjustable wrench to refrigerator [] No water leaks present at all corners Electrical Power...
...running. SHIPPING MATERIAL 1....... Connecting to adjust front rollers. Humidity o ""H_h'd'ty_-_)_ CONTROLS When changing controls, wait 24 hours before making additional adjustments. / 7 ICEMAKER Ensure icemaker is turned ON. [/"/_,//_ Signal Arm f if you may vary per model.) 3 WATER SUPPLY Plastic Water Connect water supply - Congratulations! Turn icemaker OFF if water supply is turned ON. recheck in ice Maker [] House water supply connected to adjust leveling screws. Use adjustable wrench to refrigerator [] No water leaks present at all corners Electrical Power...


