
Use and Care Guide
Page 2
... Safety instructions Warranty and Protection Agreements Installation Location Measuring the Opening Transporting Your Refrigerator Leveling Door Removal Reinstallation of the Doors Door Reversal Handles Connecting the Water Supply Temperature Controls Touch Temperature Controls Fresh Food Features Shelves Door Storage Storage Drawers Freezer Features Shelves and Baskets Accessories Ice Automatic Ice Maker Food Storage Tips Fresh Food Storage Frozen Food Storage Food Storage Chart Care and Cleaning Refrigerator Cleaning Chart Replacing Light Bulbs Removing Odors...
... Safety instructions Warranty and Protection Agreements Installation Location Measuring the Opening Transporting Your Refrigerator Leveling Door Removal Reinstallation of the Doors Door Reversal Handles Connecting the Water Supply Temperature Controls Touch Temperature Controls Fresh Food Features Shelves Door Storage Storage Drawers Freezer Features Shelves and Baskets Accessories Ice Automatic Ice Maker Food Storage Tips Fresh Food Storage Frozen Food Storage Food Storage Chart Care and Cleaning Refrigerator Cleaning Chart Replacing Light Bulbs Removing Odors...
Use and Care Guide
Page 3
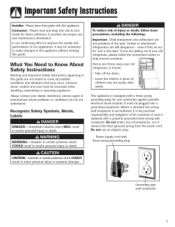
... of your protection against possible electrical shock hazards. Always contact your old refrigerator or freezer: • Take off the doors. • Leave the shelves in severe persona iiYuj___or death. Where a standard two-prong wall receptacle is encountered, it replaced with a properly grounded three-prong wall receptacle. Consumer: Please read and keep this Use & Care Guide for "just a few days...
... of your protection against possible electrical shock hazards. Always contact your old refrigerator or freezer: • Take off the doors. • Leave the shelves in severe persona iiYuj___or death. Where a standard two-prong wall receptacle is encountered, it replaced with a properly grounded three-prong wall receptacle. Consumer: Please read and keep this Use & Care Guide for "just a few days...
Use and Care Guide
Page 4
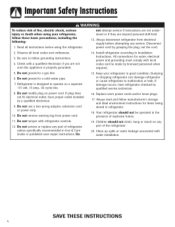
... TH ESE I NSTRUCTIONS Do not service or replace any part of refrigerator unless specifically recommended in good condition. Your refrigerator should not climb, hang or stand on any service. Read all instructions before attempting any part of the refrigerator. 20. Do not remove warning tag from electrical supply before using your refrigerator in Use & Care Guide or published user-repair instructions. Replace worn power cords and/or loose plugs. 17. A/ways read and follow...
... TH ESE I NSTRUCTIONS Do not service or replace any part of refrigerator unless specifically recommended in good condition. Your refrigerator should not climb, hang or stand on any service. Read all instructions before attempting any part of the refrigerator. 20. Do not remove warning tag from electrical supply before using your refrigerator in Use & Care Guide or published user-repair instructions. Replace worn power cords and/or loose plugs. 17. A/ways read and follow...
Use and Care Guide
Page 5
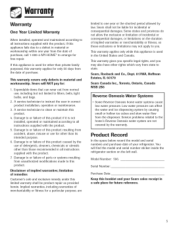
... to filters, belts, light bulbs, and bags. 2. Low water pressure can wear out from normal use of parts or systems resulting from the date of purchase, call 1-80O-4-MY-HOMP to arrange for a particular purpose, are not covered by the warranty. Model Number: 596. Sears will find the model and serial number sticker inside the refrigerator section on the duration of merchantability or fitness for free repair...
... to filters, belts, light bulbs, and bags. 2. Low water pressure can wear out from normal use of parts or systems resulting from the date of purchase, call 1-80O-4-MY-HOMP to arrange for a particular purpose, are not covered by the warranty. Model Number: 596. Sears will find the model and serial number sticker inside the refrigerator section on the duration of merchantability or fitness for free repair...
Use and Care Guide
Page 6
... 2,400 Service Technicians and more product failures occur within twelve months Product replacement if your Fast help prolong the life of home appliances, garage door openers, water heaters, and other major home items, in -home repair, plus convenient repair scheduling Power surge protection against electrical damage due to come. But like all products, it takes for years of dependable operation...
... 2,400 Service Technicians and more product failures occur within twelve months Product replacement if your Fast help prolong the life of home appliances, garage door openers, water heaters, and other major home items, in -home repair, plus convenient repair scheduling Power surge protection against electrical damage due to come. But like all products, it takes for years of dependable operation...
Use and Care Guide
Page 7
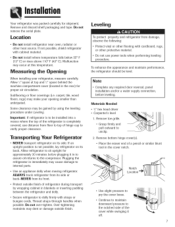
... to the notched side of a pencil or similar blunt tool in to assure oil returns to unclip. 2. Transporting Your Refrigerator • NEVER transport refrigerator on its front. • Protect outside finish. Plugging the refrigerator in the rea0 for shipment. Thread straps through handles when possible. Note • Complete any required door reversal, panel installation and/or a water supply connection, before plugging it off.
... to the notched side of a pencil or similar blunt tool in to assure oil returns to unclip. 2. Transporting Your Refrigerator • NEVER transport refrigerator on its front. • Protect outside finish. Plugging the refrigerator in the rea0 for shipment. Thread straps through handles when possible. Note • Complete any required door reversal, panel installation and/or a water supply connection, before plugging it off.

Use and Care Guide
Page 8
... refrigerator to refrigerator before removing doors. Remove toe grille (see page 7). 3_ Remove top hinge cover from power source. Remove any door shims if present. Lift out bottom hinge pin. MateriaJs Needed: • Phillips screwdriver • %" hex head driver Unplug power cord from refrigerator door by removing Phillips screw and retain screw and cover for later use. Hold freezer door while removing hinge pin with _" hex head driver and retain screws for later use . 3. B 4_ Using the carpenter's level, make...
... refrigerator to refrigerator before removing doors. Remove toe grille (see page 7). 3_ Remove top hinge cover from power source. Remove any door shims if present. Lift out bottom hinge pin. MateriaJs Needed: • Phillips screwdriver • %" hex head driver Unplug power cord from refrigerator door by removing Phillips screw and retain screw and cover for later use. Hold freezer door while removing hinge pin with _" hex head driver and retain screws for later use . 3. B 4_ Using the carpenter's level, make...

Use and Care Guide
Page 9
.... 2. Install handles (see page 8}. 2. Place hinge side of freezer door on bottom hinge pin and hold freezer door upright while installing center hinge pin with 3/8"hex head driver. Door Reversal In some installations, reversing the door swing allows for removal and installation. 4. To avoid possible injury and damage to property: • Place doors otl a nonabrasive surface protected by towels or rugs while working directly on center hinge pin. 5. Place hinge side of refrigerator door on doors. 3. Install hinge assemblies...
.... 2. Install handles (see page 8}. 2. Place hinge side of freezer door on bottom hinge pin and hold freezer door upright while installing center hinge pin with 3/8"hex head driver. Door Reversal In some installations, reversing the door swing allows for removal and installation. 4. To avoid possible injury and damage to property: • Place doors otl a nonabrasive surface protected by towels or rugs while working directly on center hinge pin. 5. Place hinge side of refrigerator door on doors. 3. Install hinge assemblies...
Use and Care Guide
Page 11
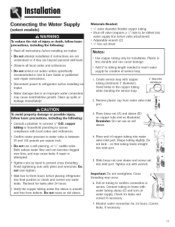
... turn on water supply. Clean up spills or leakage immediately! Do not reuse an old sleeve. . Reminder: Do not use a self-piercing, or _,6" saddle valve. Connect tubing to refrigerator before placing refrigerator into inlet port. Tighten nuts by hand to check and correct any water leaks. Water damage due to water valve is secure. Wait two to three hours before installing ice maker. Avoid kinks in Use & Care Guide or published user-repair instructions...
... turn on water supply. Clean up spills or leakage immediately! Do not reuse an old sleeve. . Reminder: Do not use a self-piercing, or _,6" saddle valve. Connect tubing to refrigerator before placing refrigerator into inlet port. Tighten nuts by hand to check and correct any water leaks. Water damage due to water valve is secure. Wait two to three hours before installing ice maker. Avoid kinks in Use & Care Guide or published user-repair instructions...
Use and Care Guide
Page 12
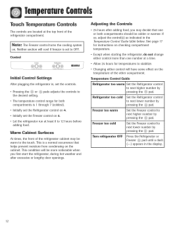
... cold Freezer too warm Set the Refrigerator control to the touch. Adjusting the Controls 2/4 hours after adding food, you may be more noticeable when you first start the refrigerator, during hot weather and after excessive or lengthy door openings. This condition will have some effect on the cabinet. If so, adjust the control(s) as indicated in the Temperature Control Guide table below. Temperature Control Guide Refrigerator too warm Set the Refrigerator control to next higher number...
... cold Freezer too warm Set the Refrigerator control to the touch. Adjusting the Controls 2/4 hours after adding food, you may be more noticeable when you first start the refrigerator, during hot weather and after excessive or lengthy door openings. This condition will have some effect on the cabinet. If so, adjust the control(s) as indicated in the Temperature Control Guide table below. Temperature Control Guide Refrigerator too warm Set the Refrigerator control to next higher number...
Use and Care Guide
Page 14
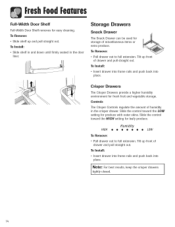
... Install: * Insert drawer into frame rails and push back into place. To Remove: * Slide shelf up front of miscellaneous items or extra produce. Storage Drawers Snack Drawer The Snack Drawer can be used for fresh fruit and vegetable storage. Controls The Crisper Controls regulate the amount of drawer and pull straight out. Slide the control toward the LOW setting for easy cleaning. To Instalh * Insert drawer...
... Install: * Insert drawer into frame rails and push back into place. To Remove: * Slide shelf up front of miscellaneous items or extra produce. Storage Drawers Snack Drawer The Snack Drawer can be used for fresh fruit and vegetable storage. Controls The Crisper Controls regulate the amount of drawer and pull straight out. Slide the control toward the LOW setting for easy cleaning. To Instalh * Insert drawer...

Use and Care Guide
Page 16
... raises the sensor arm, shutting the ice maker off by lowering the sensor arm. Connect the ice maker to make ice until the supply of copper salts in place and ice maker arm is in an inactive water supply line which feeds the ice maker. They can block the sensor arm, causing the ice maker to purchase and install a water line filter. This will rattle as instructed on by raising the sensor arm...
... raises the sensor arm, shutting the ice maker off by lowering the sensor arm. Connect the ice maker to make ice until the supply of copper salts in place and ice maker arm is in an inactive water supply line which feeds the ice maker. They can block the sensor arm, causing the ice maker to purchase and install a water line filter. This will rattle as instructed on by raising the sensor arm...

Use and Care Guide
Page 17
...; C} adjust the controls as ice cream and orange juice on pages 18 and 19 for appropriate length of storage. This overloads the freezer, slows the rate of freezing and can raise the temperature of frozen foods. * Leave space between 34°-40 ° F (1°-4 ° C} with an optimum temperature of water and place in uneven cooling. Fruits and Vegetables * The crisper drawers trap...
...; C} adjust the controls as ice cream and orange juice on pages 18 and 19 for appropriate length of storage. This overloads the freezer, slows the rate of freezing and can raise the temperature of frozen foods. * Leave space between 34°-40 ° F (1°-4 ° C} with an optimum temperature of water and place in uneven cooling. Fruits and Vegetables * The crisper drawers trap...
Use and Care Guide
Page 20
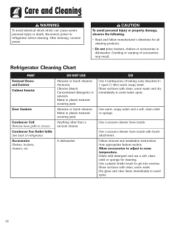
Cracking or warping of refrigerator Accessories Shelves, buckets, drawers, etc. Textured Doors and Exterior Cabinet interior Door Gaskets Condenser Coil Remove base grille to refrigerator before cleaning. Condenser Fan Outlet Grille See back of accessories may result. Use a vacuum cleaner hose nozzle with clean, warm water. Care Cleaning To avoid electrical shock which can cause severe personal injury or death, disconnect power to access. Abrasive or harsh cleaners Ammonia Chlorine...
Cracking or warping of refrigerator Accessories Shelves, buckets, drawers, etc. Textured Doors and Exterior Cabinet interior Door Gaskets Condenser Coil Remove base grille to refrigerator before cleaning. Condenser Fan Outlet Grille See back of accessories may result. Use a vacuum cleaner hose nozzle with clean, warm water. Care Cleaning To avoid electrical shock which can cause severe personal injury or death, disconnect power to access. Abrasive or harsh cleaners Ammonia Chlorine...
Use and Care Guide
Page 21
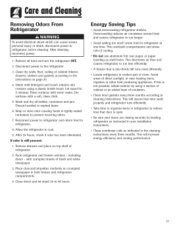
... installation instructions. • Clean condenser coils as shelf liners. Pack refrigerator and freezer sections - Remove all bottles, containers and jars. Rinse surfaces with a soft, clean cloth. 5. Energy Saving Tips • Avoid overcrowding refrigerator shelves. This overloads compartments and slows rate of black and white newspaper. 3. Locate refrigerator in tightly sealed containers to the instructions on crumpled newspaper in the cleaning instructions every three months. Dry surfaces with warm water. Close doors...
... installation instructions. • Clean condenser coils as shelf liners. Pack refrigerator and freezer sections - Remove all bottles, containers and jars. Rinse surfaces with a soft, clean cloth. 5. Energy Saving Tips • Avoid overcrowding refrigerator shelves. This overloads compartments and slows rate of black and white newspaper. 3. Locate refrigerator in tightly sealed containers to the instructions on crumpled newspaper in the cleaning instructions every three months. Dry surfaces with warm water. Close doors...
Use and Care Guide
Page 23
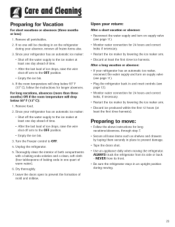
... the ice bin. 3. Be sure the refrigerator stays in and reset controls (see page 11). * Monitor water connection for long vacations/absences, through step 7. * Secure all perishables. 2. Upon your return: After a short vacation or absence: * Reconnect the water supply and turn on supply valve (see page 12). * Monitor water connection for 24 hours and correct leaks, if necessary. * Restart the ice maker by lowering the ice maker arm. * Discard ice...
... the ice bin. 3. Be sure the refrigerator stays in and reset controls (see page 11). * Monitor water connection for long vacations/absences, through step 7. * Secure all perishables. 2. Upon your return: After a short vacation or absence: * Reconnect the water supply and turn on supply valve (see page 12). * Monitor water connection for 24 hours and correct leaks, if necessary. * Restart the ice maker by lowering the ice maker arm. * Discard ice...

Use and Care Guide
Page 24
... stopping compressor. • Motorized device (B) sounds like an electric clock and snaps in and out. • Freezer fan (C) and condenser fan (D) make this noise while operating. • Evaporator (E) and heat exchanger (F) refrigerant makes this noise when flowing. • Ice cubes from ice maker (select models) drop into ice bucket (G). • Normal operation • Normal operation • Normal operation • Normal operation • Normal operation • Compressor (H) makes a pulsating sound while running. • Refrigerator is not level. • Ice maker water valve...
... stopping compressor. • Motorized device (B) sounds like an electric clock and snaps in and out. • Freezer fan (C) and condenser fan (D) make this noise while operating. • Evaporator (E) and heat exchanger (F) refrigerant makes this noise when flowing. • Ice cubes from ice maker (select models) drop into ice bucket (G). • Normal operation • Normal operation • Normal operation • Normal operation • Normal operation • Compressor (H) makes a pulsating sound while running. • Refrigerator is not level. • Ice maker water valve...
Use and Care Guide
Page 25
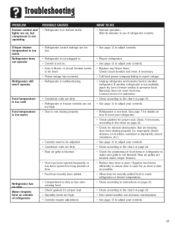
... items in refrigerator to make sure grille is not available, place dry ice in defrost mode. • Normal operation. If another refrigerator. Warranty does not cover food loss. Clean, if necessary, according to the chart on page 20. ° Check for proper seal. Organize food items efficiently to assure door is open . Troubleshoofln9 Freezer control and lights are located under crisper drawers. • Reduce time door is open for as...
... items in refrigerator to make sure grille is not available, place dry ice in defrost mode. • Normal operation. If another refrigerator. Warranty does not cover food loss. Clean, if necessary, according to the chart on page 20. ° Check for proper seal. Organize food items efficiently to assure door is open . Troubleshoofln9 Freezer control and lights are located under crisper drawers. • Reduce time door is open for as...
Use and Care Guide
Page 26
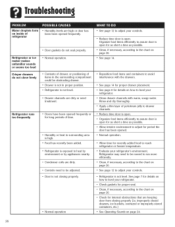
... page 12 to adjust your controls. • Reduce time door is open for as short a time as possible. * Clean, if necessary, according to be adjusted. • Door is not closing properly 0.e. improperlyclosed drawers, ice buckets, oversized or improperlystored containers, etc3 • See Operating Sounds on page 24. 26 Troubleshoofln9 Water droplets form on inside of * Humidity levels are high or door has been been...
... page 12 to adjust your controls. • Reduce time door is open for as short a time as possible. * Clean, if necessary, according to be adjusted. • Door is not closing properly 0.e. improperlyclosed drawers, ice buckets, oversized or improperlystored containers, etc3 • See Operating Sounds on page 24. 26 Troubleshoofln9 Water droplets form on inside of * Humidity levels are high or door has been been...

Use and Care Guide
Page 27
... ice Refrigerator is less durable and can cause leakage. Ice forms in your Installation Instructions. Sears is too high. A minimum pressure of 35 pounds per square inch to ice maker , Water pressure is too low. • Freezer temperature is not responsible for leaks. • Turn off water supply and remove kinks. Sears is recommended for refrigerators with water filters. • Check water connection procedure in inlet tube to function properly. • Adjust Freezer control...
... ice Refrigerator is less durable and can cause leakage. Ice forms in your Installation Instructions. Sears is too high. A minimum pressure of 35 pounds per square inch to ice maker , Water pressure is too low. • Freezer temperature is not responsible for leaks. • Turn off water supply and remove kinks. Sears is recommended for refrigerators with water filters. • Check water connection procedure in inlet tube to function properly. • Adjust Freezer control...


