Use and Care Guide
Page 2
WARRANTY 2 SAFETY 3-4 Precautions To Avoid Possible Exposure To Excessive Microwave Energy 3 Grounding Instructions 3 Important Safety Instructions 4 UNDERSTANDING YOUR MICROWAVE OVEN 5-8 Specifications 5 Installation 5 Parts And Accessories 6 Control Panel 6 Cookware Guide 7 Tips For Microwave Cooking 8 Cleaning 8 USING YOUR MICROWAVE OVEN 9-19 Clock 9 Kitchen Timer 9 Child Lock 9 Quick Touch Sensor Operation Instruction ....... 10 Potato 10 Quick Touch Sensor Table 11 Reheat 11 Reheat Table 11 Auto Cook 12 Auto Cook Table 12 Add ...
WARRANTY 2 SAFETY 3-4 Precautions To Avoid Possible Exposure To Excessive Microwave Energy 3 Grounding Instructions 3 Important Safety Instructions 4 UNDERSTANDING YOUR MICROWAVE OVEN 5-8 Specifications 5 Installation 5 Parts And Accessories 6 Control Panel 6 Cookware Guide 7 Tips For Microwave Cooking 8 Cleaning 8 USING YOUR MICROWAVE OVEN 9-19 Clock 9 Kitchen Timer 9 Child Lock 9 Quick Touch Sensor Operation Instruction ....... 10 Potato 10 Quick Touch Sensor Table 11 Reheat 11 Reheat Table 11 Auto Cook 12 Auto Cook Table 12 Add ...
Use and Care Guide
Page 3
... MICROWAVE ENERGY ... • Do not attempt to operate this oven with the door open, since open-door operation can be pulled on sealing surfaces. • The oven should not be grounded! Put the plug into an outlet that there is damaged. the grounding instructions or over or becoming entangled If you wonder whether the appliance is equipped with a cord having a grounding wire...
... MICROWAVE ENERGY ... • Do not attempt to operate this oven with the door open, since open-door operation can be pulled on sealing surfaces. • The oven should not be grounded! Put the plug into an outlet that there is damaged. the grounding instructions or over or becoming entangled If you wonder whether the appliance is equipped with a cord having a grounding wire...
Use and Care Guide
Page 4
... both before using your oven. Keep a browning dish at the fuse or circuit breaker panel. 9. Do not tamper with the provided installation instructions. 11. could break the glass turntable. 19. b) Turn the oven off the power at least 316 inch above the glass turntable. This could result in the microwave oven for commercial purposes. Be careful not to chip or scratch the edges of burns, electric shock, fire...
... both before using your oven. Keep a browning dish at the fuse or circuit breaker panel. 9. Do not tamper with the provided installation instructions. 11. could break the glass turntable. 19. b) Turn the oven off the power at least 316 inch above the glass turntable. This could result in the microwave oven for commercial purposes. Be careful not to chip or scratch the edges of burns, electric shock, fire...

Use and Care Guide
Page 5
Remove your Kenmore microwave oven and all packing materials from the shipping carton. 2. Ft. 3. Place the oven on the top of the turntable roller rest. Place the turntable roller rest in the oven outlet Counte_op Blocking the inlet and/or openings can damage the oven. NOTE: Never place the glass turntable upside down. SPECIFICATIONS Power Supply Rated Power Consumption Microwave Output Rated Current Overall Dimensions (WxHxD) Oven Cavity Dimensions (WxHxD...
Remove your Kenmore microwave oven and all packing materials from the shipping carton. 2. Ft. 3. Place the oven on the top of the turntable roller rest. Place the turntable roller rest in the oven outlet Counte_op Blocking the inlet and/or openings can damage the oven. NOTE: Never place the glass turntable upside down. SPECIFICATIONS Power Supply Rated Power Consumption Microwave Output Rated Current Overall Dimensions (WxHxD) Oven Cavity Dimensions (WxHxD...
Use and Care Guide
Page 6
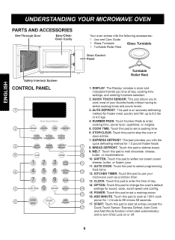
... frozen juice. --@ -@ 11. Touch this pad to use your favorite foods without having to select programming food items. 12. Touch this pad to change the oven's default -ooo..,.:.:,..o.._.o s.ett.ing.s .fo.r .so.und, clock, scroll speed and Lbs/Kg. I @ 15. AUTO COOK. OPTION. ADD MINUTE. Panel fl Turntable Roller Rest Safety Interlock System CONTROL PANEL 1. KITCHEN TIMER. START. COOK TIME. BREAD DEFROST. Touch this pad to set a cooking time. 6. Touch this pad to enter cooking time, power level, quantities, or weights. 5.
... frozen juice. --@ -@ 11. Touch this pad to use your favorite foods without having to select programming food items. 12. Touch this pad to change the oven's default -ooo..,.:.:,..o.._.o s.ett.ing.s .fo.r .so.und, clock, scroll speed and Lbs/Kg. I @ 15. AUTO COOK. OPTION. ADD MINUTE. Panel fl Turntable Roller Rest Safety Interlock System CONTROL PANEL 1. KITCHEN TIMER. START. COOK TIME. BREAD DEFROST. Touch this pad to set a cooking time. 6. Touch this pad to enter cooking time, power level, quantities, or weights. 5.
Use and Care Guide
Page 7
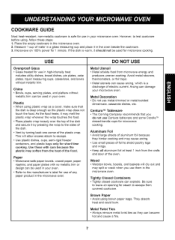
... the cookware. 3. DO NOT USE Metal Utensil • Metal shields food from covered cookware. USE Ovenproof Glass • Glass treated for use metal-trimmed or metal-banded dinnerware, casserole dishes, etc. Aluminum Foil • Avoid large sheets of electric current. Plastic • When using brown paper bags. Tightly Closed Containers • Tightly closed -handle cups for microwave cooking. Place the empty cookware in the microwave oven. 2.
... the cookware. 3. DO NOT USE Metal Utensil • Metal shields food from covered cookware. USE Ovenproof Glass • Glass treated for use metal-trimmed or metal-banded dinnerware, casserole dishes, etc. Aluminum Foil • Avoid large sheets of electric current. Plastic • When using brown paper bags. Tightly Closed Containers • Tightly closed -handle cups for microwave cooking. Place the empty cookware in the microwave oven. 2.
Use and Care Guide
Page 8
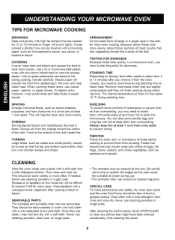
... cleaning the control panel, touch STOP/CLEAR to 15 minutes after cooking chicken or bacon. Foods cooked a shorter time can become hot during cooking. CLEANING Wipe the oven inside top will finish cooking during use. • The turntable roller rest should be cleaned at the outside with a soft cloth and a mild detergent solution. Excessive oil splatters on glass casseroles can be turned so that might have been entered accidentally while cleaning the panel...
... cleaning the control panel, touch STOP/CLEAR to 15 minutes after cooking chicken or bacon. Foods cooked a shorter time can become hot during cooking. CLEANING Wipe the oven inside top will finish cooking during use. • The turntable roller rest should be cleaned at the outside with a soft cloth and a mild detergent solution. Excessive oil splatters on glass casseroles can be turned so that might have been entered accidentally while cleaning the panel...
Use and Care Guide
Page 10
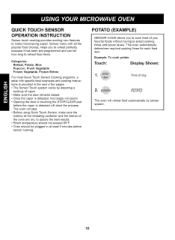
... having to select cooking times and power levels. This oven automatically determines required cooking times for each food item. The oven will abort the process. Example: To cook potato Touch: Display Shows: 1. The oven will sound. • Opening the door or touching the STOP/CLEAR pad before sensor cooking. QUICK TOUCH SENSOR OPERATION INSTRUCTION Sensor touch cooking provides exciting new features to make sure the exterior of the reheating container and the interior of the oven are dry, to assure...
... having to select cooking times and power levels. This oven automatically determines required cooking times for each food item. The oven will abort the process. Example: To cook potato Touch: Display Shows: 1. The oven will sound. • Opening the door or touching the STOP/CLEAR pad before sensor cooking. QUICK TOUCH SENSOR OPERATION INSTRUCTION Sensor touch cooking provides exciting new features to make sure the exterior of the reheating container and the interior of the oven are dry, to assure...
Use and Care Guide
Page 11
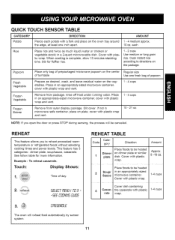
... appropriately sized Sauce microwave container. 1-4 cups Cover with plastic wrap. Example : To reheat casserole. Popcorn Fresh Vegetable Place only bag of prepackaged of turntable microwave popcorn on plate, cover with plastic 1-4 cups role wrap. 3. _F .-Fi -;5- 5-OEJ_,l,,u- _.E The oven will be heated on the oven tray around the edge, at least one fresh bag of day. 2. See follow table for fluffier rice. QUICK TOUCH SENSOR TABLE CATEGORY DIRECTION Potato...
... appropriately sized Sauce microwave container. 1-4 cups Cover with plastic wrap. Example : To reheat casserole. Popcorn Fresh Vegetable Place only bag of prepackaged of turntable microwave popcorn on plate, cover with plastic 1-4 cups role wrap. 3. _F .-Fi -;5- 5-OEJ_,l,,u- _.E The oven will be heated on the oven tray around the edge, at least one fresh bag of day. 2. See follow table for fluffier rice. QUICK TOUCH SENSOR TABLE CATEGORY DIRECTION Potato...
Use and Care Guide
Page 12
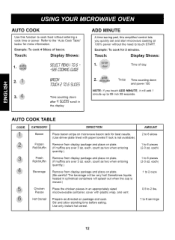
... power 100 NOTE: If you quickly set and start microwave cooking at 100% power without the need to cook food without entering a cook time or power. "1 --I1--['11_1 2. 8,%u,, ,uc,_ c TIll II- AUTO COOK TABLE CODE CATEGORY Bacon Frozen Roll/Muffin Fresh Roll/Muffin Beverage Chicken Pieces Hot Cereal DIRECTION Place bacon strips on microwave bacon rack for best results. (Use dinner plate lined with plastic wrap, and vent. count as two when entering Remove from display...
... power 100 NOTE: If you quickly set and start microwave cooking at 100% power without the need to cook food without entering a cook time or power. "1 --I1--['11_1 2. 8,%u,, ,uc,_ c TIll II- AUTO COOK TABLE CODE CATEGORY Bacon Frozen Roll/Muffin Fresh Roll/Muffin Beverage Chicken Pieces Hot Cereal DIRECTION Place bacon strips on microwave bacon rack for best results. (Use dinner plate lined with plastic wrap, and vent. count as two when entering Remove from display...
Use and Care Guide
Page 13
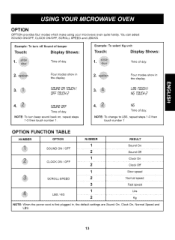
... unit: Touch: Display Shows: 1. NOTE: To change to LBS, repeat steps 1-3 then touch number 1 OPTION FUNCTION TABLE NUMBER OPTION SOUND ON / OFF CLOCK ON / OFF SCROLL SPEED LBS / KG NUMBER RESULT 1 Sound On ... 2 Sound Off 1 Clock On ... 2 Clock Off 1 Slowspeed 2 Normal speed 3 Fast speed 1 Lbs ... 2 Kg NOTE: When the power cord is first plugged in the display. Fourmodesshowin 2. Four modes show in , the default settings are Sound On, Clock On, Normal...
... unit: Touch: Display Shows: 1. NOTE: To change to LBS, repeat steps 1-3 then touch number 1 OPTION FUNCTION TABLE NUMBER OPTION SOUND ON / OFF CLOCK ON / OFF SCROLL SPEED LBS / KG NUMBER RESULT 1 Sound On ... 2 Sound Off 1 Clock On ... 2 Clock Off 1 Slowspeed 2 Normal speed 3 Fast speed 1 Lbs ... 2 Kg NOTE: When the power cord is first plugged in the display. Fourmodesshowin 2. Four modes show in , the default settings are Sound On, Clock On, Normal...
Use and Care Guide
Page 14
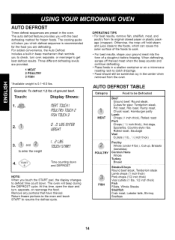
... beep sounds and continue defrosting. • Place foods in a shallow container or on a microwave roasting rack to be somewhat icy in the center when removed from its original closed paper or plastic package (wrapper). The auto defrost feature provides you touch the START pad, the display changes to get best defrost results. At this time, open the door and turn over, separate, or rearrange to defrost time count down and DEFROST...
... beep sounds and continue defrosting. • Place foods in a shallow container or on a microwave roasting rack to be somewhat icy in the center when removed from its original closed paper or plastic package (wrapper). The auto defrost feature provides you touch the START pad, the display changes to get best defrost results. At this time, open the door and turn over, separate, or rearrange to defrost time count down and DEFROST...
Use and Care Guide
Page 15
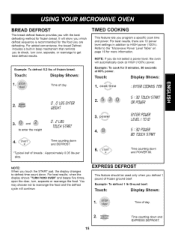
..., when the display shows "TURN FOOD OVER" and beeps five times, open the door, turn over, separate, or rearrange to the "Microwave Power Level Table" on page 16 for the food you defrost 1 pound of day. . 15 Time counting down and POWER 80. EXPRESS DEFROST This feature should be used only when you are 10 power level settings in beep mechanism that reminds you touch the START pad, the display changes to enter the weight _.., "-"_E. 5, T.Ill...
..., when the display shows "TURN FOOD OVER" and beeps five times, open the door, turn over, separate, or rearrange to the "Microwave Power Level Table" on page 16 for the food you defrost 1 pound of day. . 15 Time counting down and POWER 80. EXPRESS DEFROST This feature should be used only when you are 10 power level settings in beep mechanism that reminds you touch the START pad, the display changes to enter the weight _.., "-"_E. 5, T.Ill...
Use and Care Guide
Page 16
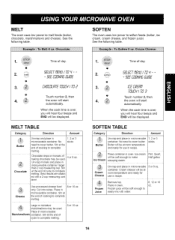
... II- SOFTEN TABLE Category Butter Direction Amount Unwrap and place in oven. Ice Cream Place container in microwavabte container. Frozen Juice Remove top. MEUI" The oven uses low power to cover butter. IIQI-IQI "_TC l_l_l_tl_l_tl_l_ll_ TIQI IF I I TIQ Touch number 2, then the oven will start automatically. No need to complete melting. 8 or 16 oz. Cheese Use processed cheese food only. Place in oven. Stir at...
... II- SOFTEN TABLE Category Butter Direction Amount Unwrap and place in oven. Ice Cream Place container in microwavabte container. Frozen Juice Remove top. MEUI" The oven uses low power to cover butter. IIQI-IQI "_TC l_l_l_tl_l_tl_l_ll_ TIQI IF I I TIQ Touch number 2, then the oven will start automatically. No need to complete melting. 8 or 16 oz. Cheese Use processed cheese food only. Place in oven. Stir at...
Use and Care Guide
Page 17
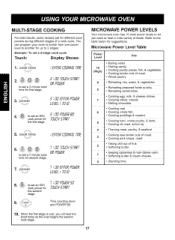
... stage, • I'31""33,'311-"3 -I -ILLI'_'31"3"131- dishes. • Cooking • Cooking • Cooking veal. Time counting down and POWER 80. 10. Example: To set an 80% cook power for suggestions: Microwave Power Level Table Power Use Level 10 (High) 9 8 7 6 • Boiling water. • Making candy. • Cooking poultry pieces, fish, & vegetables. • Cooking tender cuts of fruit. • Softening butter. 1 • Keeping casseroles & main dishes warm...
... stage, • I'31""33,'311-"3 -I -ILLI'_'31"3"131- dishes. • Cooking • Cooking • Cooking veal. Time counting down and POWER 80. 10. Example: To set an 80% cook power for suggestions: Microwave Power Level Table Power Use Level 10 (High) 9 8 7 6 • Boiling water. • Making candy. • Cooking poultry pieces, fish, & vegetables. • Cooking tender cuts of fruit. • Softening butter. 1 • Keeping casseroles & main dishes warm...
Use and Care Guide
Page 18
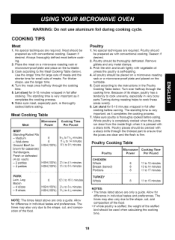
... lightly with conventional cooking. roasting on the 5. Cook according to 15 minutes NOTES: • The times listed above are required. Because of the food. Make sure poultry is pierced with a sharp knife. Whole poultry is completely cooked when the juices run clear from the inside thigh when it completes the cooking process. 6. Poultry Cooking Table Poultry CHICKEN Whole Breast (boned) Portions Microwave Power...
... lightly with conventional cooking. roasting on the 5. Cook according to 15 minutes NOTES: • The times listed above are required. Because of the food. Make sure poultry is pierced with a sharp knife. Whole poultry is completely cooked when the juices run clear from the inside thigh when it completes the cooking process. 6. Poultry Cooking Table Poultry CHICKEN Whole Breast (boned) Portions Microwave Power...
Use and Care Guide
Page 20
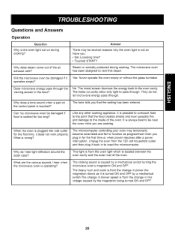
... the microwave oven is located between the oven cavity and the outer wall of the oven. Why does a tone sound when a pad on the control panel is not on during cooking. When the oven is possible to overcook food to the point that the setting has been entered. reasons why the oven light is touched? The holes (or ports) allow only light to reset the microcomputer. Can my microwave oven...
... the microwave oven is located between the oven cavity and the outer wall of the oven. Why does a tone sound when a pad on the control panel is not on during cooking. When the oven is possible to overcook food to the point that the setting has been entered. reasons why the oven light is touched? The holes (or ports) allow only light to reset the microcomputer. Can my microwave oven...
Use and Care Guide
Page 21
... removed from the top half of the two methods described below: (1) microwave-popping devices designed specifically for microwave cooking (2) prepackaged commercial microwave popcorn for specific times and power output needed that is used each manufacturer for one time and at room temperature. 21 If the cooking time is over? Why is a standing time recommended after the actual microwave oven cooking cycle. As in conventional cooking, the initial temperature of the foods. The cooking time...
... removed from the top half of the two methods described below: (1) microwave-popping devices designed specifically for microwave cooking (2) prepackaged commercial microwave popcorn for specific times and power output needed that is used each manufacturer for one time and at room temperature. 21 If the cooking time is over? Why is a standing time recommended after the actual microwave oven cooking cycle. As in conventional cooking, the initial temperature of the foods. The cooking time...
Use and Care Guide
Page 22
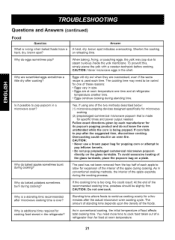
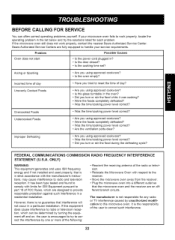
... the time/cooking power level correct? • Was the time/cooking power level correct? • Are you using approved cookware? • Were the foods completely defrosted? • Was the time/cooking power level correct? • Are the ventilation ports clear? However, there is not responsible for ISM Equipment pursuant to part 18 of the user to work properly, contact the nearest Sears Authorized Service Sears Authorized Service Centers are designed to...
... the time/cooking power level correct? • Was the time/cooking power level correct? • Are you using approved cookware? • Were the foods completely defrosted? • Was the time/cooking power level correct? • Are the ventilation ports clear? However, there is not responsible for ISM Equipment pursuant to part 18 of the user to work properly, contact the nearest Sears Authorized Service Sears Authorized Service Centers are designed to...

Use and Care Guide
Page 47
...Service Mark of home appliances and items like garage door openers and water heaters. 1-800-4-MY-HOME ® (1-800-469-4663) Call anytime, day or night (U.S.A. only) www.sears.com To purchase a protection agreement on -line for the location of all major brand appliances, lawn and garden equipment, or heating... and cooling systems, no matter who made it, no matter who sold it -yourself. For the replacement parts, accessories and owner's manuals that you need to do-it !
...Service Mark of home appliances and items like garage door openers and water heaters. 1-800-4-MY-HOME ® (1-800-469-4663) Call anytime, day or night (U.S.A. only) www.sears.com To purchase a protection agreement on -line for the location of all major brand appliances, lawn and garden equipment, or heating... and cooling systems, no matter who made it, no matter who sold it -yourself. For the replacement parts, accessories and owner's manuals that you need to do-it !


