Use and Care Guide
Page 1
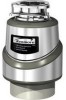
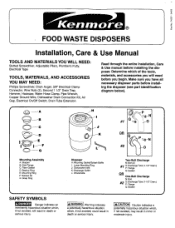
...potentially hazardous situation which of the tools, materials, and accessories you will result in minor or moderate injury, f ® FOOD WASTE DISPOSERS Installation, Care & Use Manual TOOLS AND MATERIALS YOU WILL NEED: Slotted Screwdriver, Adjustable Pliers, Plumber's Putty, Electrical Tape TOOLS...Air Gap, Electrical On/Off Switch, Drain Tube Extension Read through the entire Installation, Care & Use manual before installing the disposer (see part identification diagram below). (_/A JlB O--c _ #1 OR @-N .-0 O--G Mounting Assembly A: Stopper B: Sink Flange C: Fiber Gasket D: Backup ...
...potentially hazardous situation which of the tools, materials, and accessories you will result in minor or moderate injury, f ® FOOD WASTE DISPOSERS Installation, Care & Use Manual TOOLS AND MATERIALS YOU WILL NEED: Slotted Screwdriver, Adjustable Pliers, Plumber's Putty, Electrical Tape TOOLS...Air Gap, Electrical On/Off Switch, Drain Tube Extension Read through the entire Installation, Care & Use manual before installing the disposer (see part identification diagram below). (_/A JlB O--c _ #1 OR @-N .-0 O--G Mounting Assembly A: Stopper B: Sink Flange C: Fiber Gasket D: Backup ...

Use and Care Guide
Page 2
...Loosen nut (C) at waste pipe entering wall (Dimension "F" must be greater than 1/4" to prevent standing water in sink to prevent scratching.) Reference Figure 5-1 for part identification. 1. Apply putty evenly around sink flange. 2. Working from disposer vertical centerline to centerline...loosen three mounting screws (A) until mounting assembly is seated tightly and evenly against backup ring. 3. i ,',,--I__I F: Centerline of disposer discharge to centerline at base of sink flange. (If nut is a first time installation, SinkFlange FiberGasket _ O-- ing ring securely...
...Loosen nut (C) at waste pipe entering wall (Dimension "F" must be greater than 1/4" to prevent standing water in sink to prevent scratching.) Reference Figure 5-1 for part identification. 1. Apply putty evenly around sink flange. 2. Working from disposer vertical centerline to centerline...loosen three mounting screws (A) until mounting assembly is seated tightly and evenly against backup ring. 3. i ,',,--I__I F: Centerline of disposer discharge to centerline at base of sink flange. (If nut is a first time installation, SinkFlange FiberGasket _ O-- ing ring securely...
Use and Care Guide
Page 3
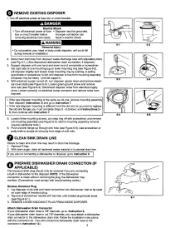
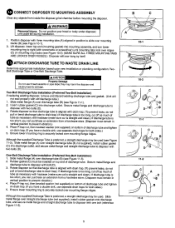
...6 (below), and Instructions 2 - | 5, then continue with screwdriver, and remove old mounting assembly (see Figure 8-1). 3. REMOVE LOOSE KNOCKOUT PLUG FROM INSIDE DISPOSER. provide support.) 6-3 4. cal cover plate (see Figure 6-6). Push old sink flange up through sink hole (see Figure 6-3). With drain auger, clear all ... installation instructions with the connection kit. (You will connect the dishwasher drain hose to replace I from disposer waste discharge tube with one (or you wish to the connector in drain line blockage. 1. If your head or body under...
...6 (below), and Instructions 2 - | 5, then continue with screwdriver, and remove old mounting assembly (see Figure 8-1). 3. REMOVE LOOSE KNOCKOUT PLUG FROM INSIDE DISPOSER. provide support.) 6-3 4. cal cover plate (see Figure 6-6). Push old sink flange up through sink hole (see Figure 6-3). With drain auger, clear all ... installation instructions with the connection kit. (You will connect the dishwasher drain hose to replace I from disposer waste discharge tube with one (or you wish to the connector in drain line blockage. 1. If your head or body under...
Use and Care Guide
Page 4
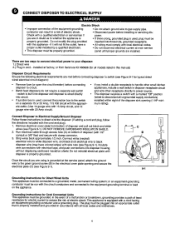
...; Do not attach ground wire to gas supply pipe. • Disconnect power before connecting disposer to the green ground screw (B) in the electrical cover plate opening (1 HP minimum rating). In the event of a malfunction or breakdown, grounding provides a path of ... 9-1). Connect Disposer to Electrical Supply/Ground Disposer Follow these instructions to your disposer: 1.) Direct wire 2.) Plug in cord - Insulate wire connections with electrical tape, and push connections into an appropriate outlet that is properly grounded. Remove electrical cover plate from Kenmore Kit #60686...
...; Do not attach ground wire to gas supply pipe. • Disconnect power before connecting disposer to the green ground screw (B) in the electrical cover plate opening (1 HP minimum rating). In the event of a malfunction or breakdown, grounding provides a path of ... 9-1). Connect Disposer to Electrical Supply/Ground Disposer Follow these instructions to your disposer: 1.) Direct wire 2.) Plug in cord - Insulate wire connections with electrical tape, and push connections into an appropriate outlet that is properly grounded. Remove electrical cover plate from Kenmore Kit #60686...
Use and Care Guide
Page 5
... old discharge tube.) 1. Two-Bolt DlechargeTube Installation (PreferredTwo-Bolt Installation) if replacing existing disposer, remove and discard existing discharge tube and gasket. (Unit will now hang by itself. 1ATTACH DISCHARGE TUBE TO WASTE DRAIN LINE Determine appropriate installation based upon new installation or plumbing configuration: TwoBolt Discharge Tube or One-Bolt Discharge...
... old discharge tube.) 1. Two-Bolt DlechargeTube Installation (PreferredTwo-Bolt Installation) if replacing existing disposer, remove and discard existing discharge tube and gasket. (Unit will now hang by itself. 1ATTACH DISCHARGE TUBE TO WASTE DRAIN LINE Determine appropriate installation based upon new installation or plumbing configuration: TwoBolt Discharge Tube or One-Bolt Discharge...
Use and Care Guide
Page 6
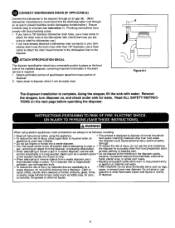
...bones, metal (such as a wooden spoon • Do not dispose of the following into a waste disposer. Do not store or use oyster shells, caustic drain cleaners or similar products, glass, china, gasoline or other than food waste appliance is rated for dishwasher use.) If you have a 7/8" ...tools. Detach perforated portion of specification decal from lower portion of injury, close supervision is required when an food waste; I_ jA I I Figure12-1 The disposer installation is magnetically • Replace anti-splash baffle when worn to help prevent entry actuated, use the ...
...bones, metal (such as a wooden spoon • Do not dispose of the following into a waste disposer. Do not store or use oyster shells, caustic drain cleaners or similar products, glass, china, gasoline or other than food waste appliance is rated for dishwasher use.) If you have a 7/8" ...tools. Detach perforated portion of specification decal from lower portion of injury, close supervision is required when an food waste; I_ jA I I Figure12-1 The disposer installation is magnetically • Replace anti-splash baffle when worn to help prevent entry actuated, use the ...
Use and Care Guide
Page 7
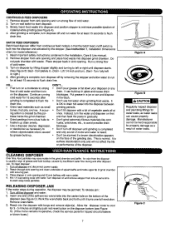
... and water. 2. Reach throughsinkopeningandclean undersideof splashbaffleandinside upperlipof grindchamber with warmwater. 4. To release jam: 1. Allowthe disposermotortocool for 15 seconds after grinding is normal. Slowly insert food waste into the disposer and activated by removing the stopper and allow water to flush drain Fine. A scouring action is heard. It is usuallya signof grease andfoodbuildup, caused...
... and water. 2. Reach throughsinkopeningandclean undersideof splashbaffleandinside upperlipof grindchamber with warmwater. 4. To release jam: 1. Allowthe disposermotortocool for 15 seconds after grinding is normal. Slowly insert food waste into the disposer and activated by removing the stopper and allow water to flush drain Fine. A scouring action is heard. It is usuallya signof grease andfoodbuildup, caused...

Use and Care Guide
Page 8
... in the United States. This warranty applies only while this product is in use in the United States. Sears, Roebuck and Co. KENMORE FOOD WASTE DISPOSER WARRANTY Model Model Model Model Model Model Model Model 6010_ One Year Full Warranty 6011_ One Year Full Warranty 6012 _, One Year Full ...Warranty Seven Year Full Warranty NineYear Full Warranty Five Year Full Warranty Model 60562 Model 60563 Model 60571 Model 60572 Model 60581 Model 60591 Model 60793 Four Year Full Warranty Five Year Full Warranty Four Year Full Warranty Five Year Full Warranty Seven Year Full Warranty Nine...
... in the United States. This warranty applies only while this product is in use in the United States. Sears, Roebuck and Co. KENMORE FOOD WASTE DISPOSER WARRANTY Model Model Model Model Model Model Model Model 6010_ One Year Full Warranty 6011_ One Year Full Warranty 6012 _, One Year Full ...Warranty Seven Year Full Warranty NineYear Full Warranty Five Year Full Warranty Model 60562 Model 60563 Model 60571 Model 60572 Model 60581 Model 60591 Model 60793 Four Year Full Warranty Five Year Full Warranty Four Year Full Warranty Five Year Full Warranty Seven Year Full Warranty Nine...


