Use and Care Guide
Page 1
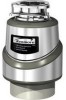
..._ #1 OR @-N .-0 O--G Mounting Assembly A: Stopper B: Sink Flange C: Fiber Gasket D: Backup Ring E: Mounting Ring F: Screws (3) G: Snap Ring Disposer H: Mounting Gasket/Splash Baffle 1: Lower Mounting Ring J: Dishwasher Inlet K: Discharge Outlet L: Wrenchette --#2 ___N Two-Bolt Discharge N: Bolt (2) _10: Discharge Tube..., and accessories you begin. Determine which , if not avoided, may result in death or serious injury. f ® FOOD WASTE DISPOSERS Installation, Care & Use Manual TOOLS AND MATERIALS YOU WILL NEED: Slotted Screwdriver, Adjustable Pliers, Plumber's Putty, Electrical Tape ...
..._ #1 OR @-N .-0 O--G Mounting Assembly A: Stopper B: Sink Flange C: Fiber Gasket D: Backup Ring E: Mounting Ring F: Screws (3) G: Snap Ring Disposer H: Mounting Gasket/Splash Baffle 1: Lower Mounting Ring J: Dishwasher Inlet K: Discharge Outlet L: Wrenchette --#2 ___N Two-Bolt Discharge N: Bolt (2) _10: Discharge Tube..., and accessories you begin. Determine which , if not avoided, may result in death or serious injury. f ® FOOD WASTE DISPOSERS Installation, Care & Use Manual TOOLS AND MATERIALS YOU WILL NEED: Slotted Screwdriver, Adjustable Pliers, Plumber's Putty, Electrical Tape ...

Use and Care Guide
Page 2
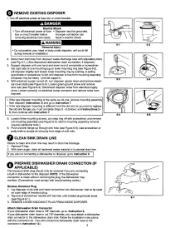
... and mounting ring tight to sink until you can access snap ring (B). 3. O 5-1 With your other debris. @) CHECK INSTALLATION DIMENSIONS A: Disposer Height B: Distance from bottom of sink bowl to centerline of discharge B outlet. (Add 1/2" when stainless steel sink is used.) C: Distance ...HOLE 1. Use screwdriver to end of any putty or other hand, turn mounting assembly counterclockwise to Instruction 6. Loosen nut (B) at waste pipe entering wall (Dimension "F" must be greater than 1/4" to prevent standing water in place, slip mounting ring over sink flange so...
... and mounting ring tight to sink until you can access snap ring (B). 3. O 5-1 With your other debris. @) CHECK INSTALLATION DIMENSIONS A: Disposer Height B: Distance from bottom of sink bowl to centerline of discharge B outlet. (Add 1/2" when stainless steel sink is used.) C: Distance ...HOLE 1. Use screwdriver to end of any putty or other hand, turn mounting assembly counterclockwise to Instruction 6. Loosen nut (B) at waste pipe entering wall (Dimension "F" must be greater than 1/4" to prevent standing water in place, slip mounting ring over sink flange so...
Use and Care Guide
Page 3
... (IF The knockout drain plug should only be heavy - unit could fall during removal or installation. 6-1 6-2 2. Disconnect disposer wires from disposer. Push old sink flange up through sink hole (see Figure 6-3). O CLEAN SINK DRAIN LINE Failure to Instruction 9. Tap...connection is different from disposer waste discharge tube with local plumbing codes.) Remove Knockout Plug 1. REMOVE LOOSE KNOCKOUT PLUG FROM INSIDE DISPOSER. J 6-5 5. Loosen three mounting screws, pry snap ring off , turn disposer upside down and remove electri- Lift disposer slightly and loosen lower...
... (IF The knockout drain plug should only be heavy - unit could fall during removal or installation. 6-1 6-2 2. Disconnect disposer wires from disposer. Push old sink flange up through sink hole (see Figure 6-3). O CLEAN SINK DRAIN LINE Failure to Instruction 9. Tap...connection is different from disposer waste discharge tube with local plumbing codes.) Remove Knockout Plug 1. REMOVE LOOSE KNOCKOUT PLUG FROM INSIDE DISPOSER. J 6-5 5. Loosen three mounting screws, pry snap ring off , turn disposer upside down and remove electri- Lift disposer slightly and loosen lower...
Use and Care Guide
Page 4
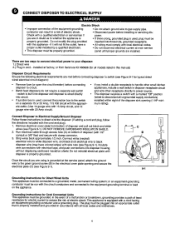
... appliances, include a wall switch in the electrical cover plate opening (1 HP minimum rating). Remove electrical cover plate from Kenmore Kit #60686 (for all ungrounded supply conductors) installed within sight of the disposer sink opening and secure the electrical plate (C) (see Figure 9-1). Strip wires...gas supply pipe. • Disconnect power before connectingdisposer to switch(see Figure 9-1). Connect white (neutral) electrical wire to white disposer wire, and black (hot) electrical wire to reduce the risk of electric shock. This appliance is grounded at the service ...
... appliances, include a wall switch in the electrical cover plate opening (1 HP minimum rating). Remove electrical cover plate from Kenmore Kit #60686 (for all ungrounded supply conductors) installed within sight of the disposer sink opening and secure the electrical plate (C) (see Figure 9-1). Strip wires...gas supply pipe. • Disconnect power before connectingdisposer to switch(see Figure 9-1). Connect white (neutral) electrical wire to white disposer wire, and black (hot) electrical wire to reduce the risk of electric shock. This appliance is grounded at the service ...
Use and Care Guide
Page 5
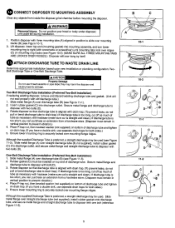
..., use separate drain traps for both sides.) 5. O CONNECT DISPOSERTO MOUNTING ASSEMBLY Clear any objects from a hardware store. (Disposer must remain in vertical position to prevent vibration.) 4. Insert rubber gasket (C) into discharge outlet, and secure metal flange and straight...Two-Bolt DlechargeTube Installation (PreferredTwo-Bolt Installation) if replacing existing disposer, remove and discard existing discharge tube and gasket. (Unit will now hang by itself. 1ATTACH DISCHARGE TUBE TO WASTE DRAIN LINE Determine appropriate installation based upon new installation or plumbing...
..., use separate drain traps for both sides.) 5. O CONNECT DISPOSERTO MOUNTING ASSEMBLY Clear any objects from a hardware store. (Disposer must remain in vertical position to prevent vibration.) 4. Insert rubber gasket (C) into discharge outlet, and secure metal flange and straight...Two-Bolt DlechargeTube Installation (PreferredTwo-Bolt Installation) if replacing existing disposer, remove and discard existing discharge tube and gasket. (Unit will now hang by itself. 1ATTACH DISCHARGE TUBE TO WASTE DRAIN LINE Determine appropriate installation based upon new installation or plumbing...
Use and Care Guide
Page 6
... decal to place on the next page before using is rated for drain hose other than food waste appliance is required when an food waste; I_ jA I I Figure12-1 The disposer installation is required. 1. This product is designed to the dishwasher inlet. (Verify that hose you have a 7/8" diameter dishwasher drain hose, use the self- inserting materials...
... decal to place on the next page before using is rated for drain hose other than food waste appliance is required when an food waste; I_ jA I I Figure12-1 The disposer installation is required. 1. This product is designed to the dishwasher inlet. (Verify that hose you have a 7/8" diameter dishwasher drain hose, use the self- inserting materials...
Use and Care Guide
Page 7
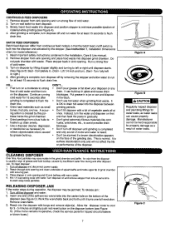
... extremely fibrous materials like corn husks, artichokes, etc., to freshen up drain smells. Place stopper back in sink opening and place food waste into the disposer with scouringpad. 3. Sea/- Continue running cold water for 15 seconds after grinding is completed to minimize possible ejection of motor and...the drain line. • Grind hard materials such as a result of cold water. 2. To release jam: 1. Slowly insert food waste into the disposer and activated by the particles inside the grind chamber. • Grind peelings from sink opening and run for water leaks, as ...
... extremely fibrous materials like corn husks, artichokes, etc., to freshen up drain smells. Place stopper back in sink opening and place food waste into the disposer with scouringpad. 3. Sea/- Continue running cold water for 15 seconds after grinding is completed to minimize possible ejection of motor and...the drain line. • Grind hard materials such as a result of cold water. 2. To release jam: 1. Slowly insert food waste into the disposer and activated by the particles inside the grind chamber. • Grind peelings from sink opening and run for water leaks, as ...

Use and Care Guide
Page 8
... from the date of purchase, Sears will repair or replace, free of the warranty from state to state. Sears, Roebuck and Co. KENMORE FOOD WASTE DISPOSER WARRANTY Model Model Model Model Model Model Model Model 6010_ One Year Full Warranty 6011_ One Year Full Warranty 6012 _, One Year Full Warranty... Warranty Seven Year Full Warranty NineYear Full Warranty Five Year Full Warranty Model 60562 Model 60563 Model 60571 Model 60572 Model 60581 Model 60591 Model 60793 Four Year Full Warranty Five Year Full Warranty Four Year Full Warranty Five Year Full Warranty Seven Year Full Warranty Nine...
... from the date of purchase, Sears will repair or replace, free of the warranty from state to state. Sears, Roebuck and Co. KENMORE FOOD WASTE DISPOSER WARRANTY Model Model Model Model Model Model Model Model 6010_ One Year Full Warranty 6011_ One Year Full Warranty 6012 _, One Year Full Warranty... Warranty Seven Year Full Warranty NineYear Full Warranty Five Year Full Warranty Model 60562 Model 60563 Model 60571 Model 60572 Model 60581 Model 60591 Model 60793 Four Year Full Warranty Five Year Full Warranty Four Year Full Warranty Five Year Full Warranty Seven Year Full Warranty Nine...


