Use and Care Guide
Page 1
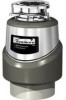
... or moderate injury, f ® FOOD WASTE DISPOSERS Installation, Care & Use Manual TOOLS AND MATERIALS YOU WILL NEED: Slotted Screwdriver, Adjustable Pliers, Plumber's Putty, Electrical Tape TOOLS, MATERIALS, AND ACCESSORIES YOU MAY NEED: Phillips Screwdriver, Drain Auger, 3/8" Electrical Clamp Connector, Wire Nuts (2), Second 1 1/2" Drain Trap, Hammer, Hacksaw, Water Hose Clamp, Pipe Wrench, Copper Ground Wire, Dishwasher Drain Connection Kit, Air Gap, Electrical On/Off Switch, Drain Tube Extension Read through the entire Installation, Care & Use manual before you will result in...
... or moderate injury, f ® FOOD WASTE DISPOSERS Installation, Care & Use Manual TOOLS AND MATERIALS YOU WILL NEED: Slotted Screwdriver, Adjustable Pliers, Plumber's Putty, Electrical Tape TOOLS, MATERIALS, AND ACCESSORIES YOU MAY NEED: Phillips Screwdriver, Drain Auger, 3/8" Electrical Clamp Connector, Wire Nuts (2), Second 1 1/2" Drain Trap, Hammer, Hacksaw, Water Hose Clamp, Pipe Wrench, Copper Ground Wire, Dishwasher Drain Connection Kit, Air Gap, Electrical On/Off Switch, Drain Tube Extension Read through the entire Installation, Care & Use manual before you will result in...

Use and Care Guide
Page 2
...mounting assembly is a first time installation, SinkFlange FiberGasket _ O-- Apply putty evenly around sink flange. 2. Press sink flange slowly but firmly into sink drain hole to sink bottom, slide snap ring onto sink flange until you can access snap ring (B). 3. O 5-1 Use screwdriver to prevent scratching.) Reference Figure 5-1 for part identification. 1. Loosen nut (C) at waste pipe entering wall (Dimension "F" must be greater than 1/4" to seal around sink hole (see Figure 2-2). 5. "P-Trap" O DMIOSUANSTSIENMGBLEASSENMEBWLYDISPOSER 2-1 1. Holding fiber gasket...
...mounting assembly is a first time installation, SinkFlange FiberGasket _ O-- Apply putty evenly around sink flange. 2. Press sink flange slowly but firmly into sink drain hole to sink bottom, slide snap ring onto sink flange until you can access snap ring (B). 3. O 5-1 Use screwdriver to prevent scratching.) Reference Figure 5-1 for part identification. 1. Loosen nut (C) at waste pipe entering wall (Dimension "F" must be greater than 1/4" to seal around sink hole (see Figure 2-2). 5. "P-Trap" O DMIOSUANSTSIENMGBLEASSENMEBWLYDISPOSER 2-1 1. Holding fiber gasket...
Use and Care Guide
Page 3
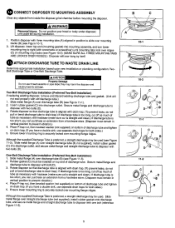
... new disposer mounting is free from disposer waste discharge tube with adjustable pliers (see Fig. 6-1). (Also disconnect dishwasher drain connection, if required.) 3. Lay disposer on lower mounting ring (see Figure 8-1). 3. Loosen screw(s) on electrical clamp connector and remove wires from the old one mounting lug on its side and insert screwdriver into right side of screwdriver handle with hammer until disposer is the same as old one, remove mounting assembly I the old sink flange) you must comply with Instruction...
... new disposer mounting is free from disposer waste discharge tube with adjustable pliers (see Fig. 6-1). (Also disconnect dishwasher drain connection, if required.) 3. Lay disposer on lower mounting ring (see Figure 8-1). 3. Loosen screw(s) on electrical clamp connector and remove wires from the old one mounting lug on its side and insert screwdriver into right side of screwdriver handle with hammer until disposer is the same as old one, remove mounting assembly I the old sink flange) you must comply with Instruction...
Use and Care Guide
Page 4
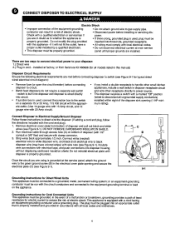
...; Disconnect power before installing or servicing dis- Run electrical cable through access hole (A) on bottom of disposer (with 1/2" conduit or 3/8" flex) and secure with electrical tape, and push connections into disposer and disposer is properly installed and grounded in the electrical cover plate opening (1 HP minimum rating). Strip wires back approximately 1/2 inch. Connect white (neutral) electrical wire to white disposer wire, and black (hot) electrical wire to direct wire the disposer. (If adding a cord and plug, follow...
...; Disconnect power before installing or servicing dis- Run electrical cable through access hole (A) on bottom of disposer (with 1/2" conduit or 3/8" flex) and secure with electrical tape, and push connections into disposer and disposer is properly installed and grounded in the electrical cover plate opening (1 HP minimum rating). Strip wires back approximately 1/2 inch. Connect white (neutral) electrical wire to white disposer wire, and black (hot) electrical wire to direct wire the disposer. (If adding a cord and plug, follow...
Use and Care Guide
Page 5
... discharge may harm the disposer and cause property damage. Place P-trap nut, then beveled washer (net supplied) on bottom of discharge tube and tighten on drain trap. (If you have a double sink, use separate drain traps for both sides.) 5. Ensure lower mounting ring 'is too long. unit could fall during installation. 1. Secure metal flange and discharge tube to right (with drain trap. (To prevent leaks, do not pull or bend discharge tube to drain trap.) If discharge tube...
... discharge may harm the disposer and cause property damage. Place P-trap nut, then beveled washer (net supplied) on bottom of discharge tube and tighten on drain trap. (If you have a double sink, use separate drain traps for both sides.) 5. Ensure lower mounting ring 'is too long. unit could fall during installation. 1. Secure metal flange and discharge tube to right (with drain trap. (To prevent leaks, do not pull or bend discharge tube to drain trap.) If discharge tube...
Use and Care Guide
Page 6
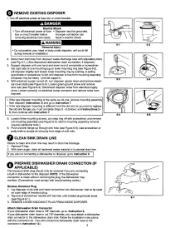
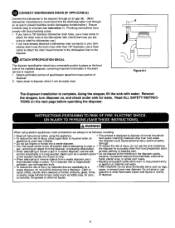
... dispose of the following into a waste disposer. I_ jA I I Figure12-1 The disposer installation is removed (see Instruction 1). Using the stopper, fill the sink with local plumbing codes. Do not store or use a hose clamp to attach the drain hose/connector to clear a • To reduce the risk of disposer. inserting materials other hot liquids. damage. • Turn the power switch to the off position before attempting to the dishwasher...
... dispose of the following into a waste disposer. I_ jA I I Figure12-1 The disposer installation is removed (see Instruction 1). Using the stopper, fill the sink with local plumbing codes. Do not store or use a hose clamp to attach the drain hose/connector to clear a • To reduce the risk of disposer. inserting materials other hot liquids. damage. • Turn the power switch to the off position before attempting to the dishwasher...
Use and Care Guide
Page 7
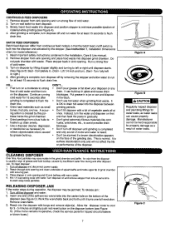
... flush drain line. To clean disposer: 1. Insert one full revolution. Remove wrenchette. 3. Allowthe disposermotortocool for at once. Remove stopper from continuous feed models in gradually. • Don't grind extremely fibrous materials like corn husks, artichokes, etc., to drain hot water into disposer and position stopper to minimize possible ejection of cold water. 2. This is usuallya signof grease andfoodbuildup, caused byinsufficienwt aterflow duringandafterdisposer use hot water when grinding food waste. To release jam: 1. Work the...
... flush drain line. To clean disposer: 1. Insert one full revolution. Remove wrenchette. 3. Allowthe disposermotortocool for at once. Remove stopper from continuous feed models in gradually. • Don't grind extremely fibrous materials like corn husks, artichokes, etc., to drain hot water into disposer and position stopper to minimize possible ejection of cold water. 2. This is usuallya signof grease andfoodbuildup, caused byinsufficienwt aterflow duringandafterdisposer use hot water when grinding food waste. To release jam: 1. Work the...

Use and Care Guide
Page 8
... Model 60563 Model 60571 Model 60572 Model 60581 Model 60591 Model 60793 Four Year Full Warranty Five Year Full Warranty Four Year Full Warranty Five Year Full Warranty Seven Year Full Warranty Nine Year Full Warranty Ten Year Full Warranty For the duration of the warranty from the date of purchase, Sears will repair or replace, free of charge, defects in material or workmanship which vary from state to state. WARRANTY SERVICE...
... Model 60563 Model 60571 Model 60572 Model 60581 Model 60591 Model 60793 Four Year Full Warranty Five Year Full Warranty Four Year Full Warranty Five Year Full Warranty Seven Year Full Warranty Nine Year Full Warranty Ten Year Full Warranty For the duration of the warranty from the date of purchase, Sears will repair or replace, free of charge, defects in material or workmanship which vary from state to state. WARRANTY SERVICE...


