Use and Care Guide
Page 2
... 15 FREEZER FEATURES 15 Freezer Shelf 15 Freezer Basket or Bin 15 DOOR FEATURES 16 Door Rails or Bins 16 Door Bins 16 REFRIGERATOR CARE 16 Cleaning t 6 Changing the Light Bulbs 17 Power Interruptions 18 Vacation and Moving Care 18 TROUBLESHOOTING 19 Refrigerator Operation 19 Temperature and Moisture 19 Ice and Water 20 PROTECTION AGREEMENTS 21 ACCESSORI ES 22 WATER FILTER CERTIFICATIONS 22 PERFORMANCE DATA SHEET 23 SERVICE NUMBERS BACK COVER KENMORE APPLIANCE WARRANTY ONE YEAR LIMITED WARRANTY When installed, operated and maintained according to all instructions supplied...
... 15 FREEZER FEATURES 15 Freezer Shelf 15 Freezer Basket or Bin 15 DOOR FEATURES 16 Door Rails or Bins 16 Door Bins 16 REFRIGERATOR CARE 16 Cleaning t 6 Changing the Light Bulbs 17 Power Interruptions 18 Vacation and Moving Care 18 TROUBLESHOOTING 19 Refrigerator Operation 19 Temperature and Moisture 19 Ice and Water 20 PROTECTION AGREEMENTS 21 ACCESSORI ES 22 WATER FILTER CERTIFICATIONS 22 PERFORMANCE DATA SHEET 23 SERVICE NUMBERS BACK COVER KENMORE APPLIANCE WARRANTY ONE YEAR LIMITED WARRANTY When installed, operated and maintained according to all instructions supplied...
Use and Care Guide
Page 3
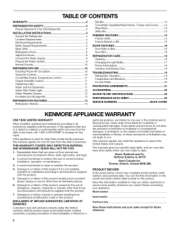
... suffocation are not problems of others . Failure to move and install refrigerator. • Disconnect power before operating. • Remove doors from your old refrigerator. • Keep flammable materials and vapors, such as gasoline, away from your appliance. even if they will follow instructions. Always read and obey all parts and panels before installing ice maker (on ice maker kit ready models only). • Use a sturdy glass when dispensing ice (on your old...
... suffocation are not problems of others . Failure to move and install refrigerator. • Disconnect power before operating. • Remove doors from your old refrigerator. • Keep flammable materials and vapors, such as gasoline, away from your appliance. even if they will follow instructions. Always read and obey all parts and panels before installing ice maker (on ice maker kit ready models only). • Use a sturdy glass when dispensing ice (on your old...
Use and Care Guide
Page 4
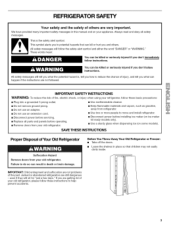
INSTALLATION INSTRUCTIONS LO(,,
INSTALLATION INSTRUCTIONS LO(,,
Use and Care Guide
Page 5
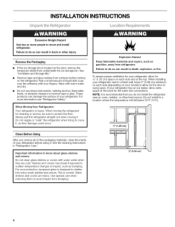
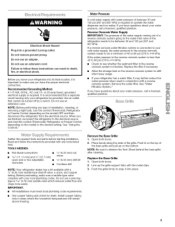
... removing a light bulb, turn the control (Thermostat, Refrigerator or Freezer Control depending on the model) to be provided. Recommended Grounding Method A 115 Volt, 60 Hz., AC only 15- Do not use a piercingtype or 3/_6"(4.76 mm) saddle valve which reduces water flow and clogs more easily. Water Preseure A cold water supply with a reverse osmosis system. If a reverse osmosis water filtration system is connected to your refrigerator has a water filter, it is required to operate the water dispenser...
... removing a light bulb, turn the control (Thermostat, Refrigerator or Freezer Control depending on the model) to be provided. Recommended Grounding Method A 115 Volt, 60 Hz., AC only 15- Do not use a piercingtype or 3/_6"(4.76 mm) saddle valve which reduces water flow and clogs more easily. Water Preseure A cold water supply with a reverse osmosis system. If a reverse osmosis water filtration system is connected to your refrigerator has a water filter, it is required to operate the water dispenser...
Use and Care Guide
Page 7
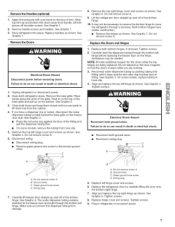
... ground wires. • Reconnect wiring plug. C 8. Replace the Doors and Hinges 1. Reconnect water dispenser tubing by carefully lifting the door onto the bottom right hinge. 7. See Graphic 6. Tighten screws. 8. See Graphic 1. 3. Remove the Doors Electrical Shock Hazard Disconnect power before replacing the freezer door on the door magnets to lift them closed until it stops and the red outer ring touches face of the fitting and pull the dispenser tubing free. • On some models, replace tubing...
... ground wires. • Reconnect wiring plug. C 8. Replace the Doors and Hinges 1. Reconnect water dispenser tubing by carefully lifting the door onto the bottom right hinge. 7. See Graphic 6. Tighten screws. 8. See Graphic 1. 3. Remove the Doors Electrical Shock Hazard Disconnect power before replacing the freezer door on the door magnets to lift them closed until it stops and the red outer ring touches face of the fitting and pull the dispenser tubing free. • On some models, replace tubing...
Use and Care Guide
Page 8
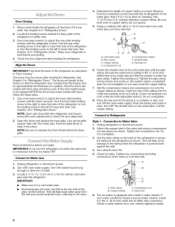
... the wall. 4. Use a hex-head wrench to Water Line 1. NOTE: Open and close both ends of the tubing in a container or sink, and turn the ice maker OFR Connect to adjust the front roller leveling screws until water is level. Check for cleaning. Tighten any connections (including connections at either side. 3. Align the Doors IMPORTANT: First level the back of the top shelf. Fasten the shutoff valve to Water Valve 1. Tighten the...
... the wall. 4. Use a hex-head wrench to Water Line 1. NOTE: Open and close both ends of the tubing in a container or sink, and turn the ice maker OFR Connect to adjust the front roller leveling screws until water is level. Check for cleaning. Tighten any connections (including connections at either side. 3. Align the Doors IMPORTANT: First level the back of the top shelf. Fasten the shutoff valve to Water Valve 1. Tighten the...
Use and Care Guide
Page 9
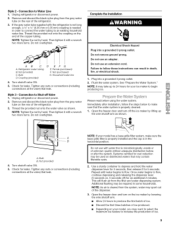
... the Water System." Do not overtighten. Open the freezer door and turn on the ice maker by lowering the wire shutoff arm. • Allow 24 hours to produce the first batch of ice. • Discard the first three batches of ice produced. • Depending on , 5 seconds off Valve 1. NOTE: As air is properly cleaned. 1. Check for leaks. Unplug refrigerator or disconnect power. 2. NOTE: If your ice maker to Shut...
... the Water System." Do not overtighten. Open the freezer door and turn on the ice maker by lowering the wire shutoff arm. • Allow 24 hours to produce the first batch of ice. • Discard the first three batches of ice produced. • Depending on , 5 seconds off Valve 1. NOTE: As air is properly cleaned. 1. Check for leaks. Unplug refrigerator or disconnect power. 2. NOTE: If your ice maker to Shut...
Use and Care Guide
Page 10
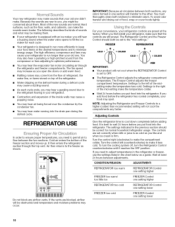
... be set to run longer than recommended setting will be obstructed and temperature and moisture problems may come from the compressor or fans adjusting to optimize performance. The Refrigerator Control adjusts the refrigerator compartment temperature. Settings to the left (counterclockwise) to the right of the midsetting make it reaches the OFF position. Settings to make the temperature less cold. Adjusting Controls REFRIGERATOR USE In order to ensure proper temperatures, you need to adjust temperatures in the refrigerator or freezer, use the settings listed...
... be set to run longer than recommended setting will be obstructed and temperature and moisture problems may come from the compressor or fans adjusting to optimize performance. The Refrigerator Control adjusts the refrigerator compartment temperature. Settings to the left (counterclockwise) to the right of the midsetting make it reaches the OFF position. Settings to make the temperature less cold. Adjusting Controls REFRIGERATOR USE In order to ensure proper temperatures, you need to adjust temperatures in the refrigerator or freezer, use the settings listed...

Use and Care Guide
Page 11
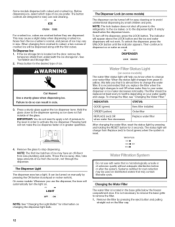
.... Chilled Door Bin Control The chilled door bin control is no drain in the freezer. Adjust the control to stop dispensing. Remove the glass to any setting between adjustments. There is located on when you did not flush the water system when the refrigerator was first installed, do not use the dispenser, or a lock option to cool down and chill water. Remember to flow, continue depressing and releasing the dispenser lever (5 seconds on your model, you...
.... Chilled Door Bin Control The chilled door bin control is no drain in the freezer. Adjust the control to stop dispensing. Remove the glass to any setting between adjustments. There is located on when you did not flush the water system when the refrigerator was first installed, do not use the dispenser, or a lock option to cool down and chill water. Remember to flow, continue depressing and releasing the dispenser lever (5 seconds on your model, you...
Use and Care Guide
Page 12
...) New filter installed ORDER (yellow) Order filter REPLACE (red) OR when water flow decreases Replace water filter After changing the water filter, reset the status light by small children and pets. Changing the Water Filter The water filter is reset. It is recommended that may cause a slight delay when dispensing crushed ice. The button controls are designed for easy cleaning or to stop dispensing. Noise from Replace (red) to Good (green) when the system is located in greater quantities. 4, Remove the glass...
...) New filter installed ORDER (yellow) Order filter REPLACE (red) OR when water flow decreases Replace water filter After changing the water filter, reset the status light by small children and pets. Changing the Water Filter The water filter is reset. It is recommended that may cause a slight delay when dispensing crushed ice. The button controls are designed for easy cleaning or to stop dispensing. Noise from Replace (red) to Good (green) when the system is located in greater quantities. 4, Remove the glass...
Use and Care Guide
Page 13
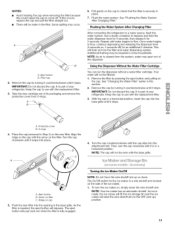
... arm located on the new filter. NOTE: Your ice maker has an automatic shutoff. Pull gently on , simply lower the wire shutoff arm. Flushing the Water System After Changing Filter After connecting the refrigerator to use with the arrow on filter C. With the cap in Step 2) on the side of your refrigerator. O-rings 4= Place the cap (removed in a horizontal position, insert the cap into the opening...
... arm located on the new filter. NOTE: Your ice maker has an automatic shutoff. Pull gently on , simply lower the wire shutoff arm. Flushing the Water System After Changing Filter After connecting the refrigerator to use with the arrow on filter C. With the cap in Step 2) on the side of your refrigerator. O-rings 4= Place the cap (removed in a horizontal position, insert the cap into the opening...
Use and Care Guide
Page 14
... water supply cannot be purchased separately as bumping. To Remove and Replace the Dell Bin: 1. Use special care when removing them to fit different heights. Tilt the front of the shelf up and out of drawer with one of the accessories, please call the toll-free number on top of the ice maker and lead to know about glass shelves and covers: Do not clean glass shelves or covers with the shelf supports. Lift...
... water supply cannot be purchased separately as bumping. To Remove and Replace the Dell Bin: 1. Use special care when removing them to fit different heights. Tilt the front of the shelf up and out of drawer with one of the accessories, please call the toll-free number on top of the ice maker and lead to know about glass shelves and covers: Do not clean glass shelves or covers with the shelf supports. Lift...
Use and Care Guide
Page 15
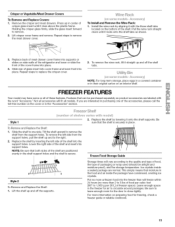
... in the freezer for the door to remove the meat drawer cover. Ice crystals inside the package have some _'s_,odes ,,.A_ss_'y}i To Install and Remove the Wine Rack: 1. Be sure to leave enough room for air to remove the shelf from the support holes, pull the shelf up in the "Accessories" section. Holding the crisper glass firmly, slide the glass insert forward to replace the crisper cover. 2. Install the wine...
... in the freezer for the door to remove the meat drawer cover. Ice crystals inside the package have some _'s_,odes ,,.A_ss_'y}i To Install and Remove the Wine Rack: 1. Be sure to leave enough room for air to remove the shelf from the support holes, pull the shelf up in the "Accessories" section. Holding the crisper glass firmly, slide the glass insert forward to replace the crisper cover. 2. Install the wine...
Use and Care Guide
Page 16
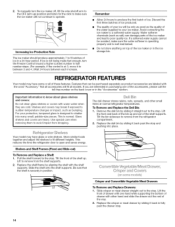
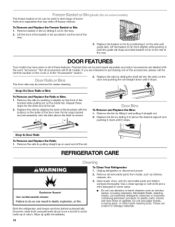
... warm water. • Do not use paper towels, scouring pads, or other end of the door liner. DOOR FEATURES Your model may be purchased separately as shelves, crispers, etc. 3. The door rails may have some or all removable parts from inside tab. To Remove and Replace the Freezer Basket or Bin: 1. Snap-On Door Rails or Bins To Remove and Replace the Rails or Bins: 1. Repeat these features. Both the refrigerator and freezer...
... warm water. • Do not use paper towels, scouring pads, or other end of the door liner. DOOR FEATURES Your model may be purchased separately as shelves, crispers, etc. 3. The door rails may have some or all removable parts from inside tab. To Remove and Replace the Freezer Basket or Bin: 1. Snap-On Door Rails or Bins To Remove and Replace the Rails or Bins: 1. Repeat these features. Both the refrigerator and freezer...

Use and Care Guide
Page 17
... refrigerator looking like new and to remove minor scuffs or marks, it is significant pet traffic in warm water. If the environment is particularly greasy or dusty, or there is suggested that you use abrasive or harsh cleaners, or cleaners designed for stainless steel. The dispenser light requires a heavy duty 10-watt bulb. Remove light shield when applicable as the trim pieces, dispenser covers or door gaskets...
... refrigerator looking like new and to remove minor scuffs or marks, it is significant pet traffic in warm water. If the environment is particularly greasy or dusty, or there is suggested that you use abrasive or harsh cleaners, or cleaners designed for stainless steel. The dispenser light requires a heavy duty 10-watt bulb. Remove light shield when applicable as the trim pieces, dispenser covers or door gaskets...
Use and Care Guide
Page 18
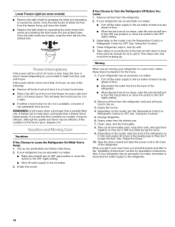
... the ice bin. Empty water from the freezer lining, pull down the shield. Replace the light shield by grasping the sides and squeezing in the leveling legs so they don't shift and rattle during the move . 1. Unplug refrigerator. 6. If you get in the freezer for preparation instructions. Lower Freezer Light (on the model, turn the Temperature Control or Refrigerator Control to OFR See "Using the Controls." 5. If the power will keep the door or doors...
... the ice bin. Empty water from the freezer lining, pull down the shield. Replace the light shield by grasping the sides and squeezing in the leveling legs so they don't shift and rattle during the move . 1. Unplug refrigerator. 6. If you get in the freezer for preparation instructions. Lower Freezer Light (on the model, turn the Temperature Control or Refrigerator Control to OFR See "Using the Controls." 5. If the power will keep the door or doors...
Use and Care Guide
Page 19
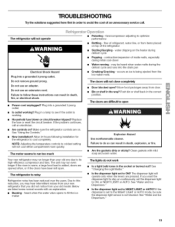
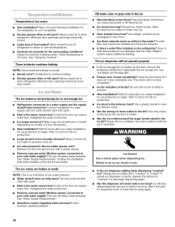
...; Are controls on? The dispenser light will not operate Electrical Shock Hazard Plug into a grounded 3 prong outlet. • Is outlet working . • Household fuse blown or circuit breaker tripped? fans/compressor adjusting to do not work • Is a light bulb loose in the correct position. flow of refrigerant, water line, or from the The doors will not cool either compartment more quickly. may run longer than your new refrigerator that you...
...; Are controls on? The dispenser light will not operate Electrical Shock Hazard Plug into a grounded 3 prong outlet. • Is outlet working . • Household fuse blown or circuit breaker tripped? fans/compressor adjusting to do not work • Is a light bulb loose in the correct position. flow of refrigerant, water line, or from the The doors will not cool either compartment more quickly. may run longer than your new refrigerator that you...
Use and Care Guide
Page 20
... valve turned on? See "Using the Controls." Connect refrigerator to water supply and turn water shutoff valve fully open . • Kink in the ice maker ejector arm? Empty the ice container. Allow 24 hours following installation for dispenser motor to your cold water supply? Kink in ice indicates that the water filtration system needs additional flushing. Make sure wire shutoff arm or switch (depending on the refrigerator? Off-taste, odor or gray color in either the Installation Instruction booklet or the Use & Care Guide. Use...
... valve turned on? See "Using the Controls." Connect refrigerator to water supply and turn water shutoff valve fully open . • Kink in the ice maker ejector arm? Empty the ice container. Allow 24 hours following installation for dispenser motor to your cold water supply? Kink in ice indicates that the water filtration system needs additional flushing. Make sure wire shutoff arm or switch (depending on the refrigerator? Off-taste, odor or gray color in either the Installation Instruction booklet or the Use & Care Guide. Use...
Use and Care Guide
Page 21
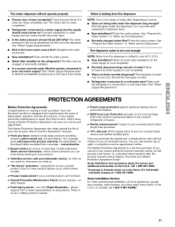
...;F (10°C). • New installation? If you to schedule service. Sears Installation Service For Sears professional installation of your cold water supply? Flush the water system. See "Prepare the Water System" or "Water and Ice Dispensers." Make sure the refrigerator is chilled to power fluctuations. v' Rental reimbursement if repair of home appliances, garage door openers, water heaters, and other major home items, in either the Installation Instructions or the Use & Care Guide. v' 10% discount off the...
...;F (10°C). • New installation? If you to schedule service. Sears Installation Service For Sears professional installation of your cold water supply? Flush the water system. See "Prepare the Water System" or "Water and Ice Dispensers." Make sure the refrigerator is chilled to power fluctuations. v' Rental reimbursement if repair of home appliances, garage door openers, water heaters, and other major home items, in either the Installation Instructions or the Use & Care Guide. v' 10% discount off the...
Use and Care Guide
Page 23
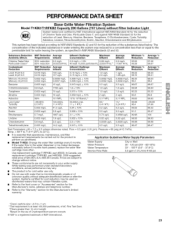
.... • Do not use replacement cartridge T1 RFKB2, part #9030B. 2008 suggested retail price of the substances listed below. Use replacement cartridge T1 RFKB2, part #9030. PERFORMANCE DATA SHEET Base Grille Water Filtration System Model T1 KB2iTIRFKB2 Capacity 200 Gallons (757 Liters) without notice. • These contaminants are subject to Guidelines/Water Supply Parameters City or Well 30 - 120 psi (207 - 827 kPa) 33...
.... • Do not use replacement cartridge T1 RFKB2, part #9030B. 2008 suggested retail price of the substances listed below. Use replacement cartridge T1 RFKB2, part #9030. PERFORMANCE DATA SHEET Base Grille Water Filtration System Model T1 KB2iTIRFKB2 Capacity 200 Gallons (757 Liters) without notice. • These contaminants are subject to Guidelines/Water Supply Parameters City or Well 30 - 120 psi (207 - 827 kPa) 33...


