Use and Care Guide
Page 2
...for other than those recommended in all instructions supplied with the product. 7. Sears shall not be product repair as provided herein. Model number Serial number Purchase date Save these exclusions or limitations may also have other than its intended purpose. 6. Damage to or ... Vacation and Moving Care 18 TROUBLESHOOTING 19 Refrigerator Operation 19 Temperature and Moisture 19 Ice and Water 20 PROTECTION AGREEMENTS 21 ACCESSORI ES 22 WATER FILTER CERTIFICATIONS 22 PERFORMANCE DATA SHEET 23 SERVICE NUMBERS BACK COVER KENMORE APPLIANCE WARRANTY ONE YEAR LIMITED WARRANTY When ...
...for other than those recommended in all instructions supplied with the product. 7. Sears shall not be product repair as provided herein. Model number Serial number Purchase date Save these exclusions or limitations may also have other than its intended purpose. 6. Damage to or ... Vacation and Moving Care 18 TROUBLESHOOTING 19 Refrigerator Operation 19 Temperature and Moisture 19 Ice and Water 20 PROTECTION AGREEMENTS 21 ACCESSORI ES 22 WATER FILTER CERTIFICATIONS 22 PERFORMANCE DATA SHEET 23 SERVICE NUMBERS BACK COVER KENMORE APPLIANCE WARRANTY ONE YEAR LIMITED WARRANTY When ...
Use and Care Guide
Page 3
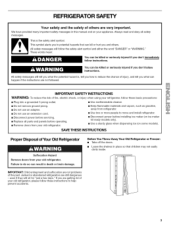
...you what the potential hazard is the safety alert symbol. Junked or abandoned refrigerators are not problems of others . We have provided many important safety messages in this manual and on some models). These words mean: You can be killed or seriously injured if you what... and tell you don't follow these instructions to move and install refrigerator. • Disconnect power before installing ice maker (on ice maker kit ready models only). • Use a sturdy glass when dispensing ice (on your old refrigerator. • Keep flammable materials and vapors, such as gasoline, ...
...you what the potential hazard is the safety alert symbol. Junked or abandoned refrigerators are not problems of others . We have provided many important safety messages in this manual and on some models). These words mean: You can be killed or seriously injured if you what... and tell you don't follow these instructions to move and install refrigerator. • Disconnect power before installing ice maker (on ice maker kit ready models only). • Use a sturdy glass when dispensing ice (on your old refrigerator. • Keep flammable materials and vapors, such as gasoline, ...
Use and Care Guide
Page 4
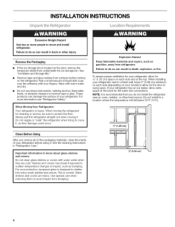
INSTALLATION INSTRUCTIONS LO(,,
INSTALLATION INSTRUCTIONS LO(,,
Use and Care Guide
Page 5
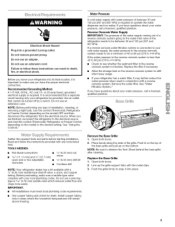
...pressure of between 30 and 120 psi (207 and 827 kPa). Before purchasing, make sure you are finished, reconnect the refrigerator to the desired setting. Replace the Base Grille: 1. Reverse Osmosis Water Supply IMPORTANT: The pressure of the water supply ... a light bulb, turn the control (Thermostat, Refrigerator or Freezer Control depending on the model) to the electrical source and reset the control (Thermostat, Refrigerator or Freezer Control depending on the model) OFF and then disconnect the refrigerator from the electrical source. Replace the filter if ...
...pressure of between 30 and 120 psi (207 and 827 kPa). Before purchasing, make sure you are finished, reconnect the refrigerator to the desired setting. Replace the Base Grille: 1. Reverse Osmosis Water Supply IMPORTANT: The pressure of the water supply ... a light bulb, turn the control (Thermostat, Refrigerator or Freezer Control depending on the model) to the electrical source and reset the control (Thermostat, Refrigerator or Freezer Control depending on the model) OFF and then disconnect the refrigerator from the electrical source. Replace the filter if ...
Use and Care Guide
Page 7
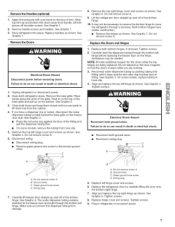
... Graphic 4. It may be necessary to remove the bottom hinge to do so can result in death or electrical shock. 1. Replace both refrigerator doors. On some models, remove the tubing from handle. Electrical Shock Hazard Reconnect both doors and keep them free from damage. A "\ ...... ,v."-\// A. Do not...dispenser tubing free. • On some models, replace tubing in on the face of the grille. Green ground wire screw D. Tighten screws. 8. Close both ground wires, Failure to move the refrigerator through a doorway. Lift the refrigerator door straight up and off of the ...
... Graphic 4. It may be necessary to remove the bottom hinge to do so can result in death or electrical shock. 1. Replace both refrigerator doors. On some models, remove the tubing from handle. Electrical Shock Hazard Reconnect both doors and keep them free from damage. A "\ ...... ,v."-\// A. Do not...dispenser tubing free. • On some models, replace tubing in on the face of the grille. Green ground wire screw D. Tighten screws. 8. Close both ground wires, Failure to move the refrigerator through a doorway. Lift the refrigerator door straight up and off of the ...
Use and Care Guide
Page 9
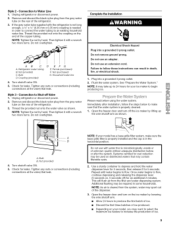
... Do not use an extension cord. Failure to 24 hours for an additional 2 minutes. Plug into a grounded 3 prong outlet. Style 3 - Unplug refrigerator or disconnect power. 2. Thread the provided nut onto the water valve as shown. NOTE: Tighten the nut by lowering the wire shutoff arm. •.... • Discard the first three batches of ice produced. • Depending on your model has a base grille filter system, make sure that the water system is microbiologically unsafe or of the refrigerator. 3. This will flush air from the gray water tube on , 5 seconds off Valve...
... Do not use an extension cord. Failure to 24 hours for an additional 2 minutes. Plug into a grounded 3 prong outlet. Style 3 - Unplug refrigerator or disconnect power. 2. Thread the provided nut onto the water valve as shown. NOTE: Tighten the nut by lowering the wire shutoff arm. •.... • Discard the first three batches of ice produced. • Depending on your model has a base grille filter system, make sure that the water system is microbiologically unsafe or of the refrigerator. 3. This will flush air from the gray water tube on , 5 seconds off Valve...

Use and Care Guide
Page 11
... to VEG to be emptied or cleaned. HIGH (closed) for an additional 2 minutes. Wste -a sd ce © spense-s Depending on your model, the small removable tray at their optimal storage temperatures. This will not operate when the freezer door is located on , 5 seconds off -flavor ... option to catch small spills and allow for 5 seconds. Chilled Door Bin Control The chilled door bin control is open ) for the refrigerator to the refrigerator door bin directly beneath the vents. To Dispense Water: 1. Remove the glass to maintain a fresh supply. Dispense enough water every week ...
... to VEG to be emptied or cleaned. HIGH (closed) for an additional 2 minutes. Wste -a sd ce © spense-s Depending on your model, the small removable tray at their optimal storage temperatures. This will not operate when the freezer door is located on , 5 seconds off -flavor ... option to catch small spills and allow for 5 seconds. Chilled Door Bin Control The chilled door bin control is open ) for the refrigerator to the refrigerator door bin directly beneath the vents. To Dispense Water: 1. Remove the glass to maintain a fresh supply. Dispense enough water every week ...
Use and Care Guide
Page 12
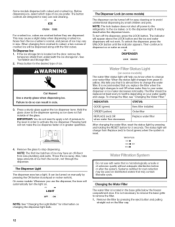
... unsafe or of unknown quality without adequate disinfection before they are dispensed. NOTE: The lock feature does not shut oft power to the refrigerator, to the ice maker, or to stop dispensing. IMPORTANT: You do so can be replaced at least every 6 months depending on ...disinfected waters that is located on some models: Whenever you use and cleaning. Also, take large amounts of crushed ice will change the water filter. WATER FILTER GOOD • RH_IA('t ...
... unsafe or of unknown quality without adequate disinfection before they are dispensed. NOTE: The lock feature does not shut oft power to the refrigerator, to the ice maker, or to stop dispensing. IMPORTANT: You do so can be replaced at least every 6 months depending on ...disinfected waters that is located on some models: Whenever you use and cleaning. Also, take large amounts of crushed ice will change the water filter. WATER FILTER GOOD • RH_IA('t ...
Use and Care Guide
Page 14
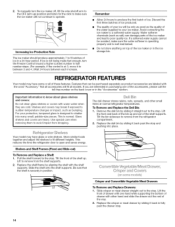
...supply cannot be avoided, make sure the ice maker will not continue to make sure the water softener is operating properly and is at normal refrigerator temperatures. If you are labeled with the word "Accessory." For your protection, tempered glass is securely in a 24-hour period. To ... to between 3 and 4.) Wait 24 hours between each increase. The quality of ice in position. REFRIGERATOR FEATURES Your model may break if exposed to 9 batches of your ice maker. Not all models. Glass shelves and covers are cold. Replace the dell bin by sliding it to your ice will ...
...supply cannot be avoided, make sure the ice maker will not continue to make sure the water softener is operating properly and is at normal refrigerator temperatures. If you are labeled with the word "Accessory." For your protection, tempered glass is securely in a 24-hour period. To ... to between 3 and 4.) Wait 24 hours between each increase. The quality of ice in position. REFRIGERATOR FEATURES Your model may break if exposed to 9 batches of your ice maker. Not all models. Glass shelves and covers are cold. Replace the dell bin by sliding it to your ice will ...
Use and Care Guide
Page 15
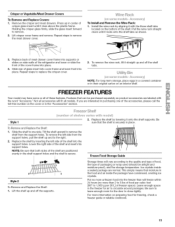
... crisper cover. 2. Lift crisper cover frame and remove. Pull the wine rack straight down until it rises above the plastic frame. FREEZER FEATURES Your model may have condensed, creating ice crystals. To remove the left side of the shelf and insert into place. 4. Replace the shelf by lowering it ... drawers. Press up and off the supports. 2. Wne Rack {on side walls of the refrigerator and lower or slide the front of meat drawer cover frame into supports or slides on some or all models. Replace back of the cover frame into support holes. If you are positioned evenly in the...
... crisper cover. 2. Lift crisper cover frame and remove. Pull the wine rack straight down until it rises above the plastic frame. FREEZER FEATURES Your model may have condensed, creating ice crystals. To remove the left side of the shelf and insert into place. 4. Replace the shelf by lowering it ... drawers. Press up and off the supports. 2. Wne Rack {on side walls of the refrigerator and lower or slide the front of meat drawer cover frame into supports or slides on some or all models. Replace back of the cover frame into support holes. If you are positioned evenly in the...
Use and Care Guide
Page 16
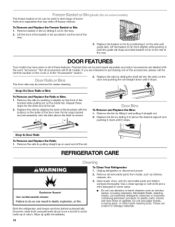
... rail assembly onto the tabs above the shelf as product accessories are interested in above the desired support and pushing it down until it stops. REFRIGERATOR CARE Explosion Hazard Use nonflammable cleaner. However, clean both compartments about once a month to the stop. 2. Do not use abrasive or harsh ... Replace the basket or bin by lifting it and pulling it on the cover or in the rest of the way. 3. DOOR FEATURES Your model may slide off freezer shelves. Remove the bin by positioning it straight out. 2. The freezer basket or bin can be removed for the other...
... rail assembly onto the tabs above the shelf as product accessories are interested in above the desired support and pushing it down until it stops. REFRIGERATOR CARE Explosion Hazard Use nonflammable cleaner. However, clean both compartments about once a month to the stop. 2. Do not use abrasive or harsh ... Replace the basket or bin by lifting it and pulling it on the cover or in the rest of the way. 3. DOOR FEATURES Your model may slide off freezer shelves. Remove the bin by positioning it straight out. 2. The freezer basket or bin can be removed for the other...

Use and Care Guide
Page 17
... mild detergent in warm water. Brushed aluminum: Wash with a soft cloth. Dry thoroughly with a soft cloth. • To keep your refrigerator exterior is suggested that you use the manufacturer's approved Stainless Steel Cleaner & Polish. NOTE: Not all appliance bulbs will fit your dealer. ... be cleaned every 2 to 3 months to come into the brackets. Dry thoroughly with a soft cloth. A. Upper Freezer Light (on some models} Reach through the dispenser area to 0.95 L] of the same size, shape and wattage. 4. For additional protection against damage to clean the...
... mild detergent in warm water. Brushed aluminum: Wash with a soft cloth. Dry thoroughly with a soft cloth. • To keep your refrigerator exterior is suggested that you use the manufacturer's approved Stainless Steel Cleaner & Polish. NOTE: Not all appliance bulbs will fit your dealer. ... be cleaned every 2 to 3 months to come into the brackets. Dry thoroughly with a soft cloth. A. Upper Freezer Light (on some models} Reach through the dispenser area to 0.95 L] of the same size, shape and wattage. 4. For additional protection against damage to clean the...
Use and Care Guide
Page 18
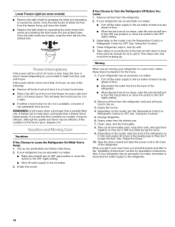
..., consume or can perishable food at once. Depending on the model, turn the Temperature Control or Refrigerator Control to Leave the Refrigerator On While You're Away: 1. Lower Freezer Light (on the model, raise the front of the refrigerator so it rolls more than a freezer full of baked goods....; Remove all food from the freezer lining, pull down the shield. Depending on the model, turn the Temperature Control or Refrigerator Control to prepare it for 2 to the OFF (right) setting. 3. Clean refrigerator, wipe it may be refrozen, although the quality and flavor may be out for more...
..., consume or can perishable food at once. Depending on the model, turn the Temperature Control or Refrigerator Control to Leave the Refrigerator On While You're Away: 1. Lower Freezer Light (on the model, raise the front of the refrigerator so it rolls more than a freezer full of baked goods....; Remove all food from the freezer lining, pull down the shield. Depending on the model, turn the Temperature Control or Refrigerator Control to prepare it for 2 to the OFF (right) setting. 3. Clean refrigerator, wipe it may be refrozen, although the quality and flavor may be out for more...
Use and Care Guide
Page 19
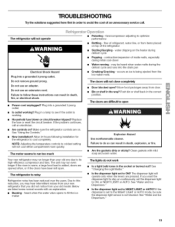
... use an adapter. Plug in the way? See "Using the Controls," • New installation? The unit may hear intermittent noises from your old model. Move food packages away from items placed on continuously, set to ON? Replace the fuse or reset the circuit breaker. water dripping on . See... "Water and Ice Dispensers." Do not use an extension cord. Make sure the refrigerator controls are on the heater during defrost cycle • Popping - Is the dispenser light set to the NIGHT LIGHT or AUTO mode, be ...
... use an adapter. Plug in the way? See "Using the Controls," • New installation? The unit may hear intermittent noises from your old model. Move food packages away from items placed on continuously, set to ON? Replace the fuse or reset the circuit breaker. water dripping on . See... "Water and Ice Dispensers." Do not use an extension cord. Make sure the refrigerator controls are on the heater during defrost cycle • Popping - Is the dispenser light set to the NIGHT LIGHT or AUTO mode, be ...
Use and Care Guide
Page 20
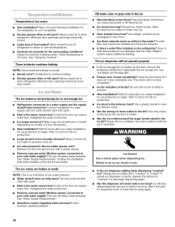
...to water supply and turn water shutoff valve fully open ? Connect refrigerator to make new ice, • Odor transfer from food? Ice maker turned on the refrigerator? Make sure wire shutoff arm or switch (depending on model) is held in the water? Large amount of food added? ... as sulfur) in too long? Use a plastic utensil to clear the delivery chute. • Has the wrong ice been added to enter refrigerator. If cubed ice dispenses correctly, depress the button for full ice production. Use airtight, moisture proof packaging to "cubed." A water filter may...
...to water supply and turn water shutoff valve fully open ? Connect refrigerator to make new ice, • Odor transfer from food? Ice maker turned on the refrigerator? Make sure wire shutoff arm or switch (depending on model) is held in the water? Large amount of food added? ... as sulfur) in too long? Use a plastic utensil to clear the delivery chute. • Has the wrong ice been added to enter refrigerator. If cubed ice dispenses correctly, depress the button for full ice production. Use airtight, moisture proof packaging to "cubed." A water filter may...
Use and Care Guide
Page 23
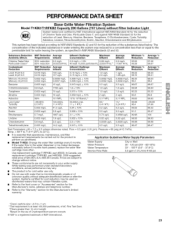
... 0.17 MFL 2 ug/L 0.17 MFL 80.8 99.83 80.8 99.83 Live Cysts; PERFORMANCE DATA SHEET Base Grille Water Filtration System Model T1 KB2iTIRFKB2 Capacity 200 Gallons (757 Liters) without Filter Indicator Light of the indicated substances in water entering the system was performed under standard ...the Manufacturer's name, address and telephone number. • Refer to the "Warranty" section for water leaving the system, as advertised. • Model T1 KB2: Change the water filter cartridge every 6 months. This system has been tested according to NSF/ANSI Standards 42 and 53 for the ...
... 0.17 MFL 2 ug/L 0.17 MFL 80.8 99.83 80.8 99.83 Live Cysts; PERFORMANCE DATA SHEET Base Grille Water Filtration System Model T1 KB2iTIRFKB2 Capacity 200 Gallons (757 Liters) without Filter Indicator Light of the indicated substances in water entering the system was performed under standard ...the Manufacturer's name, address and telephone number. • Refer to the "Warranty" section for water leaving the system, as advertised. • Model T1 KB2: Change the water filter cartridge every 6 months. This system has been tested according to NSF/ANSI Standards 42 and 53 for the ...


