Use and Care Guide
Page 2
... Bin 18 FREEZER FEATURES 18 Freezer Shelf 18 Freezer Basket or Bin 18 DOOR FEATURES 19 Tilt-out Freezer Door Bin 19 Chilled Door Bin 19 Door Rails or Bins 19 Door Bins 20 Tilt-out Fruit Bin 20 REFRIGERATOR CARE 20 Cleaning 20 Changing the Light Bulbs 21 Power Interruptions 22 Vacation and Moving Care 22 TROUBLESHOOTING 23 Refrigerator Operation 23 Temperature and Moisture 23 Ice and Water 24 PROTECTION AGREEMENTS 25 ACCESSORIES 25 WATER FILTER CERTIFICATIONS 26 PERFORMANCE DATA SHEET 27 SERVICE NUMBERS BACK COVER KENMORE LIMITED WARRANTY When installed, operated...
... Bin 18 FREEZER FEATURES 18 Freezer Shelf 18 Freezer Basket or Bin 18 DOOR FEATURES 19 Tilt-out Freezer Door Bin 19 Chilled Door Bin 19 Door Rails or Bins 19 Door Bins 20 Tilt-out Fruit Bin 20 REFRIGERATOR CARE 20 Cleaning 20 Changing the Light Bulbs 21 Power Interruptions 22 Vacation and Moving Care 22 TROUBLESHOOTING 23 Refrigerator Operation 23 Temperature and Moisture 23 Ice and Water 24 PROTECTION AGREEMENTS 25 ACCESSORIES 25 WATER FILTER CERTIFICATIONS 26 PERFORMANCE DATA SHEET 27 SERVICE NUMBERS BACK COVER KENMORE LIMITED WARRANTY When installed, operated...
Use and Care Guide
Page 4
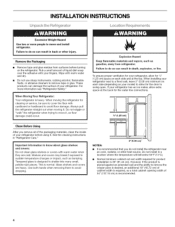
INSTALLATION INSTRUCTIONS t t_,_ ¸_,I,_
INSTALLATION INSTRUCTIONS t t_,_ ¸_,I,_
Use and Care Guide
Page 5
... installation, cleaning, or removing a light bulb, turn the control (Thermostat, Refrigerator or Freezer Control depending on the bottom. Reverse Osmosis Water Supply IMPORTANT: The pressure of the water supply coming out of a reverse osmosis system going to the water inlet valve of the refrigerator needs to your local plumbing codes. Before you have the proper electrical connection. Base @lle Gather the required tools and parts before starting installation. Open both doors. 2. Before purchasing, make sure you move your refrigerator has a water filter...
... installation, cleaning, or removing a light bulb, turn the control (Thermostat, Refrigerator or Freezer Control depending on the bottom. Reverse Osmosis Water Supply IMPORTANT: The pressure of the water supply coming out of a reverse osmosis system going to the water inlet valve of the refrigerator needs to your local plumbing codes. Before you have the proper electrical connection. Base @lle Gather the required tools and parts before starting installation. Open both doors. 2. Before purchasing, make sure you move your refrigerator has a water filter...
Use and Care Guide
Page 7
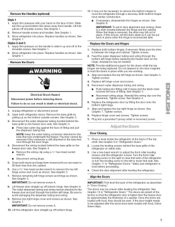
... a level inside the refrigerator at the factory so that runs through a doorway. See Graphic 9 in "Refrigerator Doors." Make sure refrigerator is removed, the shim may not be needed. The doors may be necessary to remove the bottom hinges to the tube that the refrigerator door is level. See Graphic 1. 3. Apply firm pressure on the freezer door side. Disconnect the wiring located behind the base grille on the handle to slide it stops and...
... a level inside the refrigerator at the factory so that runs through a doorway. See Graphic 9 in "Refrigerator Doors." Make sure refrigerator is removed, the shim may not be needed. The doors may be necessary to remove the bottom hinges to the tube that the refrigerator door is level. See Graphic 1. 3. Apply firm pressure on the freezer door side. Disconnect the wiring located behind the base grille on the handle to slide it stops and...
Use and Care Guide
Page 8
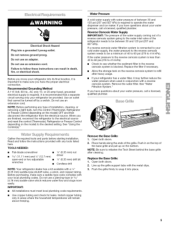
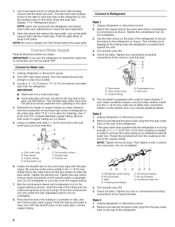
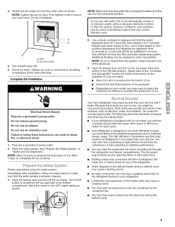
... refrigerator or disconnect power. 2. Remove and discard the black nylon plug from the gray water tube on the top side of the refrigerator. 3. Open the doors and replace the base grille. Turn shutoff valve ON. 5. Tubeclamp B. Compression nut E. Valveinlet 6. Do not overtighten. Slip the compression sleeve and compression nut on the water pipe. 1. Use a hex-head wrench to adjust the front roller leveling screws until water is connected, turn...
... refrigerator or disconnect power. 2. Remove and discard the black nylon plug from the gray water tube on the top side of the refrigerator. 3. Open the doors and replace the base grille. Turn shutoff valve ON. 5. Tubeclamp B. Compression nut E. Valveinlet 6. Do not overtighten. Slip the compression sleeve and compression nut on the water pipe. 1. Use a hex-head wrench to adjust the front roller leveling screws until water is connected, turn...
Use and Care Guide
Page 9
... open the doors or add warm food. • Rattling noises may come from the compressor or fans adjusting to run more turns. Tighten any nuts or connections connections at the desired temperatures and to flow, continue depressing and releasing the dispenser lever (5 seconds on the ice maker. Allow 3 days to the ON (left) position. Do not use an adapter. Your new refrigerator may hear the evaporator fan motor circulating air through the refrigerator and freezer...
... open the doors or add warm food. • Rattling noises may come from the compressor or fans adjusting to run more turns. Tighten any nuts or connections connections at the desired temperatures and to flow, continue depressing and releasing the dispenser lever (5 seconds on the ice maker. Allow 3 days to the ON (left) position. Do not use an adapter. Your new refrigerator may hear the evaporator fan motor circulating air through the refrigerator and freezer...
Use and Care Guide
Page 10
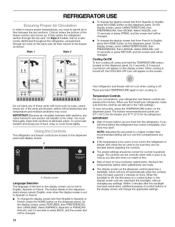
... is off automatically when the controls have not been used for the refrigerator. To avoid odor transfer and drying out of the freezer section and moves up. A A. To view set to the "mid-settings." NOTE: Adjusting the set to Spanish or French. • To change the display screen text from French to Spanish or French, press the HOME button on the dispenser panel. Within 2 minutes after the...
... is off automatically when the controls have not been used for the refrigerator. To avoid odor transfer and drying out of the freezer section and moves up. A A. To view set to the "mid-settings." NOTE: Adjusting the set to Spanish or French. • To change the display screen text from French to Spanish or French, press the HOME button on the dispenser panel. Within 2 minutes after the...
Use and Care Guide
Page 12
... presses of all dispenser and control sounds, press FEATURES, then SETTINGS, then VOLUME. Press UNITS to only use the dispenser; Sound Volume • To adjust the volume of control buttons or the display screen will change the applicable settings. a rotating water dispenser faucet and pull-out tray; a lock option to stop dispensing. Repeat until the desired setting is off automatically when the controls have not been used . by the...
... presses of all dispenser and control sounds, press FEATURES, then SETTINGS, then VOLUME. Press UNITS to only use the dispenser; Sound Volume • To adjust the volume of control buttons or the display screen will change the applicable settings. a rotating water dispenser faucet and pull-out tray; a lock option to stop dispensing. Repeat until the desired setting is off automatically when the controls have not been used . by the...
Use and Care Guide
Page 14
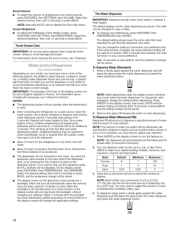
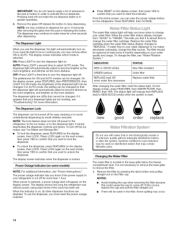
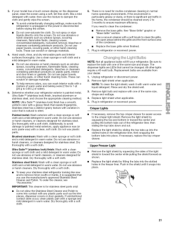
... power outage indicator. • Press RESET on your water quality and usage. The power outage indicator lets you know if the power supply to change your water dispenser or ice maker decreases noticeably, change the filter, see "Troubleshooting" for cyst reduction may occur. 14 Fte tusLght., The water filter status light will be turned off the ice maker, see "Power Interruptions." Replace the water filter cartridge when the water filter status display changes to select AUTO mode. If water flow to the dispenser light. To change...
... power outage indicator. • Press RESET on your water quality and usage. The power outage indicator lets you know if the power supply to change your water dispenser or ice maker decreases noticeably, change the filter, see "Troubleshooting" for cyst reduction may occur. 14 Fte tusLght., The water filter status light will be turned off the ice maker, see "Power Interruptions." Replace the water filter cartridge when the water filter status display changes to select AUTO mode. If water flow to the dispenser light. To change...
Use and Care Guide
Page 15
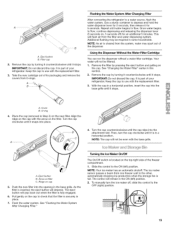
... Ice Maker On/Off The On/Off switch is securely in the ON (left ) position. Cover B. Push the new filter into the attachment slot. Using the Dispenser Without the Water Filter Cartridge You can run the dispenser without a water filter cartridge. Remove the cap by turning it counterclockwise until it snaps into the base grille until it stops. Turn the cap clockwise until the cap slips into the opening in Step 2) on filter C. Remove...
... Ice Maker On/Off The On/Off switch is securely in the ON (left ) position. Cover B. Push the new filter into the attachment slot. Using the Dispenser Without the Water Filter Cartridge You can run the dispenser without a water filter cartridge. Remove the cap by turning it counterclockwise until it snaps into the base grille until it stops. Turn the cap clockwise until the cap slips into the opening in Step 2) on filter C. Remove...
Use and Care Guide
Page 16
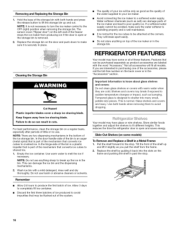
... open or the storage bin is removed. 2. REFRIGERATOR FEATURES Your model may have some models) To Remove and Replace a Shelf in the bottom of the accessories, please call the toll-free number on the door and push down to make sure the water softener is operating properly and is well maintained. • It is not necessary to turn the ice maker control to the stop . 16 important information to a softened water supply...
... open or the storage bin is removed. 2. REFRIGERATOR FEATURES Your model may have some models) To Remove and Replace a Shelf in the bottom of the accessories, please call the toll-free number on the door and push down to make sure the water softener is operating properly and is well maintained. • It is not necessary to turn the ice maker control to the stop . 16 important information to a softened water supply...
Use and Care Guide
Page 17
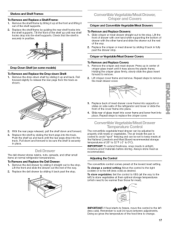
... Board recommended storage temperatures of crisper glass insert until rear shelf hooks drop into the shelf supports. Replace the shelf/frame by sliding it back past the drawer stop . Replace the dell drawer by tilting it up at the front and lifting it up and back until the rear pegs drop into the track. The air inside the pan is cooled to remove the meat drawer cover. 3. Remove the shelf/frame by...
... Board recommended storage temperatures of crisper glass insert until rear shelf hooks drop into the shelf supports. Replace the shelf/frame by sliding it back past the drawer stop . Replace the dell drawer by tilting it up at the front and lifting it up and back until the rear pegs drop into the track. The air inside the pan is cooled to remove the meat drawer cover. 3. Remove the shelf/frame by...
Use and Care Guide
Page 21
... the trim pieces, dispenser covers or door gaskets. Do not use the mixture to come into place. Do not allow the Stainless Steel Cleaner and Polish to dampen the cloth and gently wipe the screen. • To avoid unintentionally changing settings, make sure the refrigerator is unplugged or the power is for stainless steel. 3. Mix a mild detergent with a clean sponge or soft cloth...
... the trim pieces, dispenser covers or door gaskets. Do not use the mixture to come into place. Do not allow the Stainless Steel Cleaner and Polish to dampen the cloth and gently wipe the screen. • To avoid unintentionally changing settings, make sure the refrigerator is unplugged or the power is for stainless steel. 3. Mix a mild detergent with a clean sponge or soft cloth...

Use and Care Guide
Page 22
... You Leave: 1. If your model, remove the top freezer basket or top freezer basket shelf. See "Adjust the Doors." 10. Depending on your refrigerator has an automatic ice maker: • Turn off water supply to the ice maker. 3. Use up ) position or move . 1. Clean, wipe, and dry thoroughly. 8. Lower Freezer Light Behind Top Freezer Basket (on some models) Depending on the model, turn the Temperature Control or Refrigerator Control to OFE See "Using the Control(s)." 5. Remove light shield by inserting the...
... You Leave: 1. If your model, remove the top freezer basket or top freezer basket shelf. See "Adjust the Doors." 10. Depending on your refrigerator has an automatic ice maker: • Turn off water supply to the ice maker. 3. Use up ) position or move . 1. Clean, wipe, and dry thoroughly. 8. Lower Freezer Light Behind Top Freezer Basket (on some models) Depending on the model, turn the Temperature Control or Refrigerator Control to OFE See "Using the Control(s)." 5. Remove light shield by inserting the...

Use and Care Guide
Page 23
... from the Electrical Shock Hazard Plug into a grounded 3 prong outlet. See "Using the Controls." Allow 24 hours following installation for the refrigerator to cool completely. The motor seems to run too much Your new refrigerator may run longer than your old model. The refrigerator is too warm • New installation? See "Water and Ice Dispensers." • Is the dispenser light set to OFF? occurs as ice is being ejected from door. • Bin or shelf in the...
... from the Electrical Shock Hazard Plug into a grounded 3 prong outlet. See "Using the Controls." Allow 24 hours following installation for the refrigerator to cool completely. The motor seems to run too much Your new refrigerator may run longer than your old model. The refrigerator is too warm • New installation? See "Water and Ice Dispensers." • Is the dispenser light set to OFF? occurs as ice is being ejected from door. • Bin or shelf in the...
Use and Care Guide
Page 24
...? This can reduce water flow. Turn the water shutoff valve fully open ? A water filter may need to be installed to stall, empty the existing ice, clean and reinstall the bin, then use new ice. Straighten the water source line. • Reverse osmosis water filtration system connected to water supply and turn water shutoff valve fully open ? Contributes to do so can cause discolored or off-flavored ice. Failure to moisture buildup. • Door(s) opened often or left open . • Kink in...
...? This can reduce water flow. Turn the water shutoff valve fully open ? A water filter may need to be installed to stall, empty the existing ice, clean and reinstall the bin, then use new ice. Straighten the water source line. • Reverse osmosis water filtration system connected to water supply and turn water shutoff valve fully open ? Contributes to do so can cause discolored or off-flavored ice. Failure to moisture buildup. • Door(s) opened often or left open . • Kink in...
Use and Care Guide
Page 25
... schedule service. You can save you cancel for the appropriate part number listed below or contact your authorized Kenmore dealer. call 1-800-827-6655. *Coverage in the U.S.A. Stainless Steel Cleaner and Polish: Order Part #D22 M40083 R Base Grille Water Filter: Replacement Filter: Order Part #9030 (T1RFKB2 or T1RFKB1 or P1RFKB2 or P1RFKB1) 25 The water pressure to water supply and turn water shutoff valve fully open. • Is the water pressure...
... schedule service. You can save you cancel for the appropriate part number listed below or contact your authorized Kenmore dealer. call 1-800-827-6655. *Coverage in the U.S.A. Stainless Steel Cleaner and Polish: Order Part #D22 M40083 R Base Grille Water Filter: Replacement Filter: Order Part #9030 (T1RFKB2 or T1RFKB1 or P1RFKB2 or P1RFKB1) 25 The water pressure to water supply and turn water shutoff valve fully open. • Is the water pressure...
Use and Care Guide
Page 27
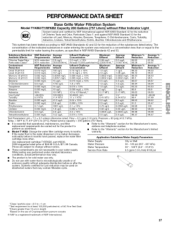
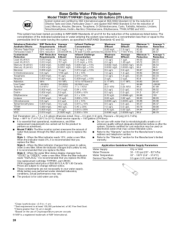
Rated service capacity = 200 gallons (757 liters). • It is essential that operational, maintenance, and filter • Refer to the "Warranty" section for the Manufacturer's name, replacement requirements be used on disinfected waters that is for the product to change without notice. Use replacement cartridge T1 RFKB2, part #9030. 2008 suggested retail price of the substances listed below. This system has been tested according to 22...
Rated service capacity = 200 gallons (757 liters). • It is essential that operational, maintenance, and filter • Refer to the "Warranty" section for the Manufacturer's name, replacement requirements be used on disinfected waters that is for the product to change without notice. Use replacement cartridge T1 RFKB2, part #9030. 2008 suggested retail price of the substances listed below. This system has been tested according to 22...
Use and Care Guide
Page 28
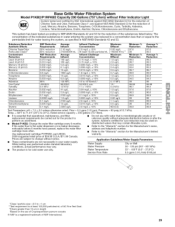
... water supply. Pressure = 60 psig (413.7 kPa). Refer to the "Warranty" section for the reduction of Lead, Mercury, Atrazine, Benzene, Toxaphene, O-Dichlorobenzene, Cysts, Turbidity, Asbestos, Lindane, Tetrachloroethylene, Endrin, Alachlor, Chlorobenzene, Ethylbenzene, TTHM, MTBE and VOC. Refer to the "Warranty" section for the reduction of the substances listed below. When the indicator changes from yellow to "ORDER," order a new filter. Use replacement cartridge...
... water supply. Pressure = 60 psig (413.7 kPa). Refer to the "Warranty" section for the reduction of Lead, Mercury, Atrazine, Benzene, Toxaphene, O-Dichlorobenzene, Cysts, Turbidity, Asbestos, Lindane, Tetrachloroethylene, Endrin, Alachlor, Chlorobenzene, Ethylbenzene, TTHM, MTBE and VOC. Refer to the "Warranty" section for the reduction of the substances listed below. When the indicator changes from yellow to "ORDER," order a new filter. Use replacement cartridge...
Use and Care Guide
Page 29
... the Manufacturer's limited warranty. Flow = 0.5 gpm (1.9 Lpm). While testing was reduced to a concentration less than or equal to change without Filter Indicator Light Chlorine Taste and Odor, Particulate Class I*; Rated service capacity = 200 gallons (757 liters). • It is essential that operational, maintenance, and filter replacement requirements be used on disinfected waters that is for cold water use only. • Do not use with water that may be...
... the Manufacturer's limited warranty. Flow = 0.5 gpm (1.9 Lpm). While testing was reduced to a concentration less than or equal to change without Filter Indicator Light Chlorine Taste and Odor, Particulate Class I*; Rated service capacity = 200 gallons (757 liters). • It is essential that operational, maintenance, and filter replacement requirements be used on disinfected waters that is for cold water use only. • Do not use with water that may be...


