Use and Care Manual
Page 2
... 7 Electrical Requirements 8 INSTALLATION INSTRUCTIONS g Remove Transport System 9 Connect the Inlet Hoses 9 Route the Drain Hose 10 Secure the Drain Hose 10 Level the Washer 11 Complete Installation 11 FEATURES AND BENEFITS 12 WASHER USE 13 Starting Your Washer 13 Using the Proper Detergent 13 Using the Dispenser 14 Pausing or Restarting 15 Changing Cycles, Options and Modifiers 15 Status Lights 15 Cycles 16 Normal Sounds 17 Options 17 Modifiers 17 Laundry Guide 18 LAUNDRY TIPS 19 Loading 19 Stain Removal Guide 20 WASHER CARE 21 Cleaning...
... 7 Electrical Requirements 8 INSTALLATION INSTRUCTIONS g Remove Transport System 9 Connect the Inlet Hoses 9 Route the Drain Hose 10 Secure the Drain Hose 10 Level the Washer 11 Complete Installation 11 FEATURES AND BENEFITS 12 WASHER USE 13 Starting Your Washer 13 Using the Proper Detergent 13 Using the Dispenser 14 Pausing or Restarting 15 Changing Cycles, Options and Modifiers 15 Status Lights 15 Cycles 16 Normal Sounds 17 Options 17 Modifiers 17 Laundry Guide 18 LAUNDRY TIPS 19 Loading 19 Stain Removal Guide 20 WASHER CARE 21 Cleaning...
Use and Care Manual
Page 3
... the model and serial number label located on products requiring in the United States and Canada. Have this appliance is not installed, operated or maintained according to provide years of merchantability or fitness for incidental or consequential damages. Your Kenmore ® product is designed, manufactured and tested to all products, it may not apply to you don't need repairs, provides an annual Preventive Maintenance Check, at...
... the model and serial number label located on products requiring in the United States and Canada. Have this appliance is not installed, operated or maintained according to provide years of merchantability or fitness for incidental or consequential damages. Your Kenmore ® product is designed, manufactured and tested to all products, it may not apply to you don't need repairs, provides an annual Preventive Maintenance Check, at...
Use and Care Manual
Page 4
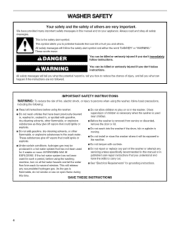
... been used near children. [] Before the washer is moving. [] Do not install or store the washer where it will release any servicing unless specifically recommended in this manual and on all safety messages. IMPORTANT SAFETY INSTRUCTIONS WARNING: To reduce the risk of the washer or attempt any accumulated hydrogen gas. SAVE THESE [] Do not allow children to persons when using the washing machine, turn on...
... been used near children. [] Before the washer is moving. [] Do not install or store the washer where it will release any servicing unless specifically recommended in this manual and on all safety messages. IMPORTANT SAFETY INSTRUCTIONS WARNING: To reduce the risk of the washer or attempt any accumulated hydrogen gas. SAVE THESE [] Do not allow children to persons when using the washing machine, turn on...
Use and Care Manual
Page 5
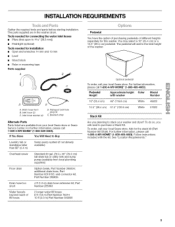
... Sears store. and connector kit, Part Number 285835 Drain hose too short 4 ft (1.2 m) drain hose extension kit, Part Number 285863 Water faucets beyond reach of different heights separately for the stack kit (Part Number 8572546). INSTALLATION REQUIREMENTS Gather the required tools and parts before starting installation. Tools needed for connecting the water inlet hoses • Pliers (that open to stack your local Sears store or Sears Service Center. additional drain hose, Part Number 8318155; Ask for this washer. For further information, please...
... Sears store. and connector kit, Part Number 285835 Drain hose too short 4 ft (1.2 m) drain hose extension kit, Part Number 285863 Water faucets beyond reach of different heights separately for the stack kit (Part Number 8572546). INSTALLATION REQUIREMENTS Gather the required tools and parts before starting installation. Tools needed for connecting the water inlet hoses • Pliers (that open to stack your local Sears store or Sears Service Center. additional drain hose, Part Number 8318155; Ask for this washer. For further information, please...
Use and Care Manual
Page 6
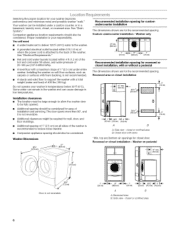
... support the washer with or without a pedestal The dimensions shown are for the recommended spacing. The door opens more than 90 ° , and it is not reversible. 1" -_1 I_- 27" _ I_- 1" -_41"_ 30v_"_q _" I_- (2.5 cm) (68.6 cm) (2.6 cm} (2.5 cm) (77.5 cm) (10.2 cm) A B A. Recessed or closet installation - See "Electrical Requirements." • Hot and cold water faucets located within 6 ft (1.8 m) of where the power cord...
... support the washer with or without a pedestal The dimensions shown are for the recommended spacing. The door opens more than 90 ° , and it is not reversible. 1" -_1 I_- 27" _ I_- 1" -_41"_ 30v_"_q _" I_- (2.5 cm) (68.6 cm) (2.6 cm} (2.5 cm) (77.5 cm) (10.2 cm) A B A. Recessed or closet installation - See "Electrical Requirements." • Hot and cold water faucets located within 6 ft (1.8 m) of where the power cord...
Use and Care Manual
Page 9
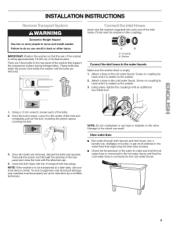
... spacers. Once the bolt is seated on the valve. A B A. Attach a hose to the cold water faucet. Attach a hose to the hot water faucet. Once all 4 bolts are removed. Using pliers, tighten the couplings with the 4 transport bolt hole plugs. Then pull the power cord through both faucets and inlet hoses, into each of the bolts. 2. Screw on coupling by hand until it is loose, move and install washer. INSTALLATION INSTRUCTIONS £emove...
... spacers. Once the bolt is seated on the valve. A B A. Attach a hose to the cold water faucet. Attach a hose to the hot water faucet. Once all 4 bolts are removed. Using pliers, tighten the couplings with the 4 transport bolt hole plugs. Then pull the power cord through both faucets and inlet hoses, into each of the bolts. 2. Screw on coupling by hand until it is loose, move and install washer. INSTALLATION INSTRUCTIONS £emove...
Use and Care Manual
Page 11
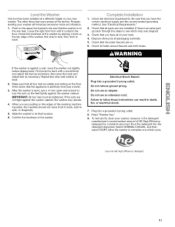
..., and then select START. Use only HE High Efficiency detergent. 11 If the washer is perfectly level (use a 14 mm open-end wrench to clean your washer, measure V_the detergent manufacturer's recommended amount of your tools. 4. Electrical Shock Hazard Plug into a grounded 3 prong outlet. 8. One foot has been installed at the factory. Be sure that all of HE High Efficiency detergent for leaks around faucets and inlet hoses. If there is...
..., and then select START. Use only HE High Efficiency detergent. 11 If the washer is perfectly level (use a 14 mm open-end wrench to clean your washer, measure V_the detergent manufacturer's recommended amount of your tools. 4. Electrical Shock Hazard Plug into a grounded 3 prong outlet. 8. One foot has been installed at the factory. Be sure that all of HE High Efficiency detergent for leaks around faucets and inlet hoses. If there is...

Use and Care Manual
Page 12
... large load size. The motor can wash larger, bulkier items such as an average size sleeping bag. Auto Water Level Adjusting to the size of the cycle the Add A Garment status light will be changed, however. Stainless Steel Drum The stainless steel drum eliminates corrosion and enables higher spin speeds for highperformance cleaning. Dynamic Balance A precision balancing system that they are evenly balanced. The fabric softener is powerful enough to drive an average clothes load...
... large load size. The motor can wash larger, bulkier items such as an average size sleeping bag. Auto Water Level Adjusting to the size of the cycle the Add A Garment status light will be changed, however. Stainless Steel Drum The stainless steel drum eliminates corrosion and enables higher spin speeds for highperformance cleaning. Dynamic Balance A precision balancing system that they are evenly balanced. The fabric softener is powerful enough to drive an average clothes load...
Use and Care Manual
Page 13
... and small items. Avoid washing a single item. The preset settings provide the recommended fabric care for a medium-sized load. STATUS Add a Garment 0 Prewash / Wash (_ | Rinse _: ¥ Spin Clothes Clean O Power Heavy Duty Whitest Whites Door Locked _} ControlsLocked_ WASHER USE Delicate Rinse/Drain c_ BL_No_¥ WasherClean_ e Oe;ay Start 1obas gNTI $1A_ %_'_ MODIFIERS & OPTIONS Auto Temp Control High Medium Hot /Cold I[ ]1 _ Prewash v _Warm / Warm _Warm / Cold _ _:_2rid Rinse Low O0 _Cold/ Cold Spin Speed Wash / Rinse Temp Fire Hazard Never...
... and small items. Avoid washing a single item. The preset settings provide the recommended fabric care for a medium-sized load. STATUS Add a Garment 0 Prewash / Wash (_ | Rinse _: ¥ Spin Clothes Clean O Power Heavy Duty Whitest Whites Door Locked _} ControlsLocked_ WASHER USE Delicate Rinse/Drain c_ BL_No_¥ WasherClean_ e Oe;ay Start 1obas gNTI $1A_ %_'_ MODIFIERS & OPTIONS Auto Temp Control High Medium Hot /Cold I[ ]1 _ Prewash v _Warm / Warm _Warm / Cold _ _:_2rid Rinse Low O0 _Cold/ Cold Spin Speed Wash / Rinse Temp Fire Hazard Never...
Use and Care Manual
Page 14
... of colorsafe bleach to remain in Dispenser Illustration) Add liquid or powdered HE detergent to this dispenser. It may be marked "HE" or "High Efficiency." Dispenser release lever B. Fabric softener compartment Main Wash detergent compartment (Letter B in the dispensers when the wash cycle is complete, the CLOTHES CLEAN status light illuminates, the door unlocks, and the wash load can be automatically diluted and dispensed at the proper time during the wash cycle, making it stops. Follow the manufacturer's directions for...
... of colorsafe bleach to remain in Dispenser Illustration) Add liquid or powdered HE detergent to this dispenser. It may be marked "HE" or "High Efficiency." Dispenser release lever B. Fabric softener compartment Main Wash detergent compartment (Letter B in the dispensers when the wash cycle is complete, the CLOTHES CLEAN status light illuminates, the door unlocks, and the wash load can be automatically diluted and dispensed at the proper time during the wash cycle, making it stops. Follow the manufacturer's directions for...
Use and Care Manual
Page 15
... the washer. Select STOP twice. 2. The washer powers down, the door unlocks, and clothes can lock the controls while the washer is operating. If the option or modifier are locked. These lights show which portion of your water pressure, water temperature, detergent, and clothes load. All cycles have this compartment. To unlock the door after the wash cycle has started 1. Clothes Clean The Clothes Clean light comes on your garments. You can be automatically dispensed in the final rinse or in the Preset Cycle Settings...
... the washer. Select STOP twice. 2. The washer powers down, the door unlocks, and clothes can lock the controls while the washer is operating. If the option or modifier are locked. These lights show which portion of your water pressure, water temperature, detergent, and clothes load. All cycles have this compartment. To unlock the door after the wash cycle has started 1. Clothes Clean The Clothes Clean light comes on your garments. You can be automatically dispensed in the final rinse or in the Preset Cycle Settings...

Use and Care Manual
Page 16
... 0:37 Warm/Cold Warm/Cold High Medium Rinse/Drain & 0:25 Spin Cold/Cold High Drain & Spin 0:15 N/A High Clean Washer 0:54 N/A High *The cycle times vary automatically based on your laundry. This cycle combines fast-speed tumbling, longer wash time, and high speed spin to reduce wrinkling. Large wash loads will be changed anytime before START is selected. The preset settings provide the recommended fabric care for gentle fabric care. • Use mesh garment bags to wash sheer fabrics and lingerie. Hot washing temperatures assure optimal bleach activity. This...
... 0:37 Warm/Cold Warm/Cold High Medium Rinse/Drain & 0:25 Spin Cold/Cold High Drain & Spin 0:15 N/A High Clean Washer 0:54 N/A High *The cycle times vary automatically based on your laundry. This cycle combines fast-speed tumbling, longer wash time, and high speed spin to reduce wrinkling. Large wash loads will be changed anytime before START is selected. The preset settings provide the recommended fabric care for gentle fabric care. • Use mesh garment bags to wash sheer fabrics and lingerie. Hot washing temperatures assure optimal bleach activity. This...
Use and Care Manual
Page 17
... cycle with a selected cycle, there will hear sounds that need pretreatment. • Add detergent to the Main Wash Compartment of your washing machine. This option adds tumbling time prior to handle. Select ON or OFR Preset cycle settings of Water Temperature, Spin Speed, and Rinse Options can add or change the water temperature, select the WASH/RINSE TEMP button until the desired setting illuminates. Use the warmest wash water safe for loads of normal washer operation. Follow garment label instructions. In cold climates, a warm rinse...
... cycle with a selected cycle, there will hear sounds that need pretreatment. • Add detergent to the Main Wash Compartment of your washing machine. This option adds tumbling time prior to handle. Select ON or OFR Preset cycle settings of Water Temperature, Spin Speed, and Rinse Options can add or change the water temperature, select the WASH/RINSE TEMP button until the desired setting illuminates. Use the warmest wash water safe for loads of normal washer operation. Follow garment label instructions. In cold climates, a warm rinse...
Use and Care Manual
Page 18
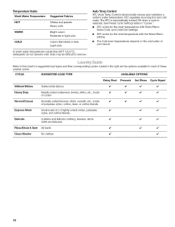
... Temp Control) electronically senses and maintains a uniform water temperature. v' v' Delicate Curtains and delicate clothing, dresses, skirts, v' shirts and blouses v' v' Rinse/Drain & Spin All loads Clean Washer No clothes v' v' v' v' v' 18 Listed to the right are the options available to this chart for the rinse temperature with Warm/Warm, Warm/Cold, and Cold/Cold settings. • ATC works for suggested load types and their corresponding cycles. See Preset Cycle Settings table in "Cycles." • ATC works for the wash temperature...
... Temp Control) electronically senses and maintains a uniform water temperature. v' v' Delicate Curtains and delicate clothing, dresses, skirts, v' shirts and blouses v' v' Rinse/Drain & Spin All loads Clean Washer No clothes v' v' v' v' v' 18 Listed to the right are the options available to this chart for the rinse temperature with Warm/Warm, Warm/Cold, and Cold/Cold settings. • ATC works for suggested load types and their corresponding cycles. See Preset Cycle Settings table in "Cycles." • ATC works for the wash temperature...

Use and Care Manual
Page 21
... unlock, lock again, and then the cycle will continue. • The machine will not fill, but the basket will proceed to the drawer. 21 Remove the drawer. 2. Occasionally wipe the outside of your installation and usage conditions for better ventilation and drying of washer interior. • Repeat the cleaning procedure monthly, using a damp cloth. WASHER CARE Cleaning the Door Seal/Bellow 1= Open the washer door and remove any clothing or items from the softener...
... unlock, lock again, and then the cycle will continue. • The machine will not fill, but the basket will proceed to the drawer. 21 Remove the drawer. 2. Occasionally wipe the outside of your installation and usage conditions for better ventilation and drying of washer interior. • Repeat the cleaning procedure monthly, using a damp cloth. WASHER CARE Cleaning the Door Seal/Bellow 1= Open the washer door and remove any clothing or items from the softener...

Use and Care Manual
Page 22
.... 5. Electrical Shock Hazard Plug into a grounded 3 prong outlet. Run the washer through the Normal/Casual cycle with 1/2the manufacturer's recommended amount of HE detergent for a medium-size load, to the rear panel of the washer. 6. Turn on a Drain & Spin cycle. 2. Washer must be on a Drain & Spin cycle. 3. Failure to provide ventilation. Flush water pipes. 2. If storing or moving your washer. Unplug the power cord. 3. Replace inlet hoses after 5 years of use an extension cord. Run washer on vacation or not using your washer...
.... 5. Electrical Shock Hazard Plug into a grounded 3 prong outlet. Run the washer through the Normal/Casual cycle with 1/2the manufacturer's recommended amount of HE detergent for a medium-size load, to the rear panel of the washer. 6. Turn on a Drain & Spin cycle. 2. Washer must be on a Drain & Spin cycle. 3. Failure to provide ventilation. Flush water pipes. 2. If storing or moving your washer. Unplug the power cord. 3. Replace inlet hoses after 5 years of use an extension cord. Run washer on vacation or not using your washer...

Use and Care Manual
Page 23
... START. It is locked or unlocked, and during the wash and rinse cycles. You may be reduced by placing a piece of normal washer operation. Is washer installed on display (Drain Problem) Select STOP twice to cancel the cycle. Noise and vibration may hear various sounds when the door is normal. Electrical Shock Hazard Plug into a grounded 3 prong outlet. Between changes in wash actions, there will hear water spraying and splashing during the washing, rinsing, or spinning process. This is drained...
... START. It is locked or unlocked, and during the wash and rinse cycles. You may be reduced by placing a piece of normal washer operation. Is washer installed on display (Drain Problem) Select STOP twice to cancel the cycle. Noise and vibration may hear various sounds when the door is normal. Electrical Shock Hazard Plug into a grounded 3 prong outlet. Between changes in wash actions, there will hear water spraying and splashing during the washing, rinsing, or spinning process. This is drained...
Use and Care Manual
Page 24
... the washer. Use of water will unlock. The door will remain in the dispenser at the end of the cycle? Wash smaller loads. The door must be able to the drainpipe or laundry tub. Check both the hot and cold water faucets turned on the water. Measure detergent and fabric softener. See "Washer Care" for about 2 minutes during the spin? Press STOP once. Do not use the chlorine bleach dispenser for color-safe bleach. • Is the fabric softener dispenser clogged? Replace the fuse, or reset...
... the washer. Use of water will unlock. The door will remain in the dispenser at the end of the cycle? Wash smaller loads. The door must be able to the drainpipe or laundry tub. Check both the hot and cold water faucets turned on the water. Measure detergent and fabric softener. See "Washer Care" for about 2 minutes during the spin? Press STOP once. Do not use the chlorine bleach dispenser for color-safe bleach. • Is the fabric softener dispenser clogged? Replace the fuse, or reset...

Use and Care Manual
Page 25
... washer Is the drain hose clogged, or the end of the drain hose more frequently when a non-HE detergent is it taped to the original cycle. Press and hold START, for your garments. The top of the washer. Check electrical source or call electrician. Not enough water/Not enough suds Low water? Are you using the Express Wash, or Delicate wash cycles you select will be removed for smaller load sizes...
... washer Is the drain hose clogged, or the end of the drain hose more frequently when a non-HE detergent is it taped to the original cycle. Press and hold START, for your garments. The top of the washer. Check electrical source or call electrician. Not enough water/Not enough suds Low water? Are you using the Express Wash, or Delicate wash cycles you select will be removed for smaller load sizes...

Use and Care Manual
Page 26
... load you are connected to provide a hot water wash. Did you unload the washer promptly? Load is wrinkled, twisted, tangled • Did you use a fabric softener dispensing ball? Are the hot and cold water hoses reversed? A hot rinse followed by spin will not operate correctly with this washer. Select RINSE/DRAIN & SPIN, and then select 2ND RINSE (to turn off the rinse option), to the washer drum. Sort lint givers (towels, chenille) from whites and lights. Sort dark clothes...
... load you are connected to provide a hot water wash. Did you unload the washer promptly? Load is wrinkled, twisted, tangled • Did you use a fabric softener dispensing ball? Are the hot and cold water hoses reversed? A hot rinse followed by spin will not operate correctly with this washer. Select RINSE/DRAIN & SPIN, and then select 2ND RINSE (to turn off the rinse option), to the washer drum. Sort lint givers (towels, chenille) from whites and lights. Sort dark clothes...


