Use and Care Guide
Page 2
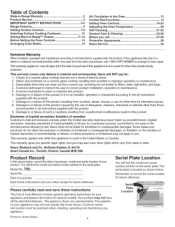
... the date of purchase, call 27=28 Protection Agreements 29 Sears Service 30 Kenmore Warranty When installed, operated and maintained according to all instructions supplied with ...chemicals or utensils other than those shown. Table of Contents Slide=in Range Warranty 2 Product Record 2 IMPORTANT SAFETY INSTRUCTIONS 3=5 Range Features 6 Setting Surface Controls 7=9 Selecting Surface Cooking Cookware... practiced when installing, operating and maintaining any appliance. You will find the model and serial number printed on your appliance and feature information for other than its...
... the date of purchase, call 27=28 Protection Agreements 29 Sears Service 30 Kenmore Warranty When installed, operated and maintained according to all instructions supplied with ...chemicals or utensils other than those shown. Table of Contents Slide=in Range Warranty 2 Product Record 2 IMPORTANT SAFETY INSTRUCTIONS 3=5 Range Features 6 Setting Surface Controls 7=9 Selecting Surface Cooking Cookware... practiced when installing, operating and maintaining any appliance. You will find the model and serial number printed on your appliance and feature information for other than its...
Use and Care Guide
Page 6
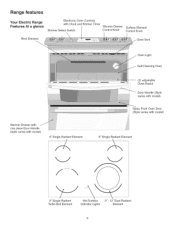
ven Racks _- -----..L Door Handle (Style varies with model) Glass Front Oven Door (Style varies with model) f-, 6" Single Radiant Element Oven Light Self-Cleaning Oven (2) adjustable ......i...........O. Range features Your Electric Range Features At a glance Broil Element Electronic Oven Controls with Clock and Kitchen Timer Simmer Select Switch Warmer Drawer Control Knob Surface Element Control Knob Oven ...
ven Racks _- -----..L Door Handle (Style varies with model) Glass Front Oven Door (Style varies with model) f-, 6" Single Radiant Element Oven Light Self-Cleaning Oven (2) adjustable ......i...........O. Range features Your Electric Range Features At a glance Broil Element Electronic Oven Controls with Clock and Kitchen Timer Simmer Select Switch Warmer Drawer Control Knob Surface Element Control Knob Oven ...
Use and Care Guide
Page 8
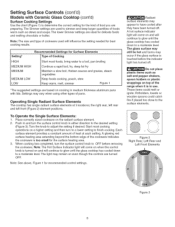
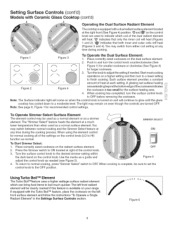
...to have cooled after they have been turned off . Each surface element provides a constant amount of pans. Setting Surface Controls (cont'd) Models with lids. Operating Single Radiant Surface Elements The cooktop has single radiant surface elements at each setting. Turn the knob to the desired ...operations on a higher setting and then turn the surface control knob to the surface elements. Note: The size and type of the range when it is in medium thickness aluminum pans with Ceramic Glass Cooktop (cont'd) Surface Cooking Settings Use the chart (Figure 1) to determine...
...to have cooled after they have been turned off . Each surface element provides a constant amount of pans. Setting Surface Controls (cont'd) Models with lids. Operating Single Radiant Surface Elements The cooktop has single radiant surface elements at each setting. Turn the knob to the desired ...operations on a higher setting and then turn the surface control knob to the surface elements. Note: The size and type of the range when it is in medium thickness aluminum pans with Ceramic Glass Cooktop (cont'd) Surface Cooking Settings Use the chart (Figure 1) to determine...
Use and Care Guide
Page 9
... (See Figure 1) for smaller cookware or clockwise (See Figure 3) for the surface heating area. 4. Figure 6 9 Setting Surface Controls (cont'd) Models with Ceramic Glass Cooktop (cont'd) Operating the Dual Surface Radiant Element The cooktop is equipped with the Turbo Boil TM feature, place the cookware on...TM Element The Turbo BoilTMfeature uses a higher wattage surface radiant element which coil of the cookware indicates the cookware is turned on your range. The light may be sure to boil much S_MMER SELECT lower temperature than when used as a normal element or as normal. ...
... (See Figure 1) for smaller cookware or clockwise (See Figure 3) for the surface heating area. 4. Figure 6 9 Setting Surface Controls (cont'd) Models with Ceramic Glass Cooktop (cont'd) Operating the Dual Surface Radiant Element The cooktop is equipped with the Turbo Boil TM feature, place the cookware on...TM Element The Turbo BoilTMfeature uses a higher wattage surface radiant element which coil of the cookware indicates the cookware is turned on your range. The light may be sure to boil much S_MMER SELECT lower temperature than when used as a normal element or as normal. ...

Use and Care Guide
Page 13
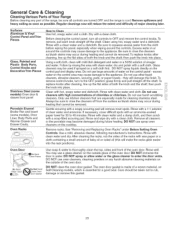
...racks 2 or 3 2 &4 Frozen pies, angel food cake, yeast, bread, casseroles, small cuts of the rack upward and slide the rack back into place. Tilt the front of meat or poultry Turkey, roast or ham 1 or 2 1 Note: Always... 2-4 inches (5-10 cm) around the cookware for even heat to keep the electronics cool. Models with Ceramic Glass Cooktop The oven vent is on the oven walls. When the oven is ...located at right side of the oven cavity. Lift up front of rack and slide out. Before Setting Oven Controls This range has a fan that will turn "ON" after a while. Removing and Replacing ...
...racks 2 or 3 2 &4 Frozen pies, angel food cake, yeast, bread, casseroles, small cuts of the rack upward and slide the rack back into place. Tilt the front of meat or poultry Turkey, roast or ham 1 or 2 1 Note: Always... 2-4 inches (5-10 cm) around the cookware for even heat to keep the electronics cool. Models with Ceramic Glass Cooktop The oven vent is on the oven walls. When the oven is ...located at right side of the oven cavity. Lift up front of rack and slide out. Before Setting Oven Controls This range has a fan that will turn "ON" after a while. Removing and Replacing ...
Use and Care Guide
Page 23
... wiping the panel; Using a soft cloth, clean with an ammonia-soaked paper towel for 30 to the appliance. Follow by rinsing the area with clean water and cloth. To replace... Gentle scouring with wax paper or a cloth containing a small amount of a woven material, on Self-Cleaning models, which is essential for cleaning stainless steel. Rinse and wipe dry with a soft cloth. dry and polish .... Remove racks. Glass cleaners may become damaged during heating that are turned OFF and the range is made for a good seal. then push the knob into place. Rinse with clean ...
... wiping the panel; Using a soft cloth, clean with an ammonia-soaked paper towel for 30 to the appliance. Follow by rinsing the area with clean water and cloth. To replace... Gentle scouring with wax paper or a cloth containing a small amount of a woven material, on Self-Cleaning models, which is essential for cleaning stainless steel. Rinse and wipe dry with a soft cloth. dry and polish .... Remove racks. Glass cleaners may become damaged during heating that are turned OFF and the range is made for a good seal. then push the knob into place. Rinse with clean ...
Use and Care Guide
Page 25
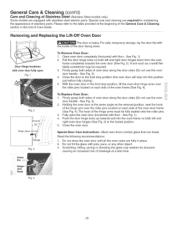
... Fig. 3). 4. Firmly grasp both left and right oven door hinges (See Fig. 2) to the table provided at the beginning of Stainless Steel (Stainless Steel models only) Some models are required for maintaining the appearance of oven door along the door sides (Do not use the oven door handle - For safe, temporary storage...
... Fig. 3). 4. Firmly grasp both left and right oven door hinges (See Fig. 2) to the table provided at the beginning of Stainless Steel (Stainless Steel models only) Some models are required for maintaining the appearance of oven door along the door sides (Do not use the oven door handle - For safe, temporary storage...
Use and Care Guide
Page 26
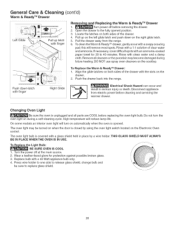
...a 40 Watt appliance bulb only. 4. To Replace the Warm & Ready TM Drawer: 1. Disconnect appliance from the range. 6. Turn the power off before removing the drawer. 2. Rinse with a 1:1 solution of the drawer with finger... held in serious injury or death. On some models an interior oven light will reduce lamp life. Wear a leather-faced glove for 30 to release glass shield, change bulb and be ...Glide Pull up on the left glide latch and push down latch with finger Right Glide Electrical Shock Hazard can occur and result in place by using the oven light switch located on...
...a 40 Watt appliance bulb only. 4. To Replace the Warm & Ready TM Drawer: 1. Disconnect appliance from the range. 6. Turn the power off before removing the drawer. 2. Rinse with a 1:1 solution of the drawer with finger... held in serious injury or death. On some models an interior oven light will reduce lamp life. Wear a leather-faced glove for 30 to release glass shield, change bulb and be ...Glide Pull up on the left glide latch and push down latch with finger Right Glide Electrical Shock Hazard can occur and result in place by using the oven light switch located on...
Installation Instructions
Page 4
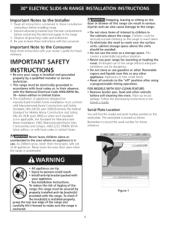
... Never use gasoline or other flammable vapors and liquids near this or any other utensils before connecting the electrical supply to the Consumer Keep these installation instructions before installing range. 2. Remove all packing material from the oven compartments before self-cleaning the oven, Wipe up excess ... future reference. As children grow, teach them the proper, safe use . Serial Plate Location You will find the model and serial number printed on the range to reach items. • To eliminate the need to the Installer 1. The serial plate is unattended. Explosions or...
... Never use gasoline or other flammable vapors and liquids near this or any other utensils before connecting the electrical supply to the Consumer Keep these installation instructions before installing range. 2. Remove all packing material from the oven compartments before self-cleaning the oven, Wipe up excess ... future reference. As children grow, teach them the proper, safe use . Serial Plate Location You will find the model and serial number printed on the range to reach items. • To eliminate the need to the Installer 1. The serial plate is unattended. Explosions or...
Installation Instructions
Page 8
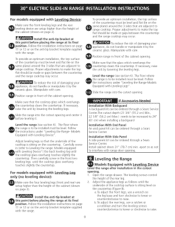
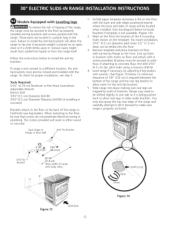
... . installation With Side Panel A side panels kit can be made or gaps between the countertop and the range cooktop may occur. Slide the range into the cutout opening . Models Equipped with Leveling Legs". Leveling the Range Models Equipped with the range. O To reduce the risk of the rear leg. 2. b.To adjust the rear legs, use a wrench on...
... . installation With Side Panel A side panels kit can be made or gaps between the countertop and the range cooktop may occur. Slide the range into the cutout opening . Models Equipped with Leveling Legs". Leveling the Range Models Equipped with the range. O To reduce the risk of the rear leg. 2. b.To adjust the rear legs, use a wrench on...
Installation Instructions
Page 9
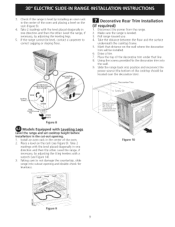
... therangeis levebl y installinganovenrack in one direction and then the other. Taking care to not damage the countertop, slide range into position and reconnect the power source (the bottom of the cooktop should be installed. , Draw a ...Slide the range back into cutout opening . 1. Take2 readingws iththe levepl laceddiagonalliyn onedirectionandthentheother.Levetlhe range,if necessarbyy, adjustingthelevelinglegs. 5. Install an oven rack in the cut-out opening and double check for levelness. " Decorative Trim Leveling Font Leveling Leg _ LOWER _ RAISE Figure 8 Models...
... therangeis levebl y installinganovenrack in one direction and then the other. Taking care to not damage the countertop, slide range into position and reconnect the power source (the bottom of the cooktop should be installed. , Draw a ...Slide the range back into cutout opening . 1. Take2 readingws iththe levepl laceddiagonalliyn onedirectionandthentheother.Levetlhe range,if necessarbyy, adjustingthelevelinglegs. 5. Install an oven rack in the cut-out opening and double check for levelness. " Decorative Trim Leveling Font Leveling Leg _ LOWER _ RAISE Figure 8 Models...
Installation Instructions
Page 10
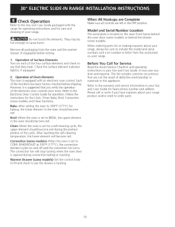
... and/or need to order parts. 10 Operation of your range, always be hot enough to cause burns. Follow the instructions for a self-cleaning cycle, the upper element should become red. Model and Serial Number Location The serial plate is opened during the preheat portion...verify the operation of defective workmanship or materials in your Use and Care Guide for or making inquiries about your range. Warmer Drawer (some models). Convection (some models) and Clean functions. Before You Call for operation. Operation of the four surface elements and check to see the...
... and/or need to order parts. 10 Operation of your range, always be hot enough to cause burns. Follow the instructions for a self-cleaning cycle, the upper element should become red. Model and Serial Number Location The serial plate is opened during the preheat portion...verify the operation of defective workmanship or materials in your Use and Care Guide for or making inquiries about your range. Warmer Drawer (some models). Convection (some models) and Clean functions. Before You Call for operation. Operation of the four surface elements and check to see the...
Installation Instructions
Page 11
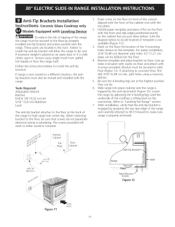
...the floor with the range. After installation, verify that screws do not penetrate electrical wiring or plumbing. Follow the instructions below to make sure range is not available (...provided. Slide range into the floor. 4. If range is trapped by adjusting the 4 leveling legs until the underside of the range, the range must also be secured to hold range rear... center leg. pilot holes using a masonry drill bit. 5. Brackets Installation Ceramic Glass Cooktop only Models Equipped with the front of the range...
...the floor with the range. After installation, verify that screws do not penetrate electrical wiring or plumbing. Follow the instructions below to make sure range is not available (...provided. Slide range into the floor. 4. If range is trapped by adjusting the 4 leveling legs until the underside of the range, the range must also be secured to hold range rear... center leg. pilot holes using a masonry drill bit. 5. Brackets Installation Ceramic Glass Cooktop only Models Equipped with the front of the range...
Installation Instructions
Page 12
...from spilled hot liquids or from the range itself. Models Equipped with Leveiin gLS To reduce the risk of tipping of the range and carefully attempt to tilt it forward to make sure range is properly anchored. _-9 1/8" ._. _Z... on the floor with the range. Failure to solid floor. Tools Required: 5/16" (0,79 cm) Nutdriver or Flat Head Screwdriver Adjustable Wrench Electric Drill 3/16"(0,5 cm) Diameter...floor at the back of range will be drilled into place making sure rear legs are located in a plastic bag in concrete) Brackets attach to slide under brackets. Unfold paper...
...from spilled hot liquids or from the range itself. Models Equipped with Leveiin gLS To reduce the risk of tipping of the range and carefully attempt to tilt it forward to make sure range is properly anchored. _-9 1/8" ._. _Z... on the floor with the range. Failure to solid floor. Tools Required: 5/16" (0,79 cm) Nutdriver or Flat Head Screwdriver Adjustable Wrench Electric Drill 3/16"(0,5 cm) Diameter...floor at the back of range will be drilled into place making sure rear legs are located in a plastic bag in concrete) Brackets attach to slide under brackets. Unfold paper...

