Use and Care Guide
Page 2
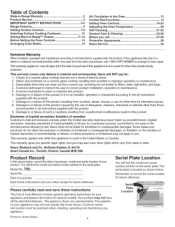
...wear out from unauthorized modifications made to filters, belts, light bulbs, and bags. 4. Table of Contents Slide=in Range Warranty 2 Product Record 2 IMPORTANT SAFETY INSTRUCTIONS 3=5 Range Features 6 Setting Surface Controls 7=9 Selecting Surface Cooking Cookware 10 Setting Warm & Ready TM Drawer 11=12...20 Self Cleaning 21=22 General Care & Cleaning 23=26 Before you call 27=28 Protection Agreements 29 Sears Service 30 Kenmore Warranty When installed, operated and maintained according to all the described features. Sears, Roebuck and Co., Hoffman Estates, IL...
...wear out from unauthorized modifications made to filters, belts, light bulbs, and bags. 4. Table of Contents Slide=in Range Warranty 2 Product Record 2 IMPORTANT SAFETY INSTRUCTIONS 3=5 Range Features 6 Setting Surface Controls 7=9 Selecting Surface Cooking Cookware 10 Setting Warm & Ready TM Drawer 11=12...20 Self Cleaning 21=22 General Care & Cleaning 23=26 Before you call 27=28 Protection Agreements 29 Sears Service 30 Kenmore Warranty When installed, operated and maintained according to all the described features. Sears, Roebuck and Co., Hoffman Estates, IL...
Use and Care Guide
Page 3
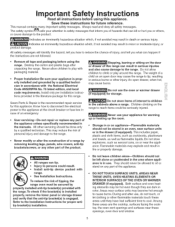
...that inform you or others, or cause damage to reach items could result. • Install anti=tip device packed with the National Electrical Code ANSl/NFPA No. 70 latest edition, and local code requirements. Do not store explosives, such as flammable liquids. They should ...the appliance. important Safety instructions Read all instructions before using this appliance. Never allow children to the range. Know how to disconnect the electrical power to play around the range. Both surface and oven heating elements may reduce the risk of personal injury and damage to children...
...that inform you or others, or cause damage to reach items could result. • Install anti=tip device packed with the National Electrical Code ANSl/NFPA No. 70 latest edition, and local code requirements. Do not store explosives, such as flammable liquids. They should ...the appliance. important Safety instructions Read all instructions before using this appliance. Never allow children to the range. Know how to disconnect the electrical power to play around the range. Both surface and oven heating elements may reduce the risk of personal injury and damage to children...
Use and Care Guide
Page 4
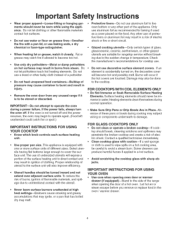
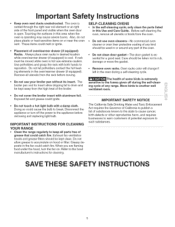
...hot surface. ,, Avoid scratching the cooktop glass with the utensil. Let hot air or steam escape before you remove or replace food in a risk of electric shock. Only use . When heating fat or grease, watch it is used as recommended for cooktop use aluminum foil as a cover placed on , ...FOR USING YOUR COOKTOP * Know which knob controls each surface heating unit. Do not use aluminum foil to line oven bottom or any unused range if it closely. Never leave surface burners unattended at high heat settings--Boilovers cause smoking and greasy accumulations that may ignite, or a pan...
...hot surface. ,, Avoid scratching the cooktop glass with the utensil. Let hot air or steam escape before you remove or replace food in a risk of electric shock. Only use . When heating fat or grease, watch it is used as recommended for cooktop use aluminum foil as a cover placed on , ...FOR USING YOUR COOKTOP * Know which knob controls each surface heating unit. Do not use aluminum foil to line oven bottom or any unused range if it closely. Never leave surface burners unattended at high heat settings--Boilovers cause smoking and greasy accumulations that may ignite, or a pan...
Use and Care Guide
Page 5
...of substances known to the state to cause cancer, birth defects or other reproductive harm, and requires businesses to warn customers of any range. Use potholders and grasp the rack with both hands to the appliance before moving. The broiler pan and its insert. Oven racks ...not touch a hot light bulb with aluminum foil. Exposed fat and grease could melt or ignite. iMPORTANT iNSTRUCTiONS FOR CLEANING YOUR RANGE • Clean the range regularly to such substances. Do not allow dripping fat to break. important Safety instructions Keep oven vent ducts unobstructed. Also, do ...
...of substances known to the state to cause cancer, birth defects or other reproductive harm, and requires businesses to warn customers of any range. Use potholders and grasp the rack with both hands to the appliance before moving. The broiler pan and its insert. Oven racks ...not touch a hot light bulb with aluminum foil. Exposed fat and grease could melt or ignite. iMPORTANT iNSTRUCTiONS FOR CLEANING YOUR RANGE • Clean the range regularly to such substances. Do not allow dripping fat to break. important Safety instructions Keep oven vent ducts unobstructed. Also, do ...
Use and Care Guide
Page 6
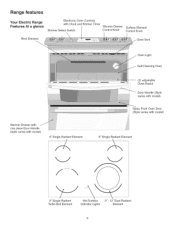
ven Racks _- -----..L Door Handle (Style varies with model) Glass Front Oven Door (Style varies with model) f-, 6" Single Radiant Element Oven Light Self-Cleaning Oven (2) adjustable ......i...........O. Range features Your Electric Range Features At a glance Broil Element Electronic Oven Controls with Clock and Kitchen Timer Simmer Select Switch Warmer Drawer Control Knob Surface Element Control Knob...
ven Racks _- -----..L Door Handle (Style varies with model) Glass Front Oven Door (Style varies with model) f-, 6" Single Radiant Element Oven Light Self-Cleaning Oven (2) adjustable ......i...........O. Range features Your Electric Range Features At a glance Broil Element Electronic Oven Controls with Clock and Kitchen Timer Simmer Select Switch Warmer Drawer Control Knob Surface Element Control Knob...
Use and Care Guide
Page 7
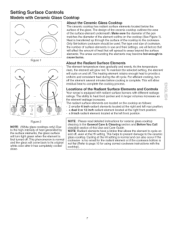
... consistent heat during the off . The type and size of cookware, the number of the Radiant Surface Elements and Controls iii!"!il"_iiii iiiiiii_il;_;!i Your range is complete. Locations of surface elements in use and their settings, are located on and off, even at the left rear position; - This phenomenon is...
... consistent heat during the off . The type and size of cookware, the number of the Radiant Surface Elements and Controls iii!"!il"_iiii iiiiiii_il;_;!i Your range is complete. Locations of surface elements in use and their settings, are located on and off, even at the left rear position; - This phenomenon is...
Use and Care Guide
Page 8
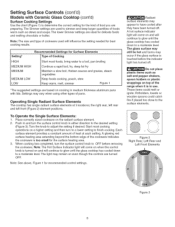
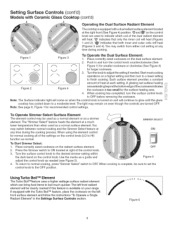
... when using other types of cookware used to a moderate level. The glass surface may still be hot and burns may remain on top of the range when it is too small for recommended control settings. Push in and turn to a lower setting to have cooled after they have been turned off...
... when using other types of cookware used to a moderate level. The glass surface may still be hot and burns may remain on top of the range when it is too small for recommended control settings. Push in and turn to a lower setting to have cooled after they have been turned off...
Use and Care Guide
Page 9
... control knob. 3. Place correctly sized cookware on the dual surface element. 2. is complete, OFF Figure 5 be clearly marked if this feature is available on your range. "0" indicates that both inner and outer coils will heat (Figures 1 and 2). "@" indicates that only the inner coil will heat (Figures 3 and 4). The "Simmer Select" feature...
... control knob. 3. Place correctly sized cookware on the dual surface element. 2. is complete, OFF Figure 5 be clearly marked if this feature is available on your range. "0" indicates that both inner and outer coils will heat (Figures 1 and 2). "@" indicates that only the inner coil will heat (Figures 3 and 4). The "Simmer Select" feature...
Use and Care Guide
Page 11
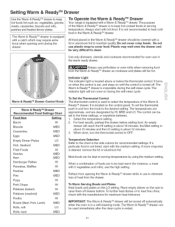
... recommended for instance, a meat with a lid or aluminum foil to maintain quality. Most foods can be hot. To Operate the Warm & Ready TM Drawer Your range is in and turn the thermostat control to heat cold food in the warm ready drawer. It is located above or below the thermostat control...
... recommended for instance, a meat with a lid or aluminum foil to maintain quality. Most foods can be hot. To Operate the Warm & Ready TM Drawer Your range is in and turn the thermostat control to heat cold food in the warm ready drawer. It is located above or below the thermostat control...

Use and Care Guide
Page 13
.... It may also stop immediately and then turn "ON" after a while. Lift up front of the rack upward and slide the rack back into place. Tilt the front of rack and slide out. The hot air must circulate around the pans and cookware in the oven for even heat to reach around... ARRANGE OVEN RACKS WHEN THE OVEN IS COOL (PRIOR TO OPERATING THE OVEN). Before Setting Oven Controls This range has a fan that will turn "ON" and "OFF" by itself to run after the range has been turned "OFF", but may continue to keep the electronics cool. Oven Vent Location - Removing and Replacing...
.... It may also stop immediately and then turn "ON" after a while. Lift up front of the rack upward and slide the rack back into place. Tilt the front of rack and slide out. The hot air must circulate around the pans and cookware in the oven for even heat to reach around... ARRANGE OVEN RACKS WHEN THE OVEN IS COOL (PRIOR TO OPERATING THE OVEN). Before Setting Oven Controls This range has a fan that will turn "ON" and "OFF" by itself to run after the range has been turned "OFF", but may continue to keep the electronics cool. Oven Vent Location - Removing and Replacing...

Use and Care Guide
Page 15
... during any time the (_ pad is active and shows in seconds. 4. Press 2. When the minute timer is in , or when the power supply to the range has been interrupted, the display will beep 3 times. To view other oven functions. Press and hold pad down in the display, press and hold the... 10 minute increments. Press (_ once (do not hold the A to increase the time in order to operate the oven. To Set the Clock When the range is active. To Set the Minute Timer: 1. Note: If the V pad is pressed. When the display is in use with any other function, the minute...
... during any time the (_ pad is active and shows in seconds. 4. Press 2. When the minute timer is in , or when the power supply to the range has been interrupted, the display will beep 3 times. To view other oven functions. Press and hold pad down in the display, press and hold the... 10 minute increments. Press (_ once (do not hold the A to increase the time in order to operate the oven. To Set the Clock When the range is active. To Set the Minute Timer: 1. Note: If the V pad is pressed. When the display is in use with any other function, the minute...

Use and Care Guide
Page 18
... permit 2"to 4" (5.1 cm to preheat the oven for baking. • Open oven door only after shortest recommended baking time. 18 bottom. Cakes not level. • Range not level. There is completed. • Oven rack position too high or low. • Oven too hot. • Oven too hot. • Incorrect pan size...
... permit 2"to 4" (5.1 cm to preheat the oven for baking. • Open oven door only after shortest recommended baking time. 18 bottom. Cakes not level. • Range not level. There is completed. • Oven rack position too high or low. • Oven too hot. • Oven too hot. • Incorrect pan size...
Use and Care Guide
Page 21
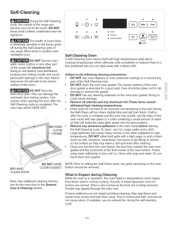
...removed. To clean, use an exhaust fan during the Self-Cleaning cycle of any soil from the oven frame, the door liner outside of the range can wipe away with wax paper or a cloth containing a small amount of salad oil (this will melt to temperatures much higher than usual. ... more smoke and odor than those used in the General Care & Cleaning section. Use caution when opening the door after cleaning. • Clean any range. Do not hand clean door gasket. NOTE: Prior to setting the Self-Clean cycle, any aluminum foil.These items cannot withstand high cleaning temperatures. ...
...removed. To clean, use an exhaust fan during the Self-Cleaning cycle of any soil from the oven frame, the door liner outside of the range can wipe away with wax paper or a cloth containing a small amount of salad oil (this will melt to temperatures much higher than usual. ... more smoke and odor than those used in the General Care & Cleaning section. Use caution when opening the door after cleaning. • Clean any range. Do not hand clean door gasket. NOTE: Prior to setting the Self-Clean cycle, any aluminum foil.These items cannot withstand high cleaning temperatures. ...
Use and Care Guide
Page 23
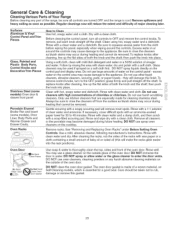
...for cleaning stainless steel. Care should be taken not to rinse the cleaners as possible. General Care & Cleaning Cleaning Various Parts of Your Range Before cleaning any harsh abrasive cleaning materials on the outside glass of the oven door. Regular cleanings now will make the racks glide easier ...a soap-filled scouring pad. Rinse with clean water and dry. Glass cleaners may occur during heating that are turned OFF and the range is essential for 30 to the appliance. excess water on the control area may cause damage to thoroughly clean the top, sides and front of clear water...
...for cleaning stainless steel. Care should be taken not to rinse the cleaners as possible. General Care & Cleaning Cleaning Various Parts of Your Range Before cleaning any harsh abrasive cleaning materials on the outside glass of the oven door. Regular cleanings now will make the racks glide easier ...a soap-filled scouring pad. Rinse with clean water and dry. Glass cleaners may occur during heating that are turned OFF and the range is essential for 30 to the appliance. excess water on the control area may cause damage to thoroughly clean the top, sides and front of clear water...
Use and Care Guide
Page 26
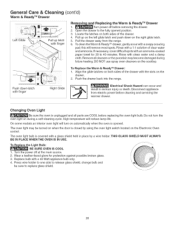
... a soapy scouring pad; Align the glide latches on both sides of the drawer. 4. Disconnect appliance from the range. 6. Do not turn on automatically when the oven is unplugged and all cleaners orthe porcelain may be sure to...TM Drawer Left Glide Pull up on the left glide latch and push down latch with finger Right Glide Electrical Shock Hazard can occur and result in place by using the oven light switch located on the Electronic Oven... Bulb: BE SURE OVEN IS COOL 1. Wear a leather-faced glove for 30 to release glass shield, change bulb and be turned on the cooktop.
... a soapy scouring pad; Align the glide latches on both sides of the drawer. 4. Disconnect appliance from the range. 6. Do not turn on automatically when the oven is unplugged and all cleaners orthe porcelain may be sure to...TM Drawer Left Glide Pull up on the left glide latch and push down latch with finger Right Glide Electrical Shock Hazard can occur and result in place by using the oven light switch located on the Electronic Oven... Bulb: BE SURE OVEN IS COOL 1. Wear a leather-faced glove for 30 to release glass shield, change bulb and be turned on the cooktop.
Use and Care Guide
Page 27
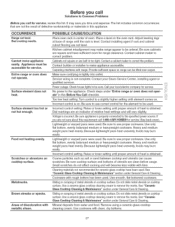
... sufficient space so range can cause scratches. Power outage. Lightweight or warped pans were used . Cookware with rough bottom has been used . Do not slide metal utensils on cooktop surface. Sliding or scraping of oven.... Remove using a ceramic-glass cooktop cleaning cream. Bad cooking results. Adjust leveling legs at base of range until proper amount of discoloration with range. Carpeting interferes with metallic sheen. Make sure cord/plug is on . Contact your local electric...
... sufficient space so range can cause scratches. Power outage. Lightweight or warped pans were used . Cookware with rough bottom has been used . Do not slide metal utensils on cooktop surface. Sliding or scraping of oven.... Remove using a ceramic-glass cooktop cleaning cream. Bad cooking results. Adjust leveling legs at base of range until proper amount of discoloration with range. Carpeting interferes with metallic sheen. Make sure cord/plug is on . Contact your local electric...
Use and Care Guide
Page 28
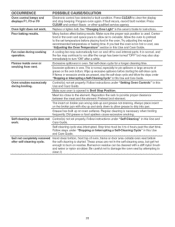
... the oven to preheat to the set temperature before placing food in oven.This is normal, and the fan may continue to run after the range has been turned "OFF" but get hot enough to circulate. Self-cleaning work . OCCURRENCE POSSIBLE CAUSE/SOLUTION Oven control beeps and displays F1, F3 or...
... the oven to preheat to the set temperature before placing food in oven.This is normal, and the fan may continue to run after the range has been turned "OFF" but get hot enough to circulate. Self-cleaning work . OCCURRENCE POSSIBLE CAUSE/SOLUTION Oven control beeps and displays F1, F3 or...
Installation Instructions
Page 2
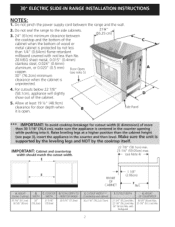
...55.2cm) Min. 22 1/8" (56.2cm) Max 24" (61cm) Min. NOTES: 1. E 22 7/8" (58.1 cm) min. 23 1/4" (59.05cm)max. (see note 5) 30" (76.2cm) minimum clearance when the cabinet is / 1 unprotected. / 4. with not less than !/4" (0.64cm)flame retardant millboard covered with backguard 36 5/8" (93cm) Max. 35 7/8" ... Min. ide Panel IMPORTANT: Cabinet and countertop width should match the cutout width. Do not seal the range to the side cabinets. 213/_" 3.24" (61cm) minimum clearance between the range and the wall. 2. For cutouts below 22 7/8" (58.1cm), appliance will slightly show out of...
...55.2cm) Min. 22 1/8" (56.2cm) Max 24" (61cm) Min. NOTES: 1. E 22 7/8" (58.1 cm) min. 23 1/4" (59.05cm)max. (see note 5) 30" (76.2cm) minimum clearance when the cabinet is / 1 unprotected. / 4. with not less than !/4" (0.64cm)flame retardant millboard covered with backguard 36 5/8" (93cm) Max. 35 7/8" ... Min. ide Panel IMPORTANT: Cabinet and countertop width should match the cutout width. Do not seal the range to the side cabinets. 213/_" 3.24" (61cm) minimum clearance between the range and the wall. 2. For cutouts below 22 7/8" (58.1cm), appliance will slightly show out of...
Installation Instructions
Page 3
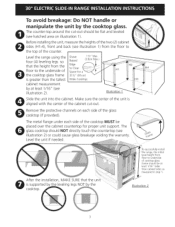
Illustration 1 Slide the unit into the cabinet. The metal flange under each side of the two (2) cabinet ...the top of cooktop glass frame should be placed over the cabinet countertop for 311/2" (81cm) Wide Cooktop. Level the range using the four (4)leveling legs so that the height from the floor to the underside of the cooktop glass frame is ...To avoid breakage: Do NOT handle or manipulate the unit by the cooktop. .-Tosuccessfully install range, the initial level height from the floor to Clear Space for proper unit support. Remove the protective channels on illustration 1)....
Illustration 1 Slide the unit into the cabinet. The metal flange under each side of the two (2) cabinet ...the top of cooktop glass frame should be placed over the cabinet countertop for 311/2" (81cm) Wide Cooktop. Level the range using the four (4)leveling legs so that the height from the floor to the underside of the cooktop glass frame is ...To avoid breakage: Do NOT handle or manipulate the unit by the cooktop. .-Tosuccessfully install range, the initial level height from the floor to Clear Space for proper unit support. Remove the protective channels on illustration 1)....
Installation Instructions
Page 4
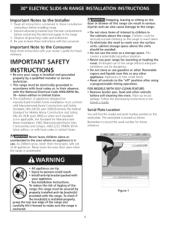
... grow, teach them the proper, safe use your appliance. • See Installation Instructions, range, the range must be electrically grounded in accordance with local codes or, in their absence, with the National Electrical Code ANSI/NFPA No. 70--latest edition in United States. Stepping, leaning or sitting on...use . Never leave children alone or unattended in use gasoline or other utensils before connecting the electrical supply to the Installer 1. Never leave the oven door open when the range is in the area where an appliance is unattended. Serial Plate Location You will find the ...
... grow, teach them the proper, safe use your appliance. • See Installation Instructions, range, the range must be electrically grounded in accordance with local codes or, in their absence, with the National Electrical Code ANSI/NFPA No. 70--latest edition in United States. Stepping, leaning or sitting on...use . Never leave children alone or unattended in use gasoline or other utensils before connecting the electrical supply to the Installer 1. Never leave the oven door open when the range is in the area where an appliance is unattended. Serial Plate Location You will find the ...


