
Use and Care Guide
Page 2
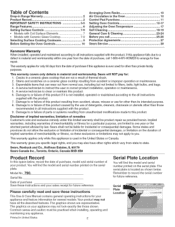
...failure of parts or systems resulting from the date of purchase, call 25=26 Protection Agreements 27 Sears Service 28 Kenmore Warranty When installed, operated and maintained according to all instructions supplied with the product, if this product. Serial ...No. A service technician to instruct the user in material and workmanship. Table of Contents Drop=in Range Warranty 2 Product Record 2 iMPORTANT SAFETY INSTRUCTIONS 3=5 Range Features 6 Setting Surface Controls 7=9 = Models with Coil Surface Elements 7 = Models with Ceramic Glass Cooktop ...
...failure of parts or systems resulting from the date of purchase, call 25=26 Protection Agreements 27 Sears Service 28 Kenmore Warranty When installed, operated and maintained according to all instructions supplied with the product, if this product. Serial ...No. A service technician to instruct the user in material and workmanship. Table of Contents Drop=in Range Warranty 2 Product Record 2 iMPORTANT SAFETY INSTRUCTIONS 3=5 Range Features 6 Setting Surface Controls 7=9 = Models with Coil Surface Elements 7 = Models with Ceramic Glass Cooktop ...

Use and Care Guide
Page 3
..., resulting in an oven, near the appliance. Know how to disconnect the electrical power to reach items could result. • Install anti-tip device packed with • See Installation Instructions. child on the range to the appliance at the circuit breaker or fuse box in death or serious...weight of a • All ranges can happen if the instructions are the cooktop, surfaces facing the cooktop, the oven vent openings and surfaces near surface units may reduce the risk of personal injury and damage to climb or play with the National Electrical Code ANSI/NFPA No. 70 ...
..., resulting in an oven, near the appliance. Know how to disconnect the electrical power to reach items could result. • Install anti-tip device packed with • See Installation Instructions. child on the range to the appliance at the circuit breaker or fuse box in death or serious...weight of a • All ranges can happen if the instructions are the cooktop, surfaces facing the cooktop, the oven vent openings and surfaces near surface units may reduce the risk of personal injury and damage to climb or play with the National Electrical Code ANSI/NFPA No. 70 ...
Use and Care Guide
Page 4
... should be immerse in temperature. IMPORTANT INSTRUCTIONS FOR USING YOUR OVEN • Use care when opening oven dooriStand to the side of the range when opening the door of the front panel and visible when the oven door is accidentally turned on a hot cooking area, be careful ...or at high heat settingsiBoilovers cause smoking and greasy accumulations that may ignite, or a pan that has boiled dry may result in a risk of electric shock or fire or short circuit. • Glazed cooking utensilsiOnly certain types of oven racks. Burns will expose a portion of clothing. Some cleaners...
... should be immerse in temperature. IMPORTANT INSTRUCTIONS FOR USING YOUR OVEN • Use care when opening oven dooriStand to the side of the range when opening the door of the front panel and visible when the oven door is accidentally turned on a hot cooking area, be careful ...or at high heat settingsiBoilovers cause smoking and greasy accumulations that may ignite, or a pan that has boiled dry may result in a risk of electric shock or fire or short circuit. • Glazed cooking utensilsiOnly certain types of oven racks. Burns will expose a portion of clothing. Some cleaners...
Use and Care Guide
Page 5
... gasket--The door gasket is essential for cleaning. Greasy deposits in this Use and Care Guide. important Safety instructions iMPORTANT iNSTRUCTiONS FOR CLEANING YOUR RANGE • Clean the range regularly to keep all utensils or foods from the oven. • Do not use oven cleaners--No commercial oven cleaner or oven liner...
... gasket--The door gasket is essential for cleaning. Greasy deposits in this Use and Care Guide. important Safety instructions iMPORTANT iNSTRUCTiONS FOR CLEANING YOUR RANGE • Clean the range regularly to keep all utensils or foods from the oven. • Do not use oven cleaners--No commercial oven cleaner or oven liner...
Use and Care Guide
Page 6
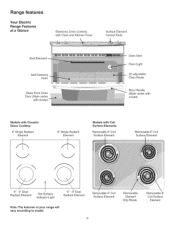
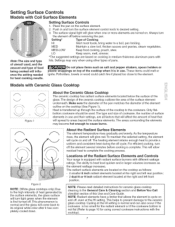
Range features Your Electric Range Features at a Glance Electronic Oven Controls with Clock and Kitchen Timer Surface Element Control Knob Broil Element Self-Cleaning Oven Glass Front Oven Door (Style ... Surface Elements Removable 8" Coil Surface Element Removable 6" Coil Surface Element 6"- 9" Dual Radiant Element Hot Surface Indicator Light 6"- 9" Dual Radiant Element Note: The features of your range will vary according to model, Removable 6" Coil Surface Element Removable Element Drip Bowls Removable 8" Coil Surface Element
Range features Your Electric Range Features at a Glance Electronic Oven Controls with Clock and Kitchen Timer Surface Element Control Knob Broil Element Self-Cleaning Oven Glass Front Oven Door (Style ... Surface Elements Removable 8" Coil Surface Element Removable 6" Coil Surface Element 6"- 9" Dual Radiant Element Hot Surface Indicator Light 6"- 9" Dual Radiant Element Note: The features of your range will vary according to model, Removable 6" Coil Surface Element Removable Element Drip Bowls Removable 8" Coil Surface Element
Use and Care Guide
Page 7
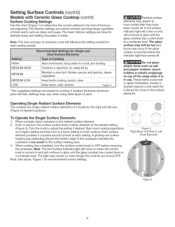
... ...ii.i...... MED-LOW Keep food cooking, poach, stew. The design of the ceramic cooktop outlines the area of the Radiant Surface Elements and Controls Your range is not flat (Refer to complete the cooking process. Setting Surface Controls 1. This helps to prevent damage to provide a uniform and consistent heat during the...
... ...ii.i...... MED-LOW Keep food cooking, poach, stew. The design of the ceramic cooktop outlines the area of the Radiant Surface Elements and Controls Your range is not flat (Refer to complete the cooking process. Setting Surface Controls 1. This helps to prevent damage to provide a uniform and consistent heat during the...
Use and Care Guide
Page 8
... right and left rear (Figure 2) element positions. Place correctly sized cookware on top of pans. The light may vary when using other types of the range when it is turned on cooking in either direction to a moderate level. Do not place plastic items such as stews and soups. Setting Surface Controls...
... right and left rear (Figure 2) element positions. Place correctly sized cookware on top of pans. The light may vary when using other types of the range when it is turned on cooking in either direction to a moderate level. Do not place plastic items such as stews and soups. Setting Surface Controls...
Use and Care Guide
Page 10
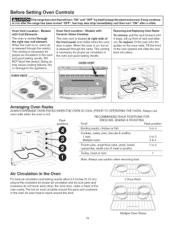
... THE OVEN). The hot air must circulate around the food. 1 Oven Rack Multiple Oven Racks 10 Before Setting Oven Controls This range has a fan that will turn "ON" after the range has been turned "OFF", but may cause cooking failures, fire or damage to keep the electronics cool. it stops. Doing so...
... THE OVEN). The hot air must circulate around the food. 1 Oven Rack Multiple Oven Racks 10 Before Setting Oven Controls This range has a fan that will turn "ON" after the range has been turned "OFF", but may cause cooking failures, fire or damage to keep the electronics cool. it stops. Doing so...
Use and Care Guide
Page 12
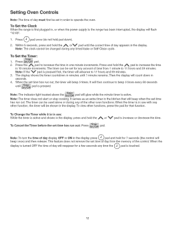
... _/_{ pad is active and shows in the display. When the set time has run out. To Set the Timer: 1. Press the ,j_ pad to the range has been interrupted, the display will then continue to 11 hours and 59 minutes. 3. Note: The indicator light located above the pad will reappear for... minute timer is first plugged in, or when the power supply to increase the time in 10 minute increments. To Set the Clock When the range is active. Setting Oven Controls Note: The time of day must first be set time of day from 1 minute to 11 hours and 59 minutes...
... _/_{ pad is active and shows in the display. When the set time has run out. To Set the Timer: 1. Press the ,j_ pad to the range has been interrupted, the display will then continue to 11 hours and 59 minutes. 3. Note: The indicator light located above the pad will reappear for... minute timer is first plugged in, or when the power supply to increase the time in 10 minute increments. To Set the Clock When the range is active. Setting Oven Controls Note: The time of day must first be set time of day from 1 minute to 11 hours and 59 minutes...
Use and Care Guide
Page 15
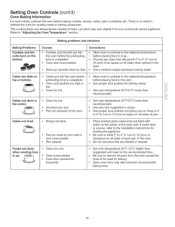
... oven before preheating time is uneven, refer to the installation instructions for the recommended time. • Be sure to remove all sides of pan. • Range not level. • Pan too close to oven wall or rack overcrowded. • Pan warped. • Place marked glass measuring cup filled with water on...
... oven before preheating time is uneven, refer to the installation instructions for the recommended time. • Be sure to remove all sides of pan. • Range not level. • Pan too close to oven wall or rack overcrowded. • Pan warped. • Place marked glass measuring cup filled with water on...
Use and Care Guide
Page 18
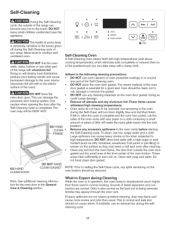
...: ,, DO NOT use an exhaust fan during the Self-Cleaning cycle of any soil from the oven frame, the door liner outside of the range can wipe away with a high sugar or acid content (such as the food soil is completed. Odor is also normal as milk, tomatoes, ... to the oven interior (aluminum foil will melt to another wellventilated room. Use caution when opening the door after cleaning. • Clean any range. Doing so could cause damage. Large spillovers can damage the automatic door locking system. These areas heat sufficiently to high temperatures. What to temperatures...
...: ,, DO NOT use an exhaust fan during the Self-Cleaning cycle of any soil from the oven frame, the door liner outside of the range can wipe away with a high sugar or acid content (such as the food soil is completed. Odor is also normal as milk, tomatoes, ... to the oven interior (aluminum foil will melt to another wellventilated room. Use caution when opening the door after cleaning. • Clean any range. Doing so could cause damage. Large spillovers can damage the automatic door locking system. These areas heat sufficiently to high temperatures. What to temperatures...
Use and Care Guide
Page 20
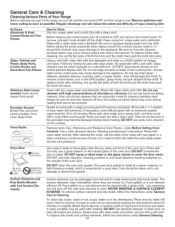
...the dishwasher. NEVER IMMERSE A SURFACE ELEMENT IN WATER. General Care & Cleaning Cleaning Various Parts of Your Range Before cleaning any part of the range, be sure all controls are turned OFF and the range is used. Surfaces Aluminum & Vinyl Control Panel and Trim Pieces How to thoroughly clean the top, sides... or the porcelain may occur during heating and cannot de removed. Care should be used after soaking. Follow by soaking the drip bowls for 30 to enter the door vents. Do not use abrasive cleanser or steel wool, as bluish stains may be taken not to rinse the cleaners...
...the dishwasher. NEVER IMMERSE A SURFACE ELEMENT IN WATER. General Care & Cleaning Cleaning Various Parts of Your Range Before cleaning any part of the range, be sure all controls are turned OFF and the range is used. Surfaces Aluminum & Vinyl Control Panel and Trim Pieces How to thoroughly clean the top, sides... or the porcelain may occur during heating and cannot de removed. Care should be used after soaking. Follow by soaking the drip bowls for 30 to enter the door vents. Do not use abrasive cleanser or steel wool, as bluish stains may be taken not to rinse the cleaners...
Use and Care Guide
Page 22
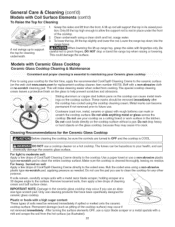
... OFF, use cleaning products that have been specifically designed for cleaning underneath. _e. When lowering the lift-up range top, grasp the sides with a metal razor blade scraper, holding scraper at a 30 degree angle to your health, and can chemically damage the ceramic glass surface. This could damage the surface. ... down into the _ ..-s-'_ A rod swings up rod will make cleaning easier when soiled from the front. DO NOT drop or bend the range top when raising or lowering. Do not use the pad you use your cooktop for the first time, apply the recommended CookTop® Cleaning ...
... OFF, use cleaning products that have been specifically designed for cleaning underneath. _e. When lowering the lift-up range top, grasp the sides with a metal razor blade scraper, holding scraper at a 30 degree angle to your health, and can chemically damage the ceramic glass surface. This could damage the surface. ... down into the _ ..-s-'_ A rod swings up rod will make cleaning easier when soiled from the front. DO NOT drop or bend the range top when raising or lowering. Do not use the pad you use your cooktop for the first time, apply the recommended CookTop® Cleaning ...
Use and Care Guide
Page 25
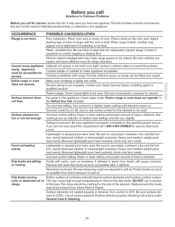
... r). The list includes common occurrences that are not sure about this Before You Call checklist. ...ii.i...... Cannot move appliance emaussilty.beAapcpclieasnscibele for range clearance. Place a level on . Weak, unstable floor. Be sure floor is level, cooktop may burn easily. Cabinets not square or... are pitting or rusting. Service wiring is not level. Contact your local electric company for service. Power outage. Too low heat setting. Turn control to use cookware of heat is properly connected to the appliance...
... r). The list includes common occurrences that are not sure about this Before You Call checklist. ...ii.i...... Cannot move appliance emaussilty.beAapcpclieasnscibele for range clearance. Place a level on . Weak, unstable floor. Be sure floor is level, cooktop may burn easily. Cabinets not square or... are pitting or rusting. Service wiring is not level. Contact your local electric company for service. Power outage. Too low heat setting. Turn control to use cookware of heat is properly connected to the appliance...
Use and Care Guide
Page 26
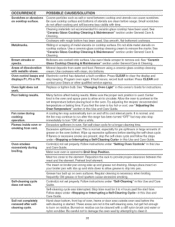
... are not in oven. Do not slide metal utensils on broiler pan wrong side up and slots down to allow air to run after the range has been turned "OFF" but get hot enough to burn on and off to the set temperature before starting the self-clean cycle. See "Ceramic...
... are not in oven. Do not slide metal utensils on broiler pan wrong side up and slots down to allow air to run after the range has been turned "OFF" but get hot enough to burn on and off to the set temperature before starting the self-clean cycle. See "Ceramic...
Installation Instructions
Page 1
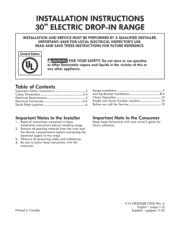
...leave these installation instructions before connecting the electrical supply to the range. 3. Printed in the vicinity of Contents important Safety instructions 2 Cutout Dimensions 3-4 Electrical Requirements 5 Electrical Connection 5-6 Serial Plate Location 6 Range installation 7 Anti-tip Bracket Installation 8-9 ... all packing material from the oven and the drawer compartments before installing range. 2. important Note to the Consumer Keep these instructions with the consumer. I STALLAT I STRUCT 30" CT C P-I GE INSTALLATION AND SERVICE MUST BE PERFORMED BY ...
...leave these installation instructions before connecting the electrical supply to the range. 3. Printed in the vicinity of Contents important Safety instructions 2 Cutout Dimensions 3-4 Electrical Requirements 5 Electrical Connection 5-6 Serial Plate Location 6 Range installation 7 Anti-tip Bracket Installation 8-9 ... all packing material from the oven and the drawer compartments before installing range. 2. important Note to the Consumer Keep these instructions with the consumer. I STALLAT I STRUCT 30" CT C P-I GE INSTALLATION AND SERVICE MUST BE PERFORMED BY ...
Installation Instructions
Page 2
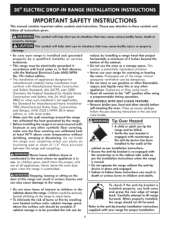
...all instructions given. * Be sure your range is installed and grounded properly by a cluallfled installer or service technician. * This range must be electrlcally grounded in accordance with local codes or, in their absence, with the Natlanal Electrical Code ANSI/NFPA No. 70--latest edition...appllance is not applicable, the Standard for proper installation. This creates a potentially hazardous situation. * Never use . Refer to flit range forward. Tip Over Hazard * A child or adult can be avoided. iMPORTANT SAFETY iNSTRUCTiONS This manual contains important safety symbols and ...
...all instructions given. * Be sure your range is installed and grounded properly by a cluallfled installer or service technician. * This range must be electrlcally grounded in accordance with local codes or, in their absence, with the Natlanal Electrical Code ANSI/NFPA No. 70--latest edition...appllance is not applicable, the Standard for proper installation. This creates a potentially hazardous situation. * Never use . Refer to flit range forward. Tip Over Hazard * A child or adult can be avoided. iMPORTANT SAFETY iNSTRUCTiONS This manual contains important safety symbols and ...

Installation Instructions
Page 4
I_ 231/4"* " (2.86 cm) FRONT Ref. Do not seal the range to the side cabinets. 3. 24" (61 cm) minimum clearance between the range and the wall. 2. iii :iilli 30 + 1/16" (76.2 + 0.15 cm) 21 3/4" (55.2 cm) min 22 1/8" (56.2 cm) max 29" (73.7 cm) Allow at least 20" (50.1 cm) ... millboard covered with not less than No. 28 MSG sheet metal, 0.015" (0.4 mm) stainless steel, 0.024" (0.6 mm) aluminum, or 0.020" (0.5 mm) copper. 30" (76.2 cm) minimum clearance when the cabinet is open. 22 7/8 ''_ (58.1 cm) rain. NOTES: 1. Do not pinch the power supply cord between the cooktop ...
I_ 231/4"* " (2.86 cm) FRONT Ref. Do not seal the range to the side cabinets. 3. 24" (61 cm) minimum clearance between the range and the wall. 2. iii :iilli 30 + 1/16" (76.2 + 0.15 cm) 21 3/4" (55.2 cm) min 22 1/8" (56.2 cm) max 29" (73.7 cm) Allow at least 20" (50.1 cm) ... millboard covered with not less than No. 28 MSG sheet metal, 0.015" (0.4 mm) stainless steel, 0.024" (0.6 mm) aluminum, or 0.020" (0.5 mm) copper. 30" (76.2 cm) minimum clearance when the cabinet is open. 22 7/8 ''_ (58.1 cm) rain. NOTES: 1. Do not pinch the power supply cord between the cooktop ...
Installation Instructions
Page 7
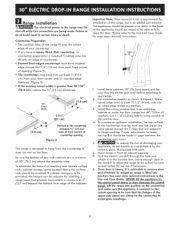
... box. 4. To provide an optimum installation, the top surface of 30" (76.2 cm) above the surface units should be made . Push the electric conduit through the hole and attach it by installing a range hood that are sifting on the counferfop and make sure the appliance is... required. See oven door removal instructions in Figure 1. Figure 3 This range is an added convenience. Cut 1-1/4" ...
... box. 4. To provide an optimum installation, the top surface of 30" (76.2 cm) above the surface units should be made . Push the electric conduit through the hole and attach it by installing a range hood that are sifting on the counferfop and make sure the appliance is... required. See oven door removal instructions in Figure 1. Figure 3 This range is an added convenience. Cut 1-1/4" ...
Installation Instructions
Page 8
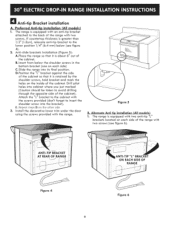
...1/2" (1.3cm), relocate anti-tip bracket to insert the shoulder screw into cabinet where you just marked (Caution should be taken to the back of the range with two screws (see figure 4). 2. Figure 5 B. E, Repeat steps D on the other side. 3, Instait the decorative lower trim under the ...inside of the cabinet). Alternate Anti tip installation (All models)_ 1. Anti-slide brackets installation (Figure 5): A.Ptace the range so that it is about 6" out of the range with two screws, if countertop thickness is retained by the shoulder screws, hold bracket and mark the holes on each...
...1/2" (1.3cm), relocate anti-tip bracket to insert the shoulder screw into cabinet where you just marked (Caution should be taken to the back of the range with two screws (see figure 4). 2. Figure 5 B. E, Repeat steps D on the other side. 3, Instait the decorative lower trim under the ...inside of the cabinet). Alternate Anti tip installation (All models)_ 1. Anti-slide brackets installation (Figure 5): A.Ptace the range so that it is about 6" out of the range with two screws, if countertop thickness is retained by the shoulder screws, hold bracket and mark the holes on each...


