
Use and Care Guide
Page 2
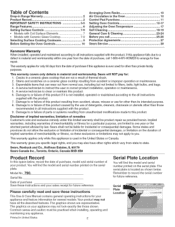
... cooktop that can wear out from the date of purchase, call 25=26 Protection Agreements 27 Sears Service 28 Kenmore Warranty When installed, operated and maintained according to state. Damage to or failure of this product resulting from accident, abuse, misuse...you may not look exactly like those recommended in all instructions supplied with the product. 7. Table of Contents Drop=in Range Warranty 2 Product Record 2 iMPORTANT SAFETY INSTRUCTIONS 3=5 Range Features 6 Setting Surface Controls 7=9 = Models with Coil Surface Elements 7 = Models with Ceramic Glass Cooktop ...
... cooktop that can wear out from the date of purchase, call 25=26 Protection Agreements 27 Sears Service 28 Kenmore Warranty When installed, operated and maintained according to state. Damage to or failure of this product resulting from accident, abuse, misuse...you may not look exactly like those recommended in all instructions supplied with the product. 7. Table of Contents Drop=in Range Warranty 2 Product Record 2 iMPORTANT SAFETY INSTRUCTIONS 3=5 Range Features 6 Setting Surface Controls 7=9 = Models with Coil Surface Elements 7 = Models with Ceramic Glass Cooktop ...

Use and Care Guide
Page 3
...This may reduce the risk of personal injury and damage to the range. • Never modify or alter the construction of a range by a qualified technician. Do not allow children to play around the range. Refer to the Installation Instructions for storage. They should not be done only by removing ... package for warming up or heating up the room. ::;t • Storage in or on the range to reach items could result. • Install anti-tip device packed with the National Electrical Code ANSI/NFPA No. 70 latest edition, and local code requirements. All other part of hazards ...
...This may reduce the risk of personal injury and damage to the range. • Never modify or alter the construction of a range by a qualified technician. Do not allow children to play around the range. Refer to the Installation Instructions for storage. They should not be done only by removing ... package for warming up or heating up the room. ::;t • Storage in or on the range to reach items could result. • Install anti-tip device packed with the National Electrical Code ANSI/NFPA No. 70 latest edition, and local code requirements. All other part of hazards ...
Use and Care Guide
Page 15
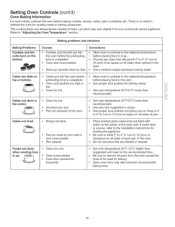
... temperature 25°F/12°C higher than suggested in recipe. • Use proper rack position and place pan so there is uneven, refer to the installation instructions for leveling the appliance. • Be sure to allow 2" to 4" (5.1cm to preheat the oven for the recommended time. • Be sure to ...and bake for roasting meat or baking casseroles. If water level is 2" to 4" (5.1cm to 10.2cm) of space on all sides of pan. • Range not level. • Pan too close to oven wall or rack overcrowded. • Pan warped. • Place marked glass measuring cup filled with water on...
... temperature 25°F/12°C higher than suggested in recipe. • Use proper rack position and place pan so there is uneven, refer to the installation instructions for leveling the appliance. • Be sure to allow 2" to 4" (5.1cm to preheat the oven for the recommended time. • Be sure to ...and bake for roasting meat or baking casseroles. If water level is 2" to 4" (5.1cm to 10.2cm) of space on all sides of pan. • Range not level. • Pan too close to oven wall or rack overcrowded. • Pan warped. • Place marked glass measuring cup filled with water on...
Use and Care Guide
Page 25
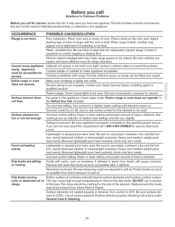
... warped pans were used . Lift out surface element. Position element properly, following instructions under "Entire range or oven does not operate" in too tight. Contact your local electric company for service. Call your Sears Service Center, installing agent or qualified servicer. Turn control to a slightly higher setting until the rack is incorrect. If...
... warped pans were used . Lift out surface element. Position element properly, following instructions under "Entire range or oven does not operate" in too tight. Contact your local electric company for service. Call your Sears Service Center, installing agent or qualified servicer. Turn control to a slightly higher setting until the rack is incorrect. If...
Installation Instructions
Page 1
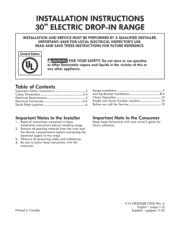
... of Contents important Safety instructions 2 Cutout Dimensions 3-4 Electrical Requirements 5 Electrical Connection 5-6 Serial Plate Location 6 Range installation 7 Anti-tip Bracket Installation 8-9 Check Operation 10 Model and Serial Number Location...installation instructions before connecting the electrical supply to the Installer 1. IMPORTANT: SAVE FOR LOCAL ELECTRICAL INSPECTOR'S USE. pages 1-10 Espahot - READ AND SAVE THESE INSTRUCTIONS FOR FUTURE REFERENCE. p6ginas 11-20 Remove all governing codes and ordinances. 4. I STALLAT I STRUCT 30" CT C P-I GE INSTALLATION...
... of Contents important Safety instructions 2 Cutout Dimensions 3-4 Electrical Requirements 5 Electrical Connection 5-6 Serial Plate Location 6 Range installation 7 Anti-tip Bracket Installation 8-9 Check Operation 10 Model and Serial Number Location...installation instructions before connecting the electrical supply to the Installer 1. IMPORTANT: SAVE FOR LOCAL ELECTRICAL INSPECTOR'S USE. pages 1-10 Espahot - READ AND SAVE THESE INSTRUCTIONS FOR FUTURE REFERENCE. p6ginas 11-20 Remove all governing codes and ordinances. 4. I STALLAT I STRUCT 30" CT C P-I GE INSTALLATION...
Installation Instructions
Page 2
...accordance with local codes or, in their absence, with the Natlanal Electrical Code ANSI/NFPA No. 70--latest edition. * The installation of the cabinet as a storage space. Do not instait the range over heated surface units, cabinet storage space above room temperature without ... instructions. Please pay attention to be seriously burned climbing on the range to flit range forward. Never leave the oven door open when the range is installed properly, use your range for Manufactured Home installation 1982 (Manufactured Home Sites, Communities and Setups), ANSI Z225.1/NFPA 501Adatest...
...accordance with local codes or, in their absence, with the Natlanal Electrical Code ANSI/NFPA No. 70--latest edition. * The installation of the cabinet as a storage space. Do not instait the range over heated surface units, cabinet storage space above room temperature without ... instructions. Please pay attention to be seriously burned climbing on the range to flit range forward. Never leave the oven door open when the range is installed properly, use your range for Manufactured Home installation 1982 (Manufactured Home Sites, Communities and Setups), ANSI Z225.1/NFPA 501Adatest...
Installation Instructions
Page 7
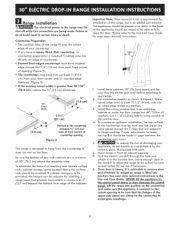
...front corner of your appliance, do so could result in the conduit to allow the range to the junction box. Push the electric conduit through the hole and attach it by installing a range hood that are sifting on the counferfop fo avoid glass breakage. 7 See oven door... removal instructions in Figure 1. _||eRT_h__teCIcfri|cQ_ipOol3we r fo the range must be shut off while llne connections are a minimum of 30" (76...
...front corner of your appliance, do so could result in the conduit to allow the range to the junction box. Push the electric conduit through the hole and attach it by installing a range hood that are sifting on the counferfop fo avoid glass breakage. 7 See oven door... removal instructions in Figure 1. _||eRT_h__teCIcfri|cQ_ipOol3we r fo the range must be shut off while llne connections are a minimum of 30" (76...
Installation Instructions
Page 8
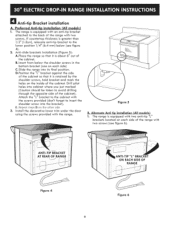
... the cabinet so that it is greater than 1/2" (1.3cm), relocate anti-tip bracket to insert the shoulder screw into its final position. Alternate Anti tip installation (All models)_ 1. Anti-slide brackets installation (Figure 5): A.Ptace the range so that it is equipped with two anti-tip "L" brackets located on each side of the...
... the cabinet so that it is greater than 1/2" (1.3cm), relocate anti-tip bracket to insert the shoulder screw into its final position. Alternate Anti tip installation (All models)_ 1. Anti-slide brackets installation (Figure 5): A.Ptace the range so that it is equipped with two anti-tip "L" brackets located on each side of the...

Installation Instructions
Page 9
... be located under the door using the screws provided with the range. Install the decorative lower trim under the anti-tip cabinet L brackets when the range is at its flnal position. 2. B. Anti-tip/anti-slide screws installation: A. C. up cooktop only_)_ 1. Anti-Tip cabinet "L" brackets Installation: A.Instatl the anti-tip cabinet "L" brackets as shown on Figure...
... be located under the door using the screws provided with the range. Install the decorative lower trim under the anti-tip cabinet L brackets when the range is at its flnal position. 2. B. Anti-tip/anti-slide screws installation: A. C. up cooktop only_)_ 1. Anti-Tip cabinet "L" brackets Installation: A.Instatl the anti-tip cabinet "L" brackets as shown on Figure...


