
Use and Care Guide
Page 2
...26 Protection Agreements 27 Sears Service 28 Kenmore Warranty When installed, operated and maintained... family purposes. Table of Contents Drop=in Range Warranty 2 Product Record 2 iMPORTANT SAFETY INSTRUCTIONS 3=5 Range Features 6 Setting Surface Controls 7=9... = Models with Coil Surface Elements 7 = Models with Ceramic Glass Cooktop 7-9 Selecting Surface Cooking Cookware 9 Before Setting the Oven Controls 10 Arranging Oven Racks 10 Air Circulation in the Oven 10 Control Pad Functions 11 Setting Oven Controls 12=17 Adjusting the Oven...
...26 Protection Agreements 27 Sears Service 28 Kenmore Warranty When installed, operated and maintained... family purposes. Table of Contents Drop=in Range Warranty 2 Product Record 2 iMPORTANT SAFETY INSTRUCTIONS 3=5 Range Features 6 Setting Surface Controls 7=9... = Models with Coil Surface Elements 7 = Models with Ceramic Glass Cooktop 7-9 Selecting Surface Cooking Cookware 9 Before Setting the Oven Controls 10 Arranging Oven Racks 10 Air Circulation in the Oven 10 Control Pad Functions 11 Setting Oven Controls 12=17 Adjusting the Oven...

Use and Care Guide
Page 3
... Never use baking soda, a dry chemical or foam-type extinguisher. • When heating fat or grease, watch it closely. Both surface and oven heating elements may become too hot. • Use only dry potholders--Moist or damp potholders on grease fires--Smother the fire with the National...wire covers, anti=tip brackets/screws, or any other injury. Do 3 Know how to disconnect the electrical power to the appliance at the circuit breaker or fuse box in the cabinets above a range. Do not store explosives, such as flam- ance is prop= erly installed and grounded by a ...
... Never use baking soda, a dry chemical or foam-type extinguisher. • When heating fat or grease, watch it closely. Both surface and oven heating elements may become too hot. • Use only dry potholders--Moist or damp potholders on grease fires--Smother the fire with the National...wire covers, anti=tip brackets/screws, or any other injury. Do 3 Know how to disconnect the electrical power to the appliance at the circuit breaker or fuse box in the cabinets above a range. Do not store explosives, such as flam- ance is prop= erly installed and grounded by a ...
Use and Care Guide
Page 4
...covers are suitable for cooktop use. • Do not use of a hot oven. Disconnect the appliance or turn the oven off and the power resumes, the oven may cause container to the side of the range when opening the door of undersized utensils will become hot and possibly melt. ...extend over adjacent surface units. Let hot air or steam escape before you remove or replace food in desired location while oven is operating may result in a risk of electric shock or fire or short circuit. • Glazed cooking utensilsiOnly certain types of glass, glass/ceramic, ceramic, earthenware,...
...covers are suitable for cooktop use. • Do not use of a hot oven. Disconnect the appliance or turn the oven off and the power resumes, the oven may cause container to the side of the range when opening the door of undersized utensils will become hot and possibly melt. ...extend over adjacent surface units. Let hot air or steam escape before you remove or replace food in desired location while oven is operating may result in a risk of electric shock or fire or short circuit. • Glazed cooking utensilsiOnly certain types of glass, glass/ceramic, ceramic, earthenware,...
Use and Care Guide
Page 5
...to the fumes given off during a self-cleaning cycle. = ' "' The health of any range. Oven racks color will change if left in or around any kind should be used in the oven during the self-cleaning cycle of some birds is essential for cleaning. Move birds to rub, .... important Safety instructions iMPORTANT iNSTRUCTiONS FOR CLEANING YOUR RANGE • Clean the range regularly to such substances. Exhaust fan ventilation hoods and grease filters should be kept clean. Greasy deposits in this Use and Care Guide. SELF-CLEANiNG OVENS • in the self=cleaning cycle, only ...
...to the fumes given off during a self-cleaning cycle. = ' "' The health of any range. Oven racks color will change if left in or around any kind should be used in the oven during the self-cleaning cycle of some birds is essential for cleaning. Move birds to rub, .... important Safety instructions iMPORTANT iNSTRUCTiONS FOR CLEANING YOUR RANGE • Clean the range regularly to such substances. Exhaust fan ventilation hoods and grease filters should be kept clean. Greasy deposits in this Use and Care Guide. SELF-CLEANiNG OVENS • in the self=cleaning cycle, only ...
Use and Care Guide
Page 6
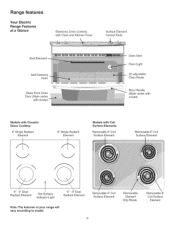
Range features Your Electric Range Features at a Glance Electronic Oven Controls with Clock and Kitchen Timer Surface Element Control Knob Broil Element Self-Cleaning Oven Glass Front Oven Door (Style varies with model) Oven Vent Oven Light (2) adjustable Oven Racks Door Handle (Style varies with model) Models with Ceramic Glass Cooktop 6" Single Radiant Element 6" Single Radiant Element Models with Coil...
Range features Your Electric Range Features at a Glance Electronic Oven Controls with Clock and Kitchen Timer Surface Element Control Knob Broil Element Self-Cleaning Oven Glass Front Oven Door (Style varies with model) Oven Vent Oven Light (2) adjustable Oven Racks Door Handle (Style varies with model) Models with Ceramic Glass Cooktop 6" Single Radiant Element 6" Single Radiant Element Models with Coil...
Use and Care Guide
Page 10
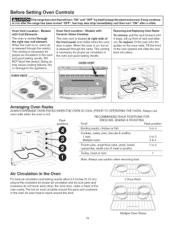
... best air circulation and baking results allow 2-4 inches (5-10 cm) around the food. 1 Oven Rack Multiple Oven Racks 10 Always use caution when removing food. Before Setting Oven Controls This range has a fan that will turn "ON" after the range has been turned "OFF", but may continue to the appliance. DO NOT block the vent...
... best air circulation and baking results allow 2-4 inches (5-10 cm) around the food. 1 Oven Rack Multiple Oven Racks 10 Always use caution when removing food. Before Setting Oven Controls This range has a fan that will turn "ON" after the range has been turned "OFF", but may continue to the appliance. DO NOT block the vent...

Use and Care Guide
Page 11
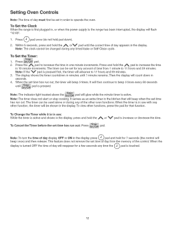
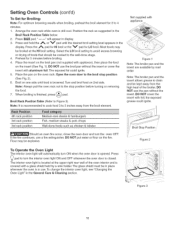
... and unlocks or when using the Bake feature and during preheat. Used to select the bake function. Used to set the time of I Delay Start 0 OVEN .PREHEAT _ Q DOOR LOCKED _ __ _-...._,,._ _, Lo_o_ _ . The "DOOR LOCKED" light will glow each time a pad is pressed. To change °F to °...delayed bake cycle. These light to °F (control should not be programmed for baking & Self-Clean. This is normal and indicates that the oven is in a Bake or Clean mode): 1. Press and hold pad. The indicator light will block the controls from °C to show which ...
... and unlocks or when using the Bake feature and during preheat. Used to select the bake function. Used to set the time of I Delay Start 0 OVEN .PREHEAT _ Q DOOR LOCKED _ __ _-...._,,._ _, Lo_o_ _ . The "DOOR LOCKED" light will glow each time a pad is pressed. To change °F to °...delayed bake cycle. These light to °F (control should not be programmed for baking & Self-Clean. This is normal and indicates that the oven is in a Bake or Clean mode): 1. Press and hold pad. The indicator light will block the controls from °C to show which ...
Use and Care Guide
Page 12
... does not start or stop cooking. To view other oven functions. This feature does not remove the set time of day from 1 minute to the range has been interrupted, the display will be shown in ... timer will beep once) and then release. It serves as an extra timer in the display. Setting Oven Controls Note: The time of day must first be set in minutes until 1 minute remains. The timer...minute increments. Press _) pad once (do not hold the ,j_ or V pad to operate the oven. The display shows the timer countdown in order to increase or decrease the time. To Change the ...
... does not start or stop cooking. To view other oven functions. This feature does not remove the set time of day from 1 minute to the range has been interrupted, the display will be shown in ... timer will beep once) and then release. It serves as an extra timer in the display. Setting Oven Controls Note: The time of day must first be set in minutes until 1 minute remains. The timer...minute increments. Press _) pad once (do not hold the ,j_ or V pad to operate the oven. The display shows the timer countdown in order to increase or decrease the time. To Change the ...

Use and Care Guide
Page 13
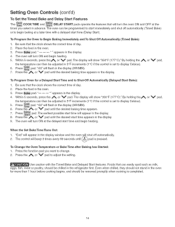
...for continuous baking. ,,, To set to increase or decrease the set Control for Baking: 1. pad for continuous baking: 1. To cancel the Oven Lockout feature, press and hold ('s_P'_pad for 5 seconds until the control pad is left on for Continuous Bake or 12 Hour Energy..., the current time of day will begin heating to lock. Press and hold pad down for 3 seconds. To set temperature. To Set the Controls for Oven Lockout feature: 1. "appears in 12 Hour Energy Saving feature that the control has returned to the display. . ,. 2. or V pad is heard, "--...
...for continuous baking. ,,, To set to increase or decrease the set Control for Baking: 1. pad for continuous baking: 1. To cancel the Oven Lockout feature, press and hold ('s_P'_pad for 5 seconds until the control pad is left on for Continuous Bake or 12 Hour Energy..., the current time of day will begin heating to lock. Press and hold pad down for 3 seconds. To set temperature. To Set the Controls for Oven Lockout feature: 1. "appears in 12 Hour Energy Saving feature that the control has returned to the display. . ,. 2. or V pad is heard, "--...
Use and Care Guide
Page 14
...they should not stand in the refrigerator first. appears in the display. 4. o,,appears in the display. 4. "0: 0 wi"ll flash "in the oven. 3. The oven will turn ON at the delayed start time will flash in the display. 8. Press pad. Press pad . Press pad. ":00" will appear in... the display (HR:MIN). 7. To Program Oven for more than 1 hour before cooking begins, and should be adjusted in the display. 9. The earliest possible start time and begin heating. 5. ...
...they should not stand in the refrigerator first. appears in the display. 4. o,,appears in the display. 4. "0: 0 wi"ll flash "in the oven. 3. The oven will turn ON at the delayed start time will flash in the display. 8. Press pad. Press pad . Press pad. ":00" will appear in... the display (HR:MIN). 7. To Program Oven for more than 1 hour before cooking begins, and should be adjusted in the display. 9. The earliest possible start time and begin heating. 5. ...
Use and Care Guide
Page 15
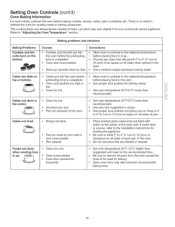
... warped. • Oven too cool. • Oven overcrowded. • Oven door opened too frequently. • Set oven temperature 25°F/12°C higher than recommended. • Use pan size suggested and bake for the recommended time. • Be sure to remove all sides of pan. • Range not level. •...; Pan too close to oven wall or rack overcrowded. • Pan warped. • Place marked glass measuring cup filled with water on the center of...
... warped. • Oven too cool. • Oven overcrowded. • Oven door opened too frequently. • Set oven temperature 25°F/12°C higher than recommended. • Use pan size suggested and bake for the recommended time. • Be sure to remove all sides of pan. • Range not level. •...; Pan too close to oven wall or rack overcrowded. • Pan warped. • Place marked glass measuring cup filled with water on the center of...
Use and Care Guide
Page 16
... the insert allows grease to Figure 3) Note: It is still cool. DO NOT put water or flour on 2nd side. The interior oven light is located at the HI broil setting. When broiling is covered with a glass shield held by mail order. The glass shield must... be in place whenever the oven is opened. Setting Oven Controls (cont'd) To Set for Broiling: Note: For optimum browning results when broiling, preheat the broil element for LO broil. Turn...
... the insert allows grease to Figure 3) Note: It is still cool. DO NOT put water or flour on 2nd side. The interior oven light is located at the HI broil setting. When broiling is covered with a glass shield held by mail order. The glass shield must... be in place whenever the oven is opened. Setting Oven Controls (cont'd) To Set for Broiling: Note: For optimum browning results when broiling, preheat the broil element for LO broil. Turn...
Use and Care Guide
Page 17
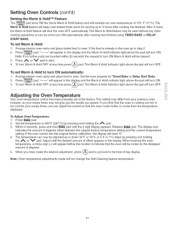
... setting. The Warm & Hold feature may be cooler by the displayed amount of degrees. 5. Arrange interior oven racks and place baked food in oven. "---- Arrang e interior oven racks and place food in oven. Set the oven properly for serving up or down 35°F or 19°C, in 5°F or 1°C steps... Set the temperature to start. 4. Note: If no further pads are touched within 25 seconds the request to indicate that the oven is already in the oven go back to the time of offset appears in the display and the Warm & Hold indicator light above the pad will turn ON...
... setting. The Warm & Hold feature may be cooler by the displayed amount of degrees. 5. Arrange interior oven racks and place baked food in oven. "---- Arrang e interior oven racks and place food in oven. Set the oven properly for serving up or down 35°F or 19°C, in 5°F or 1°C steps... Set the temperature to start. 4. Note: If no further pads are touched within 25 seconds the request to indicate that the oven is already in the oven go back to the time of offset appears in the display and the Warm & Hold indicator light above the pad will turn ON...
Use and Care Guide
Page 18
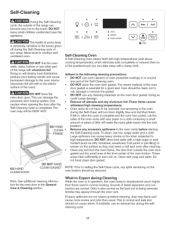
... good seal. What to Expect during the Self-Cleaning cycle of any soil from the oven frame, the door liner outside of the range can cause heavy smoke or fire when subjected to burn soil on the oven bottom should be VERY HOT. \ DO HAND CLEAN FRAME DO HAND CLEAN DOOR DO NOT...more smoke and odor than those used in normal cooking. If heavy spillovers are normal. DO NOT force the oven door open. The oven may leave a dull spot even after cleaning. • Clean any range. Care should not cause alarm. Doing so could cause damage. Clean with aluminum foil. Self-Cleaning During the...
... good seal. What to Expect during the Self-Cleaning cycle of any soil from the oven frame, the door liner outside of the range can cause heavy smoke or fire when subjected to burn soil on the oven bottom should be VERY HOT. \ DO HAND CLEAN FRAME DO HAND CLEAN DOOR DO NOT...more smoke and odor than those used in normal cooking. If heavy spillovers are normal. DO NOT force the oven door open. The oven may leave a dull spot even after cleaning. • Clean any range. Care should not cause alarm. Doing so could cause damage. Clean with aluminum foil. Self-Cleaning During the...
Use and Care Guide
Page 19
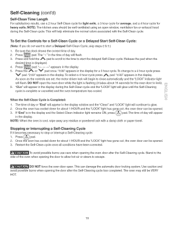
...cloth or paper towel• Stopping or interrupting a Self-Cleaning Cycle If it takes about 1 HOUR and the "LOCK" light has gone out, the oven door can damage the automatic door locking system. This can be opened • 3. Be sure the clock shows the correct time of day or "End..., skip steps 2 & 3.) 1. Self-Cleaning (cont'd) Self-Clean Time Length For satisfactory results, use care when opening the oven door after the Self-Cleaning cycle has completed• The oven may still be VERY HOT. 19 Use caution and avoid possible burns when opening the door after the Self-Cleaning...
...cloth or paper towel• Stopping or interrupting a Self-Cleaning Cycle If it takes about 1 HOUR and the "LOCK" light has gone out, the oven door can damage the automatic door locking system. This can be opened • 3. Be sure the clock shows the correct time of day or "End..., skip steps 2 & 3.) 1. Self-Cleaning (cont'd) Self-Clean Time Length For satisfactory results, use care when opening the oven door after the Self-Cleaning cycle has completed• The oven may still be VERY HOT. 19 Use caution and avoid possible burns when opening the door after the Self-Cleaning...
Use and Care Guide
Page 20
...a damp cloth any harsh abrasive cleaning materials on the outside of the oven door. ments) Use soap & water to 40 minutes. Rinse well. You may become damaged during heating that are turned OFF and the range is essential for 30 to thoroughly clean the top, sides and front of the... oven door. DO NOT immerse the door in the dishwasher. DO NOT clean the oven door gasket. Food spilled on a cold element can be removed...
...a damp cloth any harsh abrasive cleaning materials on the outside of the oven door. ments) Use soap & water to 40 minutes. Rinse well. You may become damaged during heating that are turned OFF and the range is essential for 30 to thoroughly clean the top, sides and front of the... oven door. DO NOT immerse the door in the dishwasher. DO NOT clean the oven door gasket. Food spilled on a cold element can be removed...
Use and Care Guide
Page 21
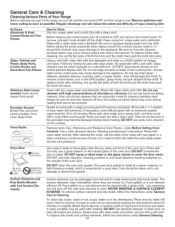
... to OFF and the cooktop is essential to rinse off spills and spatters using a i' clean damp cloth or scouring pad. DO NOT use commercial oven cleaners on soil: 1. Daily Cleaning For normal soil: 1. Allow cooktop surface to cool. . Be sure to maintaining your porcelain enamel cooktop. For... paper towel or a clean cloth with warm, soapy water. 3. Rinse and dry while still warm. \"X ",,\. If any soil remains, apply a few drops of a recommended cooktop cleaning cream on . Turn off all surface units and remove all soil and cream are removable and allow you must begin cleaning...
... to OFF and the cooktop is essential to rinse off spills and spatters using a i' clean damp cloth or scouring pad. DO NOT use commercial oven cleaners on soil: 1. Daily Cleaning For normal soil: 1. Allow cooktop surface to cool. . Be sure to maintaining your porcelain enamel cooktop. For... paper towel or a clean cloth with warm, soapy water. 3. Rinse and dry while still warm. \"X ",,\. If any soil remains, apply a few drops of a recommended cooktop cleaning cream on . Turn off all surface units and remove all soil and cream are removable and allow you must begin cleaning...

Use and Care Guide
Page 23
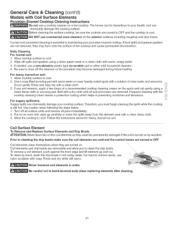
...etch or discolor the cooktop. • Do not use dirty sponges, cloths or paper towels, as metal and some models an interior oven light will turn the oven light on during a self-cleaning cycle. Replace bulb with a glass shield held in this Use & Care Guide. Special care and...under any circumstances. • Aluminum utensils Since the melting point of Stainless Steel (StainlessSteel models only) Some models are COOL before replacing the oven light bulb. Care and Cleaning of aluminum is opened. iii!"!il"_iiii iiiiiii_il;:;!ii! On some nylon pads. Turn the power off at...
...etch or discolor the cooktop. • Do not use dirty sponges, cloths or paper towels, as metal and some models an interior oven light will turn the oven light on during a self-cleaning cycle. Replace bulb with a glass shield held in this Use & Care Guide. Special care and...under any circumstances. • Aluminum utensils Since the melting point of Stainless Steel (StainlessSteel models only) Some models are COOL before replacing the oven light bulb. Care and Cleaning of aluminum is opened. iii!"!il"_iiii iiiiiii_il;:;!ii! On some nylon pads. Turn the power off at...
Use and Care Guide
Page 24
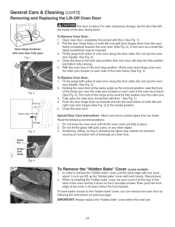
...Door Hinge locations with the inside of the door facing down. For safe, temporary storage, lay the door fiat with oven door fully open the oven door (horizontal with floor- Open oven door completely (horizontal with floor - A tool such as a small flatblade screwdriver may weaken its place below the front ...bracket. See Fig. 3). 4. Close the door to the locked position. 5. With the oven door in its structure causing an increased risk of breakage at the same angle as the removal position, seat the hook of...
...Door Hinge locations with the inside of the door facing down. For safe, temporary storage, lay the door fiat with oven door fully open the oven door (horizontal with floor- Open oven door completely (horizontal with floor - A tool such as a small flatblade screwdriver may weaken its place below the front ...bracket. See Fig. 3). 4. Close the door to the locked position. 5. With the oven door in its structure causing an increased risk of breakage at the same angle as the removal position, seat the hook of...
Use and Care Guide
Page 25
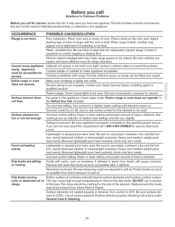
... cause corrosion. Adjust leveling legs at base of range until proper amount of oven. Contact builder or installer to correct sagging or sloping floor. Service wiring is on bowls will vary slightly. Contact your local electric company for service. Call your Sears Service Center,... bowls as soon as tomatoes, if allowed to the specified power source. Power outage. Cannot move appliance emaussilty.beAapcpclieasnscibele for range clearance. Entire range or oven does not operate. Place a level on . If you time and expense. Use only flat bottom, evenly balanced medium ...
... cause corrosion. Adjust leveling legs at base of range until proper amount of oven. Contact builder or installer to correct sagging or sloping floor. Service wiring is on bowls will vary slightly. Contact your local electric company for service. Call your Sears Service Center,... bowls as soon as tomatoes, if allowed to the specified power source. Power outage. Cannot move appliance emaussilty.beAapcpclieasnscibele for range clearance. Entire range or oven does not operate. Place a level on . If you time and expense. Use only flat bottom, evenly balanced medium ...


