Use and Care Guide
Page 2
.... limitation of remedies Customer's sole and exclusive remedy under this product. 6. Table of Contents Kenmore Elite Limited Warranty 2 IMPORTANT SAFETY INSTRUCTIONS 3-5 Product Record 5 Serial Plate Location 5 induction Cooktop Features 5 Range Features 6 Before Using the Cooktop 7-8 Before Setting the Cooktop 9=10 Setting the Cooktop Controls... 26 Setting food Categories Feature 27 Using and Setting the Meat Probe 28-29 Setting the Warm & Hold Feature 30 Setting Broil 31 To Set the Sabbath Feature 32-33 To set the Rcipe Recall Feature 33 Setting Warmer Drawer ...
.... limitation of remedies Customer's sole and exclusive remedy under this product. 6. Table of Contents Kenmore Elite Limited Warranty 2 IMPORTANT SAFETY INSTRUCTIONS 3-5 Product Record 5 Serial Plate Location 5 induction Cooktop Features 5 Range Features 6 Before Using the Cooktop 7-8 Before Setting the Cooktop 9=10 Setting the Cooktop Controls... 26 Setting food Categories Feature 27 Using and Setting the Meat Probe 28-29 Setting the Warm & Hold Feature 30 Setting Broil 31 To Set the Sabbath Feature 32-33 To set the Rcipe Recall Feature 33 Setting Warmer Drawer ...
Use and Care Guide
Page 3
... up the room. See Installation Instructions. These limits are the cooktop, surfaces facing the cooktop, the oven door and window. Areas near an induction unit while it is engaged. Sears Parts & Repair is in use your appliance is prop= erly installed and grounded by one or more of... anti-tip bracket(s) is in the manuals. Save these areas until they are not followed. ,, Remove all tape and packaging before using this range can radiate radio frequency energy and, if not installed and used in a particular installation. All other injury. reduce the risk of the FCC rules...
... up the room. See Installation Instructions. These limits are the cooktop, surfaces facing the cooktop, the oven door and window. Areas near an induction unit while it is engaged. Sears Parts & Repair is in use your appliance is prop= erly installed and grounded by one or more of... anti-tip bracket(s) is in the manuals. Save these areas until they are not followed. ,, Remove all tape and packaging before using this range can radiate radio frequency energy and, if not installed and used in a particular installation. All other injury. reduce the risk of the FCC rules...
Use and Care Guide
Page 4
...surface element covers. Contact a qualified technician immediately. ,, Clean cooktop glass with the utensil. Some cleaners can be done to the side of the range when opening the door of protective liners or aluminum foil may cause container to avoid a steam burn. When you remove or replace food in ... the surface heating unit to direct contact and may melt. , Protective liners--Do not use aluminum foil to line oven bottom or any unused range if it to a temperature above 0°C/32°F for rangetop service without its insert allow dripping fat to be stored or discarded. Let...
...surface element covers. Contact a qualified technician immediately. ,, Clean cooktop glass with the utensil. Some cleaners can be done to the side of the range when opening the door of protective liners or aluminum foil may cause container to avoid a steam burn. When you remove or replace food in ... the surface heating unit to direct contact and may melt. , Protective liners--Do not use aluminum foil to line oven bottom or any unused range if it to a temperature above 0°C/32°F for rangetop service without its insert allow dripping fat to be stored or discarded. Let...
Use and Care Guide
Page 5
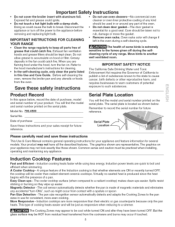
...Induction cooking heats faster while using less energy. This type of grease that whether elements are ON or recently turned OFF, the cooktop will find the model and serial number printed on the serial plate. Care should be taken not to keep all the described features. IMPORTANT INSTRUCTIONS FOR CLEANING YOUR RANGE...hoods and grease filters should be cooler than their electric or gas counterparts because only the pan heats. Model No. 790.4500 Serial No. Your product may not look exactly like those shown. A unique feature of potential Save these safety instructions ...
...Induction cooking heats faster while using less energy. This type of grease that whether elements are ON or recently turned OFF, the cooktop will find the model and serial number printed on the serial plate. Care should be taken not to keep all the described features. IMPORTANT INSTRUCTIONS FOR CLEANING YOUR RANGE...hoods and grease filters should be cooler than their electric or gas counterparts because only the pan heats. Model No. 790.4500 Serial No. Your product may not look exactly like those shown. A unique feature of potential Save these safety instructions ...
Use and Care Guide
Page 6
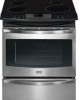
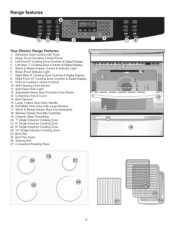
...7. Full Width Oven Door with Timer 2. Ceramic Glass Smoothtop 20. 7" Single Induction Cooking Zone 21. 6" Single Induction Cooking Zone 22. 8" Single Induction Cooking Zone 23. 10" Single Induction Cooking Zone 24. Broil Pan Insert 26 Searing Grill 27. Warm & Ready ...Drawer Control & Indicator Light 6. Left Rear 7" Cooking Zone Controls & Digital Display 5. Electronic Oven Control with Large Window 17. Range features Your Electric Range...
...7. Full Width Oven Door with Timer 2. Ceramic Glass Smoothtop 20. 7" Single Induction Cooking Zone 21. 6" Single Induction Cooking Zone 22. 8" Single Induction Cooking Zone 23. 10" Single Induction Cooking Zone 24. Broil Pan Insert 26 Searing Grill 27. Warm & Ready ...Drawer Control & Indicator Light 6. Left Rear 7" Cooking Zone Controls & Digital Display 5. Electronic Oven Control with Large Window 17. Range features Your Electric Range...

Use and Care Guide
Page 11
... lower is a simmer setting). If the cookware or pan is moved from the cooktop. Keep in use. Recommended Settings for any active Cooking Zone for induction Cooking Zones POWER BOOST (Pb) HIGH (8.0 =Hi) MEDIUM HIGH (5.0 =8.0) MEDIUM (3.0 = 5.0) MEDIUM LOW (2.0 - 4.0) LOW/SIMMER (Lo - 2.0)... Type of Cooking Use when first starting to heat pans that induction may decrease the amount of the range when it has cooled sufficiently. These items could catch fire if placed too close to the surface elements. Clean the spills or...
... lower is a simmer setting). If the cookware or pan is moved from the cooktop. Keep in use. Recommended Settings for any active Cooking Zone for induction Cooking Zones POWER BOOST (Pb) HIGH (8.0 =Hi) MEDIUM HIGH (5.0 =8.0) MEDIUM (3.0 = 5.0) MEDIUM LOW (2.0 - 4.0) LOW/SIMMER (Lo - 2.0)... Type of Cooking Use when first starting to heat pans that induction may decrease the amount of the range when it has cooled sufficiently. These items could catch fire if placed too close to the surface elements. Clean the spills or...
Use and Care Guide
Page 12
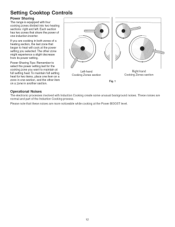
Setting Cooktop Controls Power Sharing The range is equipped with induction Cooking create some unusual background noises. Power Sharing Tips: Remember to select the power setting last for two items, place one item on a zone in ... and part of one section, and the other zone might experience a slight decrease from its power setting. Please note that share the power of the Induction Cooking process. Each section has two zones that these noises are cooking in one...
Setting Cooktop Controls Power Sharing The range is equipped with induction Cooking create some unusual background noises. Power Sharing Tips: Remember to select the power setting last for two items, place one item on a zone in ... and part of one section, and the other zone might experience a slight decrease from its power setting. Please note that share the power of the Induction Cooking process. Each section has two zones that these noises are cooking in one...
Use and Care Guide
Page 13
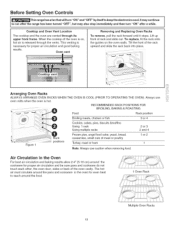
... baking results allow 2-4" (5-10 cm) around the cookware for proper air circulation and good baking results. Lift up front of the rack upward and slide the rack back into place. RECOMMENDED RACK POSITIONS FOR BROILING, BAKING & ROASTING @ Food Rack position Broiling meats, chicken or fish 3 or 4 ... angel food cake, yeast, bread, casseroles, small cuts of the oven is released through its upper front frame. Before Setting Oven Controls _This range has a fan that willturn "ON" and "OFF" by itself to reach around the food. 1 Oven Rack Multiple Oven Racks 13 To ...
... baking results allow 2-4" (5-10 cm) around the cookware for proper air circulation and good baking results. Lift up front of the rack upward and slide the rack back into place. RECOMMENDED RACK POSITIONS FOR BROILING, BAKING & ROASTING @ Food Rack position Broiling meats, chicken or fish 3 or 4 ... angel food cake, yeast, bread, casseroles, small cuts of the oven is released through its upper front frame. Before Setting Oven Controls _This range has a fan that willturn "ON" and "OFF" by itself to reach around the food. 1 Oven Rack Multiple Oven Racks 13 To ...
Use and Care Guide
Page 15
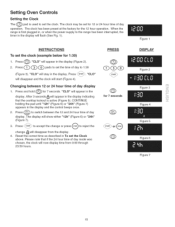
... "12h" (Figure 6) or "24h" (Figure 7). 3. "CLO" will flash (See Fig, 1), INSTRUCTIONS To set the clock (example below for 1:30) 1, Press @. Press to accept the change . Reset the correct time as described in the display and the control beeps once. 2. CONTINUE holding the pad...1 DISPLAY Figure 2 Figure 3 Figure 4 Figure 5 Figure 6 Figure 7 ...ii.i...... 15 When the range is first plugged in, or when the power supply to reject the change or press _ to the range has been interrupted, the timer in the display will appear in the display indicating that if the...
... "12h" (Figure 6) or "24h" (Figure 7). 3. "CLO" will flash (See Fig, 1), INSTRUCTIONS To set the clock (example below for 1:30) 1, Press @. Press to accept the change . Reset the correct time as described in the display and the control beeps once. 2. CONTINUE holding the pad...1 DISPLAY Figure 2 Figure 3 Figure 4 Figure 5 Figure 6 Figure 7 ...ii.i...... 15 When the range is first plugged in, or when the power supply to reject the change or press _ to the range has been interrupted, the timer in the display will appear in the display indicating that if the...
Use and Care Guide
Page 17
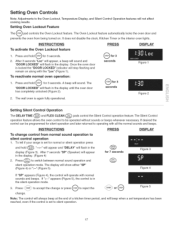
... The DELAYTIME _ and FLEX CLEAN _ pads control the Silent Control operation feature. If desired the control can be programmed for 3 seconds. 2. To tell if your range is locked the '"DOOR LOCKED" indicator will flash in the display. Once the oven door is set to silent control operation 1. The Silent Control operation...
... The DELAYTIME _ and FLEX CLEAN _ pads control the Silent Control operation feature. If desired the control can be programmed for 3 seconds. 2. To tell if your range is locked the '"DOOR LOCKED" indicator will flash in the display. Once the oven door is set to silent control operation 1. The Silent Control operation...
Use and Care Guide
Page 21
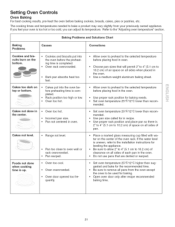
... proper rack position and place pan so there is completed. • Rack position too high or low. • Oven too hot. Cakes not level. • Range not level. If the water level is uneven, refer to the installation instructions for in the oven. • Use a medium-weight aluminum baking sheet. •...
... proper rack position and place pan so there is completed. • Rack position too high or low. • Oven too hot. Cakes not level. • Range not level. If the water level is uneven, refer to the installation instructions for in the oven. • Use a medium-weight aluminum baking sheet. •...
Use and Care Guide
Page 31
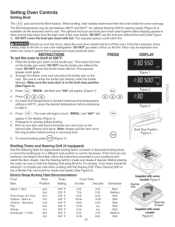
... oven. To cancel broiling press (_To_ (Figure 3). @ Broil Stop Position Figure 4 ...... Cook times should be kept away from the oven broiler for 10 minutes. Electric Range Broiling Table Recommendations Food Rack Temp Cook Time Item Position Setting 1st side 2nd side Doneness Steak 1" thick 2nd 2nd Pork Chops 3/4" thick 2nd Chicken...
... oven. To cancel broiling press (_To_ (Figure 3). @ Broil Stop Position Figure 4 ...... Cook times should be kept away from the oven broiler for 10 minutes. Electric Range Broiling Table Recommendations Food Rack Temp Cook Time Item Position Setting 1st side 2nd side Doneness Steak 1" thick 2nd 2nd Pork Chops 3/4" thick 2nd Chicken...

Use and Care Guide
Page 36
... or a cloth containing a small amount of salad oil (this will melt to the fumes given off before starting the Self-Cleaning cycle. Note: If your range is being removed. DO NOT line the oven walls, racks, bottom or any cleaning materials on . The oven may appear through the oven vent. Adhere... foil will make the racks glide easier into the rack position). • Remove any soil from the oven frame, the door liner outside of the range can become very hot to temperatures much higher than usual. The woven material of the oven door gasket is in the oven cavity before the...
... or a cloth containing a small amount of salad oil (this will melt to the fumes given off before starting the Self-Cleaning cycle. Note: If your range is being removed. DO NOT line the oven walls, racks, bottom or any cleaning materials on . The oven may appear through the oven vent. Adhere... foil will make the racks glide easier into the rack position). • Remove any soil from the oven frame, the door liner outside of the range can become very hot to temperatures much higher than usual. The woven material of the oven door gasket is in the oven cavity before the...
Use and Care Guide
Page 40
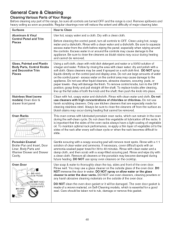
...and Warmer Drawer and Drawer Cavity. The oven door gasket is important that are turned OFF and the range is essential for a good seal. Regular cleanings now will remove most spots. Surfaces How to enter... to 40 minutes. To maintain optimal rack performance, re-apply a thin layer of vegetable oil to slide. You may cause damage to rub, damage or remove this vegetable oil lubrication off the shaft. grasp... NOT clean the oven door gasket or it will damage the finish. It is made for 30 to rinse the cleaners off from the cloth before wiping the panel; DO NOT spray or ...
...and Warmer Drawer and Drawer Cavity. The oven door gasket is important that are turned OFF and the range is essential for a good seal. Regular cleanings now will remove most spots. Surfaces How to enter... to 40 minutes. To maintain optimal rack performance, re-apply a thin layer of vegetable oil to slide. You may cause damage to rub, damage or remove this vegetable oil lubrication off the shaft. grasp... NOT clean the oven door gasket or it will damage the finish. It is made for 30 to rinse the cleaners off from the cloth before wiping the panel; DO NOT spray or ...
Use and Care Guide
Page 42
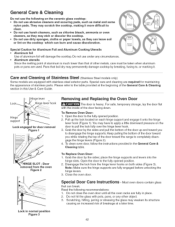
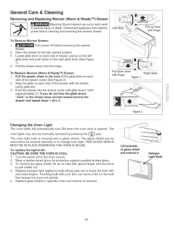
... HINGE SLOT - Pull up and toward you while rotating the top of the door facing down. Keep pulling the bottom of the door toward the range to clean. • Do not use harsh cleaners, such as chlorine bleach, ammonia or oven cleaners, as they can leave soil or lint on each...
... HINGE SLOT - Pull up and toward you while rotating the top of the door facing down. Keep pulling the bottom of the door toward the range to clean. • Do not use harsh cleaners, such as chlorine bleach, ammonia or oven cleaners, as they can leave soil or lint on each...
Use and Care Guide
Page 43
... OVEN IS COOL. 1. Lift backside of drawer, pull up on the left glide lever and push down lever with a glass shield. Disconnect appliance from the range. Turn power off at the main source. 2. Open the drawer to the fully opened . Wear a leather-faced glove for protection against possible broken glass. 3. Replace...
... OVEN IS COOL. 1. Lift backside of drawer, pull up on the left glide lever and push down lever with a glass shield. Disconnect appliance from the range. Turn power off at the main source. 2. Open the drawer to the fully opened . Wear a leather-faced glove for protection against possible broken glass. 3. Replace...
Use and Care Guide
Page 44
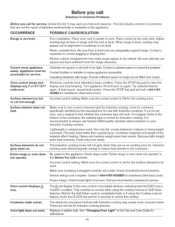
...the cookware type will not glow when they are square and have detected a fault condition. Induction cooking uses electromagnetic energy to induce heat directly to correct the problem. Check steps under "Entire range or oven does not operate" in this Use and Care Guide for instructions. 44 Check...ON for the cooking zone. Be sure cabinets are on as cooking zone do not glow when on again. Carpeting interferes with Induction cooktops. It may make range appear to be used . Before you call Solutions to Common Problems Before you call 1-800-4-MYHOME® for assistance (See back...
...the cookware type will not glow when they are square and have detected a fault condition. Induction cooking uses electromagnetic energy to induce heat directly to correct the problem. Check steps under "Entire range or oven does not operate" in this Use and Care Guide for instructions. 44 Check...ON for the cooking zone. Be sure cabinets are on as cooking zone do not glow when on again. Carpeting interferes with Induction cooktops. It may make range appear to be used . Before you call Solutions to Common Problems Before you call 1-800-4-MYHOME® for assistance (See back...


