
Use and Care Guide
Page 2
... this product if it is located under the cooktop. See bottom of your sales receipt for future reference. Kenmore Limited Warranty When installed, operated and maintained according to arrange for free repair. Expendable items that are limited to instruct the user in all instructions supplied with the product. 7. Table of Contents Cooktop Warranty 2 Product Record 2 Serial Plate Location 2 IMPORTANT SAFETY INSTRUCTIONS 3-4 Surface Cooking 5 Using Woks 5 Setting Surface Controls 6-9 General Care & Cleaning 10-11 Before You...
... this product if it is located under the cooktop. See bottom of your sales receipt for future reference. Kenmore Limited Warranty When installed, operated and maintained according to arrange for free repair. Expendable items that are limited to instruct the user in all instructions supplied with the product. 7. Table of Contents Cooktop Warranty 2 Product Record 2 Serial Plate Location 2 IMPORTANT SAFETY INSTRUCTIONS 3-4 Surface Cooking 5 Using Woks 5 Setting Surface Controls 6-9 General Care & Cleaning 10-11 Before You...
Use and Care Guide
Page 3
... circuit breaker or fuse box. • User Servicing. Fat or grease may be worn while using this appliance. • Never modify or alter the construction of an appli= ance by removing panels, wire covers or any other part of the appliance. • DO NOTTOUCH SURFACE UNITS OR AREAS NEAR THESE SURFACES. Food left alone or unattended in accordance with packaging material. Do not repair or replace...
... circuit breaker or fuse box. • User Servicing. Fat or grease may be worn while using this appliance. • Never modify or alter the construction of an appli= ance by removing panels, wire covers or any other part of the appliance. • DO NOTTOUCH SURFACE UNITS OR AREAS NEAR THESE SURFACES. Food left alone or unattended in accordance with packaging material. Do not repair or replace...
Use and Care Guide
Page 4
... sudden change in ignition of Cooktop and Should Not Extend Over Adjacent Surface Units. Do not allow grease to accumulate on the hood or filter. • Do Not Use Decorative Surface Element Covers. This could catch fire. Any other productive harm, and requires businesses to warn customers of electric shock. important Safety instructions iMPORTANT iNSTRUCTiONS FOR USING YOUR COOKTOP • Know which touch pad controls each surface unit. • Clean...
... sudden change in ignition of Cooktop and Should Not Extend Over Adjacent Surface Units. Do not allow grease to accumulate on the hood or filter. • Do Not Use Decorative Surface Element Covers. This could catch fire. Any other productive harm, and requires businesses to warn customers of electric shock. important Safety instructions iMPORTANT iNSTRUCTiONS FOR USING YOUR COOKTOP • Know which touch pad controls each surface unit. • Clean...
Use and Care Guide
Page 5
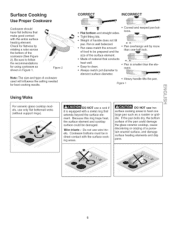
... enamel surface, and damage surface heating elements and drip pans. Figure 1 Using Woks For ceramic glass cooktop models, use wire trivets. Cookware bottoms must be in Figure 1. CORRECT INCORRECT I tt • Fiat bottom and straight sides. • Tight fitting lids. • Weight of cookware used will influence the setting needed for best cooking results. Easy to element surface diameter. Always match pot diameter to clean. Pan is equipped with the surface cooking areas...
... enamel surface, and damage surface heating elements and drip pans. Figure 1 Using Woks For ceramic glass cooktop models, use wire trivets. Cookware bottoms must be in Figure 1. CORRECT INCORRECT I tt • Fiat bottom and straight sides. • Tight fitting lids. • Weight of cookware used will influence the setting needed for best cooking results. Easy to element surface diameter. Always match pot diameter to clean. Pan is equipped with the surface cooking areas...
Use and Care Guide
Page 6
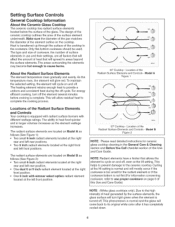
Heat is turned off . The type and size of cookware, the number of surface elements in use proper cookware on Model A as the element wattage increases. Model A Figure 1 Locations of this Use and Care Guide) NOTE: (White glass cooktops only). The ability to provide a uniform and consistent heat during the off the element several minutes before cooking is equipped with radiant surface burners with simmer select option radiant element located at the right rear and left front positions. About...
Heat is turned off . The type and size of cookware, the number of surface elements in use proper cookware on Model A as the element wattage increases. Model A Figure 1 Locations of this Use and Care Guide) NOTE: (White glass cooktops only). The ability to provide a uniform and consistent heat during the off the element several minutes before cooking is equipped with radiant surface burners with simmer select option radiant element located at the right rear and left front positions. About...
Use and Care Guide
Page 7
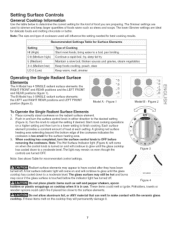
... a higher setting and then turn the surface control knob in use. Note: The size and type of cookware used to simmer and keep larger quantities of foods warm such as salt and pepper shakers, spoon Figure 4 holders or plastic wrappings on cooktop when it . ir Model B - Turn the knob to the surface elements. Potholders, towels or wooden spoons could melt or ignite. The B Model has 3 SINGLE radiant surface elements: the LEFT...
... a higher setting and then turn the surface control knob in use. Note: The size and type of cookware used to simmer and keep larger quantities of foods warm such as salt and pepper shakers, spoon Figure 4 holders or plastic wrappings on cooktop when it . ir Model B - Turn the knob to the surface elements. Potholders, towels or wooden spoons could melt or ignite. The B Model has 3 SINGLE radiant surface elements: the LEFT...
Use and Care Guide
Page 8
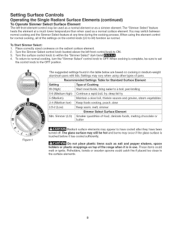
... normal cooking, turn the "Simmer Select" control knob to OFR When cooking is in medium-weight aluminum pans with lids. Settings may switch between normal cooking and the Simmer Select feature at a much lower temperature than when used as a normal element or as normal. These items could catch fire if placed too close to HI) function as a simmer element. Setting Surface Controls Operating the Single Radiant Surface Elements (continued) To Operate Simmer Select Surface Element...
... normal cooking, turn the "Simmer Select" control knob to OFR When cooking is in medium-weight aluminum pans with lids. Settings may switch between normal cooking and the Simmer Select feature at a much lower temperature than when used as a normal element or as normal. These items could catch fire if placed too close to HI) function as a simmer element. Setting Surface Controls Operating the Single Radiant Surface Elements (continued) To Operate Simmer Select Surface Element...
Use and Care Guide
Page 9
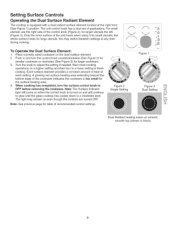
... 3 Dual Setting y_ iiJiiiiiiiiiiiiiiiiiiiiiiiiiiiiiii_iiiiiiiiiiiiiiiiiiiiiiiiiiiiiiiiiiiiiiiiiiiiiiiiiiiiiiiiiiiiiiiiiiiiiiiiWiiiii Dual Radiant heating areas on ceramic smooth top (shown in and turn the surface control knob to finish cooking. Only the inner surface of heat at any time during cooking, To Operate the Dual Surface Element: 1. Note: The Surface Indicator light will come on when the control knob is turned on and will continue to glow until the glass cooktop has cooled down to adjust the setting if needed. A glowing red surface heating area...
... 3 Dual Setting y_ iiJiiiiiiiiiiiiiiiiiiiiiiiiiiiiiii_iiiiiiiiiiiiiiiiiiiiiiiiiiiiiiiiiiiiiiiiiiiiiiiiiiiiiiiiiiiiiiiiiiiiiiiiWiiiii Dual Radiant heating areas on ceramic smooth top (shown in and turn the surface control knob to finish cooking. Only the inner surface of heat at any time during cooking, To Operate the Dual Surface Element: 1. Note: The Surface Indicator light will come on when the control knob is turned on and will continue to glow until the glass cooktop has cooled down to adjust the setting if needed. A glowing red surface heating area...
Use and Care Guide
Page 10
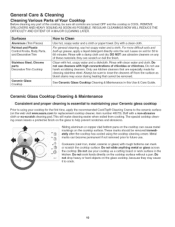
... Use & Care Guide. Metal marks can mark or scratch the cooktop surface. For general cleaning, use . Clean with a damp cloth and dry. Rinse with rough bottoms can become permanent if not removed prior to 60 minutes. Only use kitchen cleaners that cannot be sure all controls are especially made for 30 to future use hot soapy water and a cloth. Aluminum (Trim Pieces) Painted and Plastic Control Knobs, Body Parts, and Decorative Trim Stainless Steel, Chrome parts...
... Use & Care Guide. Metal marks can mark or scratch the cooktop surface. For general cleaning, use . Clean with a damp cloth and dry. Rinse with rough bottoms can become permanent if not removed prior to 60 minutes. Only use kitchen cleaners that cannot be sure all controls are especially made for 30 to future use hot soapy water and a cloth. Aluminum (Trim Pieces) Painted and Plastic Control Knobs, Body Parts, and Decorative Trim Stainless Steel, Chrome parts...

Use and Care Guide
Page 11
... clean the cooktop for Aluminum Use on a hot cooktop will be utensil be sure the COOL DO NOT use the following on soils. Only use the same method for maintaining the appearance of soils need be hazard0us t0 Y0ur health; Use a paper towel or use a non-abrasive plastic type no residue. If soils remain, carefully scrape soils with stainless steel exterior parts. Use of Stainless Steel (somemodels) Some models are required...
... clean the cooktop for Aluminum Use on a hot cooktop will be utensil be sure the COOL DO NOT use the following on soils. Only use the same method for maintaining the appearance of soils need be hazard0us t0 Y0ur health; Use a paper towel or use a non-abrasive plastic type no residue. If soils remain, carefully scrape soils with stainless steel exterior parts. Use of Stainless Steel (somemodels) Some models are required...
Use and Care Guide
Page 12
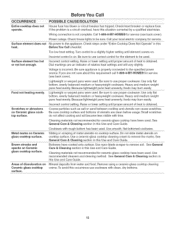
... Use and Care Guide. Remove using a ceramic-glass cooktop cleaning creme. Call 1=800=4-MY=HOME® for service. No power to remove the marks. Be sure to use correct control for service (see back cover). Lightweight or warped pans were used . Areas of utensils are not sure about this occurrence use proper cookware. Use recommended cleaners and cleaning method. Check/reset breaker or replace fuse. If the problem is obtained. Surface element does not heat. Dial markings are an indicator...
... Use and Care Guide. Remove using a ceramic-glass cooktop cleaning creme. Call 1=800=4-MY=HOME® for service. No power to remove the marks. Be sure to use correct control for service (see back cover). Lightweight or warped pans were used . Areas of utensils are not sure about this occurrence use proper cookware. Use recommended cleaners and cleaning method. Check/reset breaker or replace fuse. If the problem is obtained. Surface element does not heat. Dial markings are an indicator...

Use and Care Guide
Page 14
...; Au Canada pour service en fran£ais: 1-800-LE-FOYER Mc (1-800-533-6937) www.sears.ca ® Registered Trademark / TM Trademark / SM Service Mark of all major brand appliances, lawn and garden equipment, or heating and cooling systems, no matter who made it, no matter who sold it -yourself. For Sears professional installation of... / SM Marca de Servicio de Sears Brands, LLC MC Marque de commerce / MD Marque depos6e de Sears Brands, LLC ® Sears Brands, LLC For the replacement parts, accessories and owner's manuals that you need to do-it !
...; Au Canada pour service en fran£ais: 1-800-LE-FOYER Mc (1-800-533-6937) www.sears.ca ® Registered Trademark / TM Trademark / SM Service Mark of all major brand appliances, lawn and garden equipment, or heating and cooling systems, no matter who made it, no matter who sold it -yourself. For Sears professional installation of... / SM Marca de Servicio de Sears Brands, LLC MC Marque de commerce / MD Marque depos6e de Sears Brands, LLC ® Sears Brands, LLC For the replacement parts, accessories and owner's manuals that you need to do-it !


