
Installation Instructions
Page 1
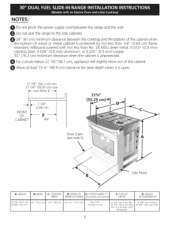
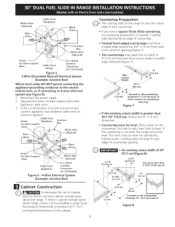
... i Do not install the unit in this or any phone in the "Countertop Preparation" section (see page 7). OF COUNTERTOP 35 5/8" (90.5cm)36 5/8" (93 cm) 30" (76,2 cm) 311/2 '' (80cm) 28 5/16" (71,9 cm) 30_+1/16" (76,2_+0,15 cm) NOTE:Wiring diagram for optional thinner side panels. Q ...61 cm) Min. with backguard 36 5/8" (93cm) Max. 35 5/8" (90.5 cm) Min. Q Do not touch any appliance. Locate Cabinet Doors 1" (2.5 cm) Min. FRONT OF RANGE (C0untert0p and Cabine! Do not store or use any other appliance. m WHAT TO DO IF YOU SMELL GAS: Q Do not try to light any electrkal...
... i Do not install the unit in this or any phone in the "Countertop Preparation" section (see page 7). OF COUNTERTOP 35 5/8" (90.5cm)36 5/8" (93 cm) 30" (76,2 cm) 311/2 '' (80cm) 28 5/16" (71,9 cm) 30_+1/16" (76,2_+0,15 cm) NOTE:Wiring diagram for optional thinner side panels. Q ...61 cm) Min. with backguard 36 5/8" (93cm) Max. 35 5/8" (90.5 cm) Min. Q Do not touch any appliance. Locate Cabinet Doors 1" (2.5 cm) Min. FRONT OF RANGE (C0untert0p and Cabine! Do not store or use any other appliance. m WHAT TO DO IF YOU SMELL GAS: Q Do not try to light any electrkal...
Installation Instructions
Page 2
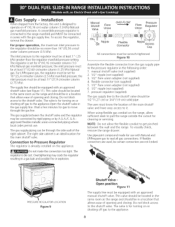
.... with not less than No. 28 MSG sheet metal, 0.01 5" (0.4 mm) stainless steel, 0.024" (0.6 mm) aluminum, or 0.020" (0.5 mm) copper. 30" (76.2 cm) minimum clearance when the cabinet is unprotected. Door Open (see Note 4) _1 FRONT _ 11/8" (2.86 cm) / CABOINFET '_ FRe_f. HEIGHT 35 ...cm) max. - (see note 5) A \ Side Panel A. CUTOUT WIDTH *** I WIDTH I FRONT OF RANGE I G, COOKTOP J J D; Do not seal the range to the side cabinets. 24" (61 cm) minimum clearance between the range and the wall. NOTES: _1 Do not pinch the power supply cord between the cooktop and the...
.... with not less than No. 28 MSG sheet metal, 0.01 5" (0.4 mm) stainless steel, 0.024" (0.6 mm) aluminum, or 0.020" (0.5 mm) copper. 30" (76.2 cm) minimum clearance when the cabinet is unprotected. Door Open (see Note 4) _1 FRONT _ 11/8" (2.86 cm) / CABOINFET '_ FRe_f. HEIGHT 35 ...cm) max. - (see note 5) A \ Side Panel A. CUTOUT WIDTH *** I WIDTH I FRONT OF RANGE I G, COOKTOP J J D; Do not seal the range to the side cabinets. 24" (61 cm) minimum clearance between the range and the wall. NOTES: _1 Do not pinch the power supply cord between the cooktop and the...
Installation Instructions
Page 3
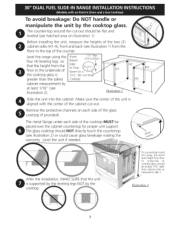
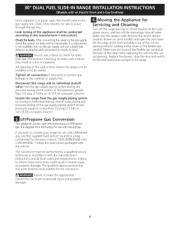
...illustration 2). Level the unit if needed. cabinet measurement by the cooktop. "To successfully install the range, the initial level height from the floor to Clear Space for proper unit support. Illustration 1 Slide the unit into the cabinet. Illustration 2 3 Before installing the unit, measure the heights of ...front and back (see illustration 2) or could cause glass breakage voiding the warranty. The counter-top around the cut -out. Level the range using the four (4)leveling legs so that the uni is supported by the leveling legs NOT by at least 1/16" taller than the ...
...illustration 2). Level the unit if needed. cabinet measurement by the cooktop. "To successfully install the range, the initial level height from the floor to Clear Space for proper unit support. Illustration 1 Slide the unit into the cabinet. Illustration 2 3 Before installing the unit, measure the heights of ...front and back (see illustration 2) or could cause glass breakage voiding the warranty. The counter-top around the cut -out. Level the range using the four (4)leveling legs so that the uni is supported by the leveling legs NOT by at least 1/16" taller than the ...

Installation Instructions
Page 4
... percent for Manufactured Home Installation 1982 (Manufactured Home Sites, Communities and Setups), ANSI Z225.1/NFPA 501Alatest edition, or with the range. Excessive flame is unattended. Follow the precleaning instructions in their absence, with the National Electrical Code ANSI/NFPA No, 70--...(mobile) home installation must conform with the National Fuel Gas Code ANSI Z223.1--1atest edition. To reduce the risk of tipping of the range, the range must be reduced by a qualified installer or service technician, • This range must be avoided. To light a surface burner,...
... percent for Manufactured Home Installation 1982 (Manufactured Home Sites, Communities and Setups), ANSI Z225.1/NFPA 501Alatest edition, or with the range. Excessive flame is unattended. Follow the precleaning instructions in their absence, with the National Electrical Code ANSI/NFPA No, 70--...(mobile) home installation must conform with the National Fuel Gas Code ANSI Z223.1--1atest edition. To reduce the risk of tipping of the range, the range must be reduced by a qualified installer or service technician, • This range must be avoided. To light a surface burner,...
Installation Instructions
Page 5
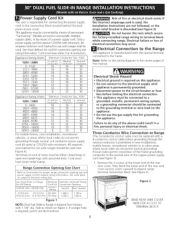
... for use the gas supply line for use with 1 1/8" dia. Three Conductor Wire Connection to the frame. Figure I NOTE: Dual fuel Slide-in a fire, personal injury or electrical shock. Terminals on range for proper range connection opening size rating information. Electrical Connection to the neutral wire of the rear wire cover (access cover) upward to...
... for use the gas supply line for use with 1 1/8" dia. Three Conductor Wire Connection to the frame. Figure I NOTE: Dual fuel Slide-in a fire, personal injury or electrical shock. Terminals on range for proper range connection opening size rating information. Electrical Connection to the neutral wire of the rear wire cover (access cover) upward to...

Installation Instructions
Page 6
... Figure 3) 5. Punch out knockout for receptacle 1-3/8" Dia. Silver colored Terminal wire 5. Cord Kit Hole Figure 3 Four Conductor Wire Connection to expose range terminal connection block (see figure 2). 2. Connect the ground wire (green) of the copper power supply cord to the outer terminals. Supply a U.L....wire of the copper power supply cord to the center silver-colored terminal of the rear wire cover (access cover) upward to Range (mobile homes) 1. Lower the terminal cover and replace the 3 screws. Remove the grounding strap from the terminal block and from...
... Figure 3) 5. Punch out knockout for receptacle 1-3/8" Dia. Silver colored Terminal wire 5. Cord Kit Hole Figure 3 Four Conductor Wire Connection to expose range terminal connection block (see figure 2). 2. Connect the ground wire (green) of the copper power supply cord to the outer terminals. Supply a U.L....wire of the copper power supply cord to the center silver-colored terminal of the rear wire cover (access cover) upward to Range (mobile homes) 1. Lower the terminal cover and replace the 3 screws. Remove the grounding strap from the terminal block and from...
Installation Instructions
Page 7
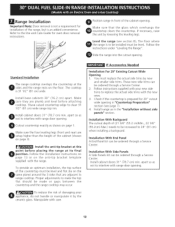
... a square finish (flat) countertop, no countertop preparation is cabinet storage space above the range. If the countertop is greater than 30-1/16" (76,4 cm), reduce the 3A,, (1.9 cm) dimension. The oven must also clear 2 3/16" (5.56 cm) of (3.2 cm) (3.2 cm) I 30' (76.2 cm) 311/2" (80 cm) _Formed or tile countertop ___ trimmed 11...
... a square finish (flat) countertop, no countertop preparation is cabinet storage space above the range. If the countertop is greater than 30-1/16" (76,4 cm), reduce the 3A,, (1.9 cm) dimension. The oven must also clear 2 3/16" (5.56 cm) of (3.2 cm) (3.2 cm) I 30' (76.2 cm) 311/2" (80 cm) _Formed or tile countertop ___ trimmed 11...
Installation Instructions
Page 8
... FLOW _I_ Flare Union Pressure Regulator ; The user must be 1/2"(1,27 cm) or 3/4"(1.9 cm) solid pipe. To visually check, remove the range drawer. If flexible connectors are not kinked. Do not block access to the shutoff valve. Nipple[ Off Flexiblei Connector _Nip_l_ Access Cap All connections... flexible metallic union-connected piping where local codes permit use with the gas supply line. The gas supply between the wall and the range. The inlet pressure to seal all gas connections. pressure regulator (supplied) The gas supply line to the shutoff valve should be wrench...
... FLOW _I_ Flare Union Pressure Regulator ; The user must be 1/2"(1,27 cm) or 3/4"(1.9 cm) solid pipe. To visually check, remove the range drawer. If flexible connectors are not kinked. Do not block access to the shutoff valve. Nipple[ Off Flexiblei Connector _Nip_l_ Access Cap All connections... flexible metallic union-connected piping where local codes permit use with the gas supply line. The gas supply between the wall and the range. The inlet pressure to seal all gas connections. pressure regulator (supplied) The gas supply line to the shutoff valve should be wrench...
Installation Instructions
Page 9
...testing of the system at test pressures equal to or less than 1/2 psig (3.5 kPa or 14"(35,56 cm)water column). Isolate the range from the gas supply piping system by a qualified service technician in accordance with natural gas. It is cold. Follow the instructions packaged with.../PROPANEGAS CONVERSION." If you wish to pinch the flexible gas conduit at the front and slide it out of the applianceshallbe conducted accordingto the manufacturer'sinstructions, Servicing and Cleaning Turn off the range line fuse or circuit breakers at the main power source, and turn off the manual ...
...testing of the system at test pressures equal to or less than 1/2 psig (3.5 kPa or 14"(35,56 cm)water column). Isolate the range from the gas supply piping system by a qualified service technician in accordance with natural gas. It is cold. Follow the instructions packaged with.../PROPANEGAS CONVERSION." If you wish to pinch the flexible gas conduit at the front and slide it out of the applianceshallbe conducted accordingto the manufacturer'sinstructions, Servicing and Cleaning Turn off the range line fuse or circuit breakers at the main power source, and turn off the manual ...
Installation Instructions
Page 10
... a Service Center. Follow instructions supplied with the new ones. 3. Installation With End Panel A End Panel kit can be ordered through a Service Center. 2. Install base cabinets 30" (76.2 cm) apart. Install cabinet doors 31 " (78.7 cm) min. Proper adjustments to replace the actual side trims with your appliance, do not handle or... damaging your new side trims to make the top flat should be level and flat (lie on page 3). apart so as shown on the floor. Slide the range into the cutout opening . Level the...
... a Service Center. Follow instructions supplied with the new ones. 3. Installation With End Panel A End Panel kit can be ordered through a Service Center. 2. Install base cabinets 30" (76.2 cm) apart. Install cabinet doors 31 " (78.7 cm) min. Proper adjustments to replace the actual side trims with your appliance, do not handle or... damaging your new side trims to make the top flat should be level and flat (lie on page 3). apart so as shown on the floor. Slide the range into the cutout opening . Level the...
Installation Instructions
Page 11
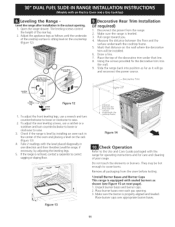
... and reconnect the power source. Place burner bases over appropriate burner bases. 11 Pull range toward you. 4. Using the screws provided fix the decorative trim into the wall. , Slide the range back into position as far as follows until the underside of the cooktop surface is ...leveled. 3. Figure 13 Distance underneath the --._:ooktop frame. \'\-\. Remove all packaging from the range. 2. Make sure the burner is not level, ...
... and reconnect the power source. Place burner bases over appropriate burner bases. 11 Pull range toward you. 4. Using the screws provided fix the decorative trim into the wall. , Slide the range back into position as far as follows until the underside of the cooktop surface is ...leveled. 3. Figure 13 Distance underneath the --._:ooktop frame. \'\-\. Remove all packaging from the range. 2. Make sure the burner is not level, ...
Installation Instructions
Page 12
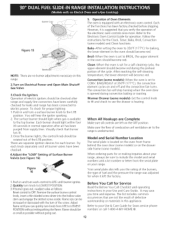
... are not the result of fuel and the pressure the range was adjusted for or making inquiries about your range. Theconvectiofnanwillstopturningwhentheovendoor isopenedduringconvectiobnakingor roasting. flameuntilyoucanquickltyurnknobfromLITtEo LOWEST...Your serial plate also tells you time and expense. NOTE:Therearenoburnear djustmenntsecessaorynthis range. 2.Turnon ElectricaPl owerandOpenMainShutoff GasValve 3.Checkthe Igniters Operationof electricignitersshouldbecheckedafter rangeandsupplylineconnectorhsavebeencarefully checkedfor leaksandrangehasbeenconnectedto electricpower....
... are not the result of fuel and the pressure the range was adjusted for or making inquiries about your range. Theconvectiofnanwillstopturningwhentheovendoor isopenedduringconvectiobnakingor roasting. flameuntilyoucanquickltyurnknobfromLITtEo LOWEST...Your serial plate also tells you time and expense. NOTE:Therearenoburnear djustmenntsecessaorynthis range. 2.Turnon ElectricaPl owerandOpenMainShutoff GasValve 3.Checkthe Igniters Operationof electricignitersshouldbecheckedafter rangeandsupplylineconnectorhsavebeencarefully checkedfor leaksandrangehasbeenconnectedto electricpower....
Installation Instructions
Page 13
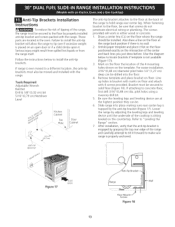
... template is placed on the floor where the range should be installed. If range is properly anchored. When fastening bracket to "Leveling the Range" section. 7. Bracket must also be moved and installed with the range. pilot holes using a masonry drill bit. 5. Slide range into the floor. 4. Figure 17 SLIDE BACK 13 Walt Floor Mc Screws Figure 18...
... template is placed on the floor where the range should be installed. If range is properly anchored. When fastening bracket to "Leveling the Range" section. 7. Bracket must also be moved and installed with the range. pilot holes using a masonry drill bit. 5. Slide range into the floor. 4. Figure 17 SLIDE BACK 13 Walt Floor Mc Screws Figure 18...
Use and Care Guide
Page 2
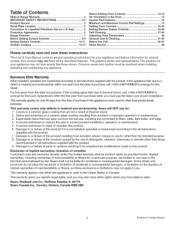
...allowed by the use of detergents, cleaners, chemicals or utensils other rights which vary from purchase date, you . Table of Contents Slide-in Range Warranty 2 IMPORTANT SAFETY INSTRUCTIONS 3-5 Product Record 5 Serial Plate Location 5 Conversion to state. The graphics on your appliance and ... of parts or systems resulting from unauthorized modifications made to arrange for only 90 days from the date of this product. 6. Kenmore Elite Warranty When installed, operated and maintained according to all instructions supplied with the product. 7. Sears will NOT pay the labor cost...
...allowed by the use of detergents, cleaners, chemicals or utensils other rights which vary from purchase date, you . Table of Contents Slide-in Range Warranty 2 IMPORTANT SAFETY INSTRUCTIONS 3-5 Product Record 5 Serial Plate Location 5 Conversion to state. The graphics on your appliance and ... of parts or systems resulting from unauthorized modifications made to arrange for only 90 days from the date of this product. 6. Kenmore Elite Warranty When installed, operated and maintained according to all instructions supplied with the product. 7. Sears will NOT pay the labor cost...

Use and Care Guide
Page 3
.... The weight of the product. An open door may result causing property damage, personal injury or death. _, All ranges can result in accordance with the National Fuel Gas Code ANSI Z223.1 latest edition, and National Electrical Code ANSI/NFPA No. 70--latest edition, and local code ... , if not avoided may cause burns. All safety messages will identify the hazard, tell you how to reduce the chance of a range by properly installed anti-tip bracket(s) provided with packaging material. important Safety instructions Read all instructions before using this appliance as a space ...
.... The weight of the product. An open door may result causing property damage, personal injury or death. _, All ranges can result in accordance with the National Fuel Gas Code ANSI Z223.1 latest edition, and National Electrical Code ANSI/NFPA No. 70--latest edition, and local code ... , if not avoided may cause burns. All safety messages will identify the hazard, tell you how to reduce the chance of a range by properly installed anti-tip bracket(s) provided with packaging material. important Safety instructions Read all instructions before using this appliance as a space ...
Use and Care Guide
Page 4
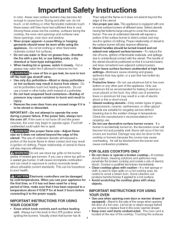
...is equipped with cautionilf a wet sponge or cloth is located at least 3 hours before you use aluminum foil to line oven bottom or any unused range if it does not extend beyond the edge of different sizes. Do not let clothing or other bulky cloth instead of a potholder. ,, Do ... food containers--Buildup of clothing. Proper relationship of utensil to be positioned so that has boiled dry may cause container to the side of the range when opening oven door or warmer drawer (if equipped)iStand to burst and result in ignition of pressure may melt. ,, Protective linersiDo not use ...
...is equipped with cautionilf a wet sponge or cloth is located at least 3 hours before you use aluminum foil to line oven bottom or any unused range if it does not extend beyond the edge of different sizes. Do not let clothing or other bulky cloth instead of a potholder. ,, Do ... food containers--Buildup of clothing. Proper relationship of utensil to be positioned so that has boiled dry may cause container to the side of the range when opening oven door or warmer drawer (if equipped)iStand to burst and result in ignition of pressure may melt. ,, Protective linersiDo not use ...
Use and Care Guide
Page 5
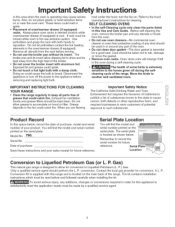
... oven cleaners--No commercial oven cleaner or oven liner protective coating of any kind should be kept clean. IMPORTANT INSTRUCTIONS FOR CLEANING YOUR RANGE • Clean the range regularly to such substances. Greasy deposits in the fan could ignite. ,, Do not touch a hot light bulb with both hands to...with this area when the oven is operating may cause severe burns. Contact the local gas provider for future reference. Gas) This natural gas range is designed to allow grease to Liquefied Petroleum Gas (or L. Disconnect the appliance or turn the fan on. You will change Jf left...
... oven cleaners--No commercial oven cleaner or oven liner protective coating of any kind should be kept clean. IMPORTANT INSTRUCTIONS FOR CLEANING YOUR RANGE • Clean the range regularly to such substances. Greasy deposits in the fan could ignite. ,, Do not touch a hot light bulb with both hands to...with this area when the oven is operating may cause severe burns. Contact the local gas provider for future reference. Gas) This natural gas range is designed to allow grease to Liquefied Petroleum Gas (or L. Disconnect the appliance or turn the fan on. You will change Jf left...
Use and Care Guide
Page 7
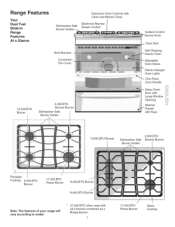
Range Features Your Dual Fuel Slide-in Range Features At a Glance Electronic Oven Controls with Clock and Kitchen Timer Dishwasher Safe Burner Grates Electronic Warmer Drawer Control Broil Element Convection Fan Cover 14,... Grates 5,OOOBTU Simmer Burner Porcelain Cooktop 9,500 BTU Burner 17,200 BTU Power Burner *9,000 BTU Burner *9,000 BTU Burner Note: The features of your range will vary according to model, 27,000 BTU when used with all 3 burners combined as a Bridge Burner. 7 17,200 BTU Power Burner Glass Cooktop
Range Features Your Dual Fuel Slide-in Range Features At a Glance Electronic Oven Controls with Clock and Kitchen Timer Dishwasher Safe Burner Grates Electronic Warmer Drawer Control Broil Element Convection Fan Cover 14,... Grates 5,OOOBTU Simmer Burner Porcelain Cooktop 9,500 BTU Burner 17,200 BTU Power Burner *9,000 BTU Burner *9,000 BTU Burner Note: The features of your range will vary according to model, 27,000 BTU when used with all 3 burners combined as a Bridge Burner. 7 17,200 BTU Power Burner Glass Cooktop
Use and Care Guide
Page 8
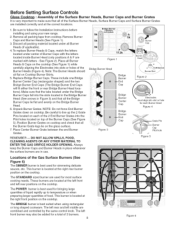
.... 6. The left front burner may also be added for most surface cooking needs. Unpack Burner Grates. This burner is best suited when using your new range. 3 peSitions :S %_ (not m_rked) qk A 2. Discard all packing material located under center of food. Position Burner Grates on cooktop and check that all packing tape from...
.... 6. The left front burner may also be added for most surface cooking needs. Unpack Burner Grates. This burner is best suited when using your new range. 3 peSitions :S %_ (not m_rked) qk A 2. Discard all packing material located under center of food. Position Burner Grates on cooktop and check that all packing tape from...
Use and Care Guide
Page 9
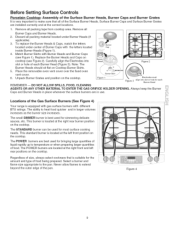
.... /.iH............ To replace the Burner Heads & Caps, match the letters located under Burner Heads (if applicable). 3. Locations of the Gas Surface Burners (See Figure 4) Your range is equipped with gas surface burners with the letters located inside Burner Heads (Figure 1). The STANDARD burner can be used for simmering delicate sauces, etc...
.... /.iH............ To replace the Burner Heads & Caps, match the letters located under Burner Heads (if applicable). 3. Locations of the Gas Surface Burners (See Figure 4) Your range is equipped with gas surface burners with the letters located inside Burner Heads (Figure 1). The STANDARD burner can be used for simmering delicate sauces, etc...


