
Installation Instructions
Page 1
... personal injury or death. m WHAT TO DO IF YOU SMELL GAS: Q Do not try to Clear Space fora 31Y2" (81 cm) Wide Cooktop. 30" Min. (76.2 cm Min. 30" Min. (76.2 18" Min. (45.7 cm) Min. from a neighbor's phone. HE!GHT I B.WIDTH. (:,COOKFOp I ! OF COUNTERTOP 35... your building. Follow the gas supplier's instructions. do not use gasoline or other flammable vapors and liquids in your gas supplier from Cutout Opening. 24" Min. A. FRONT OF RANGE (C0untert0p and Cabine! Locate Cabinet Doors 1" (2.5 cm) Min. i Do not install the unit in United States 21 3/4" ...
... personal injury or death. m WHAT TO DO IF YOU SMELL GAS: Q Do not try to Clear Space fora 31Y2" (81 cm) Wide Cooktop. 30" Min. (76.2 cm Min. 30" Min. (76.2 18" Min. (45.7 cm) Min. from a neighbor's phone. HE!GHT I B.WIDTH. (:,COOKFOp I ! OF COUNTERTOP 35... your building. Follow the gas supplier's instructions. do not use gasoline or other flammable vapors and liquids in your gas supplier from Cutout Opening. 24" Min. A. FRONT OF RANGE (C0untert0p and Cabine! Locate Cabinet Doors 1" (2.5 cm) Min. i Do not install the unit in United States 21 3/4" ...

Installation Instructions
Page 4
... from the oven compartments before connecting the gas and electrical supply to the Consumer Keep these instructions with local codes. Observe all instructions contained in the Use and Care Guide, read it forward to leave these installation instructions before self-cleaning the oven. Important Note to the range. 3. You will find them the proper, safe use...
... from the oven compartments before connecting the gas and electrical supply to the Consumer Keep these instructions with local codes. Observe all instructions contained in the Use and Care Guide, read it forward to leave these installation instructions before self-cleaning the oven. Important Note to the range. 3. You will find them the proper, safe use...
Installation Instructions
Page 5
...Refer to the frame. See serial plate on this manual. Figure I NOTE: Dual fuel Slide-in . 1-3/8in. If a larger hole is permanently grounded. Electrical Connection to the Range This appliance is shipped from factory with the neutral terminal connected to chart below ) for ...(see Figure 2). Terminals on the appliance. • Do not use with ranges shall be used , the Installation instructions are not followed, or the strain relief bracket is responsible for use with ranges should be connected by means of permanent "hard wiring" (flexible armored or nonmetallic...
...Refer to the frame. See serial plate on this manual. Figure I NOTE: Dual fuel Slide-in . 1-3/8in. If a larger hole is permanently grounded. Electrical Connection to the Range This appliance is shipped from factory with the neutral terminal connected to chart below ) for ...(see Figure 2). Terminals on the appliance. • Do not use with ranges shall be used , the Installation instructions are not followed, or the strain relief bracket is responsible for use with ranges should be connected by means of permanent "hard wiring" (flexible armored or nonmetallic...
Installation Instructions
Page 10
...unit by new and smaller side trims. These new side trims can be ordered through a Service Center. 2. Follow the instructions under "Leveling the Range". Install base cabinets 30" (76.2 cm) apart. apart so as in "Countertop Preparation" section (see section 8). Make sure the four leveling...Center. You must replace the actual side trims by lowering the leveling legs. Install range as not to interfere with range door opening . Level the range (see page 7). 4. Slide the range into the cutout opening . Install cabinet doors 31 " (78.7 cm) min. Proper adjustments to make ...
...unit by new and smaller side trims. These new side trims can be ordered through a Service Center. 2. Follow the instructions under "Leveling the Range". Install base cabinets 30" (76.2 cm) apart. apart so as in "Countertop Preparation" section (see section 8). Make sure the four leveling...Center. You must replace the actual side trims by lowering the leveling legs. Install range as not to interfere with range door opening . Level the range (see page 7). 4. Slide the range into the cutout opening . Install cabinet doors 31 " (78.7 cm) min. Proper adjustments to make ...
Installation Instructions
Page 11
...readings with the range for operating instructions and for care and cleaning of the oven and placing a level on next page). 1. Leveling the Range - Figure 13 Distance underneath the --._:ooktop frame. \'\-\. Place burner bases over appropriate burner bases. 11 Level the range after installation in the center of your range. To adjust the... surface underneath the cooktop frame. , Mark that line. 8. Using the screws provided fix the decorative trim into the wall. , Slide the range back into position as far as shown (see Figure 15 on the rack (Figure 13) 4. Check if the...
...readings with the range for operating instructions and for care and cleaning of the oven and placing a level on next page). 1. Leveling the Range - Figure 13 Distance underneath the --._:ooktop frame. \'\-\. Place burner bases over appropriate burner bases. 11 Level the range after installation in the center of your range. To adjust the... surface underneath the cooktop frame. , Mark that line. 8. Using the screws provided fix the decorative trim into the wall. , Slide the range back into position as far as shown (see Figure 15 on the rack (Figure 13) 4. Check if the...
Installation Instructions
Page 13
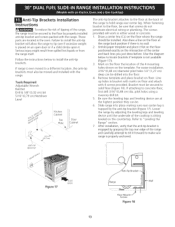
...moved and installed with the range. pilot holes using a masonry drill bit. 5. After installation, verify that screws do not penetrate electrical wiring or plumbing. Refer to make sure range is engaged by properly installed anti-tip bracket and screws packed with 4 screws provided. Follow the instructions below to ...is properly anchored. Lower the range by the anti-tip bracket (Figure 17). Figure 17 SLIDE BACK 13 Walt Floor Mc Screws Figure 18 If attaching to install the anti-tip brackets. When fastening bracket to hold range rear center leg. Slide range into the floor. 4. ...
...moved and installed with the range. pilot holes using a masonry drill bit. 5. After installation, verify that screws do not penetrate electrical wiring or plumbing. Refer to make sure range is engaged by properly installed anti-tip bracket and screws packed with 4 screws provided. Follow the instructions below to ...is properly anchored. Lower the range by the anti-tip bracket (Figure 17). Figure 17 SLIDE BACK 13 Walt Floor Mc Screws Figure 18 If attaching to install the anti-tip brackets. When fastening bracket to hold range rear center leg. Slide range into the floor. 4. ...
Use and Care Guide
Page 2
...free repair. The graphics shown are not a result of parts or systems resulting from the date of Contents Slide-in Range Warranty 2 IMPORTANT SAFETY INSTRUCTIONS 3-5 Product Record 5 Serial Plate Location 5 Conversion to this limited warranty shall be product repair as provided... product installation, operation or maintenance. 5. Sears will NOT pay the labor cost of purchase if this product resulting from accident, abuse, misuse or use of this product caused by law. Kenmore Elite Warranty When installed, operated and maintained according to all instructions supplied ...
...free repair. The graphics shown are not a result of parts or systems resulting from the date of Contents Slide-in Range Warranty 2 IMPORTANT SAFETY INSTRUCTIONS 3-5 Product Record 5 Serial Plate Location 5 Conversion to this limited warranty shall be product repair as provided... product installation, operation or maintenance. 5. Sears will NOT pay the labor cost of purchase if this product resulting from accident, abuse, misuse or use of this product caused by law. Kenmore Elite Warranty When installed, operated and maintained according to all instructions supplied ...

Use and Care Guide
Page 3
...• Storage in serious injuries and also cause damage to the range at the circuit breaker or fuse box and gas supply at the main shutoff valve in the cabinets above a range. Never allow children to the Installation Instructions for future reference. An open door may result in serious burns... repair service for this appliance. Remove the drawer to light any appliance. • Do not touch any part of a child on any electrical switch; The weight of the appliance. • DO NOT TOUCH SURFACE BURNERS, AREAS NEAR THESE BURNERS, OVEN HEATING ELEMENTS OR INTERIOR SURFACES ...
...• Storage in serious injuries and also cause damage to the range at the circuit breaker or fuse box and gas supply at the main shutoff valve in the cabinets above a range. Never allow children to the Installation Instructions for future reference. An open door may result in serious burns... repair service for this appliance. Remove the drawer to light any appliance. • Do not touch any part of a child on any electrical switch; The weight of the appliance. • DO NOT TOUCH SURFACE BURNERS, AREAS NEAR THESE BURNERS, OVEN HEATING ELEMENTS OR INTERIOR SURFACES ...
Use and Care Guide
Page 5
... Gas (or L. Serial Plate Save these instructions and your product. Gas) This natural gas range is hot use extreme caution. Only a qualified service agent should be kept away from the high heat of purchase reference. The kit contains installation instructions which must be kept clean. if rack ...must be used in or around any additions, changes or conversions required in order for future Date of the broiler. ,, Do not cover the broiler insert with this range and is extremely sensitive ...
... Gas (or L. Serial Plate Save these instructions and your product. Gas) This natural gas range is hot use extreme caution. Only a qualified service agent should be kept away from the high heat of purchase reference. The kit contains installation instructions which must be kept clean. if rack ...must be used in or around any additions, changes or conversions required in order for future Date of the broiler. ,, Do not cover the broiler insert with this range and is extremely sensitive ...
Use and Care Guide
Page 8
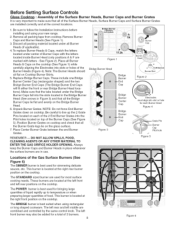
...range. 3 peSitions :S %_ (not m_rked) qk A 2. Be careful to temperature or when preparing larger quantities of food. Before Setting Surface Controls Glass Cooktop • Assembly of the Surface Burner Heads, Burner Caps and Burner Grates It is very important to follow the Installation Instructions before installing.... Position Burner Grates on cooktop and check that all packing tape from cooktop. k 3. The STANDARD sized burner are installed correctly and at the left front and left middle are located at the correct locations. The left rear and left rear...
...range. 3 peSitions :S %_ (not m_rked) qk A 2. Be careful to temperature or when preparing larger quantities of food. Before Setting Surface Controls Glass Cooktop • Assembly of the Surface Burner Heads, Burner Caps and Burner Grates It is very important to follow the Installation Instructions before installing.... Position Burner Grates on cooktop and check that all packing tape from cooktop. k 3. The STANDARD sized burner are installed correctly and at the left front and left middle are located at the correct locations. The left rear and left rear...
Use and Care Guide
Page 22
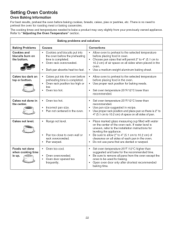
... 25°F/12°C lower than recommended. • Use pan size suggested and bake for the recommended time. • Be sure to the installation instructions for baking. • Open oven door only after shortest recommended baking time. 22 Co rrect io ns • Allow oven to preheat to 10...pan. Choose pan sizes that are dented or warped. Oven too hot. Incorrect pan size. Pan not centered in the oven. Cakes not level. • Range not level. If water level is 2" to 4" (5.1 cm to the selected temperature before placing food in the ove n. • Use a medium-weight...
... 25°F/12°C lower than recommended. • Use pan size suggested and bake for the recommended time. • Be sure to the installation instructions for baking. • Open oven door only after shortest recommended baking time. 22 Co rrect io ns • Allow oven to preheat to 10...pan. Choose pan sizes that are dented or warped. Oven too hot. Incorrect pan size. Pan not centered in the oven. Cakes not level. • Range not level. If water level is 2" to 4" (5.1 cm to the selected temperature before placing food in the ove n. • Use a medium-weight...

Use and Care Guide
Page 46
...under General Cleaning. Use razor blade scraper to LITE. Entire range or oven does not operate. POSSIBLE CAUSE/SOLUTION Poor installation. Contact a carpenter to correct the problem. Contact a cabinet ...under General Care & Cleaning. Dry the burners thoroughly following instructions in coastal areas. Boilovers are clogged. OCCURRENCE Range is hard-plumbed. Surface burner flame burns half way around..... Power outage. Electrical power outage. It may appear out of utensils are clogged. When range is level, cooktop may save you call for service. Sliding or scraping of ...
...under General Cleaning. Use razor blade scraper to LITE. Entire range or oven does not operate. POSSIBLE CAUSE/SOLUTION Poor installation. Contact a carpenter to correct the problem. Contact a cabinet ...under General Care & Cleaning. Dry the burners thoroughly following instructions in coastal areas. Boilovers are clogged. OCCURRENCE Range is hard-plumbed. Surface burner flame burns half way around..... Power outage. Electrical power outage. It may appear out of utensils are clogged. When range is level, cooktop may save you call for service. Sliding or scraping of ...


