Use and Care Guide
Page 1
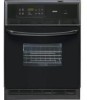
A (0805) Color number, nL_mero de color Sears Roebuck and Co., Hoffman Estates, IL 60179 U.S.A. www.sears.com PIN 318205132 Rev. Models, Modelos 790. 4045_',-" -'- ELECTRIC ® Ui LT-I OVE HORNO : ......i..
A (0805) Color number, nL_mero de color Sears Roebuck and Co., Hoffman Estates, IL 60179 U.S.A. www.sears.com PIN 318205132 Rev. Models, Modelos 790. 4045_',-" -'- ELECTRIC ® Ui LT-I OVE HORNO : ......i..
Use and Care Guide
Page 2
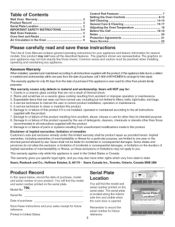
...oven door is used for other rights which vary from unauthorized modifications made to arrange for free repair. The graphics on your sales receipt for future reference. Kenmore...items that are not a result of thermal shock. 2. Disclaimer of implied warranties; Model No. 790. Your product may not look exactly like those recommended in all ... Contents Wall Oven Warranty 2 Product Record 2 Serial Plate Location 2 IMPORTANT SAFETY INSTRUCTIONS 3-4 Wall Oven Features 5 Oven Vent and Racks 6 Air Circulation in the Oven 6 Control Pad Features 7 Setting the Oven Controls ...
...oven door is used for other rights which vary from unauthorized modifications made to arrange for free repair. The graphics on your sales receipt for future reference. Kenmore...items that are not a result of thermal shock. 2. Disclaimer of implied warranties; Model No. 790. Your product may not look exactly like those recommended in all ... Contents Wall Oven Warranty 2 Product Record 2 Serial Plate Location 2 IMPORTANT SAFETY INSTRUCTIONS 3-4 Wall Oven Features 5 Oven Vent and Racks 6 Air Circulation in the Oven 6 Control Pad Features 7 Setting the Oven Controls ...
Use and Care Guide
Page 4
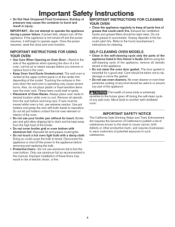
.... • Do not use oven cleaners. Greasy deposits in the oven. • Keep Oven Vent Ducts Unobstructed. The wall oven is extremely sensitive to the fumes given off the power to line the oven bottom. Doing so could melt or ignite. = Placement of the appliance listed in this manual. SELF-CLEANING OVEN MODELS • Clean in the self...
.... • Do not use oven cleaners. Greasy deposits in the oven. • Keep Oven Vent Ducts Unobstructed. The wall oven is extremely sensitive to the fumes given off the power to line the oven bottom. Doing so could melt or ignite. = Placement of the appliance listed in this manual. SELF-CLEANING OVEN MODELS • Clean in the self...
Use and Care Guide
Page 6
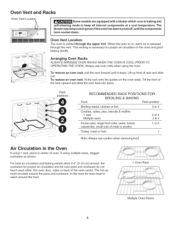
... front of rack and slide out. Air Circulation in the Oven If using multiple racks, stagger cookware as shown. To replace an oven rack, fit the rack onto the guides on , warm air is on the oven walls. The hot air must circulate around the pans and cookware ... forward until the components have cooled down. Oven Vent and Racks Oven Vent Location Some models are equipped with a blower which runs in the oven and good baking results. @ Arranging Oven Racks ALWAYS ARRANGE OVEN RACKS WHEN THE OVEN IS COOL (PRIOR TO OPERATING THE OVEN). The blower may keep all internal components at...
... front of rack and slide out. Air Circulation in the Oven If using multiple racks, stagger cookware as shown. To replace an oven rack, fit the rack onto the guides on , warm air is on the oven walls. The hot air must circulate around the pans and cookware ... forward until the components have cooled down. Oven Vent and Racks Oven Vent Location Some models are equipped with a blower which runs in the oven and good baking results. @ Arranging Oven Racks ALWAYS ARRANGE OVEN RACKS WHEN THE OVEN IS COOL (PRIOR TO OPERATING THE OVEN). The blower may keep all internal components at...

Use and Care Guide
Page 12
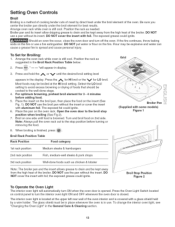
... instructed in HOT, soapy water. If necessary, use a pan without its grid allow dripping grease to the "stop" position before preheating. Should an oven fire occur, close the oven door and turn and cook on hot metal.) To preheat, set the control(s) to BROIL as possible after each use a fire extinguisher. Preheating... wool pads. To prevent grease from baking on the fire. Broiling Tips Broiler pan and its grid. DO NOT cover the broiler grid with some models) 12 The exposed grease could ignite. Setting Oven Controls Broiling information Broiling is extremely hot.
... instructed in HOT, soapy water. If necessary, use a pan without its grid allow dripping grease to the "stop" position before preheating. Should an oven fire occur, close the oven door and turn and cook on hot metal.) To preheat, set the control(s) to BROIL as possible after each use a fire extinguisher. Preheating... wool pads. To prevent grease from baking on the fire. Broiling Tips Broiler pan and its grid. DO NOT cover the broiler grid with some models) 12 The exposed grease could ignite. Setting Oven Controls Broiling information Broiling is extremely hot.
Use and Care Guide
Page 13
... that should be kept away from the high heat of the broiler. The glass shield must be broiled at the upper left rear wall of the oven interior and is covered with foil; DO NOT cover the insert with a glass shield held by direct heat under the broil element ... the broil stop position before adding food. 5. Setting Oven Controls Broil Broiling is a method of cooking tender cuts of meat by a wire holder. Grid (Supplied with some models) Figure 1 Broil Stop Position Figure 2 To Operate the Oven Light The interior oven light will appear in the General Care & Cleaning section...
... that should be kept away from the high heat of the broiler. The glass shield must be broiled at the upper left rear wall of the oven interior and is covered with foil; DO NOT cover the insert with a glass shield held by direct heat under the broil element ... the broil stop position before adding food. 5. Setting Oven Controls Broil Broiling is a method of cooking tender cuts of meat by a wire holder. Grid (Supplied with some models) Figure 1 Broil Stop Position Figure 2 To Operate the Oven Light The interior oven light will appear in the General Care & Cleaning section...
Use and Care Guide
Page 14
...those used in the oven during the self-cleaning cycle. 14 Some models have been turned OFF. If heavy spillovers are touched before starting the Self-Cleaning cycle. If available, use hot, soapy water and a cloth. Care should be removed. DO NOT use any wall oven. DO NOT allow easier... • Remove any spills remaining on . The elements may occur if these models the bake element is completed and the oven has cooled, rub the sides of the oven manually. • DO NOT clean the oven door gasket. If the racks are normal. Be careful not to another well ventilated...
...those used in the oven during the self-cleaning cycle. 14 Some models have been turned OFF. If heavy spillovers are touched before starting the Self-Cleaning cycle. If available, use hot, soapy water and a cloth. Care should be removed. DO NOT use any wall oven. DO NOT allow easier... • Remove any spills remaining on . The elements may occur if these models the bake element is completed and the oven has cooled, rub the sides of the oven manually. • DO NOT clean the oven door gasket. If the racks are normal. Be careful not to another well ventilated...
Use and Care Guide
Page 16
...made for a good seal. Use soap & water to thoroughly clean the top, sides and front of a woven material, on Self-Cleaning models, which is completed and the oven has cooled, rub the sides of the racks with high concentrations of baby oil or salad oil (this gasket. 16 Dry with an ammonia... damaged during the self-clean cycle for 30 to rinse the cleaners from the cloth before wiping the panel; Do not scour or use spray oven cleaners on the outside of these materials; To remove control knobs, turn to the appliance.To replace knobs after cleaning, line up grease, apply a ...
...made for a good seal. Use soap & water to thoroughly clean the top, sides and front of a woven material, on Self-Cleaning models, which is completed and the oven has cooled, rub the sides of the racks with high concentrations of baby oil or salad oil (this gasket. 16 Dry with an ammonia... damaged during the self-clean cycle for 30 to rinse the cleaners from the cloth before wiping the panel; Do not scour or use spray oven cleaners on the outside of these materials; To remove control knobs, turn to the appliance.To replace knobs after cleaning, line up grease, apply a ...
Use and Care Guide
Page 17
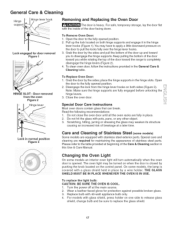
... to pull the locks fully over the hinge lever hooks. 3. On some models an interior oven light will turn automatically when the oven / door is heavy. Wear a leather-faced glove for door removal Figure 1 To Remove Oven Door: 1. Replace bulb with the inside of breakage at the main source.... IN USE. Open the door to the fully opened position. 2. Open the door to the fully opened position. 2. Changing the Oven Light On some models, the lamp is closed by a wire holder. Lock engaged for protection against possible broken glass. 3. place the hinge supports in...
... to pull the locks fully over the hinge lever hooks. 3. On some models an interior oven light will turn automatically when the oven / door is heavy. Wear a leather-faced glove for door removal Figure 1 To Remove Oven Door: 1. Replace bulb with the inside of breakage at the main source.... IN USE. Open the door to the fully opened position. 2. Open the door to the fully opened position. 2. Changing the Oven Light On some models, the lamp is closed by a wire holder. Lock engaged for protection against possible broken glass. 3. place the hinge supports in...


