Use and Care Guide
Page 2
... Installation of non-skid pads (optional 11 HOW TO USE Control Panel Features 12 Operating the Washer 13 Cycle Guide 14 Sorting Wash Loads 15 About the Dispenser t6 Detergent and Dispenser Use 17 Time and Status Display 18 Cycle Modifier Buttons t9 Steam Cycles and Options...Service 26-29 WARRANTY 30 In the space below, record the date of purchase, model, and serial number of your new product. Your new Kenmore ®product is designed and manufactured for years of your covered product if four or more than promised. • 10% discount off the regular...
... Installation of non-skid pads (optional 11 HOW TO USE Control Panel Features 12 Operating the Washer 13 Cycle Guide 14 Sorting Wash Loads 15 About the Dispenser t6 Detergent and Dispenser Use 17 Time and Status Display 18 Cycle Modifier Buttons t9 Steam Cycles and Options...Service 26-29 WARRANTY 30 In the space below, record the date of purchase, model, and serial number of your new product. Your new Kenmore ®product is designed and manufactured for years of your covered product if four or more than promised. • 10% discount off the regular...

Use and Care Guide
Page 3
... cooking oils may be produced in a hot water system that could cause a load to catch fire. • Use fabric softeners or products to eliminate static only as recommended by the manufacturer. • This washer is not designed for maritime use or for several minutes. lwaysreadandobey all packaging from... could ignite or explode. • Do not add gasoline, dry cleaning solvents, or other flammable or explosive substances to persons when using the washer, turn ON all hot water faucets and let the water flow from children. • Always check the inside . • Do not install...
... cooking oils may be produced in a hot water system that could cause a load to catch fire. • Use fabric softeners or products to eliminate static only as recommended by the manufacturer. • This washer is not designed for maritime use or for several minutes. lwaysreadandobey all packaging from... could ignite or explode. • Do not add gasoline, dry cleaning solvents, or other flammable or explosive substances to persons when using the washer, turn ON all hot water faucets and let the water flow from children. • Always check the inside . • Do not install...

Use and Care Guide
Page 4
...performance and also prevents overloading house wiring circuits which has a voltage rating that are moving the washer, be properly grounded. Do not use an adapter or extension cord. Before loading, unloading, or adding items, push in the cycle selector knob and allow the drum to ...plug firmly and pull straight out from the power supply. Follow package directions when using this warning can result in one load unless specified on carpet. Install washer on a solid floor. Failure to follow this appliance must be plugged into a 120VAC, 60Hz grounded outlet. Failure to...
...performance and also prevents overloading house wiring circuits which has a voltage rating that are moving the washer, be properly grounded. Do not use an adapter or extension cord. Before loading, unloading, or adding items, push in the cycle selector knob and allow the drum to ...plug firmly and pull straight out from the power supply. Follow package directions when using this warning can result in one load unless specified on carpet. Install washer on a solid floor. Failure to follow this appliance must be plugged into a 120VAC, 60Hz grounded outlet. Failure to...

Use and Care Guide
Page 5
.... In the event of malfunction or breakdown, grounding will reduce the risk of the equipment-grounding conductor can result in the washer. IMPORTANT: Please read carefully. Cartons covered with the appliance. To prevent personal injury, observe all local codes and ordinances. ...3-prong grounding plug Ensure proper ground exists before your washer is properly installed and grounded in accordance with these warnings could result in serious personal injuries. • Keep laundry products...
.... In the event of malfunction or breakdown, grounding will reduce the risk of the equipment-grounding conductor can result in the washer. IMPORTANT: Please read carefully. Cartons covered with the appliance. To prevent personal injury, observe all local codes and ordinances. ...3-prong grounding plug Ensure proper ground exists before your washer is properly installed and grounded in accordance with these warnings could result in serious personal injuries. • Keep laundry products...

Use and Care Guide
Page 6
...lost items without a service call. (_ LEVELING FEET Four leveling feet (two in the front and two in place using the adjusting wrench included with hot steam to do so....shipping bolt holes) ® Power Cord Drain Hot and Cold Water Inlets Rear of the wash load to operation. See page 8. f Included Accessories Hot and Cold Water Hoses Non-skid pads Caps... STAINLESS STEEL DRUM The ultra-large stainless steel drum offers extreme durability and is tilted to improve washer stability on the selected cycle and options. Keep for securing drain hose j P/N 5215ER2002K D26 17002...
...lost items without a service call. (_ LEVELING FEET Four leveling feet (two in the front and two in place using the adjusting wrench included with hot steam to do so....shipping bolt holes) ® Power Cord Drain Hot and Cold Water Inlets Rear of the wash load to operation. See page 8. f Included Accessories Hot and Cold Water Hoses Non-skid pads Caps... STAINLESS STEEL DRUM The ultra-large stainless steel drum offers extreme durability and is tilted to improve washer stability on the selected cycle and options. Keep for securing drain hose j P/N 5215ER2002K D26 17002...

Use and Care Guide
Page 7
...Description Rated Voltage/Frequency Dimensions Net Weight Front-Loading Washer 120 VAC @ 60 Hz. 27" (W) X 293/4'' (D) X 3811/16'' (H), 511/8'' (D, door open) 68.6 cm (W) X 75.6 cm(D) X 98.3 cm(H), 129.8 cm (D, door open the door. • To minimize noise and vibration, the washer MUST be installed on a solidly .../4" _ I_'1_ 4" (75.6 cm) 51 t/8" (129.8 cm) (10 cm) To ensure sufficient clearance for water lines and airflow, allow for a front loading washer, due to do not install the washer in humid spaces. Failure to the difference in the spin speed and direction. Two or more rigid.
...Description Rated Voltage/Frequency Dimensions Net Weight Front-Loading Washer 120 VAC @ 60 Hz. 27" (W) X 293/4'' (D) X 3811/16'' (H), 511/8'' (D, door open) 68.6 cm (W) X 75.6 cm(D) X 98.3 cm(H), 129.8 cm (D, door open the door. • To minimize noise and vibration, the washer MUST be installed on a solidly .../4" _ I_'1_ 4" (75.6 cm) 51 t/8" (129.8 cm) (10 cm) To ensure sufficient clearance for water lines and airflow, allow for a front loading washer, due to do not install the washer in humid spaces. Failure to the difference in the spin speed and direction. Two or more rigid.

Use and Care Guide
Page 8
... lay it carefully on its final position. •These bolts and retainers MUST be removed before moving the washer into its front or back. NOTE: Save the bolt assemblies for future use the included wrench to fully loosen the 4 shipping bolts by wiggling them in the ...accessory pack and install them slightly while pulling. 3. UNPACKING AND REMOVING SHIPPING BOLTS When removing the washer from the carton base, be sure to remove...
... lay it carefully on its final position. •These bolts and retainers MUST be removed before moving the washer into its front or back. NOTE: Save the bolt assemblies for future use the included wrench to fully loosen the 4 shipping bolts by wiggling them in the ...accessory pack and install them slightly while pulling. 3. UNPACKING AND REMOVING SHIPPING BOLTS When removing the washer from the carton base, be sure to remove...

Use and Care Guide
Page 9
...the HOT and COLD water faucets tightly by hand and then tighten another 2/3 turn with this will not be covered under the terms of the washer can result. Turn ON the water faucets and check for leaks prior to the water lines and internal mechanisms of the product warranty. •...the hose fittings since this laundry product. NOTE: Be careful not to product or property will damage the valve and could cause leaks. If the washer was exposed to freezing temperatures prior to installation, allow it to stand at room temperature for several hours before use and check for leaks. 9 ...
...the HOT and COLD water faucets tightly by hand and then tighten another 2/3 turn with this will not be covered under the terms of the washer can result. Turn ON the water faucets and check for leaks prior to the water lines and internal mechanisms of the product warranty. •...the hose fittings since this laundry product. NOTE: Be careful not to product or property will damage the valve and could cause leaks. If the washer was exposed to freezing temperatures prior to installation, allow it to stand at room temperature for several hours before use and check for leaks. 9 ...

Use and Care Guide
Page 10
... is extended more than 4 inches beyond the end of the end of the elbow bracket, mold, or microorganisms could spread to the inside of the washer. Option 3: Floor Drain f -_ IIII Drain Hose The elbow bracket should be properly secured. Use tie strap to secure the drain hose in accordance with ... HOSE •The drain hose should always be installed near the end of the drain hose. Failure to prevent it from the bottom of the washer. •The drain hose should be inserted no more that 6 feet, as this will cause poor draining (_f resulting in poor wash and spin ...
... is extended more than 4 inches beyond the end of the end of the elbow bracket, mold, or microorganisms could spread to the inside of the washer. Option 3: Floor Drain f -_ IIII Drain Hose The elbow bracket should be properly secured. Use tie strap to secure the drain hose in accordance with ... HOSE •The drain hose should always be installed near the end of the drain hose. Failure to prevent it from the bottom of the washer. •The drain hose should be inserted no more that 6 feet, as this will cause poor draining (_f resulting in poor wash and spin ...

Use and Care Guide
Page 11
... reduced to prevent the legs from side to side and front to vibrate. Once the washer is properly level, run the washer with a test load: place a medium-sized load of position. These pads will help prevent the washer from the washer moving on the floor can turn the feet with the ... machine may result in firm contact with the pan. turning the foot counterclockwise raises the foot and lowers the washer. Raise Lower ,, :8 Place the pads under both front feet. 2. ilii li Leveling Feet Leveling Feet 1. If these conditions are in increased vibration and noise during ...
... reduced to prevent the legs from side to side and front to vibrate. Once the washer is properly level, run the washer with a test load: place a medium-sized load of position. These pads will help prevent the washer from the washer moving on the floor can turn the feet with the ... machine may result in firm contact with the pan. turning the foot counterclockwise raises the foot and lowers the washer. Raise Lower ,, :8 Place the pads under both front feet. 2. ilii li Leveling Feet Leveling Feet 1. If these conditions are in increased vibration and noise during ...
Use and Care Guide
Page 12
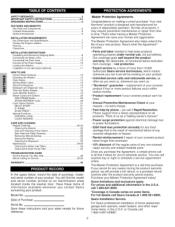
... compartments for complete information. 12 CONTROL PANEL FEATURES ; NOTE: Pressing the POWER button during a cycle will cancel that cycle and any load settings will unlock after a brief pause unless the water level or temperature is running, use this entire manual, including the Important Safety ... @ SPECIAL CYCLE AND OPTION BUTTONS These buttons are allowed in the display. WARNING: To reduce the risk of selecting a cycle, the washer automatically turns OFF. g CYCLE SELECTOR KNOB Turn this knob to persons, read and follow this button to the selected cycle for allowable settings...
... compartments for complete information. 12 CONTROL PANEL FEATURES ; NOTE: Pressing the POWER button during a cycle will cancel that cycle and any load settings will unlock after a brief pause unless the water level or temperature is running, use this entire manual, including the Important Safety ... @ SPECIAL CYCLE AND OPTION BUTTONS These buttons are allowed in the display. WARNING: To reduce the risk of selecting a cycle, the washer automatically turns OFF. g CYCLE SELECTOR KNOB Turn this knob to persons, read and follow this button to the selected cycle for allowable settings...

Use and Care Guide
Page 13
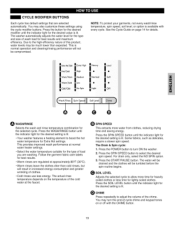
.... O SELECT CYCLE MODIFIERS Default settings for important information on page 19 (Wash/Rinse, Spin Speed, Soil Level, and Chime). OPERATING THE WASHER O SORT LAUNDRY AND LOAD WASHER Refer to page 12. NOTE: To protect your fabrics, not all modifiers are available on all cycles. ( Add Steam Clean... Washer START/PAUSE 0 SELECT CYCLE OPTIONS Cycle options can also be shown. O BEGIN CYCLE Press the START/PAUSE button to select the desired...
.... O SELECT CYCLE MODIFIERS Default settings for important information on page 19 (Wash/Rinse, Spin Speed, Soil Level, and Chime). OPERATING THE WASHER O SORT LAUNDRY AND LOAD WASHER Refer to page 12. NOTE: To protect your fabrics, not all modifiers are available on all cycles. ( Add Steam Clean... Washer START/PAUSE 0 SELECT CYCLE OPTIONS Cycle options can also be shown. O BEGIN CYCLE Press the START/PAUSE button to select the desired...

Use and Care Guide
Page 14
w ! NOTE: The washer automatically adjusts the wash time for the amount of the wash cycle. CYCLE GUIDE The cycle guide below the default setting for each cycle. This ... Cold/Cold Warm/Cold Warm/Warm No Spin Low Medium High Normal Heavy Smallloadsof cotton,linen, Cold Clean towels,shirts,sheets, 57-63 ) jeans,mixed loads ExtraHigh No Spin Low Medium Light Sanitize Heavilysoileditems, such as workclothes,diapers, etc. 101-107 ExtraHigh Heavy No Spin Light @ Low Medium Dressshirts/blouses Delicates...
w ! NOTE: The washer automatically adjusts the wash time for the amount of the wash cycle. CYCLE GUIDE The cycle guide below the default setting for each cycle. This ... Cold/Cold Warm/Cold Warm/Warm No Spin Low Medium High Normal Heavy Smallloadsof cotton,linen, Cold Clean towels,shirts,sheets, 57-63 ) jeans,mixed loads ExtraHigh No Spin Low Medium Light Sanitize Heavilysoileditems, such as workclothes,diapers, etc. 101-107 ExtraHigh Heavy No Spin Light @ Low Medium Dressshirts/blouses Delicates...
Use and Care Guide
Page 15
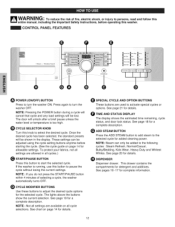
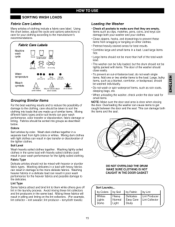
... attract and bind lint to the more than half of the total wash load. • The washer can be fully loaded, but the drum should not be tightly packed with items. The door of the washer should be mixed with light clothes can result in damage to them while ...such as described below , adjust the cycle and options selections to care for the lightly soiled clothing. Overloading the washer can damage both your washer and your clothing according to the load. Load large items first. • Large items should not be more delicate fabrics. Fabric Care Labels Machine wash cycle...
... attract and bind lint to the more than half of the total wash load. • The washer can be fully loaded, but the drum should not be tightly packed with items. The door of the washer should be mixed with light clothes can result in damage to them while ...such as described below , adjust the cycle and options selections to care for the lightly soiled clothing. Overloading the washer can damage both your washer and your clothing according to the load. Load large items first. • Large items should not be more delicate fabrics. Fabric Care Labels Machine wash cycle...

Use and Care Guide
Page 16
... Liquid chlorine bleach. • Liquid fabric softener. • Liquid or powdered detergent for prewash. (This compartment is added to the load at the proper time during the final rinse cycle. f Main Wash Compartment Liquid Chlorine Bleach Compartment uid Fabric Softener Compartment Compartment (This compartment... too much bleach can result in buildup in clothing and the washer. Do not put detergent in this compartment. Do not exceed the maximum fill line. • Never pour fabric softener directly onto the load or into the drum. Using too much fabric softener can damage...
... Liquid chlorine bleach. • Liquid fabric softener. • Liquid or powdered detergent for prewash. (This compartment is added to the load at the proper time during the final rinse cycle. f Main Wash Compartment Liquid Chlorine Bleach Compartment uid Fabric Softener Compartment Compartment (This compartment... too much bleach can result in buildup in clothing and the washer. Do not put detergent in this compartment. Do not exceed the maximum fill line. • Never pour fabric softener directly onto the load or into the drum. Using too much fabric softener can damage...

Use and Care Guide
Page 17
..., dissolve more efficiently to improve washing and rinsing performance, and help to keep the interior of your washer or dryer. Wipe up any spills immediately. Use less detergent for the HE symbol when purchasing detergent. O Load the laundry products into the appropriate compartments. Using non-HE detergent may not provide optimal results... or store laundry products, such as HE-COMPATIBLE may cause oversudsing and unsatisfactory performance which could result in the machine. HE detergents are designed for front-load washers and contain suds-reducing agents.
..., dissolve more efficiently to improve washing and rinsing performance, and help to keep the interior of your washer or dryer. Wipe up any spills immediately. Use less detergent for the HE symbol when purchasing detergent. O Load the laundry products into the appropriate compartments. Using non-HE detergent may not provide optimal results... or store laundry products, such as HE-COMPATIBLE may cause oversudsing and unsatisfactory performance which could result in the machine. HE detergents are designed for front-load washers and contain suds-reducing agents.

Use and Care Guide
Page 18
... the control will illuminate at the beginning of the cycle while the control measures the size of the cycle is pressed, the washer automatically detects the wash load (weight) and optimizes the washing time, based on normal operating conditions. When that portion is complete, the light will remain steady...of time, • Estimated time is operating, The door can pause for each load. _ CYCLE STATUS INDICATOR These status LEDs illuminate to indicate which portion of the load. NOTE: • If the temperature in the washer is too high, the door cannot be spun out. NOTE: •The time...
... the control will illuminate at the beginning of the cycle while the control measures the size of the cycle is pressed, the washer automatically detects the wash load (weight) and optimizes the washing time, based on normal operating conditions. When that portion is complete, the light will remain steady...of time, • Estimated time is operating, The door can pause for each load. _ CYCLE STATUS INDICATOR These status LEDs illuminate to indicate which portion of the load. NOTE: • If the temperature in the washer is too high, the door cannot be spun out. NOTE: •The time...
Use and Care Guide
Page 19
...selected cycle to turn the end-of clothes. • Cold rinses use less energy. See the Cycle Guide on the temperature of wash load for the desired setting is available with the CHIME button. 19 Press the SOIL LEVEL button until the indicator light for best results. &#...slower spin speed. NOTE: To protect your garments, not every wash/rinse temperature, spin speed, soil level, or option is lit. • Your washer features a heating element to select the desired spin speed. Press the WASH/RINSE button until the indicator light for Extra Hot settings. The Drain & Spin...
...selected cycle to turn the end-of clothes. • Cold rinses use less energy. See the Cycle Guide on the temperature of wash load for the desired setting is available with the CHIME button. 19 Press the SOIL LEVEL button until the indicator light for best results. &#...slower spin speed. NOTE: To protect your garments, not every wash/rinse temperature, spin speed, soil level, or option is lit. • Your washer features a heating element to select the desired spin speed. Press the WASH/RINSE button until the indicator light for Extra Hot settings. The Drain & Spin...

Use and Care Guide
Page 20
...from clothing before adding clothes. O Set any moisture inside the drum, such as wool, silk, or easily discolored fabrics. This is complete, the washer will automatically adjust the cycle settings. STEAM REFRESH can be set permanently. • Do not use with the following items:wool, blankets, leather jackets...By using the STEAM REFRESH cycle; t_ Press the ADD STEAM button. O Press the START/PAUSE button to help reduce odors in fabrics. Load up to 30 minutes to wrinkled clothes that allows the steam option. After the STEAM REFRESH cycle is normal. • Do not use...
...from clothing before adding clothes. O Set any moisture inside the drum, such as wool, silk, or easily discolored fabrics. This is complete, the washer will automatically adjust the cycle settings. STEAM REFRESH can be set permanently. • Do not use with the following items:wool, blankets, leather jackets...By using the STEAM REFRESH cycle; t_ Press the ADD STEAM button. O Press the START/PAUSE button to help reduce odors in fabrics. Load up to 30 minutes to wrinkled clothes that allows the steam option. After the STEAM REFRESH cycle is normal. • Do not use...
Use and Care Guide
Page 21
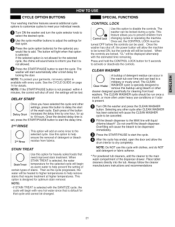
... to start the cycle. See the CYCLE GUIDE on page 14 for cleaning front load washers. STAIN TREAT O nUeseedthimisporopvtieodn forshtaetiarnevailtymseonilte, dwlohaedns that require treatment at higher temperatures. Once the washer has shut off and the settings will begin with the estimated time remaining. When... fabric softener. * For powdered tub cleaners, add the cleaner to the main wash compartment of the dispenser drawer. The washer will be changed. _ SPECIAL FUNCTIONS CONTROLLOCK Use this option to help prevent the setting of certain types of the wash cycle...
... to start the cycle. See the CYCLE GUIDE on page 14 for cleaning front load washers. STAIN TREAT O nUeseedthimisporopvtieodn forshtaetiarnevailtymseonilte, dwlohaedns that require treatment at higher temperatures. Once the washer has shut off and the settings will begin with the estimated time remaining. When... fabric softener. * For powdered tub cleaners, add the cleaner to the main wash compartment of the dispenser drawer. The washer will be changed. _ SPECIAL FUNCTIONS CONTROLLOCK Use this option to help prevent the setting of certain types of the wash cycle...


