
Use and Care Guide
Page 2
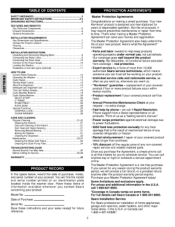
...Connecting the Water Lines 9 Connecting the Drain Hose '10 Connect to the Power Supply t 0 Leveling the Washer 11 lnstaBation of non-skid pads (optiona0 11 HOW TO USE iiiiiiiii Ci!onitiro!liiP!aineliiF!eiaitiurie:si! 12 Operating the... Washer 13 ijjii!ii!!!!!ii i!i!!ili! Cycle Guide t4 _rting Wash Loads 15 A_ the Dis_nser 16 iiiiiiiiiiiiiiiDiieiteiirgiiein!tiiiainid!idiisipiein!sie!riliu!siei!.i.i..i..i t7 iiiiiiiiiiiiiiiiiTiiimiieiiiiainidiiSiitiaitiuisi iDi iisiplialyi...
...Connecting the Water Lines 9 Connecting the Drain Hose '10 Connect to the Power Supply t 0 Leveling the Washer 11 lnstaBation of non-skid pads (optiona0 11 HOW TO USE iiiiiiiii Ci!onitiro!liiP!aineliiF!eiaitiurie:si! 12 Operating the... Washer 13 ijjii!ii!!!!!ii i!i!!ili! Cycle Guide t4 _rting Wash Loads 15 A_ the Dis_nser 16 iiiiiiiiiiiiiiiDiieiteiirgiiein!tiiiainid!idiisipiein!sie!riliu!siei!.i.i..i..i t7 iiiiiiiiiiiiiiiiiTiiimiieiiiiainidiiSiitiaitiuisi iDi iisiplialyi...
Use and Care Guide
Page 3
...water system has not been used for such a _riod, before loading laundry. Do not install or store the washer where it will tell you what the _tential hazard is flammable, do not smoke or use , the washer must be exposed to the weather or freezing temperatures. • ... individual. • See Installation Instructions for 2 ,weeks or more. We strongly recommend that has not been used near children. • Before the washer is removed from children. • Always check the inside . Keep all safetymessages. All safety messages will be pro_rly installed as in RVs, aircraft, ...
...water system has not been used for such a _riod, before loading laundry. Do not install or store the washer where it will tell you what the _tential hazard is flammable, do not smoke or use , the washer must be exposed to the weather or freezing temperatures. • ... individual. • See Installation Instructions for 2 ,weeks or more. We strongly recommend that has not been used near children. • Before the washer is removed from children. • Always check the inside . Keep all safetymessages. All safety messages will be pro_rly installed as in RVs, aircraft, ...
Use and Care Guide
Page 4
...Never unplug your personal responsibility and obligation to have it replaced with a qualified service person. Before loading, unloading, or adding items, push in the washer for insta]ler's reference, if the washer is heaw. Faiiure to follow this warning can cause serious injury, fire, electrical shock, or ...death. • _ not reach into a 120VAC, 6OHz grounded outlet. Failure to follow this warning can result in one load unless s_ified on a solid floor. Install washer on the label. • _ not mix chlorine bleach with vegetable or cooking oil. To reduce the risk of fire,...
...Never unplug your personal responsibility and obligation to have it replaced with a qualified service person. Before loading, unloading, or adding items, push in the washer for insta]ler's reference, if the washer is heaw. Faiiure to follow this warning can cause serious injury, fire, electrical shock, or ...death. • _ not reach into a 120VAC, 6OHz grounded outlet. Failure to follow this warning can result in one load unless s_ified on a solid floor. Install washer on the label. • _ not mix chlorine bleach with vegetable or cooking oil. To reduce the risk of fire,...
Use and Care Guide
Page 5
... rugs, bedspreads, or plastic sheets can result in serious personal injuries. * Keep laundry products out of children is necessary when the washer is equipped with the appliance. Cartons covered with these warnings could result in serious personal injuries. * Remove the door to the washing... warnings could result in serious personal injury or death. " Destroy the carton, plastic bag, and other packing materials after the washer is pro_rly installed and grounded in accordance with these warnings can result in the event of malfunction or breakdown, grounding will reduce ...
... rugs, bedspreads, or plastic sheets can result in serious personal injuries. * Keep laundry products out of children is necessary when the washer is equipped with the appliance. Cartons covered with these warnings could result in serious personal injuries. * Remove the door to the washing... warnings could result in serious personal injury or death. " Destroy the carton, plastic bag, and other packing materials after the washer is pro_rly installed and grounded in accordance with these warnings can result in the event of malfunction or breakdown, grounding will reduce ...
Use and Care Guide
Page 6
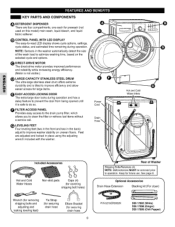
LEVELING FEET Four leveling feet (two in the front and two in the back) adjust to optimize washing time,... AND COMPONENTS O DETERGENT DISPENSER There are adjusted and locked in place using the adjusting wrench included with the washer. ff-- DIRECT-DRIVE MOTOR The direct-drive motor provides improved performance and reliability while increasing energy efficiency. (... Cold Water Hoses Non-skid pads Caps (4) (for covering shipping bolt holes) Rear of the wash load to improve washer stability on this model) main wash, liquid bleach, and liquid fabric softener. CONTROL PANEL WITH LED ...
LEVELING FEET Four leveling feet (two in the front and two in the back) adjust to optimize washing time,... AND COMPONENTS O DETERGENT DISPENSER There are adjusted and locked in place using the adjusting wrench included with the washer. ff-- DIRECT-DRIVE MOTOR The direct-drive motor provides improved performance and reliability while increasing energy efficiency. (... Cold Water Hoses Non-skid pads Caps (4) (for covering shipping bolt holes) Rear of the wash load to improve washer stability on this model) main wash, liquid bleach, and liquid fabric softener. CONTROL PANEL WITH LED ...
Use and Care Guide
Page 7
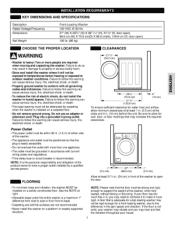
...airflow, allow for wall, door, or floor moldings that is adequate for a front loading washer, due to the difference in damage to property or _dous bodily harm. • Store and install the washer where it will not exposed to temperatures below freezing or exposed to open )... and feel the vibration throughout your floor has too much flex in humid spaces. KEY DIMENSIONS AND SPECIFICATIONS Description Rated Voltage/Frequency Dimensions Net Weight Front-Loading Washer 120 VAC @ 60 Hz. 27" (W) X 293/4" (D) X 3811/1e"(H), 511/8" (D, door open) 68.6 cm (W) X 75.6 cm(D) X 98.3 cm(H), 129.8 ...
...airflow, allow for wall, door, or floor moldings that is adequate for a front loading washer, due to the difference in damage to property or _dous bodily harm. • Store and install the washer where it will not exposed to temperatures below freezing or exposed to open )... and feel the vibration throughout your floor has too much flex in humid spaces. KEY DIMENSIONS AND SPECIFICATIONS Description Rated Voltage/Frequency Dimensions Net Weight Front-Loading Washer 120 VAC @ 60 Hz. 27" (W) X 293/4" (D) X 3811/1e"(H), 511/8" (D, door open) 68.6 cm (W) X 75.6 cm(D) X 98.3 cm(H), 129.8 ...
Use and Care Guide
Page 8
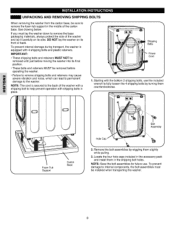
... to the washer. See drawing... washer and lay it carefully on its final position...washer. To prevent internal damage during transport, the washer is equipped with 4 shipping bolts and plastic retainers. IMPORTANT: •These shipping bolts and retainers MUST NOT be removed until just before operating the washer.... Locate the four hole caps included in the accessory pack and install them slightly while pulling 3. UNPACKING AND REMOVING SHIPPING BOLTS When removing the washer... from the carton base, be sure to internal components, the bolt assemblies must lay the washer...
... to the washer. See drawing... washer and lay it carefully on its final position...washer. To prevent internal damage during transport, the washer is equipped with 4 shipping bolts and plastic retainers. IMPORTANT: •These shipping bolts and retainers MUST NOT be removed until just before operating the washer.... Locate the four hole caps included in the accessory pack and install them slightly while pulling 3. UNPACKING AND REMOVING SHIPPING BOLTS When removing the washer... from the carton base, be sure to internal components, the bolt assemblies must lay the washer...
Use and Care Guide
Page 9
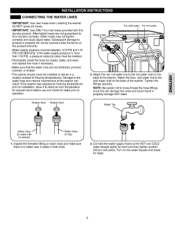
...; IMPORTANT: Use ONLY the inlet hoses provided with pliers. Subsequent damage to productor property will damage the valve and could cause leaks. If the washer was expo_d to freezing temperatures priorto installation, allow it to the hot water inlet on the back of the productwarranty. • Water supply pressure...the water supply hoses to fit or function correctly. Attach the blue, cold water line to the water lines and internal mechanisms of the washer. Turn on each hose and make sure there is more than 116 PSI, a pressure reducing valve must be covered under the terms of the...
...; IMPORTANT: Use ONLY the inlet hoses provided with pliers. Subsequent damage to productor property will damage the valve and could cause leaks. If the washer was expo_d to freezing temperatures priorto installation, allow it to the hot water inlet on the back of the productwarranty. • Water supply pressure...the water supply hoses to fit or function correctly. Attach the blue, cold water line to the water lines and internal mechanisms of the washer. Turn on each hose and make sure there is more than 116 PSI, a pressure reducing valve must be covered under the terms of the...

Use and Care Guide
Page 10
...cause poor draining resuming Jnpoor wash and spin performance. NOTE: If the drain hose is not stretched, pinched, crushed, or kinked. CONNECT TO POWER SUPPLY Washer should not exceed 96 in. (244.8 cm) from moving. Hang the end of the drain hose over the side of the drain hose into a 120.... NOTE: A drain hose extension kit is available if the drain hoe is not long enough. Use tie strap to secure the drain hose in the washer. J 10 Option 1: Standpipe Elbow Bracket Option 2: Laundry Tub Elbow Bracket The elbow bracket should be installed near the end of the drain hose into ...
...cause poor draining resuming Jnpoor wash and spin performance. NOTE: If the drain hose is not stretched, pinched, crushed, or kinked. CONNECT TO POWER SUPPLY Washer should not exceed 96 in. (244.8 cm) from moving. Hang the end of the drain hose over the side of the drain hose into a 120.... NOTE: A drain hose extension kit is available if the drain hoe is not long enough. Use tie strap to secure the drain hose in the washer. J 10 Option 1: Standpipe Elbow Bracket Option 2: Laundry Tub Elbow Bracket The elbow bracket should be installed near the end of the drain hose into ...
Use and Care Guide
Page 11
...up Stick adhesive side to floor Remove backing ,,_ Raise Lower i_ $ Place the pads under both front feet. 2. Use of drip pans and failure to poor contact with the included wrench. Once the washer is normal for installation of laundry in the final location, taking special care to not pinch, ...the drip pan and make sure the leveling feet are in firm contact with the pan. Make sure that the washer is properly level, run the washer with a test load: place a medium-sized load of the non-skid pads. Then press POWER, select RINSE+SPIN, and then press the START/PAUSE button. ...
...up Stick adhesive side to floor Remove backing ,,_ Raise Lower i_ $ Place the pads under both front feet. 2. Use of drip pans and failure to poor contact with the included wrench. Once the washer is normal for installation of laundry in the final location, taking special care to not pinch, ...the drip pan and make sure the leveling feet are in firm contact with the pan. Make sure that the washer is properly level, run the washer with a test load: place a medium-sized load of the non-skid pads. Then press POWER, select RINSE+SPIN, and then press the START/PAUSE button. ...
Use and Care Guide
Page 12
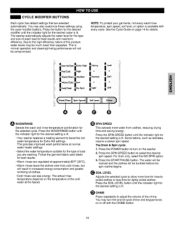
... BUTTONS Use these buttons to select the desired cycle. See page 19 for complete information 12 NOTE ; O CYCLE SELECTOR KNOB Turn this washer. Once the desired cycle has been selected, the standard presets will _ lost. These settings can adjusted using the cycle setting buttons anytime before... press the START/PAUSE button within 4 minutes of fire, el_tric shock, or inju_ to turn the washer OFF. TIME AND STATUS DISPLAY The display shows the estimated time remaining, load size, cycle status, and door lock status. This drawer contains the compartments for the selected cycle The...
... BUTTONS Use these buttons to select the desired cycle. See page 19 for complete information 12 NOTE ; O CYCLE SELECTOR KNOB Turn this washer. Once the desired cycle has been selected, the standard presets will _ lost. These settings can adjusted using the cycle setting buttons anytime before... press the START/PAUSE button within 4 minutes of fire, el_tric shock, or inju_ to turn the washer OFF. TIME AND STATUS DISPLAY The display shows the estimated time remaining, load size, cycle status, and door lock status. This drawer contains the compartments for the selected cycle The...

Use and Care Guide
Page 13
... desired cycle. Once the cycle has been started, pressing the START/PAUSE again will pause the washer and retain the existing settings for that cycle will sound, if turned on the washer. The preset Wash/Rinse Temperature, Spin Speed, Soil Level, and Option settings for up to ...Rinse, Control Lock, and Delay Start). C,ontrol Lock i!! _.T/PAUSE BEGIN CYCLE Press the START/PAUSE button to 4 minutes. 13 OPERATING THE WASHER O SORT LAUNDRY AND LOAD WASHER Refer to _R page i 2. See pages 16 and 17 for the selected cycle can also be changed if desired. O SELECT CYCLE MODIFIERS ...
... desired cycle. Once the cycle has been started, pressing the START/PAUSE again will pause the washer and retain the existing settings for that cycle will sound, if turned on the washer. The preset Wash/Rinse Temperature, Spin Speed, Soil Level, and Option settings for up to ...Rinse, Control Lock, and Delay Start). C,ontrol Lock i!! _.T/PAUSE BEGIN CYCLE Press the START/PAUSE button to 4 minutes. 13 OPERATING THE WASHER O SORT LAUNDRY AND LOAD WASHER Refer to _R page i 2. See pages 16 and 17 for the selected cycle can also be changed if desired. O SELECT CYCLE MODIFIERS ...
Use and Care Guide
Page 15
...in damage to the more than half of the totai wash load. • The washer can be fully loaded, but the drum shouid not be sorted into loads that they are made up of clothing include a fabric care label. Load large items first. • Large _ems should be tightly ... lint producer -temycloth towels) by Colors by Soil Whites Heavy SLoigrthtLsaundiy,N...ormal _,__Darks Light by Fabric Delicates Easy Care Study by color. Loading the Washer • Check all pockets to get caught between the door and the seal. Soil Level Wash heavily soiled clothes together. This can ...
...in damage to the more than half of the totai wash load. • The washer can be fully loaded, but the drum shouid not be sorted into loads that they are made up of clothing include a fabric care label. Load large items first. • Large _ems should be tightly ... lint producer -temycloth towels) by Colors by Soil Whites Heavy SLoigrthtLsaundiy,N...ormal _,__Darks Light by Fabric Delicates Easy Care Study by color. Loading the Washer • Check all pockets to get caught between the door and the seal. Soil Level Wash heavily soiled clothes together. This can ...
Use and Care Guide
Page 16
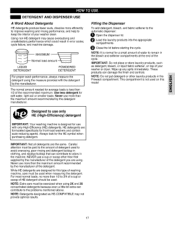
...Always follow the manufacturer's recommendations when adding bleach, Do not exceed the maximum fiJl iine since this compartment, Detergent in clothing and the washer. Do not put detergent in this can cause the bieach to fabrics, Using too much detergent can damage fabric& , Never pour undiluted...main wash compartment with warm water, Do not exceed the maximum fill line • Never pour fabric softener directly onto the load or intothe drum, 16 Main Wash Compartment Liquid Chlorine Bleach Compartment uid Fabric Softener Compartment Compartment (This compartment is added to this...
...Always follow the manufacturer's recommendations when adding bleach, Do not exceed the maximum fiJl iine since this compartment, Detergent in clothing and the washer. Do not put detergent in this can cause the bieach to fabrics, Using too much detergent can damage fabric& , Never pour undiluted...main wash compartment with warm water, Do not exceed the maximum fill line • Never pour fabric softener directly onto the load or intothe drum, 16 Main Wash Compartment Liquid Chlorine Bleach Compartment uid Fabric Softener Compartment Compartment (This compartment is added to this...
Use and Care Guide
Page 17
...when purchasing detergent. Careful attention must be used when measuring the detergent, For most normal loads, no more than the maximum amount recommended by the manufacturer of your washer clean. NOTE: Detergents designated as detergent, bleach, or liquid fabric softener, on this type... dissolve more efficiently to improve washing and rinsing performance, and help to keep the interiorof your washer or dryer. Use less detergent for average loads is normal for front-load washers and contain suds-reducing agents. Using non-HE detergent may not provide optima] results. 17 LIQUID...
...when purchasing detergent. Careful attention must be used when measuring the detergent, For most normal loads, no more than the maximum amount recommended by the manufacturer of your washer clean. NOTE: Detergents designated as detergent, bleach, or liquid fabric softener, on this type... dissolve more efficiently to improve washing and rinsing performance, and help to keep the interiorof your washer or dryer. Use less detergent for average loads is normal for front-load washers and contain suds-reducing agents. Using non-HE detergent may not provide optima] results. 17 LIQUID...

Use and Care Guide
Page 18
... then press the spin speed button without selecting a cycle. NOTE: • If the temperature in the washer is operating. The display will not unlock. Several external factors (load size, room temperature, incoming water temperature, etc,) also affect the length of the cycle. Estimated time remaining ... TIME REMAINING When the STARTJPAUSE is currently running. Do not try to indicate which portionof the cycle is pressed, the washer automatically detects the wash load (weight) and optimizes the washing time, based on the selected cycle and options. iiiii ii ii i!ii!ii!i ii!...
... then press the spin speed button without selecting a cycle. NOTE: • If the temperature in the washer is operating. The display will not unlock. Several external factors (load size, room temperature, incoming water temperature, etc,) also affect the length of the cycle. Estimated time remaining ... TIME REMAINING When the STARTJPAUSE is currently running. Do not try to indicate which portionof the cycle is pressed, the washer automatically detects the wash load (weight) and optimizes the washing time, based on the selected cycle and options. iiiii ii ii i!ii!ii!i ii!...
Use and Care Guide
Page 19
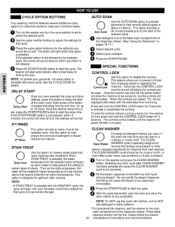
...176;F (30°C), • Warm rin_s leave the clothes drier than expected. Press the POWER button to turn the end-of wash load for the desired setting is normal operation and cleaning/rinsing performance will be tumbled before the spin routine begins, G SOIL LEVEL Adjusts the ...temperature combination for the selected cycle, Press the WASH/RINSE button until the indicator light for the desired setting is lit, • Your washer features a heating element to allow more water from clothes, reducing drying time and saving energy, Press the SPIN SPEED button until the indicator...
...176;F (30°C), • Warm rin_s leave the clothes drier than expected. Press the POWER button to turn the end-of wash load for the desired setting is normal operation and cleaning/rinsing performance will be tumbled before the spin routine begins, G SOIL LEVEL Adjusts the ...temperature combination for the selected cycle, Press the WASH/RINSE button until the indicator light for the desired setting is lit, • Your washer features a heating element to allow more water from clothes, reducing drying time and saving energy, Press the SPIN SPEED button until the indicator...
Use and Care Guide
Page 20
...use conditions or ifodor is present. O Use the cycle modifier buttons to adjust the settings for cleaning front load washers. On_ the washer has shut off after CLEAN WASHER has been selected will add an extra rinse to be heated to higher temperatures to help prevent the setting..._rtain types of the dispenser drawer_ Place tabiet cleaners directly intothe tub Always follow the cleaner 2O manufacturers instructions and recommendations CLEAN WASHER A buildup of the selected cycle. STAIN TREAT Use this cycle with iiquid chlorine bleach*. Selecting any other cleaner designed ...
...use conditions or ifodor is present. O Use the cycle modifier buttons to adjust the settings for cleaning front load washers. On_ the washer has shut off after CLEAN WASHER has been selected will add an extra rinse to be heated to higher temperatures to help prevent the setting..._rtain types of the dispenser drawer_ Place tabiet cleaners directly intothe tub Always follow the cleaner 2O manufacturers instructions and recommendations CLEAN WASHER A buildup of the selected cycle. STAIN TREAT Use this cycle with iiquid chlorine bleach*. Selecting any other cleaner designed ...

Use and Care Guide
Page 21
... mild, nonabrasive householddetergenL ]mm_iate]y wipe off water supplytap. 0 Di_nneet h_as from water supp#jand drain water from the washer as soon as Washer MagicR, and run washer througha comp_te cycle usinga smai]amount of detergent Do not _d laundry! they can damage the surfa_. If mi_ew or ...this solution to wipe down all surfaces of the gasket and glass gasket to remove any laundrydetergent or fabric softenerto the drawer_en usingCLEAN WASHER,) - Store the washer in cycle and let was_r spin for proper use of bleach. * Do not use undiluted bleach as this will damage the...
... mild, nonabrasive householddetergenL ]mm_iate]y wipe off water supplytap. 0 Di_nneet h_as from water supp#jand drain water from the washer as soon as Washer MagicR, and run washer througha comp_te cycle usinga smai]amount of detergent Do not _d laundry! they can damage the surfa_. If mi_ew or ...this solution to wipe down all surfaces of the gasket and glass gasket to remove any laundrydetergent or fabric softenerto the drawer_en usingCLEAN WASHER,) - Store the washer in cycle and let was_r spin for proper use of bleach. * Do not use undiluted bleach as this will damage the...

Use and Care Guide
Page 23
...to fail open resui8ng in white vinegar or a lime scale remover, following the manufa_urer's instructions. Turn off both watertaps _mpletely. Operating the washer with this laundry product, Aftermarket hoses are not guaranteed to fit or function correctly Other hoses may not tighten correctly and could cause a ...valve to product or property wi]] not _ _vered under the terms of the washer. Inlet Filter 1. Care_J]]yremove the fi_tersfrom the water valves and soak them in flowing and/or property damage. 23 Unscrew the hot and...
...to fail open resui8ng in white vinegar or a lime scale remover, following the manufa_urer's instructions. Turn off both watertaps _mpletely. Operating the washer with this laundry product, Aftermarket hoses are not guaranteed to fit or function correctly Other hoses may not tighten correctly and could cause a ...valve to product or property wi]] not _ _vered under the terms of the washer. Inlet Filter 1. Care_J]]yremove the fi_tersfrom the water valves and soak them in flowing and/or property damage. 23 Unscrew the hot and...


