
Owners Manual
Page 1
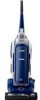
Part # 1-113890-000 Rev, 9/07 Printed in China Impreso en China Imprim6 en Chine Owner's Manual Manual Del Propietario Manuel Du Propri_taire ® Vacuum Cleaner Aspiradora Aspirateur [3 Model, Modelo, Mod61e 216.37100, 37105 (US) 216.31704 (Canada) CAUTION: Read and follow all safety and operating instructions before first use of this product. CUIDADO...
Part # 1-113890-000 Rev, 9/07 Printed in China Impreso en China Imprim6 en Chine Owner's Manual Manual Del Propietario Manuel Du Propri_taire ® Vacuum Cleaner Aspiradora Aspirateur [3 Model, Modelo, Mod61e 216.37100, 37105 (US) 216.31704 (Canada) CAUTION: Read and follow all safety and operating instructions before first use of this product. CUIDADO...

Owners Manual
Page 2
... Valve ......... 14 Troubleshooting 15 Master Protection Agreements o 16 Requesting Service ........ (back page) Please read this book and your new Kenmore vacuum cleaner. Serial No. Use the space below to record the model number and serial number of Purchase Keep this guide. For more information... about vacuum cleaner care and operation, call your new Kenmore vacuum cleaner in a safe place for future reference., It will help you assemble and operate your nearest Sears...
... Valve ......... 14 Troubleshooting 15 Master Protection Agreements o 16 Requesting Service ........ (back page) Please read this book and your new Kenmore vacuum cleaner. Serial No. Use the space below to record the model number and serial number of Purchase Keep this guide. For more information... about vacuum cleaner care and operation, call your new Kenmore vacuum cleaner in a safe place for future reference., It will help you assemble and operate your nearest Sears...

Owners Manual
Page 3
...installation, operation or maintenance. 3. Disclaimer of this product if it to any Sears store, Sears Parts & Repair Service Center, or other Kenmore outlet for a particular purpose, are limited to one year from the date of purchase, return it is not installed, operated or maintained... according to the all instructions supplied with the product, 7. ONE YEAR LIMITED WARRANTY ON KENMORE VACUUM CLEANER When installed, operated and maintained according to all instructions supplied with the product, if this appliance fails due to a defect in...
...installation, operation or maintenance. 3. Disclaimer of this product if it to any Sears store, Sears Parts & Repair Service Center, or other Kenmore outlet for a particular purpose, are limited to one year from the date of purchase, return it is not installed, operated or maintained... according to the all instructions supplied with the product, 7. ONE YEAR LIMITED WARRANTY ON KENMORE VACUUM CLEANER When installed, operated and maintained according to all instructions supplied with the product, if this appliance fails due to a defect in...

Owners Manual
Page 4
... children. Do not pull or carry by cord, use without dirt container and filters in place. Do not handle plug or appliance with Store the vacuum cleaner indoors. Do not use with damaged cord or plug. Call 1-877839-2046 to persons or damage when using your... moving parts. To reduce the risk of body away from heated surfaces. WARN ,, HHI IHHH'I Your safety is necessary when used as described in this vacuum cleaner. Use only manufacturer's recommended attachments. Turn off all parts of fire, electrical shock, injury to locate the nearest service center.
... children. Do not pull or carry by cord, use without dirt container and filters in place. Do not handle plug or appliance with Store the vacuum cleaner indoors. Do not use with damaged cord or plug. Call 1-877839-2046 to persons or damage when using your... moving parts. To reduce the risk of body away from heated surfaces. WARN ,, HHI IHHH'I Your safety is necessary when used as described in this vacuum cleaner. Use only manufacturer's recommended attachments. Turn off all parts of fire, electrical shock, injury to locate the nearest service center.
Owners Manual
Page 5
Your vacuum cleaner is listed on the data plate° WARNING: The cords, wires, and/or cables supplied with this product contains chemicals, including lead or lead ... given. Inspect the exhaust, inlet, and filters for Household use of California to the state of your vacuum cleaner are your responsibilities. After approximately 30 minutes the motor will have cooled and the vacuum will be ready to these boxes and follow any blockage. Wash hands after using. SAVE INSTRUCTIONS Proper assembly...
Your vacuum cleaner is listed on the data plate° WARNING: The cords, wires, and/or cables supplied with this product contains chemicals, including lead or lead ... given. Inspect the exhaust, inlet, and filters for Household use of California to the state of your vacuum cleaner are your responsibilities. After approximately 30 minutes the motor will have cooled and the vacuum will be ready to these boxes and follow any blockage. Wash hands after using. SAVE INSTRUCTIONS Proper assembly...
Owners Manual
Page 6
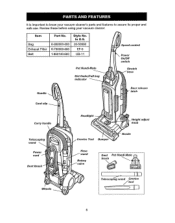
Review these before using your vacuum cleaner's parts and features to know your vacuum cleaner. In U,S. 20-50690 EF-5 UB-11 Pet Handi-Mate _peed control Power On/Off switch Stretch Dirt finder/Full bag indicator Handle Door release latch Cord clip Carry handle \ Telescoping wand Power cord Dust Brush Wheels Headlight Height adjust knob Bumpe, Nozzle Hose wand Rotary Dust Pet Handi,Mate / Telescoping wand Crevice tool It is important to assure its proper and safe use. I(-800000-000 }(-700000-000 1-860140-600 Style No. Item Bag Exhaust Filter Belt Part No.
Review these before using your vacuum cleaner's parts and features to know your vacuum cleaner. In U,S. 20-50690 EF-5 UB-11 Pet Handi-Mate _peed control Power On/Off switch Stretch Dirt finder/Full bag indicator Handle Door release latch Cord clip Carry handle \ Telescoping wand Power cord Dust Brush Wheels Headlight Height adjust knob Bumpe, Nozzle Hose wand Rotary Dust Pet Handi,Mate / Telescoping wand Crevice tool It is important to assure its proper and safe use. I(-800000-000 }(-700000-000 1-860140-600 Style No. Item Bag Exhaust Filter Belt Part No.

Owners Manual
Page 7
Attach upper handle to verify that you have received all the components of your new Kenmore vacuum cleaner. EXTENSION WAND/ CREVICE TOOL PLACEMENT Place the telescoping wand (A) into the electrical supply until the assembly is secure. 7 Push handle plug onto the... tool (B) in place. Overtightening screw holes. A B 2. WARNING Electrical Shock Hazard Do not plug into the wand holder on the right side of the vacuum cleaner,. Please pay special attention to these hazard alert boxes, and follow any instructions given° WARNING statements alert you to do so could strip...
Attach upper handle to verify that you have received all the components of your new Kenmore vacuum cleaner. EXTENSION WAND/ CREVICE TOOL PLACEMENT Place the telescoping wand (A) into the electrical supply until the assembly is secure. 7 Push handle plug onto the... tool (B) in place. Overtightening screw holes. A B 2. WARNING Electrical Shock Hazard Do not plug into the wand holder on the right side of the vacuum cleaner,. Please pay special attention to these hazard alert boxes, and follow any instructions given° WARNING statements alert you to do so could strip...

Owners Manual
Page 8
... ON position. Plug the polarized power cord into the cord clip on the body as shownoThis helps keep the power cord out from under the vacuum cleaner nozzle.. 3. ii ii iiiiiiiiiii1,11111 2. To store cord, turn upper cord hook to install the proper outlet. Personal injury or damage could occur. i 8 DO...
... ON position. Plug the polarized power cord into the cord clip on the body as shownoThis helps keep the power cord out from under the vacuum cleaner nozzle.. 3. ii ii iiiiiiiiiii1,11111 2. To store cord, turn upper cord hook to install the proper outlet. Personal injury or damage could occur. i 8 DO...
Owners Manual
Page 9
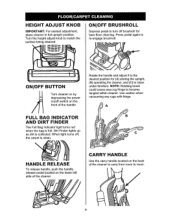
...CARRY HANDLE Use the carry handle located on the back of the cleaner to carry from room to become tangled within cleaner._ Use caution when vacuuming any rugs with fringe. When light turns off, the carpet is clean° Rotate the handle and adjust it to the desired position for .... Turn the height adjust knob to re-engage brushrolL ON/OFF BUTTON Turn cleaner on by depressing the power on/off brushroll for (A) storing the upright, (B) operating the cleaner, and (C) to clean under furnitureo NOTE: Rotating brush could cause area rug fringe to room.. / FULL BAG INDICATOR AND DIRT ...
...CARRY HANDLE Use the carry handle located on the back of the cleaner to carry from room to become tangled within cleaner._ Use caution when vacuuming any rugs with fringe. When light turns off, the carpet is clean° Rotate the handle and adjust it to the desired position for .... Turn the height adjust knob to re-engage brushrolL ON/OFF BUTTON Turn cleaner on by depressing the power on/off brushroll for (A) storing the upright, (B) operating the cleaner, and (C) to clean under furnitureo NOTE: Rotating brush could cause area rug fringe to room.. / FULL BAG INDICATOR AND DIRT ...

Owners Manual
Page 11
...Shock and Personal Injury Hazard Disconnect electrical supply before servicing or cleaning the unit. to remove_ Shake or brush excess dirt off of filter. VACUUM CLEANER CARE I Depress tab to remove exhaust filter from cleaner, Tap filter on inside of trash can to remove excess dirt and dust... to cleaner° Failure to do so could result in electrical shock or personal injury from vacuum cleaner suddenly starting . Failure to do so could result in electrical shock or personal injury from vacuum cleaner suddenly starting . ,i ,i 11 Lift up on front edge of filter pad and pull...
...Shock and Personal Injury Hazard Disconnect electrical supply before servicing or cleaning the unit. to remove_ Shake or brush excess dirt off of filter. VACUUM CLEANER CARE I Depress tab to remove exhaust filter from cleaner, Tap filter on inside of trash can to remove excess dirt and dust... to cleaner° Failure to do so could result in electrical shock or personal injury from vacuum cleaner suddenly starting . Failure to do so could result in electrical shock or personal injury from vacuum cleaner suddenly starting . ,i ,i 11 Lift up on front edge of filter pad and pull...
Owners Manual
Page 12
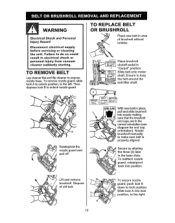
... to expose nozzle base.. Ensure to unlock nozzle guard. A 12 TO REPLACE BELT OR BRUSHROLL Place new belt in electrical shock or personal injury from vacuum cleaner suddenly starting. Then depress lock B to loop the belt around the belt lifter shaff_ Rotate/pivot the nozzle guard and /, pull off f Lift and...
... to expose nozzle base.. Ensure to unlock nozzle guard. A 12 TO REPLACE BELT OR BRUSHROLL Place new belt in electrical shock or personal injury from vacuum cleaner suddenly starting. Then depress lock B to loop the belt around the belt lifter shaff_ Rotate/pivot the nozzle guard and /, pull off f Lift and...

Owners Manual
Page 13
TO REMOVE LIGHT BULB 1. ii I3 Remove the two (2) screws from the bulb could result in the upright position. insert flat blade of screwdriver into place and secure the headlight lens by replacing the two screws. 4. CAUTION Do not use a bulb rated over ... suddenly starting. Snap lens cover back into slot at top of the lens. Press handle release pedal and lay vacuum cleaner back. 3. WARNING Electrical Shock and Personal Injury Hazard Wrapping the cord too tightly puts stress on the floor with the handle locked in electrical ...
TO REMOVE LIGHT BULB 1. ii I3 Remove the two (2) screws from the bulb could result in the upright position. insert flat blade of screwdriver into place and secure the headlight lens by replacing the two screws. 4. CAUTION Do not use a bulb rated over ... suddenly starting. Snap lens cover back into slot at top of the lens. Press handle release pedal and lay vacuum cleaner back. 3. WARNING Electrical Shock and Personal Injury Hazard Wrapping the cord too tightly puts stress on the floor with the handle locked in electrical ...
Owners Manual
Page 14
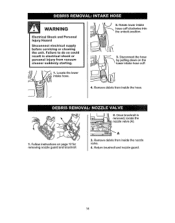
... Hazard Disconnect electrical supply before servicing or cleaning the unit. Return brushroll and nozzle guard. 14 Rotate lower intake 3. Locate the lower 4. Remove debris from vacuum cleaner suddenly starting. ___,__ hose cuff clockwise into the unlock position. .
... Hazard Disconnect electrical supply before servicing or cleaning the unit. Return brushroll and nozzle guard. 14 Rotate lower intake 3. Locate the lower 4. Remove debris from vacuum cleaner suddenly starting. ___,__ hose cuff clockwise into the unlock position. .

Owners Manual
Page 17
in products like vacuums, lawn equipment, and electronics, call or go on a product serviced by Sears: : 1-800-827-6655 (UoSA,) 1-800-361-6665 (Canada) ,, :ii; For Sears professional installation ...
in products like vacuums, lawn equipment, and electronics, call or go on a product serviced by Sears: : 1-800-827-6655 (UoSA,) 1-800-361-6665 (Canada) ,, :ii; For Sears professional installation ...


