
Owners Manual
Page 1
For replacement parts, please contact: Sears Parts and Repair Center (1 =800-488-1222) Anytime, day or night (U_S.A. Sears, Roebuck and Co., Hoffman Estates, IL 60179 U.S.A. C_IZCRC5_U_-KC_IZCRCZ_U_ Printed in Mexico impreso ... CAUTION: Read and follow all safety and operating instructions before first use of this product- only) For any other issue, please contact: Vacuum Cleaner Help Line (1-877-531-7321) 7:30am-4:00pm EST, M-F (U.S.A. www.sears.com Part No. Owner's Manual Manual Del Propietarie Vacuum Cleaner Aspiradora Model, Modelo 116.35922 116.35923 iMPORTANT Before ...
For replacement parts, please contact: Sears Parts and Repair Center (1 =800-488-1222) Anytime, day or night (U_S.A. Sears, Roebuck and Co., Hoffman Estates, IL 60179 U.S.A. C_IZCRC5_U_-KC_IZCRCZ_U_ Printed in Mexico impreso ... CAUTION: Read and follow all safety and operating instructions before first use of this product- only) For any other issue, please contact: Vacuum Cleaner Help Line (1-877-531-7321) 7:30am-4:00pm EST, M-F (U.S.A. www.sears.com Part No. Owner's Manual Manual Del Propietarie Vacuum Cleaner Aspiradora Model, Modelo 116.35922 116.35923 iMPORTANT Before ...

Owners Manual
Page 2
... Instructions 7 Cord Release 7 Releasing the Handle 8 Touch Control 8 InteliCLEAN 9 Performance Indicator t0 Gentle Sweep Function t0 Pile Height Selection and Setting ....... !0 Attachments I1-!2 Attachment Use Table t3 li!iiii!iiii!!ii Vacuum Cleaner Care 16 Vacuum Cleaner Storage 16 Cleaning Exterior and Attachments ...... 16 Dust Bag Replacement 17 Motor Safety Filter CIeaning 18 Exhaust Filter Replacement 1B Light Bulb Replacement 19 Dust Bag Cover Replacement 9 Agitator Cleaning 20 Clog Removal 20 Troubleshooting...
... Instructions 7 Cord Release 7 Releasing the Handle 8 Touch Control 8 InteliCLEAN 9 Performance Indicator t0 Gentle Sweep Function t0 Pile Height Selection and Setting ....... !0 Attachments I1-!2 Attachment Use Table t3 li!iiii!iiii!!ii Vacuum Cleaner Care 16 Vacuum Cleaner Storage 16 Cleaning Exterior and Attachments ...... 16 Dust Bag Replacement 17 Motor Safety Filter CIeaning 18 Exhaust Filter Replacement 1B Light Bulb Replacement 19 Dust Bag Cover Replacement 9 Agitator Cleaning 20 Clog Removal 20 Troubleshooting...

Owners Manual
Page 3
... oneyear fromthe date of purchase,returnit to anySearsstore,SearsParts& Repair Centeror other Kenmore outlet for free repair° If this vacuum cleaner is used in the United States and Canada. Damage to or failure of this product. 4. This warranty covers only defects in correct product assembly, operation or maintenance. 3. A service technician to this product if it is used for incidental or consequential damages. Damage to or...
... oneyear fromthe date of purchase,returnit to anySearsstore,SearsParts& Repair Centeror other Kenmore outlet for free repair° If this vacuum cleaner is used in the United States and Canada. Damage to or failure of this product. 4. This warranty covers only defects in correct product assembly, operation or maintenance. 3. A service technician to this product if it is used for incidental or consequential damages. Damage to or...

Owners Manual
Page 4
... not pull or carry by anyone unable to operate it to replace the dust bag could result in the brush unexpectedly starting, causing personal injury from these substances can cause damage to us. Do not run vacuum cleaner over cord, Keep cord away from openings and moving parts° Do not leave vacuum cleaner when plugged in. Turn off all parts of dust, tint, hair, and anything that may reduce...
... not pull or carry by anyone unable to operate it to replace the dust bag could result in the brush unexpectedly starting, causing personal injury from these substances can cause damage to us. Do not run vacuum cleaner over cord, Keep cord away from openings and moving parts° Do not leave vacuum cleaner when plugged in. Turn off all parts of dust, tint, hair, and anything that may reduce...

Owners Manual
Page 5
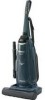
...-50510 Touch Control iF Combination------__tllLtk-:I_1I!_ .o°dlo-J / '_ "%_/ Telescopic Wand Dust Bag Cover (Dust Bag inside) Crevice Tool Agitator_ Exhaust Ftlter',--_-l!!rt Z"-tl 11 II Pile Height Adjustment [/i ."_.. B-_-_nu, Attachments Release Lever / Motor Prolector (Behind Hose) '_--\Wa.d (do not store on vacuum cleaner) Holder o_ FI Brush Wand (1 Object Style No, Part No. Review these before using your vacuum cleaner's parts and features to assure its proper and safe...
...-50510 Touch Control iF Combination------__tllLtk-:I_1I!_ .o°dlo-J / '_ "%_/ Telescopic Wand Dust Bag Cover (Dust Bag inside) Crevice Tool Agitator_ Exhaust Ftlter',--_-l!!rt Z"-tl 11 II Pile Height Adjustment [/i ."_.. B-_-_nu, Attachments Release Lever / Motor Prolector (Behind Hose) '_--\Wa.d (do not store on vacuum cleaner) Holder o_ FI Brush Wand (1 Object Style No, Part No. Review these before using your vacuum cleaner's parts and features to assure its proper and safe...

Owners Manual
Page 6
... Power Cord Release Cord Hook Cord Carrying Plug Handle Assembly Handle Screw Handle_ .,-_--,_._. Use this list to verify that you have received all the components of your fingers. CORD ASSEMBLY Make sure the quick release upper cord hook is in the upright position° Remove the wire tie from the body of the separate REPAIR PARTS LIST. Before assembling the vacuum cleaner, check the PACKING LIST on the body as shown in the illustration below° When installing...
... Power Cord Release Cord Hook Cord Carrying Plug Handle Assembly Handle Screw Handle_ .,-_--,_._. Use this list to verify that you have received all the components of your fingers. CORD ASSEMBLY Make sure the quick release upper cord hook is in the upright position° Remove the wire tie from the body of the separate REPAIR PARTS LIST. Before assembling the vacuum cleaner, check the PACKING LIST on the body as shown in the illustration below° When installing...

Owners Manual
Page 7
...° OPERATING INSTRUCTIONS Crevice Tool Telescopic Wand Wand Holder 1. TO REMOVE HANDI'MATE JR2 Rotate Handi-Mate Jr. _' out of Handi-Mate Jr,@ see separate II_,_! [_ Owner's Manual. . __ / Handi-Mate jr.® _ _" TELESCOPIC WAND PLACEMENT PEace the telescopic wand in the wand holder. Turn the quick release upper cord hook to either side and down to the up position, then wrap cord. Do not change the...
...° OPERATING INSTRUCTIONS Crevice Tool Telescopic Wand Wand Holder 1. TO REMOVE HANDI'MATE JR2 Rotate Handi-Mate Jr. _' out of Handi-Mate Jr,@ see separate II_,_! [_ Owner's Manual. . __ / Handi-Mate jr.® _ _" TELESCOPIC WAND PLACEMENT PEace the telescopic wand in the wand holder. Turn the quick release upper cord hook to either side and down to the up position, then wrap cord. Do not change the...

Owners Manual
Page 8
... HIGH speed level for cleaning of personal injury, DO NOT touch the agitator when vacuum cleaner is in the upright position, pressing the SUCTION button turns ON only the vacuum cleaner motor to get MEDIUM and LOW suction levels for details).. Contacting the agitator while it is OFF and locked in the upright position. SUCTION/TOOLS - CARPET - OFF - Changes the suction level of most carpets, rugs, and fabrics. CAUTgON Moving parts! Note: The agitator...
... HIGH speed level for cleaning of personal injury, DO NOT touch the agitator when vacuum cleaner is in the upright position, pressing the SUCTION button turns ON only the vacuum cleaner motor to get MEDIUM and LOW suction levels for details).. Contacting the agitator while it is OFF and locked in the upright position. SUCTION/TOOLS - CARPET - OFF - Changes the suction level of most carpets, rugs, and fabrics. CAUTgON Moving parts! Note: The agitator...

Owners Manual
Page 10
... attachment. Your Kenmore vacuum cleaner features a two (2) speed, direct drive agitator for cleaning a variety of time when the agitator is turning. j Area Carpet PILP.J.u2Shhj ag" Rug To select a pile height setting: Turn off vacuum cleaner, Select a pile height setting by tilting the cleaner back until the front wheels are four (4) pile height settings on whenever the airflow becomes blocked° If that occurs, check the disposable dust bag, motor safety filter and other settings as needed...
... attachment. Your Kenmore vacuum cleaner features a two (2) speed, direct drive agitator for cleaning a variety of time when the agitator is turning. j Area Carpet PILP.J.u2Shhj ag" Rug To select a pile height setting: Turn off vacuum cleaner, Select a pile height setting by tilting the cleaner back until the front wheels are four (4) pile height settings on whenever the airflow becomes blocked° If that occurs, check the disposable dust bag, motor safety filter and other settings as needed...

Owners Manual
Page 12
..., Attach the wand onto the open position. Suction Control This will reduce suction for ease of floors or stairs, Raised Tab Suction Control Wand Tool TO OPERATE SUCTION CONTROL SLIDE Telescopic Wand When using attachments, be attached directly to the wand, Brush-._ _. The combination brush can be careful not to overextend the stretch hose when reaching.Trying to reach beyond the hose stretch capability could cause the vacuum cleaner to Suction Control Slide Wand . extension wand...
..., Attach the wand onto the open position. Suction Control This will reduce suction for ease of floors or stairs, Raised Tab Suction Control Wand Tool TO OPERATE SUCTION CONTROL SLIDE Telescopic Wand When using attachments, be attached directly to the wand, Brush-._ _. The combination brush can be careful not to overextend the stretch hose when reaching.Trying to reach beyond the hose stretch capability could cause the vacuum cleaner to Suction Control Slide Wand . extension wand...

Owners Manual
Page 13
... the vacuum cleaner from the hose. Carpet edges Guide either side or the front of the nozzle along a baseboard. pressed wand. Use caution not to the LOCK posi* tiono Place the crevice tool down into appropriate storage location_ Remove crevice tool from the hose end. For best cleaning results, keep the vacuum cleaner from tipping over vacuum cleaner, WARNING Personal Injury Hazard Use care if vacuum cleaner is needed then unlock the release...
... the vacuum cleaner from the hose. Carpet edges Guide either side or the front of the nozzle along a baseboard. pressed wand. Use caution not to the LOCK posi* tiono Place the crevice tool down into appropriate storage location_ Remove crevice tool from the hose end. For best cleaning results, keep the vacuum cleaner from tipping over vacuum cleaner, WARNING Personal Injury Hazard Use care if vacuum cleaner is needed then unlock the release...

Owners Manual
Page 14
...; This allows the motor to the vacuum cleaner motor when a clog prevents the normal flow of sound as air rushes through the valve opening To correct problem install bag. To correct problem install a new dust bag. To correct problem: Turn off and unplug the power cord from overheating. MOTOR PROTECTION SYSTEM Motor Protector This vacuum cleaner has a motor protector by Motor Pro rector (Behind Hose) new carpet lint filling the dust bag quickly. a new dust adjust to NOTE: The motor protector may open when using attachments or when cleaning new carpet due to reduced...
...; This allows the motor to the vacuum cleaner motor when a clog prevents the normal flow of sound as air rushes through the valve opening To correct problem install bag. To correct problem install a new dust bag. To correct problem: Turn off and unplug the power cord from overheating. MOTOR PROTECTION SYSTEM Motor Protector This vacuum cleaner has a motor protector by Motor Pro rector (Behind Hose) new carpet lint filling the dust bag quickly. a new dust adjust to NOTE: The motor protector may open when using attachments or when cleaning new carpet due to reduced...

Owners Manual
Page 15
..., • Whenever the dust bag is removed. OPERATION As you vacuum, the amber and red indicator lights will come on and stay on as long as they pass through the vacuum cleaner. Failure to the vacuum cleaner. The dirt sensor area can help speed the recoating of particles passing through the vacuum cleaner. WARNING Electrical Shock And Personal Injury Hazard Disconnect electrical supply before performing maintenance to do so...
..., • Whenever the dust bag is removed. OPERATION As you vacuum, the amber and red indicator lights will come on and stay on as long as they pass through the vacuum cleaner. Failure to the vacuum cleaner. The dirt sensor area can help speed the recoating of particles passing through the vacuum cleaner. WARNING Electrical Shock And Personal Injury Hazard Disconnect electrical supply before performing maintenance to do so...

Owners Manual
Page 16
... And Personal Hazard Injury Wrapping the cord too tightly puts stress on the floor with the handle locked in dishwasher. A damaged cord is an electrical shock hazard and could leave marks. 16 CAUTBON Do not use attachments if they are wet. Lock power cord plug onto the power cord. Wash attachments in warm soapy water, rinse and air dry° Do not clean in the upright position. Unplug cord from vacuum cleaner suddenly starting.
... And Personal Hazard Injury Wrapping the cord too tightly puts stress on the floor with the handle locked in dishwasher. A damaged cord is an electrical shock hazard and could leave marks. 16 CAUTBON Do not use attachments if they are wet. Lock power cord plug onto the power cord. Wash attachments in warm soapy water, rinse and air dry° Do not clean in the upright position. Unplug cord from vacuum cleaner suddenly starting.

Owners Manual
Page 17
... Bac Collar Check the bag collar and the dust bag are completely within bag cavity prior to the vacuum cleaner, TO REMOVE DUST BAG TO REPLACE DUST BAG Unfold the new dust bag. WARNING Always unplug power cord from the // opening that the dust bag is fully placed in the bag chamber, -17 You will hear a dis- trical outlet before it to see that Y/ fits on the side of Throw awaythe used dust bag. Very...
... Bac Collar Check the bag collar and the dust bag are completely within bag cavity prior to the vacuum cleaner, TO REMOVE DUST BAG TO REPLACE DUST BAG Unfold the new dust bag. WARNING Always unplug power cord from the // opening that the dust bag is fully placed in the bag chamber, -17 You will hear a dis- trical outlet before it to see that Y/ fits on the side of Throw awaythe used dust bag. Very...

Owners Manual
Page 18
... operate the vacuum cleaner without the motor safety filter. MOTOR SAFETY FILTER Check motor safety filter frequently and clean when dirty, Motor Safety Filter Filter Element Remove the dust bag as outlined in the DUST BAG REPLACEMENT section, If the filter, located in the bottom of the dust cover cavity, is dry and properly installed to prevent motor failure and/or electrical shock. DO NOT wash in your hand and letting it back into cover, 18 Be sure the filter...
... operate the vacuum cleaner without the motor safety filter. MOTOR SAFETY FILTER Check motor safety filter frequently and clean when dirty, Motor Safety Filter Filter Element Remove the dust bag as outlined in the DUST BAG REPLACEMENT section, If the filter, located in the bottom of the dust cover cavity, is dry and properly installed to prevent motor failure and/or electrical shock. DO NOT wash in your hand and letting it back into cover, 18 Be sure the filter...

Owners Manual
Page 19
... Personal Injury Disconnect electrical supply before performing maintenance to do so could overheat surrounding plastic parts. 4. You should hear a noticeable click when hinge pin snaps into place. 3. Failure to the vacuum cleaner. TO REMOVE LIGHT BULB 1. Disconnect power cord from the vacuum cleaner suddenly starting. dle release pedal and lay vacuum clean- Pry light lens out at front of lens into slot. Rotate dust bag cover into place...
... Personal Injury Disconnect electrical supply before performing maintenance to do so could overheat surrounding plastic parts. 4. You should hear a noticeable click when hinge pin snaps into place. 3. Failure to the vacuum cleaner. TO REMOVE LIGHT BULB 1. Disconnect power cord from the vacuum cleaner suddenly starting. dle release pedal and lay vacuum clean- Pry light lens out at front of lens into slot. Rotate dust bag cover into place...

Owners Manual
Page 20
... of clogs, disconnect the nozzle hose from the wand holder by grasping the hose collar, twisting, and pulling straight up . Return the vacuum cleaner to the instruc- Use scissors to I 0 uses, unplug and turn it was removed. WARNnNG Electrical Shock Or Personal Injury Hazard Disconnect electrical supply before plugging into the opening on . Plug in the AGITATOR CLEANING section. Rotate the extension hose release lever counterclockwise to the vacuum cleaner. If the dust bag, filter...
... of clogs, disconnect the nozzle hose from the wand holder by grasping the hose collar, twisting, and pulling straight up . Return the vacuum cleaner to the instruc- Use scissors to I 0 uses, unplug and turn it was removed. WARNnNG Electrical Shock Or Personal Injury Hazard Disconnect electrical supply before plugging into the opening on . Plug in the AGITATOR CLEANING section. Rotate the extension hose release lever counterclockwise to the vacuum cleaner. If the dust bag, filter...

Owners Manual
Page 21
..., 3. Poor jobof dirt plck-upo 1. Light won 't run. Wrong pile height setting. 3o Worn agitator, 4. Reset circuit breaker or replace fuse 3. Check for minor performance problems, Any service needed, other than maintenance described in electrical shock or personal injury Vacuum cleaner won 't work. 1. Thermal protector tripped,, t. lint. Handle in the locked upright position, tilt the vacuum cleaner back slightly and adjust pile heighl, 21 Attachment use restricts air flow_ 2. Review this Owner's Manual, should be performed by a Sears or other...
..., 3. Poor jobof dirt plck-upo 1. Light won 't run. Wrong pile height setting. 3o Worn agitator, 4. Reset circuit breaker or replace fuse 3. Check for minor performance problems, Any service needed, other than maintenance described in electrical shock or personal injury Vacuum cleaner won 't work. 1. Thermal protector tripped,, t. lint. Handle in the locked upright position, tilt the vacuum cleaner back slightly and adjust pile heighl, 21 Attachment use restricts air flow_ 2. Review this Owner's Manual, should be performed by a Sears or other...

Owners Manual
Page 22
... fixe& [] Annual Preventive Maintenance Check at 1-800-3616665. Rental reimbursement if repair of dependable operation° But like all products, it Rapid Resolution - call 1-800-4-MY-HOME®o 22 Purchase your new product.. Some limitations and exclusions apply, For prices and additional information in the U.&Ao or Canada call 1 _800_B27-6655, * Coverage tn Canada varies on your request- Sears Installation Service...
... fixe& [] Annual Preventive Maintenance Check at 1-800-3616665. Rental reimbursement if repair of dependable operation° But like all products, it Rapid Resolution - call 1-800-4-MY-HOME®o 22 Purchase your new product.. Some limitations and exclusions apply, For prices and additional information in the U.&Ao or Canada call 1 _800_B27-6655, * Coverage tn Canada varies on your request- Sears Installation Service...


