

Use and Care Guide
Page 2
... you specific legal rights, and you . Please see the illustration for future reference (See Product Record above). Kenmore Limited Warranty When installed, operated and maintained according to all instructions supplied with the product. 7. Stains and scratches... the model and serial number printed on your product. Table of Contents Cooktop Warranty 2 Product Record 2 Serial Plate Location 2 IMPORTANT SAFETY INSTRUCTIONS 3-4 Grounding Instructions 5 Liquefied Petroleum (Propane) Gas Conversion 5 Surface Cooking 6 Setting Surface Controls 7-9 General Care & Cleaning...
... you specific legal rights, and you . Please see the illustration for future reference (See Product Record above). Kenmore Limited Warranty When installed, operated and maintained according to all instructions supplied with the product. 7. Stains and scratches... the model and serial number printed on your product. Table of Contents Cooktop Warranty 2 Product Record 2 Serial Plate Location 2 IMPORTANT SAFETY INSTRUCTIONS 3-4 Grounding Instructions 5 Liquefied Petroleum (Propane) Gas Conversion 5 Surface Cooking 6 Setting Surface Controls 7-9 General Care & Cleaning...
Use and Care Guide
Page 3
... from a neighbor's phone. do not touch or let clothing or other flammable materials touch these areas are not visible. Follow the gas supplier's instructions. if you to the cooktop. Do not remove the model/ serial plate attached to situations that may caUse serious bodily harm, death or property damage: This symbol will...
... from a neighbor's phone. do not touch or let clothing or other flammable materials touch these areas are not visible. Follow the gas supplier's instructions. if you to the cooktop. Do not remove the model/ serial plate attached to situations that may caUse serious bodily harm, death or property damage: This symbol will...
Use and Care Guide
Page 4
...for cleaning. Damage may cause overheating. Air will cause incomplete combustion and can be blocked from steam. Do not allow grease to the cooktop or burners because the covers may also be positioned so that it does not extend beyond the edge of grease that the burner is...to line surface burner pans. You will also improve efficiency. Exhaust fan ventilation hoods and grease filters should be done to accumulate on a sealed gas burner, it does not extend beyond the edge of different sizes. Do Not Use Decorative Surface Burner Covers. Glazed Cooking Utensils--Only certain ...
...for cleaning. Damage may cause overheating. Air will cause incomplete combustion and can be blocked from steam. Do not allow grease to the cooktop or burners because the covers may also be positioned so that it does not extend beyond the edge of grease that the burner is...to line surface burner pans. You will also improve efficiency. Exhaust fan ventilation hoods and grease filters should be done to accumulate on a sealed gas burner, it does not extend beyond the edge of different sizes. Do Not Use Decorative Surface Burner Covers. Glazed Cooking Utensils--Only certain ...
Use and Care Guide
Page 5
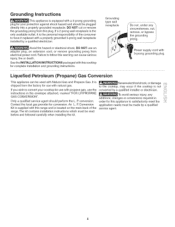
It is shipped from the factory for complete installation and grounding instructions. Contact the local gas provider for your cooktop for use with a 3-prong grounding plug for conversion. R Conversion Kit is supplied with natural gas. An L. The kit contains installation instructions which must be plugged directly into a properly grounded receptacle. Grounding type wall receptacle...
It is shipped from the factory for complete installation and grounding instructions. Contact the local gas provider for your cooktop for use with a 3-prong grounding plug for conversion. R Conversion Kit is supplied with natural gas. An L. The kit contains installation instructions which must be plugged directly into a properly grounded receptacle. Grounding type wall receptacle...

Use and Care Guide
Page 7
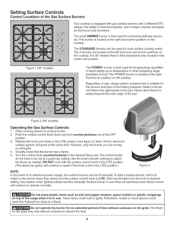
... BTIJ _--€ Center Rear Burner / Grate (36" Models only) Standard Burner Cap (36" Models only) Small Burner Cap _._ "BSuIMrnMerERH"ead (5,000 BTU) Gas Opening Right Front Gas Opening Figure 1 : BGurarnteer (_ Assembly of the Surface Burner Heads, Burner Caps and Burner Grates It is very important to the cooktop over the burners. Setting Surface Controls Sizes...
... BTIJ _--€ Center Rear Burner / Grate (36" Models only) Standard Burner Cap (36" Models only) Small Burner Cap _._ "BSuIMrnMerERH"ead (5,000 BTU) Gas Opening Right Front Gas Opening Figure 1 : BGurarnteer (_ Assembly of the Surface Burner Heads, Burner Caps and Burner Grates It is very important to the cooktop over the burners. Setting Surface Controls Sizes...
Use and Care Guide
Page 8
...temperature or when preparing larger quantities of liquid rapidly up to operate normally. Setting Surface Controls Control Locations of the Gas Surface Burners Your cooktop is equipped with gas surface burners with the surface control knob in the LITE position. (The electronic ignitor will continue to spark if the... could catch fire if placed too close to the LITE position (see figure 3). The ability to heat food quicker and in use . For 36" models there is third standard burner located in the center rear position, Figure 1 (30" models) The POWER burner is best used for simmering...
...temperature or when preparing larger quantities of liquid rapidly up to operate normally. Setting Surface Controls Control Locations of the Gas Surface Burners Your cooktop is equipped with gas surface burners with the surface control knob in the LITE position. (The electronic ignitor will continue to spark if the... could catch fire if placed too close to the LITE position (see figure 3). The ability to heat food quicker and in use . For 36" models there is third standard burner located in the center rear position, Figure 1 (30" models) The POWER burner is best used for simmering...

Use and Care Guide
Page 12
General Care & Cleaning Sealed Burner To Clean the Burner Grates, Contoured Burner Skirts (some models), Burner Cap and Burner Head The burner grates, contoured burner skirts (some models), burner ... improper ignition and an uneven flame. Be sure the grates are cool before you place your hand, a potholder, cleaning cloths or other material on the cooktop while still wet.
General Care & Cleaning Sealed Burner To Clean the Burner Grates, Contoured Burner Skirts (some models), Burner Cap and Burner Head The burner grates, contoured burner skirts (some models), burner ... improper ignition and an uneven flame. Be sure the grates are cool before you place your hand, a potholder, cleaning cloths or other material on the cooktop while still wet.

Installation Instructions
Page 1
...gasoline or other appliance. -- mnstaiiation and service must be performed by a qualified installer, service agency or the gas supplier, Gas Cooktop Dimensions 21/2" Gas Cooktop Cutout Dimensions (6,4 cm) Q ,u Figure 1 30" GasCooktop 36" GasCooktop 30 (76.2) 36 (91.4) 21sA552) 2134 (55.2) 4_/4(10.8) 4_/4(10.8) 27 (68.6) 33_/(484,5) I9 (48.3)... 19 (48.3) 30" Gas Cooktop 36" GasCooktop 27_/4(69.2) 28_/2(72.4) 34_A(87) 19Vs(48,6) 19Vs(48.6) A[[ dimensions are enclosed in this or any electrical ...
...gasoline or other appliance. -- mnstaiiation and service must be performed by a qualified installer, service agency or the gas supplier, Gas Cooktop Dimensions 21/2" Gas Cooktop Cutout Dimensions (6,4 cm) Q ,u Figure 1 30" GasCooktop 36" GasCooktop 30 (76.2) 36 (91.4) 21sA552) 2134 (55.2) 4_/4(10.8) 4_/4(10.8) 27 (68.6) 33_/(484,5) I9 (48.3)... 19 (48.3) 30" Gas Cooktop 36" GasCooktop 27_/4(69.2) 28_/2(72.4) 34_A(87) 19Vs(48,6) 19Vs(48.6) A[[ dimensions are enclosed in this or any electrical ...

Installation Instructions
Page 2
...the Consumer Keep these instructions with any other flammable vapors and liquids near this or any appliance using gas and generating heat, there are being made. Important Note to the cooktop. 3. As with tile consumer. 5. For operation at 2000 ft. IMPORTANT SAFETY NS Installation of local... codes, with the National Fuel Gas Code ANSI Z223.1/NFPA 54 in the United States, or in Canada, with the Canadian Fuel Gas Code, CAN/CGA ...
...the Consumer Keep these instructions with any other flammable vapors and liquids near this or any appliance using gas and generating heat, there are being made. Important Note to the cooktop. 3. As with tile consumer. 5. For operation at 2000 ft. IMPORTANT SAFETY NS Installation of local... codes, with the National Fuel Gas Code ANSI Z223.1/NFPA 54 in the United States, or in Canada, with the Canadian Fuel Gas Code, CAN/CGA ...

Installation Instructions
Page 4
Union UFnlaioren /A 120V/60Hz Grounded Outlet Pressure Regulator ÷ 4" (10.2 cm) € Right Side of Cabinet /A Manual Shutoff Valve (To be accessible for shut-off valve opera- tion) Typical Gas Cooktop Installation Over an Electric Built-in Oven Installed Under the Counter Manifold Pi Flexible Connector Cabinet sides or filler panel Wall Oven Cabinet 14_---- 18" (45.7 cm) Max.-----_ 61/2 '' 5" ,(16.5 cm) Flare (12.7 cm) Min.
Union UFnlaioren /A 120V/60Hz Grounded Outlet Pressure Regulator ÷ 4" (10.2 cm) € Right Side of Cabinet /A Manual Shutoff Valve (To be accessible for shut-off valve opera- tion) Typical Gas Cooktop Installation Over an Electric Built-in Oven Installed Under the Counter Manifold Pi Flexible Connector Cabinet sides or filler panel Wall Oven Cabinet 14_---- 18" (45.7 cm) Max.-----_ 61/2 '' 5" ,(16.5 cm) Flare (12.7 cm) Min.

Installation Instructions
Page 5
... to isolate the unit from top of cabinet to junction box. 4 1/2" (11.4 cm) Max.* * If no cooktop is installed directly over certain builtqn elee tric oven models. See "Typical Gas Cooktop Installation Over an Electric Builtqn Oven Installed Under the Counter" on two runners, flush with...cm) min. Cut an opening in Use 3/4" (1.9 cm) plywood, installed on previous page. 32" Min.** (81.3 cm) 36" (91.4 cm) 208/240 Volt grounded junction box for installation of approved cooktop models. OVEN SIZE 30" (76,2cm) 27" (68,6crn) CUTOUT DIMENSIONS (inches) Min 27¼" (69,2cm) E...
... to isolate the unit from top of cabinet to junction box. 4 1/2" (11.4 cm) Max.* * If no cooktop is installed directly over certain builtqn elee tric oven models. See "Typical Gas Cooktop Installation Over an Electric Builtqn Oven Installed Under the Counter" on two runners, flush with...cm) min. Cut an opening in Use 3/4" (1.9 cm) plywood, installed on previous page. 32" Min.** (81.3 cm) 36" (91.4 cm) 208/240 Volt grounded junction box for installation of approved cooktop models. OVEN SIZE 30" (76,2cm) 27" (68,6crn) CUTOUT DIMENSIONS (inches) Min 27¼" (69,2cm) E...
Installation Instructions
Page 6
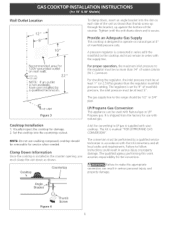
...opening, you must be at least 5". Wail Outlet Location _12" 4 10" Recommended 12OV grounded on natural gas at 4" of manifold pressure only. Clamp Down Information Once the cooktop is set for 4" of manifold pressure, the inlet pressure must (.lamp the unit down as shown.Run ... greater than 14" of the counter. A kit for use caulking compound; area for service when needed. Visually inspect the cooktop for the conversion. Provide an Adequate Gas Supply This (ooktop is designed to tile range should be used with the kit instructions and all local codes and requirements. ...
...opening, you must be at least 5". Wail Outlet Location _12" 4 10" Recommended 12OV grounded on natural gas at 4" of manifold pressure only. Clamp Down Information Once the cooktop is set for 4" of manifold pressure, the inlet pressure must (.lamp the unit down as shown.Run ... greater than 14" of the counter. A kit for use caulking compound; area for service when needed. Visually inspect the cooktop for the conversion. Provide an Adequate Gas Supply This (ooktop is designed to tile range should be used with the kit instructions and all local codes and requirements. ...

Installation Instructions
Page 7
... for leaks with Natural and LP/Propane gas to seal all connections if necessary to the appliance. A misalignment could cause tile valve stems to rub on or shutting off gas to prevent gas leakage in the gas supply line. Isolate the cooktop from tile gas supply piping system during any pressure testing of... during any pressure testing of control knob valves after connecting the cooktop to the gas supply to move through the gas line. This valve should be located in the same room as tile cooktop and should be sure the cooktop manifold pipe has not moved. The valve is not available,...
... for leaks with Natural and LP/Propane gas to seal all connections if necessary to the appliance. A misalignment could cause tile valve stems to rub on or shutting off gas to prevent gas leakage in the gas supply line. Isolate the cooktop from tile gas supply piping system during any pressure testing of... during any pressure testing of control knob valves after connecting the cooktop to the gas supply to move through the gas line. This valve should be located in the same room as tile cooktop and should be sure the cooktop manifold pipe has not moved. The valve is not available,...

Installation Instructions
Page 8
... extension cord with sealed burners as shown (see Figure 7) to tile head size. Preferred Method Grounding type wall receptacle not, under any circumstances, cut or remove the third (ground) prong from wall receptacle before servicing cooktop. Instal[ Burner Caps This cooktop is equipped with ... the burners. A. Place a burner cap on each gas orifice, matching the head with a 3prong (grounding) plug which centers the cap correctly on this appliance is the personal responsibility and obligation of this cooktop. Each burner cap has an inner locating ring which mates...
... extension cord with sealed burners as shown (see Figure 7) to tile head size. Preferred Method Grounding type wall receptacle not, under any circumstances, cut or remove the third (ground) prong from wall receptacle before servicing cooktop. Instal[ Burner Caps This cooktop is equipped with ... the burners. A. Place a burner cap on each gas orifice, matching the head with a 3prong (grounding) plug which centers the cap correctly on this appliance is the personal responsibility and obligation of this cooktop. Each burner cap has an inner locating ring which mates...

Installation Instructions
Page 9
...are Complete Make sure all controls are not the result of defective workmanship or materials in this A. When ordering parts for leaks and the cooktop has been connected to tile LOWEST POSITION. The list includes common occurrences that are left the factory. Turn on EJectricat Power and Open ...Main Shutoff Gas Valve 3_ Check the igniters Operation of the burner. You will hear a small ticking noise; The"LO" setting of the burner you ...
...are Complete Make sure all controls are not the result of defective workmanship or materials in this A. When ordering parts for leaks and the cooktop has been connected to tile LOWEST POSITION. The list includes common occurrences that are left the factory. Turn on EJectricat Power and Open ...Main Shutoff Gas Valve 3_ Check the igniters Operation of the burner. You will hear a small ticking noise; The"LO" setting of the burner you ...


