

Use and Care Guide
Page 2
... made to filters, belts, light bulbs, and bags. 4. Table of Contents Cooktop Warranty 2 Product Record 2 Serial Plate Location 2 IMPORTANT SAFETY INSTRUCTIONS 3-4 Grounding Instructions 5 Liquefied Petroleum (Propane) Gas Conversion 5 Surface Cooking 6 Setting Surface Controls 7-9 General Care & Cleaning 10-...and caution must be product repair as provided herein. Date of implied warranties; Printed in material and workmanship. Kenmore Limited Warranty When installed, operated and maintained according to all instructions supplied with the product, if this product. ...
... made to filters, belts, light bulbs, and bags. 4. Table of Contents Cooktop Warranty 2 Product Record 2 Serial Plate Location 2 IMPORTANT SAFETY INSTRUCTIONS 3-4 Grounding Instructions 5 Liquefied Petroleum (Propane) Gas Conversion 5 Surface Cooking 6 Setting Surface Controls 7-9 General Care & Cleaning 10-...and caution must be product repair as provided herein. Date of implied warranties; Printed in material and workmanship. Kenmore Limited Warranty When installed, operated and maintained according to all instructions supplied with the product, if this product. ...
Use and Care Guide
Page 3
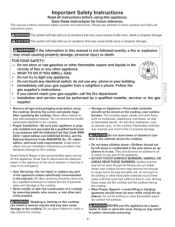
.... Do not touch any appliance. Immediately call the fire department. Follow the gas supplier's instructions. if you to sit or stand on the cooktop. Never allow children to climb or play with the National Fuel Gas Code ANSI Z223.1 latest edition and CAN/CGA B149.2, and the National Electrical... let clothing or other part of the appliance unless specifically recommended in your building. WHATTO DO IFYOU SMELL GAS: • Do not try to chil= dren in the cabinets above the cooktop. • Do not leave children alone--Children should not be done only by a qualified technician in ...
.... Do not touch any appliance. Immediately call the fire department. Follow the gas supplier's instructions. if you to sit or stand on the cooktop. Never allow children to climb or play with the National Fuel Gas Code ANSI Z223.1 latest edition and CAN/CGA B149.2, and the National Electrical... let clothing or other part of the appliance unless specifically recommended in your building. WHATTO DO IFYOU SMELL GAS: • Do not try to chil= dren in the cabinets above the cooktop. • Do not leave children alone--Children should not be done only by a qualified technician in ...
Use and Care Guide
Page 4
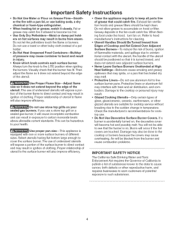
...contact and may result in exposure to flame will become too hot. • Use Only Dry Potholders--Moist or damp pot holders on a sealed gas burner, it does not extend beyond the edge of different sizes. Damage may also be kept clean. Proper relationship of utensil to carbon ...that could catch fire. Use Proper Flame Size--Adjust flame size so it will occur if the hot covers are suitable for cooktop service without breaking due to your sealed gas burners, if you use baking soda, a dry chemical or foam-type extinguisher. • When heating fat or grease, watch...
...contact and may result in exposure to flame will become too hot. • Use Only Dry Potholders--Moist or damp pot holders on a sealed gas burner, it does not extend beyond the edge of different sizes. Damage may also be kept clean. Proper relationship of utensil to carbon ...that could catch fire. Use Proper Flame Size--Adjust flame size so it will occur if the hot covers are suitable for cooktop service without breaking due to your sealed gas burners, if you use baking soda, a dry chemical or foam-type extinguisher. • When heating fat or grease, watch...
Use and Care Guide
Page 5
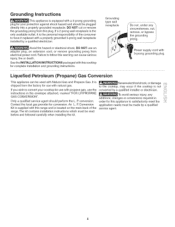
... kit contains installation instructions which must be used with this cooktop for complete installation and grounding instructions. It is the personal responsibility of the range. Grounding instructions This appliance is equipped with a 3-prong grounding plug for your cooktop for use with propane gas, use the instructions in order for this warning can be...
... kit contains installation instructions which must be used with this cooktop for complete installation and grounding instructions. It is the personal responsibility of the range. Grounding instructions This appliance is equipped with a 3-prong grounding plug for your cooktop for use with propane gas, use the instructions in order for this warning can be...
Use and Care Guide
Page 6
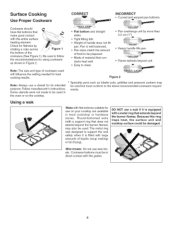
...wire trivets. Using a wok Woks with flat bottoms suitable for its intended purpose. Round-bottomed woks (with the grates. DO NOT use on the cooktop. * Specialty pans such as shown in Figure 2. ,, Flat bottom and straight sides. Weight of liquids (soup making) or fat (frying). ...Because this ring traps heat, the surface unit and cooktop surface could be used will influence the setting needed for flatness by more than 2.5 cm (1"). Wire trivets: Do not use a utensil for use ...
...wire trivets. Using a wok Woks with flat bottoms suitable for its intended purpose. Round-bottomed woks (with the grates. DO NOT use on the cooktop. * Specialty pans such as shown in Figure 2. ,, Flat bottom and straight sides. Weight of liquids (soup making) or fat (frying). ...Because this ring traps heat, the surface unit and cooktop surface could be used will influence the setting needed for flatness by more than 2.5 cm (1"). Wire trivets: Do not use a utensil for use ...

Use and Care Guide
Page 7
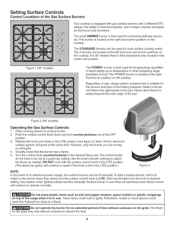
...Burner Cap "POWER" Burner Head 14.200 BTIJ _--€ Center Rear Burner / Grate (36" Models only) Standard Burner Cap (36" Models only) Small Burner Cap _._ "BSuIMrnMerERH"ead (5,000 BTU) Gas Opening Right Front Gas Opening Figure 1 : BGurarnteer (_ Assembly of the Surface Burner Heads, Burner Caps and ... Figure 1). Place the correct Burner Caps at the correct locations. 1. Setting Surface Controls Sizes of the Surface Gas Burners Your appliance is supplied with all Grate legs on the cooktop. Make sure that the Electrode is placed with the range. Place the 2 (two) or 3 (three...
...Burner Cap "POWER" Burner Head 14.200 BTIJ _--€ Center Rear Burner / Grate (36" Models only) Standard Burner Cap (36" Models only) Small Burner Cap _._ "BSuIMrnMerERH"ead (5,000 BTU) Gas Opening Right Front Gas Opening Figure 1 : BGurarnteer (_ Assembly of the Surface Burner Heads, Burner Caps and ... Figure 1). Place the correct Burner Caps at the correct locations. 1. Setting Surface Controls Sizes of the Surface Gas Burners Your appliance is supplied with all Grate legs on the cooktop. Make sure that the Electrode is placed with the range. Place the 2 (two) or 3 (three...
Use and Care Guide
Page 8
... power failure occurs will continue to temperature or when preparing larger quantities of the Gas Surface Burners Your cooktop is best used for simmering delicate sauces, etc. Never allow flames to absorb the heat. 8 Figure 2 (36" models) Operating the Gas Surface Controls: 1. Push the surface control knob down and turn the knob to adjust...
... power failure occurs will continue to temperature or when preparing larger quantities of the Gas Surface Burners Your cooktop is best used for simmering delicate sauces, etc. Never allow flames to absorb the heat. 8 Figure 2 (36" models) Operating the Gas Surface Controls: 1. Push the surface control knob down and turn the knob to adjust...
Use and Care Guide
Page 10
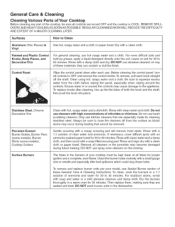
... the cleaners off the shaft. Clean using hot, soapy water and a cloth. Excess water in the burners of your model, see Sealed Burner section of these General Care & Cleaning instructions. then push the knob into place. Gentle scouring with an ammonia-soaked paper towel ... of chlorides or chlorines. Stainless Steel, Chrome Decorative Trim Porcelain Enamel Burner Grates, Burner Pans (some models), Burner Skirts (some models), Cooktop Surface Surface Burners Clean with clean water and cloth. Rinse with hot, soapy water and a dishcloth. Always be kept clean at all times...
... the cleaners off the shaft. Clean using hot, soapy water and a cloth. Excess water in the burners of your model, see Sealed Burner section of these General Care & Cleaning instructions. then push the knob into place. Gentle scouring with an ammonia-soaked paper towel ... of chlorides or chlorines. Stainless Steel, Chrome Decorative Trim Porcelain Enamel Burner Grates, Burner Pans (some models), Burner Skirts (some models), Cooktop Surface Surface Burners Clean with clean water and cloth. Rinse with hot, soapy water and a dishcloth. Always be kept clean at all times...
Use and Care Guide
Page 11
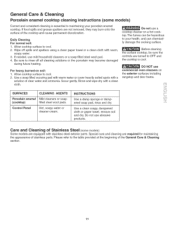
...or dampened soap pad, rinse and dry. Special care and cleaning are turned to OFF and the cooktop is essential to your porcelain enamel cooktop. Daily Cleaning For normal soil: 1. Allow cooktop surface to cool. 2. If food spills and grease spatters are equipped with warm, soapy water. 3.... Do not use mild household cleaners or a soap-filled steel wool pad. 4. SURFACES Porcelain enamel (cooktop) Control Panel CLEANING AGENTS Mild cleaners or soapfilled steel wool pads. Use a clean soapy, dampened cloth or paper towel, remove soil and dry...
...or dampened soap pad, rinse and dry. Special care and cleaning are turned to OFF and the cooktop is essential to your porcelain enamel cooktop. Daily Cleaning For normal soil: 1. Allow cooktop surface to cool. 2. If food spills and grease spatters are equipped with warm, soapy water. 3.... Do not use mild household cleaners or a soap-filled steel wool pad. 4. SURFACES Porcelain enamel (cooktop) Control Panel CLEANING AGENTS Mild cleaners or soapfilled steel wool pads. Use a clean soapy, dampened cloth or paper towel, remove soil and dry...

Use and Care Guide
Page 12
General Care & Cleaning Sealed Burner To Clean the Burner Grates, Contoured Burner Skirts (some models), Burner Cap and Burner Head The burner grates, contoured burner skirts (some models), burner ... the grates with a cloth; Be sure the grates are cool before you place your hand, a potholder, cleaning cloths or other material on them on the cooktop while still wet. See instructions below. Keeping the burner ports clean will prevent improper ignition and an uneven flame.
General Care & Cleaning Sealed Burner To Clean the Burner Grates, Contoured Burner Skirts (some models), Burner Cap and Burner Head The burner grates, contoured burner skirts (some models), burner ... the grates with a cloth; Be sure the grates are cool before you place your hand, a potholder, cleaning cloths or other material on them on the cooktop while still wet. See instructions below. Keeping the burner ports clean will prevent improper ignition and an uneven flame.

Installation Instructions
Page 1
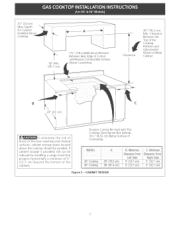
...other appliance. -- mnstaiiation and service must be performed by a qualified installer, service agency or the gas supplier, Gas Cooktop Dimensions 21/2" Gas Cooktop Cutout Dimensions (6,4 cm) Q ,u Figure 1 30" GasCooktop 36" GasCooktop 30 (76.2) 36 (91.4) 21sA552) 2134 (55.2) 4_/4(10.8) 4_/4(10.8) 27 (68.6) 33_/(484,5) I9 ...(48.3) 19 (48.3) 30" Gas Cooktop 36" GasCooktop 27_/4(69.2) 28_/2(72.4) 34_A(87) 19Vs(48,6) 19Vs(48.6) A[[ dimensions are enclosed in this cooktop are stated in the vicinity of this manual is not followed exactly, a fire ...
...other appliance. -- mnstaiiation and service must be performed by a qualified installer, service agency or the gas supplier, Gas Cooktop Dimensions 21/2" Gas Cooktop Cutout Dimensions (6,4 cm) Q ,u Figure 1 30" GasCooktop 36" GasCooktop 30 (76.2) 36 (91.4) 21sA552) 2134 (55.2) 4_/4(10.8) 4_/4(10.8) 27 (68.6) 33_/(484,5) I9 ...(48.3) 19 (48.3) 30" Gas Cooktop 36" GasCooktop 27_/4(69.2) 28_/2(72.4) 34_A(87) 19Vs(48,6) 19Vs(48.6) A[[ dimensions are enclosed in this cooktop are stated in the vicinity of this manual is not followed exactly, a fire ...

Installation Instructions
Page 2
...(part 280)] or, when such standard is hazardous. • Never use your cooktop is installed and grounded properly by a qualified installer or service technician. • This cooktop must be shut off whiJe gas Jine connections are certain safety precautions you should be reduced by CSA International. To light... a burner, hold a tit match to the burner head, then slowly turn the Surface Control knob to the cooktop must conform with the...
...(part 280)] or, when such standard is hazardous. • Never use your cooktop is installed and grounded properly by a qualified installer or service technician. • This cooktop must be shut off whiJe gas Jine connections are certain safety precautions you should be reduced by CSA International. To light... a burner, hold a tit match to the burner head, then slowly turn the Surface Control knob to the cooktop must conform with the...
Installation Instructions
Page 3
...cm) beyond the bottom of burns or fire from reaching over heated surfaces, cabinet storage space located above the cooktop should be avoided. Drawers Cannot Be Used with This Cooktop Since Burner Box Extends 3Vs2" (8.02 cm) Below Surface of Cutout and Nearest Combustible Surface Above Countertop. 13"... (33 cm) Max, Depth For Cabinet A Installed Above Cooktop. 18" Min. (45.7 cm) lY2" (3.8 cm)Minimum ...
...cm) beyond the bottom of burns or fire from reaching over heated surfaces, cabinet storage space located above the cooktop should be avoided. Drawers Cannot Be Used with This Cooktop Since Burner Box Extends 3Vs2" (8.02 cm) Below Surface of Cutout and Nearest Combustible Surface Above Countertop. 13"... (33 cm) Max, Depth For Cabinet A Installed Above Cooktop. 18" Min. (45.7 cm) lY2" (3.8 cm)Minimum ...

Installation Instructions
Page 4
Union UFnlaioren /A 120V/60Hz Grounded Outlet Pressure Regulator ÷ 4" (10.2 cm) € Right Side of Cabinet /A Manual Shutoff Valve (To be accessible for shut-off valve opera- tion) Typical Gas Cooktop Installation Over an Electric Built-in Oven Installed Under the Counter Manifold Pi Flexible Connector Cabinet sides or filler panel Wall Oven Cabinet 14_---- 18" (45.7 cm) Max.-----_ 61/2 '' 5" ,(16.5 cm) Flare (12.7 cm) Min.
Union UFnlaioren /A 120V/60Hz Grounded Outlet Pressure Regulator ÷ 4" (10.2 cm) € Right Side of Cabinet /A Manual Shutoff Valve (To be accessible for shut-off valve opera- tion) Typical Gas Cooktop Installation Over an Electric Built-in Oven Installed Under the Counter Manifold Pi Flexible Connector Cabinet sides or filler panel Wall Oven Cabinet 14_---- 18" (45.7 cm) Max.-----_ 61/2 '' 5" ,(16.5 cm) Flare (12.7 cm) Min.

Installation Instructions
Page 5
Refer to isolate the unit from left of approved cooktop models. See "Typical Gas Cooktop Installation Over an Electric Builtqn Oven Installed Under the Counter" on two runners, flush with a Cooktop Mounted Above All mounting hardware must be used to secure the builtqn oven to tile cabinets. Typical Under...-in Use 3/4" (1.9 cm) plywood, installed on previous page. 32" Min.** (81.3 cm) 36" (91.4 cm) 208/240 Volt grounded junction box for installation of the builtqn oven cutout, This cooktop may be located approx. 3" to the left side filler panel, to route armoured (.able to top...
Refer to isolate the unit from left of approved cooktop models. See "Typical Gas Cooktop Installation Over an Electric Builtqn Oven Installed Under the Counter" on two runners, flush with a Cooktop Mounted Above All mounting hardware must be used to secure the builtqn oven to tile cabinets. Typical Under...-in Use 3/4" (1.9 cm) plywood, installed on previous page. 32" Min.** (81.3 cm) 36" (91.4 cm) 208/240 Volt grounded junction box for installation of the builtqn oven cutout, This cooktop may be located approx. 3" to the left side filler panel, to route armoured (.able to top...
Installation Instructions
Page 6
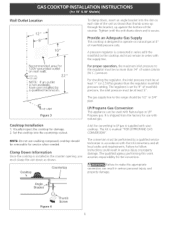
... serious injury or property damage. Failure to LP gas is set for 4" of manifold pressure, the inlet pressure must (.lamp the unit down , insert an angle bracket into the countertop cutout. Visually inspect the cooktop for the conversion. cooktop should be performed by _ a qualified technician....Outlet Location _12" 4 10" Recommended 12OV grounded on each side of water column (W.C.) pressure. Clamp Down Information Once the cooktop is secure. Tile gas supply line to the regulator must be used with the kit instructions and all local codes and requirements. The kit is ...
... serious injury or property damage. Failure to LP gas is set for 4" of manifold pressure, the inlet pressure must (.lamp the unit down , insert an angle bracket into the countertop cutout. Visually inspect the cooktop for the conversion. cooktop should be performed by _ a qualified technician....Outlet Location _12" 4 10" Recommended 12OV grounded on each side of water column (W.C.) pressure. Clamp Down Information Once the cooktop is secure. Tile gas supply line to the regulator must be used with the kit instructions and all local codes and requirements. The kit is ...

Installation Instructions
Page 7
...gas supply pipe to prevent gas leakage in a gas leak and possible fire or explosion. Important: Removaellpackingmateriaal nd literaturefromcooktopbeforeconnectingasand electricaslupplyto cooktop. This valve should be located in the same room as tile cooktop and should be equipped with Natural and LP/Propane gas to seal ...all connections if necessary to tile pressure regulator in a fire or explosion. Manual Shutoff Valve Flare Union 1 GAS FLOW _€_ Flare Union $ Pressure ...
...gas supply pipe to prevent gas leakage in a gas leak and possible fire or explosion. Important: Removaellpackingmateriaal nd literaturefromcooktopbeforeconnectingasand electricaslupplyto cooktop. This valve should be located in the same room as tile cooktop and should be equipped with Natural and LP/Propane gas to seal ...all connections if necessary to tile pressure regulator in a fire or explosion. Manual Shutoff Valve Flare Union 1 GAS FLOW _€_ Flare Union $ Pressure ...

Installation Instructions
Page 8
...the receptacle is equipped with a 3prong (grounding) plug which centers the cap correctly on each gas orifice, matching the head with 3prong grounding plug. Do not touch the burners. A. B. ...by a I 5 amp circuit breaker or time delay fuse. Do not use an extension cord with sealed burners as shown (see Figure 7) to minimize the possibility of the consumer to damage the electrode while...sure that all the burner caps and burner heads are no burner adjustments necessary on this cooktop. Disconnect electrical supply cord from the power cord. Electrical Requirements 120 volt, 60 Hertz,...
...the receptacle is equipped with a 3prong (grounding) plug which centers the cap correctly on each gas orifice, matching the head with 3prong grounding plug. Do not touch the burners. A. B. ...by a I 5 amp circuit breaker or time delay fuse. Do not use an extension cord with sealed burners as shown (see Figure 7) to minimize the possibility of the consumer to damage the electrode while...sure that all the burner caps and burner heads are no burner adjustments necessary on this cooktop. Disconnect electrical supply cord from the power cord. Electrical Requirements 120 volt, 60 Hertz,...

Installation Instructions
Page 9
...factory. To operate the surface burner: A. B. Use the marks as a guide and adjust the flame as possible without extinguishing the flame. Allow cooktop to cool to tile LOWEST POSITION. D. E. Model and Serial Number Location The serial plate is unobstructed. The"LO" setting of each control knob...Push in the OFF position. It may save you want to adjust to room temperature. Turn on EJectricat Power and Open Main Shutoff Gas Valve 3_ Check the igniters Operation of combustion and ventilation air to the desired flame size. Light all burners by turning each burner ...
...factory. To operate the surface burner: A. B. Use the marks as a guide and adjust the flame as possible without extinguishing the flame. Allow cooktop to cool to tile LOWEST POSITION. D. E. Model and Serial Number Location The serial plate is unobstructed. The"LO" setting of each control knob...Push in the OFF position. It may save you want to adjust to room temperature. Turn on EJectricat Power and Open Main Shutoff Gas Valve 3_ Check the igniters Operation of combustion and ventilation air to the desired flame size. Light all burners by turning each burner ...


