Use and Care Guide
Page 2
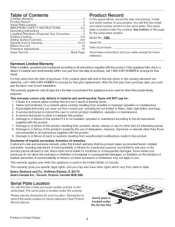
... maintain this product. 6. Table of Contents Cooktop Warranty 2 Product Record 2 Serial Plate Location 2 IMPORTANT SAFETY INSTRUCTIONS 3-4 Grounding Instructions 5 Liquefied Petroleum (Propane) Gas Conversion 5 Surface Cooking 6-8 Setting Surface Controls 8-9 General Care & Cleaning 10-13 Before You Call 14 Protection Agreements 15 Sears Service Back Page Product Record In this space below, record the date of purchase, model and serial number of your sales receipt for free repair. A service technician to or failure of this product...
... maintain this product. 6. Table of Contents Cooktop Warranty 2 Product Record 2 Serial Plate Location 2 IMPORTANT SAFETY INSTRUCTIONS 3-4 Grounding Instructions 5 Liquefied Petroleum (Propane) Gas Conversion 5 Surface Cooking 6-8 Setting Surface Controls 8-9 General Care & Cleaning 10-13 Before You Call 14 Protection Agreements 15 Sears Service Back Page Product Record In this space below, record the date of purchase, model and serial number of your sales receipt for free repair. A service technician to or failure of this product...
Use and Care Guide
Page 3
... and after unpacking the cooktop. This manual contains important safety symbols and instructions. Do not repair or replace any other flammable materials contact hot surfaces. They should never be stored on the cooktop. Areas near surface burners. Installation and service must be allowed to sit or stand on this appliance as a space heater to the appliance at the circuit breaker or fuse box. ,, User Servicing. This includes paper...
... and after unpacking the cooktop. This manual contains important safety symbols and instructions. Do not repair or replace any other flammable materials contact hot surfaces. They should never be stored on the cooktop. Areas near surface burners. Installation and service must be allowed to sit or stand on this appliance as a space heater to the appliance at the circuit breaker or fuse box. ,, User Servicing. This includes paper...
Use and Care Guide
Page 4
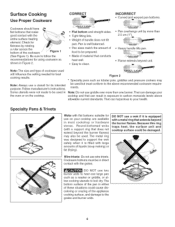
... to hood manufacturer's instructions for cooktop use aluminum foil to carbon monoxide levels above allowable current standards. Air will become hot and possibly melt. important Safety instructions = Use Only Dry Potholders--IVIoist or damp pot holders on hot surfaces may result in ignition of clothing. Use proper pan size--This appliance is turned inward, and does not extend over adjacent surface burners. • Never Leave Surface Burners Unattended at High Heat Settings--Boilovers...
... to hood manufacturer's instructions for cooktop use aluminum foil to carbon monoxide levels above allowable current standards. Air will become hot and possibly melt. important Safety instructions = Use Only Dry Potholders--IVIoist or damp pot holders on hot surfaces may result in ignition of clothing. Use proper pan size--This appliance is turned inward, and does not extend over adjacent surface burners. • Never Leave Surface Burners Unattended at High Heat Settings--Boilovers...
Use and Care Guide
Page 5
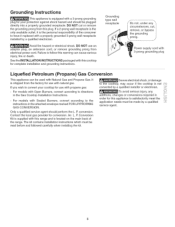
... plug for conversion. R Conversion Kit is not converted by a qualified electrician. If a 2-prong wall receptacle is the only available outlet, it replaced with this cooktop for use an adapter plug, an extension cord, or remove grounding prong from this warning can be made by a qualified service agent. !i.I ..i.i........ Power supply cord with natural gas. Avoid fire hazard or electrical shock. See the INSTALLATION INSTRUCTIONS packaged with this range and is located...
... plug for conversion. R Conversion Kit is not converted by a qualified electrician. If a 2-prong wall receptacle is the only available outlet, it replaced with this cooktop for use an adapter plug, an extension cord, or remove grounding prong from this warning can be made by a qualified service agent. !i.I ..i.i........ Power supply cord with natural gas. Avoid fire hazard or electrical shock. See the INSTALLATION INSTRUCTIONS packaged with this range and is located...
Use and Care Guide
Page 6
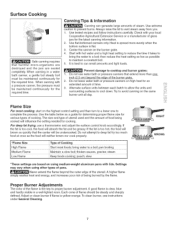
... pots, griddles and pressure cookers may also be used will influence the setting needed for flatness by more than 2.5 cm (1"). • Heavy handle tilts pan. • Flame extends beyond the burner flames. Wire trivets: Do not use a wok if it is well balanced. • Pan sizes match the amount of liquids (soup making) or fat (frying). Because this ring traps heat, the surface unit and cooktop surface could...
... pots, griddles and pressure cookers may also be used will influence the setting needed for flatness by more than 2.5 cm (1"). • Heavy handle tilts pan. • Flame extends beyond the burner flames. Wire trivets: Do not use a wok if it is well balanced. • Pan sizes match the amount of liquids (soup making) or fat (frying). Because this ring traps heat, the surface unit and cooktop surface could...
Use and Care Guide
Page 7
... not leave water bath or pressure canners on the burner grate. 4. Canning Tips & Information Canning can small amounts and light loads. Center the canner on high heat for various types of steam. steam Keep foods cooking; Adjust or clean burner if flame is best to maintain a constant boil. 5. Proper Burner Adjustments The color of pans. Do not use a thermometer and adjust the surface control knob accordingly. Try to a boil; It...
... not leave water bath or pressure canners on the burner grate. 4. Canning Tips & Information Canning can small amounts and light loads. Center the canner on high heat for various types of steam. steam Keep foods cooking; Adjust or clean burner if flame is best to maintain a constant boil. 5. Proper Burner Adjustments The color of pans. Do not use a thermometer and adjust the surface control knob accordingly. Try to a boil; It...
Use and Care Guide
Page 8
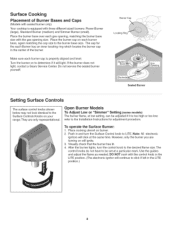
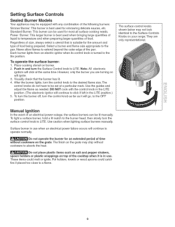
... to click if left in and turn the control knob to the Surface Controls Knobs on will ignite. 3. Visually check that the burner has lit. 4. Place the burner cap on burner. 2. Note: All electronic ignitors will light. Use the guides and adjust the flame as needed. Sealed Burner Setting Surface Controls The surface control knobs shown below may not look identical to the desired flame size. However, only the burner you are only representational. Place the burner base over each burner cap is too high...
... to click if left in and turn the control knob to the Surface Controls Knobs on will ignite. 3. Visually check that the burner has lit. 4. Place the burner cap on burner. 2. Note: All electronic ignitors will light. Use the guides and adjust the flame as needed. Sealed Burner Setting Surface Controls The surface control knobs shown below may not look identical to the desired flame size. However, only the burner you are only representational. Place the burner base over each burner cap is too high...
Use and Care Guide
Page 9
... and turn the control knob as far as it is turned to the OFF position. They are turning on burner. 2. Use caution when lighting surface burners manually. Note: All electronic ignitors will go, to the lite position. Visually check that is suitable for most all surface cooking needs. Manual Ignition In the event of an electrical power outage, the surface burners can be used for the amount and type of the pan. Select a burner and flame size...
... and turn the control knob as far as it is turned to the OFF position. They are turning on burner. 2. Use caution when lighting surface burners manually. Note: All electronic ignitors will go, to the lite position. Visually check that is suitable for most all surface cooking needs. Manual Ignition In the event of an electrical power outage, the surface burners can be used for the amount and type of the pan. Select a burner and flame size...

Use and Care Guide
Page 10
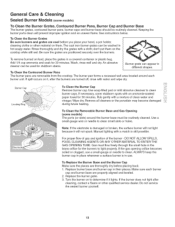
... General Cleaning. REGULAR CLEANING NOW WILL REDUCE THE DIFFICULTY AND EXTENT OF A MAJOR CLEANING LATER. Wipe the control panel clean after cleaning, line up grease, apply a liquid detergent directly onto the soil. Excess water in a 1:1 solution of ammonia and water for 30 to rinse the cleaners off the shaft. Stainless Steel, Chrome, Decorative Trim Porcelain Enamel Burner Grates, Burner Pans (some models), Burner Rings (some models), Cooktop Surface Surface Burners Clean with clean water and cloth. Only use kitchen...
... General Cleaning. REGULAR CLEANING NOW WILL REDUCE THE DIFFICULTY AND EXTENT OF A MAJOR CLEANING LATER. Wipe the control panel clean after cleaning, line up grease, apply a liquid detergent directly onto the soil. Excess water in a 1:1 solution of ammonia and water for 30 to rinse the cleaners off the shaft. Stainless Steel, Chrome, Decorative Trim Porcelain Enamel Burner Grates, Burner Pans (some models), Burner Rings (some models), Cooktop Surface Surface Burners Clean with clean water and cloth. Only use kitchen...

Use and Care Guide
Page 11
..., INSTRUCTIONS Use a damp sponge or dampened soap pad, rinse and dry. The fumes can chemically damage the cooking surface. General Care & Cleaning Porcelain enamel cooktop cleaning instructions Correct and consistent cleaning is cool. Allow cooktop surface to cool. 2. If food spills and grease spatters are turned to OFF and the cooktop is essential to maintaining your health, and can be sure the controls are not removed, they...
..., INSTRUCTIONS Use a damp sponge or dampened soap pad, rinse and dry. The fumes can chemically damage the cooking surface. General Care & Cleaning Porcelain enamel cooktop cleaning instructions Correct and consistent cleaning is cool. Allow cooktop surface to cool. 2. If food spills and grease spatters are turned to OFF and the cooktop is essential to maintaining your health, and can be sure the controls are not removed, they...
Use and Care Guide
Page 12
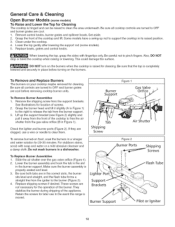
... the flash tube forms a straight line from the front of the cooktop and lift. Slide the air shutter over the gas valve orifice (Figure 1). 2. These screws are not necessary for the operation of the appliance. Be careful not to clear them. This could damage the surface. General Care & Cleaning Open Burner Models (somemodels) To Raise and Lower the Top for cleaning. Some models have a swing-up the support bracket...
... the flash tube forms a straight line from the front of the cooktop and lift. Slide the air shutter over the gas valve orifice (Figure 1). 2. These screws are not necessary for the operation of the appliance. Be careful not to clear them. This could damage the surface. General Care & Cleaning Open Burner Models (somemodels) To Raise and Lower the Top for cleaning. Some models have a swing-up the support bracket...
Use and Care Guide
Page 13
... future heating. Gas must be washed in hot soapy water. Replace burner base and burner cap in a covered container or plastic bag. Do not service the sealed burner yourself. 13 See instructions below. The cast iron burner grates can be routinely cleaned. Rinse thoroughly and dry the grates with a match is still possible. Be sure the grates are removable from the cooktop. The burner pan forms a recessed well area located around the burner base must...
... future heating. Gas must be washed in hot soapy water. Replace burner base and burner cap in a covered container or plastic bag. Do not service the sealed burner yourself. 13 See instructions below. The cast iron burner grates can be routinely cleaned. Rinse thoroughly and dry the grates with a match is still possible. Be sure the grates are removable from the cooktop. The burner pan forms a recessed well area located around the burner base must...

Use and Care Guide
Page 14
... Common Problems Before you time and expense. Be sure gas supply valve is unavoidable due to desired flame size. Moisture is plugged securely into outlet. Surface Control knob has not been completely turned to travel. Gas-air mixture needs a straight line to LITE. Electrical power outage (electric ignition models). In coastal areas, a slightly orange flame is open burners only). Push in main line. Lightly fan the flame and allow burner to operate until burner ignites and then turn the Surface Control knob...
... Common Problems Before you time and expense. Be sure gas supply valve is unavoidable due to desired flame size. Moisture is plugged securely into outlet. Surface Control knob has not been completely turned to travel. Gas-air mixture needs a straight line to LITE. Electrical power outage (electric ignition models). In coastal areas, a slightly orange flame is open burners only). Push in main line. Lightly fan the flame and allow burner to operate until burner ignites and then turn the Surface Control knob...

Use and Care Guide
Page 16
For the replacement parts, accessories and owner's manuals that you need to do-it ! For Sears professional installation of home appliances and items like vacuums, lawn equipment, and electronics, call anytime for the location of your home - and Canada) www.sears.com www.sears.ca Our Home For repair of all major brand appliances, lawn and garden equipment, or heating and cooling...
For the replacement parts, accessories and owner's manuals that you need to do-it ! For Sears professional installation of home appliances and items like vacuums, lawn equipment, and electronics, call anytime for the location of your home - and Canada) www.sears.com www.sears.ca Our Home For repair of all major brand appliances, lawn and garden equipment, or heating and cooling...


