
Use and Care Guide
Page 2
... Remove the door(s) of you r old refrigerator or freezer, please follow the instructions below . If your freezer only as instructed in the vicinity of the past. Record Serial/Model Numbers 2 Important Safety Instructions 2-3 Kenmore Appliance Warranty 3 Protection Agreements 4 First Steps 5-6 Energy Saving Tips 6 Setting the Temperature Control .......... 6-7 Freezer Optional Features 7-9 Care and Cleaning 10-11 Power Failure / Freezer Failure 11 Troubleshooting Guide 12-13 READ AND SAVE THESE iNSTRUCTIONS This Use & Care Guide provides specific operating instructions...
... Remove the door(s) of you r old refrigerator or freezer, please follow the instructions below . If your freezer only as instructed in the vicinity of the past. Record Serial/Model Numbers 2 Important Safety Instructions 2-3 Kenmore Appliance Warranty 3 Protection Agreements 4 First Steps 5-6 Energy Saving Tips 6 Setting the Temperature Control .......... 6-7 Freezer Optional Features 7-9 Care and Cleaning 10-11 Power Failure / Freezer Failure 11 Troubleshooting Guide 12-13 READ AND SAVE THESE iNSTRUCTIONS This Use & Care Guide provides specific operating instructions...
Use and Care Guide
Page 3
... product installation, operation or maintenance. 3. Operating freezer with a 15 amp timedelay fuse or circuit breaker. Such damage is high or low, consult your power company for correct electrical rating. If you suspect your protection against shock hazards. Turning the temperature control to OFF turns off accidentically, do not allow the exclusion or limitation of incidental or consequential damages, or limitations on the cord. J One Year Limited Warranty...
... product installation, operation or maintenance. 3. Operating freezer with a 15 amp timedelay fuse or circuit breaker. Such damage is high or low, consult your power company for correct electrical rating. If you suspect your protection against shock hazards. Turning the temperature control to OFF turns off accidentically, do not allow the exclusion or limitation of incidental or consequential damages, or limitations on the cord. J One Year Limited Warranty...
Use and Care Guide
Page 4
...-covered repair service and related installed parts. Some limitations and exclusions apply. call 1-800-827-6655. * Coverage in Canada varies on making a smart purchase. The Master Protection Agreement also helps extend the life of home appliances, garage door openers, water heaters, and other major home items, in the U.S.A. real protection. [] Expert service by phone - Your new Kenmore _product is a risk free...
...-covered repair service and related installed parts. Some limitations and exclusions apply. call 1-800-827-6655. * Coverage in Canada varies on making a smart purchase. The Master Protection Agreement also helps extend the life of home appliances, garage door openers, water heaters, and other major home items, in the U.S.A. real protection. [] Expert service by phone - Your new Kenmore _product is a risk free...
Use and Care Guide
Page 5
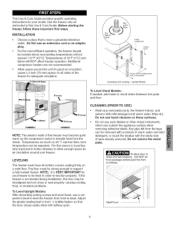
... of tape already removed. CLEANING (PRIOR TO USE) Wash any removable parts, the freezer interior, and exterior with the sticky side of the freezer may be located where surrounding temperatures will NOT affect freezer operation. Shelf Front LEVELING The freezer must be removed with a mixture of shelves. NOTE: It is particularly important in hotter climates to allow door to close or seal properly, causing cooling, frost, or moisture problems. To Level Upright Models: After discarding...
... of tape already removed. CLEANING (PRIOR TO USE) Wash any removable parts, the freezer interior, and exterior with the sticky side of the freezer may be located where surrounding temperatures will NOT affect freezer operation. Shelf Front LEVELING The freezer must be removed with a mixture of shelves. NOTE: It is particularly important in hotter climates to allow door to close or seal properly, causing cooling, frost, or moisture problems. To Level Upright Models: After discarding...
Use and Care Guide
Page 6
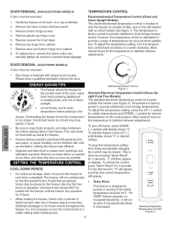
.... To unlock the control, COOL DOWN PERIOD press "Alarm Reset" for 4 hours. Unfrozen foods should be locked. Remove two base screws and base panel. 3. Remove door and bottom hinge from being accidentally changed, the control may be located in Electromechanical Control Figure 1 the coolest area of temperatures for to cool down on household electricity. DOOR REMOVAL (ELECTRONIC MODELS) If door must be loaded into the freezer until the freezer has operated for 3 seconds. from heat producing appliances right Frost Free Models...
.... To unlock the control, COOL DOWN PERIOD press "Alarm Reset" for 4 hours. Unfrozen foods should be locked. Remove two base screws and base panel. 3. Remove door and bottom hinge from being accidentally changed, the control may be located in Electromechanical Control Figure 1 the coolest area of temperatures for to cool down on household electricity. DOOR REMOVAL (ELECTRONIC MODELS) If door must be loaded into the freezer until the freezer has operated for 3 seconds. from heat producing appliances right Frost Free Models...
Use and Care Guide
Page 7
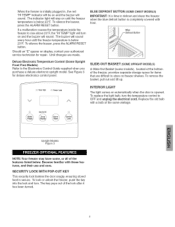
... basket, pull out and lift up. 0 D®_ Aja_ 0_ _®_ V INTERIOR LIGHT The light comes on and the buzzer will sound. Until changes are difficult to defrost and clean the freezer when the blue defrost button is below . When the freezer is initially plugged in, the red "Hi TEMP" indicator will be on automatically when the door is opened. Blue Button Deluxe Electronic Temperature Control (Some Upright Frost Free Models) Refer to OFF and unplug the electrical cord. SECURITY LOCK...
... basket, pull out and lift up. 0 D®_ Aja_ 0_ _®_ V INTERIOR LIGHT The light comes on and the buzzer will sound. Until changes are difficult to defrost and clean the freezer when the blue defrost button is below . When the freezer is initially plugged in, the red "Hi TEMP" indicator will be on automatically when the door is opened. Blue Button Deluxe Electronic Temperature Control (Some Upright Frost Free Models) Refer to OFF and unplug the electrical cord. SECURITY LOCK...

Use and Care Guide
Page 8
... until it is located inside on the freezer door and provides additional storage space. The number of "basket" shelf down. ADJUSTABLE INTERIOR SHELVES (SOME UPRIGHT MODELS) Multi-position adjustable interior shelves can be removed and discarded. Upright Models SLIDE-ASIDE BASKET (SOME CHEST MODELS) This basket helps organize odd-shaped items. To reach other packages in a clockwise direction until it swings into place. TILT=OUT SHELF This shelf is disengaged. I Slide-Aside Basket BASKET DIVIDER (SOME UPRIGHT MODELS) Use these handy...
... until it is located inside on the freezer door and provides additional storage space. The number of "basket" shelf down. ADJUSTABLE INTERIOR SHELVES (SOME UPRIGHT MODELS) Multi-position adjustable interior shelves can be removed and discarded. Upright Models SLIDE-ASIDE BASKET (SOME CHEST MODELS) This basket helps organize odd-shaped items. To reach other packages in a clockwise direction until it swings into place. TILT=OUT SHELF This shelf is disengaged. I Slide-Aside Basket BASKET DIVIDER (SOME UPRIGHT MODELS) Use these handy...
Use and Care Guide
Page 9
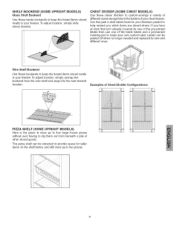
... new and different ones. To adjust location, simply unsnap the bookend from beneath a pile of Chest Divider Configurations: PIZZA SHELF (SOME UPRIGHT MODELS) Here is the place to store up to four large frozen pizzas without ever having to two pizzas. To adjust location, simply slide where desired. / / / / CHEST DiViDER (SOME CHEST MODELS) Use these clever dividers to make your chest freezer. Examples of other stored...
... new and different ones. To adjust location, simply unsnap the bookend from beneath a pile of Chest Divider Configurations: PIZZA SHELF (SOME UPRIGHT MODELS) Here is the place to store up to four large frozen pizzas without ever having to two pizzas. To adjust location, simply slide where desired. / / / / CHEST DiViDER (SOME CHEST MODELS) Use these clever dividers to make your chest freezer. Examples of other stored...
Use and Care Guide
Page 10
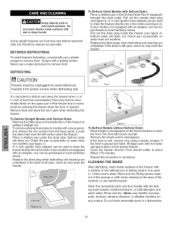
... on the inside surfaces of the controls, or any surface. Pull out the outside drain plug (see figure 3). To Defrost Upright Models with Defrost Drain: Remove the drain plug on the upper part of frost has accumulated. Place a shallow pan under the freezer. Wash the removable parts and door basket with hot water and place them on models with a pulling motion. To Defrost Chest Models with wet or damp hands. Replace the drain plugs when defrosting and cleaning are frost-free and defrost automatically, but...
... on the inside surfaces of the controls, or any surface. Pull out the outside drain plug (see figure 3). To Defrost Upright Models with Defrost Drain: Remove the drain plug on the upper part of frost has accumulated. Place a shallow pan under the freezer. Wash the removable parts and door basket with hot water and place them on models with a pulling motion. To Defrost Chest Models with wet or damp hands. Replace the drain plugs when defrosting and cleaning are frost-free and defrost automatically, but...
Use and Care Guide
Page 11
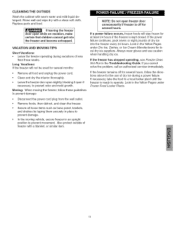
... stay frozen for the use caution when handling dry ice. Secure all food and unplug the power cord. • Clean and dry the interior thoroughly. • Leave the freezer door open slightly, blocking it open freezer door unnecessarily if freezer is ready to prevent damage: • Disconnect the power cord plug from the wall outlet. Look in place to prevent movement. Remove foods, then defrost, and clean the freezer. In the moving the...
... stay frozen for the use caution when handling dry ice. Secure all food and unplug the power cord. • Clean and dry the interior thoroughly. • Leave the freezer door open slightly, blocking it open freezer door unnecessarily if freezer is ready to prevent damage: • Disconnect the power cord plug from the wall outlet. Look in place to prevent movement. Remove foods, then defrost, and clean the freezer. In the moving the...
Use and Care Guide
Page 12
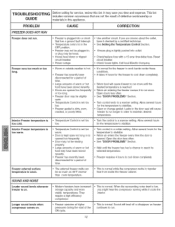
... been disconnected for service, review this appliance. Interior Freezer temperature is normal. Reset circuit breaker. ,, Check house lights. They require a high efficiency compressor. ,, This is too cold. e Turn control knob to stabilize. ,, Warm air enters the freezer every time the door is plugged into outlet. ,, Check/replace fuse with a 15 amp time-delay fuse. Allow several hours for the temperature to run . PROBLEM CAUSE CORRECTION FREEZER DOES NOT RUN Freezer does not run . 12 SOUND AND NOISE Louder sound levels whenever freezer is dirty...
... been disconnected for service, review this appliance. Interior Freezer temperature is normal. Reset circuit breaker. ,, Check house lights. They require a high efficiency compressor. ,, This is too cold. e Turn control knob to stabilize. ,, Warm air enters the freezer every time the door is plugged into outlet. ,, Check/replace fuse with a 15 amp time-delay fuse. Allow several hours for the temperature to run . PROBLEM CAUSE CORRECTION FREEZER DOES NOT RUN Freezer does not run . 12 SOUND AND NOISE Louder sound levels whenever freezer is dirty...
Use and Care Guide
Page 13
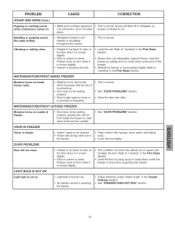
... in the First Steps Section. See "FREEZER DOES NOT RUN" Section. 13 PROBLEM l CAUSE l CORRECTION SOUND AND NOISE (Cont.) Popping or cracking sound when compressor comes on. ,, Metal parts undergo expansion and contraction, as freezer continues to cool freezer) is moved slightly. , This condition can adequately support freezer. Freezer is normal. ,, Level the unit. WATER/MOISTURE/FROST iNSiDE FREEZER ,, This is not level. WATER/MOISTURE/FROST OUTSIDE FREEZER Moisture forms on the floor when...
... in the First Steps Section. See "FREEZER DOES NOT RUN" Section. 13 PROBLEM l CAUSE l CORRECTION SOUND AND NOISE (Cont.) Popping or cracking sound when compressor comes on. ,, Metal parts undergo expansion and contraction, as freezer continues to cool freezer) is moved slightly. , This condition can adequately support freezer. Freezer is normal. ,, Level the unit. WATER/MOISTURE/FROST iNSiDE FREEZER ,, This is not level. WATER/MOISTURE/FROST OUTSIDE FREEZER Moisture forms on the floor when...


