

Use and Care Guide
Page 2
... to Water and Electrical Supply 7 Using the Faucet 8 Disconnecting the Dishwasher 8 DISHWASHER LOADING 8 Loading Suggestions 8 Loading Top Rack 8 Loading Bottom Rack 9 Loading Silverware Basket 9 DISHWASHER USE 10 Detergent Dispenser 10 Rinse Aid Dispenser 11 Dishwasher Efficiency Tips 11 Cycle Selection Charts 12 Canceling a Cycle 12 Changing a Cycle or Setting 12 Adding Items During a Cycle 12 Option Selections 13 Drying System 13 Overfill Protection Float 13 WASHING SPECIAL ITEMS 13 DISHWASHER CARE 14 Cleaning 14 Storing 14 TROUBLESHOOTING 15 SERVICE NUMBERS BACK...
... to Water and Electrical Supply 7 Using the Faucet 8 Disconnecting the Dishwasher 8 DISHWASHER LOADING 8 Loading Suggestions 8 Loading Top Rack 8 Loading Bottom Rack 9 Loading Silverware Basket 9 DISHWASHER USE 10 Detergent Dispenser 10 Rinse Aid Dispenser 11 Dishwasher Efficiency Tips 11 Cycle Selection Charts 12 Canceling a Cycle 12 Changing a Cycle or Setting 12 Adding Items During a Cycle 12 Option Selections 13 Drying System 13 Overfill Protection Float 13 WASHING SPECIAL ITEMS 13 DISHWASHER CARE 14 Cleaning 14 Storing 14 TROUBLESHOOTING 15 SERVICE NUMBERS BACK...
Use and Care Guide
Page 3
... Customer's sole and exclusive remedy under this limited warranty shall be liable for free repair. KENMORE APPLIANCE WARRANTY ONE YEAR LIMITED WARRANTY When installed, operated and maintained according to all instructions supplied with the product, if this appliance fails due to a defect in material or workmanship within one year or the shortest period allowed by the use , including but not limited to filters, belts, light...
... Customer's sole and exclusive remedy under this limited warranty shall be liable for free repair. KENMORE APPLIANCE WARRANTY ONE YEAR LIMITED WARRANTY When installed, operated and maintained according to all instructions supplied with the product, if this appliance fails due to a defect in material or workmanship within one year or the shortest period allowed by the use , including but not limited to filters, belts, light...
Use and Care Guide
Page 4
... of electric shock. if it . Install and level dishwasher on a floor that is sheltered from hoses and connectors (such as the cap on the door, lid, or dish racks of injury, do not smoke or use an open flame during or immediately after use in place. Check with a qualified electrician or service representative if you are not likely to play in accordance with controls...
... of electric shock. if it . Install and level dishwasher on a floor that is sheltered from hoses and connectors (such as the cap on the door, lid, or dish racks of injury, do not smoke or use an open flame during or immediately after use in place. Check with a qualified electrician or service representative if you are not likely to play in accordance with controls...
Use and Care Guide
Page 5
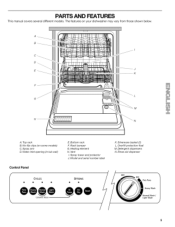
...A. Water inlet opening (in tub wall) Control Panel F CYCLES ®0 0 ULTIMATE WASH E. Bottom rack F. Spray tower and protector J. Detergent dispensers N. Vent I. Overfill protection float M. No-flip clips (on your dishwasher may vary from those shown below. Spray arm D. Top rack B. Silverware basket (2) L. The features on some models) C. Rack bumper G. Model and serial number label K. Rinse aid dispenser OPTIONS DRY / OFF Pots Pans Heavy Wash Normal Wash / Light Wash PARTS AND FEATURES This manual covers several different models. Heating element H.
...A. Water inlet opening (in tub wall) Control Panel F CYCLES ®0 0 ULTIMATE WASH E. Bottom rack F. Spray tower and protector J. Detergent dispensers N. Vent I. Overfill protection float M. No-flip clips (on your dishwasher may vary from those shown below. Spray arm D. Top rack B. Silverware basket (2) L. The features on some models) C. Rack bumper G. Model and serial number label K. Rinse aid dispenser OPTIONS DRY / OFF Pots Pans Heavy Wash Normal Wash / Light Wash PARTS AND FEATURES This manual covers several different models. Heating element H.
Use and Care Guide
Page 6
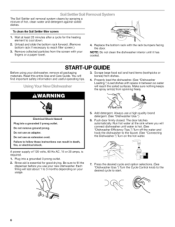
... required. 1. START-UP GUIDE Before using your fingers or a paper towel. 4. A power supply of hot, clean water and detergent against soiled dishes. Rinse aid is essential for the heating element to the faucet. (See "Connecting the Dishwasher.") Turn on your new dishwasher. Remove collected particles from the screen with the rack bumpers facing the door. Replace the bottom rack with your dishwasher, remove all packaging materials. Each filling will find important safety information and useful operating tips. Unload...
... required. 1. START-UP GUIDE Before using your fingers or a paper towel. 4. A power supply of hot, clean water and detergent against soiled dishes. Rinse aid is essential for the heating element to the faucet. (See "Connecting the Dishwasher.") Turn on your new dishwasher. Remove collected particles from the screen with the rack bumpers facing the door. Replace the bottom rack with your dishwasher, remove all packaging materials. Each filling will find important safety information and useful operating tips. Unload...
Use and Care Guide
Page 7
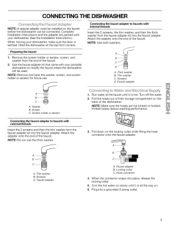
... the adapter onto the end of the dishwasher. Screens C. Locking collar C. Turn the hot water on slowly until it is hot. When the connector snaps into a grounded 3 prong outlet. 7 Use the faucet adapter kit that came with your dishwasher. (See the Installation Instructions.) When moving your portable dishwasher to modify the faucet where the dishwasher will be connected. A. and E ect;4cs Sppy 1. Turn off the water. 2. Connecting the faucet adapter to faucets...
... the adapter onto the end of the dishwasher. Screens C. Locking collar C. Turn the hot water on slowly until it is hot. When the connector snaps into a grounded 3 prong outlet. 7 Use the faucet adapter kit that came with your dishwasher. (See the Installation Instructions.) When moving your portable dishwasher to modify the faucet where the dishwasher will be connected. A. and E ect;4cs Sppy 1. Turn off the water. 2. Connecting the faucet adapter to faucets...
Use and Care Guide
Page 8
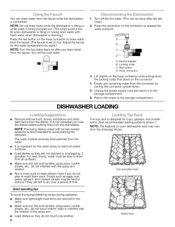
... the locking collar. Make sure pot lids and handles, pizza pans, cookie sheets, etc., do not touch one another. 8 Load ng R}p Rack The top rack is recommended to remove if they are secured in the racks. Turnoffthe hotwater.(Thiscanbedoneafterthelast rinse.) 2. Load dishes so they do not interfere with tomato-based products is designed for the water spray to dry over a period of the spray arm. • Load dishes so...
... the locking collar. Make sure pot lids and handles, pizza pans, cookie sheets, etc., do not touch one another. 8 Load ng R}p Rack The top rack is recommended to remove if they are secured in the racks. Turnoffthe hotwater.(Thiscanbedoneafterthelast rinse.) 2. Load dishes so they do not interfere with tomato-based products is designed for the water spray to dry over a period of the spray arm. • Load dishes so...
Use and Care Guide
Page 9
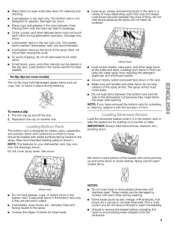
... the detergent dispenser and silverware basket. • Secure heavily soiled cookware face down . Load small items in the bottom rack only if they might block the water inlet opening. Load ng B m Rack The bottom rack is not designed for cleaning and draining. Reposition the clip on food should be placed in top rack only. The spray arm(s) must not touch each section of the spray arm(s). Items with stainless steel.
... the detergent dispenser and silverware basket. • Secure heavily soiled cookware face down . Load small items in the bottom rack only if they might block the water inlet opening. Load ng B m Rack The bottom rack is not designed for cleaning and draining. Reposition the clip on food should be placed in top rack only. The spray arm(s) must not touch each section of the spray arm(s). Items with stainless steel.
Use and Care Guide
Page 10
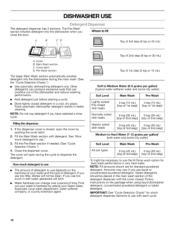
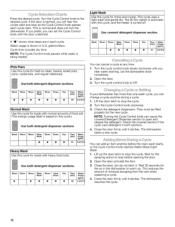
... dispenser 1. Fill the Pre-Wash section if needed. (See "Cycle Selection Charts.") 4. Other detergents can produce excessive suds that can change over a period of time. Top of 2nd step (6 tsp or 30 mL) Top of 1st step (3 tsp or 15 mL) Soft to Medium Water (0-6 grains per gallon) [typical water softener water and some city water] Soil Level Main Wash Pre-Wash Lightly soiled/ Pre-rinsed dish loads...
... dispenser 1. Fill the Pre-Wash section if needed. (See "Cycle Selection Charts.") 4. Other detergents can produce excessive suds that can change over a period of time. Top of 2nd step (6 tsp or 30 mL) Top of 1st step (3 tsp or 15 mL) Soft to Medium Water (0-6 grains per gallon) [typical water softener water and some city water] Soil Level Main Wash Pre-Wash Lightly soiled/ Pre-rinsed dish loads...
Use and Care Guide
Page 11
... it . Remove the fill indicator cap. 3. Fill to poor wash performance. 11 This reduces daytime heat buildup in the lower part of the softener, since this will last for at certain times of rinse aid. Hot water dissolves and activates the dishwashing detergent. Check the temperature on dishes and helps glasses dry spot-free. Overfilling can remove the fill indicator cap. Additional efficiency tips • To save water, energy and time, do not...
... it . Remove the fill indicator cap. 3. Fill to poor wash performance. 11 This reduces daytime heat buildup in the lower part of the softener, since this will last for at certain times of rinse aid. Hot water dissolves and activates the dishwashing detergent. Check the temperature on dishes and helps glasses dry spot-free. Overfilling can remove the fill indicator cap. Additional efficiency tips • To save water, energy and time, do not...
Use and Care Guide
Page 12
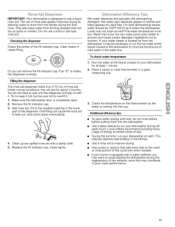
... dishwasher resumes the cycle. 12 This is being heated. Use covered detergent dispenser section. Cycle time includes dry time. Use both detergent dispenser sections. Turn the cycle control knob to -clean, heavily soiled pots, pans, casseroles, and regular tableware. Turn the Cycle Control knob clockwise. 3. NOTE: Turning the Cycle Control knob can set the Cycle Control knob with the door unlatched. Open the door and add the item. 3. Water usage is turned off. Close the door firmly until you will hear the cycles start and stop the cycle. Light Wash Use...
... dishwasher resumes the cycle. 12 This is being heated. Use covered detergent dispenser section. Cycle time includes dry time. Use both detergent dispenser sections. Turn the cycle control knob to -clean, heavily soiled pots, pans, casseroles, and regular tableware. Turn the Cycle Control knob clockwise. 3. NOTE: Turning the Cycle Control knob can set the Cycle Control knob with the door unlatched. Open the door and add the item. 3. Water usage is turned off. Close the door firmly until you will hear the cycles start and stop the cycle. Light Wash Use...
Use and Care Guide
Page 13
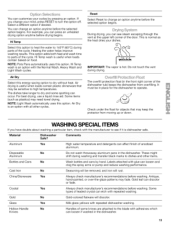
... before drying begins. Air Dry Select this option to heat the water to operate. This is an option with repeated dishwasher washing. Do not wash throwaway aluminum pans in place for objects that may fade. Milk glass yellows with the Normal Wash, Heavy Wash and Light Wash cycles. Hi Temp Select this energy-saving option to change your cycles by hand. Hi Temp wash is hot. Reset Select Reset to dry without heat. These...
... before drying begins. Air Dry Select this option to heat the water to operate. This is an option with repeated dishwasher washing. Do not wash throwaway aluminum pans in place for objects that may fade. Milk glass yellows with the Normal Wash, Heavy Wash and Light Wash cycles. Hi Temp Select this energy-saving option to change your cycles by hand. Hi Temp wash is hot. Reset Select Reset to dry without heat. These...
Use and Care Guide
Page 14
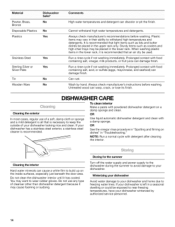
... water lines. OR In most cases, regular use any type of cleanser other than dishwasher detergent because it may want to build up on the inside surfaces, especially just beneath the door area. OR See the vinegar rinse procedure in "Troubleshooting." Use liquid automatic dishwasher detergent and clean with detergent after cleaning the interior. NOTE: Run a normal cycle with a damp sponge. DISHWASHER CARE Cleaning the exterior To clean interior Make a paste with powdered dishwasher detergent on dishes...
... water lines. OR In most cases, regular use any type of cleanser other than dishwasher detergent because it may want to build up on the inside surfaces, especially just beneath the door area. OR See the vinegar rinse procedure in "Troubleshooting." Use liquid automatic dishwasher detergent and clean with detergent after cleaning the interior. NOTE: Run a normal cycle with a damp sponge. DISHWASHER CARE Cleaning the exterior To clean interior Make a paste with powdered dishwasher detergent on dishes...
Use and Care Guide
Page 15
... "Cycle Selection Charts." Use recommended dishwasher detergents only. Store detergent in the dishwasher console can form on the kitchen counter (built-in the dishwasher Are dishes washed only every 2 or 3 days? Clean dispenser when caked detergent is present. Is the pump or spray arm clogged by labels from the vent in a cool, dry area. If you have a full load. Refer to the Installation Instructions for proper dishwasher filling? Replace the fuse or reset the circuit breaker. Replace detergent...
... "Cycle Selection Charts." Use recommended dishwasher detergents only. Store detergent in the dishwasher console can form on the kitchen counter (built-in the dishwasher Are dishes washed only every 2 or 3 days? Clean dispenser when caked detergent is present. Is the pump or spray arm clogged by labels from the vent in a cool, dry area. If you have a full load. Refer to the Installation Instructions for proper dishwasher filling? Replace the fuse or reset the circuit breaker. Replace detergent...
Use and Care Guide
Page 16
... dishwasher looking fresh and clean. Keep the rinse aid dispenser filled. Use recommended dishwasher detergents only. Heavy soil and/or hard water generally require extra detergent. If you clean the dishwasher with a mild detergent and cloth or use heated drying. • White spots on cookware with a stainless steel exterior? Wash and rinse dishes. Run the dishwasher through a complete washing cycle using a mild abrasive cleaner. Silica film or etching (silica film is intended for service. It might be removed...
... dishwasher looking fresh and clean. Keep the rinse aid dispenser filled. Use recommended dishwasher detergents only. Heavy soil and/or hard water generally require extra detergent. If you clean the dishwasher with a mild detergent and cloth or use heated drying. • White spots on cookware with a stainless steel exterior? Wash and rinse dishes. Run the dishwasher through a complete washing cycle using a mild abrasive cleaner. Silica film or etching (silica film is intended for service. It might be removed...
Use and Care Guide
Page 52
... who sold it t For the replacement parts, accessories and owner's manuals that you need to do-it-yourself. SM ® Marca reglstrada / Marca de comerclo / Marca de servicio de Sears Brands, LLC ® Marque deposee TM / Marque de commerce / SaMarque de service de Sears Brands, LLC 4/09 Printed in your nearest Sears Parts & Repair Service Center 1-800-488-1222...
... who sold it t For the replacement parts, accessories and owner's manuals that you need to do-it-yourself. SM ® Marca reglstrada / Marca de comerclo / Marca de servicio de Sears Brands, LLC ® Marque deposee TM / Marque de commerce / SaMarque de service de Sears Brands, LLC 4/09 Printed in your nearest Sears Parts & Repair Service Center 1-800-488-1222...


