
Use and Care Guide
Page 1
Use and Care Guide ® LiquidPropane Gas Grill with infraredCooking System Sears Model No. 4t5.t6657900 This Grill is for assembly: Adjustable wrench (not provided) Screwdriver (not provided) 7/16" Combination wrench (not provided) SAVE THESEINSTRUCTIONS! Sears, Roebuck and Co., Hoffman Estates, &#...Outdoor Use Only • Read and follow all Safety, Assembly, and Use and Care instructions in this Guide before assembling and cooking with this grill. • Failure to follow all instructions in this Use and Care Guide may lead to fire or explosion, which could result in property damage,...
Use and Care Guide ® LiquidPropane Gas Grill with infraredCooking System Sears Model No. 4t5.t6657900 This Grill is for assembly: Adjustable wrench (not provided) Screwdriver (not provided) 7/16" Combination wrench (not provided) SAVE THESEINSTRUCTIONS! Sears, Roebuck and Co., Hoffman Estates, &#...Outdoor Use Only • Read and follow all Safety, Assembly, and Use and Care instructions in this Guide before assembling and cooking with this grill. • Failure to follow all instructions in this Use and Care Guide may lead to fire or explosion, which could result in property damage,...

Use and Care Guide
Page 2
.... Combustion by-products produced when using this manual for use in minor or moderate injury, Read and follow all of the grill manufacturer and not a Sears employee. Open lid. 4. CAUTION For residential use for commercial cooking. 2,464261709 DANGER: Indicates an...Product Record IMPORTANTF:ill outthe productrecordinformationbelow. Do not modify for use in a safety hazard. To InstalledAssembler: Leave these instructions. Call Grill Service Center For Help And Parts If you smell gas: 1. CALIFORNIA PROPOSiTiON 65 1. Safety Symbols The symbols and boxes shown...
.... Combustion by-products produced when using this manual for use in minor or moderate injury, Read and follow all of the grill manufacturer and not a Sears employee. Open lid. 4. CAUTION For residential use for commercial cooking. 2,464261709 DANGER: Indicates an...Product Record IMPORTANTF:ill outthe productrecordinformationbelow. Do not modify for use in a safety hazard. To InstalledAssembler: Leave these instructions. Call Grill Service Center For Help And Parts If you smell gas: 1. CALIFORNIA PROPOSiTiON 65 1. Safety Symbols The symbols and boxes shown...

Use and Care Guide
Page 3
...replacement up to have other major home items, in the U.S.A. call 1-800-827-6655. *Coverage in Canada varies on Burners For ten years from time to purchase a natura_ gas conversion kff, Request Part number 41&4584609 Dual FuerrMand SureFireTM are ....m Assemb.l.y Troubleshoo.t.i.n..g 2 2 2 2 2 3 4-10 11 12 13-23 24-26 RepairProtection Agreements Congratulations on Kenmore Grill If this grill is designed and manufactured for years of dependable operation. KENMORE GRILL WARRANTY One Year Full Warranty on making a smart purchase. also, 10% off regular price of us as a "...
...replacement up to have other major home items, in the U.S.A. call 1-800-827-6655. *Coverage in Canada varies on Burners For ten years from time to purchase a natura_ gas conversion kff, Request Part number 41&4584609 Dual FuerrMand SureFireTM are ....m Assemb.l.y Troubleshoo.t.i.n..g 2 2 2 2 2 3 4-10 11 12 13-23 24-26 RepairProtection Agreements Congratulations on Kenmore Grill If this grill is designed and manufactured for years of dependable operation. KENMORE GRILL WARRANTY One Year Full Warranty on making a smart purchase. also, 10% off regular price of us as a "...
Use and Care Guide
Page 4
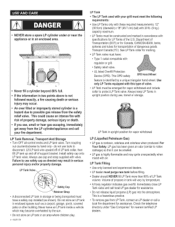
... Transportation (DOT) or for Canada, CAN/CSA-B339, tanks, spheres and tubes for transportation of support bracket. LP Tank in accordance with regulator or grill. • Safety relief valve. • UL listed Overfill Protection Device (OPD). Install safety cap onto LP tank valve. This is nontoxic, odorless ... wire upward off of LP tank collar, then lift LP tank up and off of dangerous goods. Immediately close LP Tank valve and call your grill must meet the following requirements: • Use LP Tanks only with these required measurements: 12" (30.5cm) (diameter) x 18" (45.7 cm) (...
... Transportation (DOT) or for Canada, CAN/CSA-B339, tanks, spheres and tubes for transportation of support bracket. LP Tank in accordance with regulator or grill. • Safety relief valve. • UL listed Overfill Protection Device (OPD). Install safety cap onto LP tank valve. This is nontoxic, odorless ... wire upward off of LP tank collar, then lift LP tank up and off of dangerous goods. Immediately close LP Tank valve and call your grill must meet the following requirements: • Use LP Tanks only with these required measurements: 12" (30.5cm) (diameter) x 18" (45.7 cm) (...

Use and Care Guide
Page 5
...-ventilated area, away from LP tank valve. It will defeat the safety feature of replacing your tank only for gas leaks. • Grill must be leak tested outdoors in figure below. Remove the protective cap from ignition sources such as gas fired or electrical appliances. Leaks are... or sparks. • Use a clean paintbrush and a 50/50 mild soap and water solution. Nipple has to be properly secured onto grill. (Refer to grill. LP Tank Exchange • Many retailers that inspect, precision fill, test and certify their tanks. Use only those reputable exchange companies that ...
...-ventilated area, away from LP tank valve. It will defeat the safety feature of replacing your tank only for gas leaks. • Grill must be leak tested outdoors in figure below. Remove the protective cap from ignition sources such as gas fired or electrical appliances. Leaks are... or sparks. • Use a clean paintbrush and a 50/50 mild soap and water solution. Nipple has to be properly secured onto grill. (Refer to grill. LP Tank Exchange • Many retailers that inspect, precision fill, test and certify their tanks. Use only those reputable exchange companies that ...

Use and Care Guide
Page 6
... A Never remove threaded orificeat end of a camper trailer or motor home. • Do not use grill until leak-tested. 6,464261709 If leaks cannot be stopped do not use this grill to complete the connection. Call Sears for replacement parts at 1-800-4-MY-HOME®. 6. Turn the ... the connection, disconnect regulator and repeat steps 5 and 6. If you cannot stop . Tighten by turning OPD hand wheel counterclockwise. Turn all grill control knobs to LP tank valve. Brush soapy solution onto areas where bubbles are still unable to complete the connection, do not use tools....
... A Never remove threaded orificeat end of a camper trailer or motor home. • Do not use grill until leak-tested. 6,464261709 If leaks cannot be stopped do not use this grill to complete the connection. Call Sears for replacement parts at 1-800-4-MY-HOME®. 6. Turn the ... the connection, disconnect regulator and repeat steps 5 and 6. If you cannot stop . Tighten by turning OPD hand wheel counterclockwise. Turn all grill control knobs to LP tank valve. Brush soapy solution onto areas where bubbles are still unable to complete the connection, do not use tools....

Use and Care Guide
Page 7
... a leak test. A Keep ventilation openings in well-ventilated space. Determine the cause, correct it should not be inserted into grill and emptied after each burner individually. A Do not store objects or materials inside a closed . Return to supplier! Open lid during operation. Turn on cooking...Do not block holes in sides or back of grill. • Check burner flames regularly. • Use grill only in cylinder enclosure (grill cart) free and clear of debris. A The grease tray must be used to clean any of the grill cooking surfaces, ensure no loose bristles remain on gas...
... a leak test. A Keep ventilation openings in well-ventilated space. Determine the cause, correct it should not be inserted into grill and emptied after each burner individually. A Do not store objects or materials inside a closed . Return to supplier! Open lid during operation. Turn on cooking...Do not block holes in sides or back of grill. • Check burner flames regularly. • Use grill only in cylinder enclosure (grill cart) free and clear of debris. A The grease tray must be used to clean any of the grill cooking surfaces, ensure no loose bristles remain on gas...

Use and Care Guide
Page 8
... is off by repeating steps 3 through 5 for gas to clear away and repeat the lighting procedure. Normal Hose Kinked Hose Turning Grill Off • Turn all burner control valves. 2. Turn LP tank off at LP tank. Ignitor Check • Turn gas off , wait 5 minutes for each...If only low flame is in knobs and release, and knobs should turn control knob to HI ._ position for gas to each burner individually. Replace damaged hoses before using grill. Warning: Top cover must be heard and sparking seen each use, check to light. Push and turn back to _ . ...
... is off by repeating steps 3 through 5 for gas to clear away and repeat the lighting procedure. Normal Hose Kinked Hose Turning Grill Off • Turn all burner control valves. 2. Turn LP tank off at LP tank. Ignitor Check • Turn gas off , wait 5 minutes for each...If only low flame is in knobs and release, and knobs should turn control knob to HI ._ position for gas to each burner individually. Replace damaged hoses before using grill. Warning: Top cover must be heard and sparking seen each use, check to light. Push and turn back to _ . ...

Use and Care Guide
Page 9
...use . ventilated space and out of reach of grease and smoke for paint. Topreventflashbacksand ensuregood performancethe burner assemblyshouldbe removedfromthe grill and cleanedbeforeuse wheneverthe grill has beenidle for stubborn stains. •Painted surfaces: Wash with a soft cloth after each use ... pad. Use nonabrasive scouring powder for an extendedperiod. 464261709• 9 Choose from storage, follow "Cleaning the Burner Assembly" instructions before starting grill. Damage to painted surfaces. • Plastic parts: Wash with graphics. • Cooking surfaces: If a ...
...use . ventilated space and out of reach of grease and smoke for paint. Topreventflashbacksand ensuregood performancethe burner assemblyshouldbe removedfromthe grill and cleanedbeforeuse wheneverthe grill has beenidle for stubborn stains. •Painted surfaces: Wash with a soft cloth after each use ... pad. Use nonabrasive scouring powder for an extendedperiod. 464261709• 9 Choose from storage, follow "Cleaning the Burner Assembly" instructions before starting grill. Damage to painted surfaces. • Plastic parts: Wash with graphics. • Cooking surfaces: If a ...

Use and Care Guide
Page 10
...from bracket on firebox. 13. Use the one easiest for damage, due to 165° F, or until steaming hot. Check burner for you have trouble igniting grill. 1. Use a clean platter and utensils when removing cooked foods. For more information call: USDA Meat and Poultry Notline at 1-800...We suggest three ways to kilt bacteria. Cook: Cook meat and poultry thoroughly to clean the burner tubes. How To Tell If Meat Is Grilled Thoroughly • Meat and poultry cooked on a grill often browns very fast on the clamp. Remove cooking grates and flame tamers. 3. Attach electrode...
...from bracket on firebox. 13. Use the one easiest for damage, due to 165° F, or until steaming hot. Check burner for you have trouble igniting grill. 1. Use a clean platter and utensils when removing cooked foods. For more information call: USDA Meat and Poultry Notline at 1-800...We suggest three ways to kilt bacteria. Cook: Cook meat and poultry thoroughly to clean the burner tubes. How To Tell If Meat Is Grilled Thoroughly • Meat and poultry cooked on a grill often browns very fast on the clamp. Remove cooking grates and flame tamers. 3. Attach electrode...
Use and Care Guide
Page 14
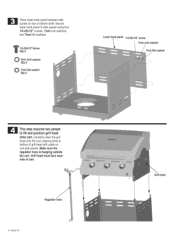
Carefully lower the grill head onto the cart, aligning slots at rear of bottom shelf. Make sure the regulator hose is hanging outside the cart. Place lower back panel between side panels at bottom of grill head with posts on cart side panels. Grill head must face open side of cart.... Regulator hose 14.464261709 Grill head l/4-20xl/2"Screw Qty.4 7mm lock washer Qty.4 7mm flat washer Qty.4 Lowerbackpanel 1/4-...
Carefully lower the grill head onto the cart, aligning slots at rear of bottom shelf. Make sure the regulator hose is hanging outside the cart. Place lower back panel between side panels at bottom of grill head with posts on cart side panels. Grill head must face open side of cart.... Regulator hose 14.464261709 Grill head l/4-20xl/2"Screw Qty.4 7mm lock washer Qty.4 7mm flat washer Qty.4 Lowerbackpanel 1/4-...

Use and Care Guide
Page 15
On backof grill, placeupperbackpanel betweensidepanelsand abovefowerback panel Secureupper backpanelin lowerholes, usingone t/4-20x114" screw,7ramIockwasher,and7ram fiat washeron eachside Do not fully tighten screws until side shelf installation is ...
On backof grill, placeupperbackpanel betweensidepanelsand abovefowerback panel Secureupper backpanelin lowerholes, usingone t/4-20x114" screw,7ramIockwasher,and7ram fiat washeron eachside Do not fully tighten screws until side shelf installation is ...

Use and Care Guide
Page 22
Insert AA battery into opening in upper back panel. m cAuTiom N Failure to install grease tray will cause hot grease to drip from bottom of grill with risk of grill, slide grease tray into ignitor, negative (=) end first. ' Replace the cap. 22.464261709 AA Battery / Electronic ignitionCap On back of fire or property damage. Greasetray Unscrew electronic ignition cap on cart right side panel.
Insert AA battery into opening in upper back panel. m cAuTiom N Failure to install grease tray will cause hot grease to drip from bottom of grill with risk of grill, slide grease tray into ignitor, negative (=) end first. ' Replace the cap. 22.464261709 AA Battery / Electronic ignitionCap On back of fire or property damage. Greasetray Unscrew electronic ignition cap on cart right side panel.

Use and Care Guide
Page 23
Make sure cylinder valve is attached. See Use & Care section of this manual to perform the "Burner Flame Check" and for important safety instructions before attaching to grill and regulator (see Use & Care section). LP CYLINDER IS SOLD SEPARATELY. Secure cylinder with cylinder screw under bottom shelf. Regulator CAUT,o./L Cylinder valve must face... once tank is facing front of fire. 464261709.23 Once cylinder has been filled and leak checked, place cylinder into hole in the risk of grill.
Make sure cylinder valve is attached. See Use & Care section of this manual to perform the "Burner Flame Check" and for important safety instructions before attaching to grill and regulator (see Use & Care section). LP CYLINDER IS SOLD SEPARATELY. Secure cylinder with cylinder screw under bottom shelf. Regulator CAUT,o./L Cylinder valve must face... once tank is facing front of fire. 464261709.23 Once cylinder has been filled and leak checked, place cylinder into hole in the risk of grill.

Use and Care Guide
Page 24
... ConnectingRegulatorto the LP Cylinder. •Turnoff controlknobsand LP cylindervalve.Leavelid opento allowflamesto die down.After fire is outand grill is cold,remove burnerand inspectfor spidernestsor rust.See Cleaningthe BurnerAssemblypages. •Turnoff control knobsand LP cylindervalve.Leavelid open ...at couplingnutto LP cylinder. • Couplingnut and LP cylindervalve not fully connected. Sideburner: •Tip of electrodeshouldbe pointingtowardgasport openingon burner.The distanceshouldbe 1t8"to gas leakage, call the fire department. if a gas leak cannot be stopped, or a fire ...
... ConnectingRegulatorto the LP Cylinder. •Turnoff controlknobsand LP cylindervalve.Leavelid opento allowflamesto die down.After fire is outand grill is cold,remove burnerand inspectfor spidernestsor rust.See Cleaningthe BurnerAssemblypages. •Turnoff control knobsand LP cylindervalve.Leavelid open ...at couplingnutto LP cylinder. • Couplingnut and LP cylindervalve not fully connected. Sideburner: •Tip of electrodeshouldbe pointingtowardgasport openingon burner.The distanceshouldbe 1t8"to gas leakage, call the fire department. if a gas leak cannot be stopped, or a fire ...

Use and Care Guide
Page 25
Flashback... •Burnerand/orburnertubes are blocked. (firein burnertube(s)), •Turnknobsto OFF,Cleanburnerand/orburnertubes.See burner cleaningsectionof Use and Care. Flamesblowout, •Vaporlock at LP cylinder.Leavelid in position and let fire burnout,After grill cools,removeandcleanall parts. If flamesare still low, turnoff knobsand LP cylinder valve.Disconnectregulator.Reconnectregulatorand leak-test,Turn on previouspage...
Flashback... •Burnerand/orburnertubes are blocked. (firein burnertube(s)), •Turnknobsto OFF,Cleanburnerand/orburnertubes.See burner cleaningsectionof Use and Care. Flamesblowout, •Vaporlock at LP cylinder.Leavelid in position and let fire burnout,After grill cools,removeandcleanall parts. If flamesare still low, turnoff knobsand LP cylinder valve.Disconnectregulator.Reconnectregulatorand leak-test,Turn on previouspage...

Use and Care Guide
Page 26
... •If possible,observegrill in dark location.Operate ignitionsystemand lookfor arcingbetweenoutputwires and grill frame. •If sparksare observedanywhereelsethanon the burners,wireinsulationmay be heardfrom spark module. •Outputlead connectionsnot connected. L •.../ornot at slow rate. ,Replacebatterywith a newAA-sizealkalinebattery. •Has moistureaccumulated on electrodeand/orin burner ports? •Use papertowelto removemoisture. •Inspectelectrodesfor cracks. ,Havethe crackedor brokenelectrodesreplacedby Searsor anotherqualifiedservicedealer....
... •If possible,observegrill in dark location.Operate ignitionsystemand lookfor arcingbetweenoutputwires and grill frame. •If sparksare observedanywhereelsethanon the burners,wireinsulationmay be heardfrom spark module. •Outputlead connectionsnot connected. L •.../ornot at slow rate. ,Replacebatterywith a newAA-sizealkalinebattery. •Has moistureaccumulated on electrodeand/orin burner ports? •Use papertowelto removemoisture. •Inspectelectrodesfor cracks. ,Havethe crackedor brokenelectrodesreplacedby Searsor anotherqualifiedservicedealer....


