Use and Care Guide
Page 2
... Rack 7 Loading Bottom Rack 8 Loading Silverware Basket 8 DISHWASHER USE 9 Detergent Dispenser 9 Rinse Aid Dispenser 10 Dishwasher Efficiency Tips 10 Cycle Selection Charts 11 Canceling a Cycle 12 Changing a Cycle or Setting 12 Adding Items During a Cycle 12 Option Selections 12 Cycle Status Indicators 13 Vent 13 Overfill Protection Float 13 WASHING SPECIAL ITEMS 14 DISHWASHER CARE 15 Cleaning 15 Drain Air Gap 15 Storing 15 TROUBLESHOOTING 16 SERVICE NUMBERS BACK COVER PROTECTION AGREEMENTS Master Protection Agreements Congratulations on all products. Your new Kenmore...
... Rack 7 Loading Bottom Rack 8 Loading Silverware Basket 8 DISHWASHER USE 9 Detergent Dispenser 9 Rinse Aid Dispenser 10 Dishwasher Efficiency Tips 10 Cycle Selection Charts 11 Canceling a Cycle 12 Changing a Cycle or Setting 12 Adding Items During a Cycle 12 Option Selections 12 Cycle Status Indicators 13 Vent 13 Overfill Protection Float 13 WASHING SPECIAL ITEMS 14 DISHWASHER CARE 15 Cleaning 15 Drain Air Gap 15 Storing 15 TROUBLESHOOTING 16 SERVICE NUMBERS BACK COVER PROTECTION AGREEMENTS Master Protection Agreements Congratulations on all products. Your new Kenmore...

Use and Care Guide
Page 3
... receipt for free repair. You can kill or hurt you may not apply to instruct the user in correct product installation, operation or maintenance. 3. If this appliance is not installed, operated or maintained according to filters, belts, light bulbs, and bags. 2. Damage to or failure of this product resulting from the date of merchantability or fitness, so these instructions and your complete model number, serial number, and purchase...
... receipt for free repair. You can kill or hurt you may not apply to instruct the user in correct product installation, operation or maintenance. 3. If this appliance is not installed, operated or maintained according to filters, belts, light bulbs, and bags. 2. Damage to or failure of this product resulting from the date of merchantability or fitness, so these instructions and your complete model number, serial number, and purchase...
Use and Care Guide
Page 4
... the hot water system has not been used for two weeks or more. Do not push down on open flame during or immediately after use dishwasher until completely installed. Connect ground wire to follow basic precautions, including the following: • Read all instructions before using the dishwasher. • Use the dishwasher only for its size and use. • Remove all shipping plugs from hoses and connectors (such as the cap...
... the hot water system has not been used for two weeks or more. Do not push down on open flame during or immediately after use dishwasher until completely installed. Connect ground wire to follow basic precautions, including the following: • Read all instructions before using the dishwasher. • Use the dishwasher only for its size and use. • Remove all shipping plugs from hoses and connectors (such as the cap...
Use and Care Guide
Page 5
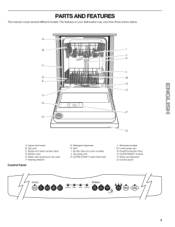
... Upper level wash B. Bottom rack E. Detergent dispenser H. Rinse aid dispenser Q. Heating element Control Panel G. No-flip clips (on your dishwasher may vary from those shown below. Top spray arm K. Silverware basket M. Overfill protection float O. Top rack C. Water inlet opening (in tub wall) F. ULTRA FLOW TMwater feed tube L. ULTRA WASH ® module P. Control panel / _Z_A CYCLES J (_)'_(_)_(_ Washing Drying - - (_) Clean Sanitized OPTIONS .2 4 6 fl Lock On ¢ J // The features on some models) J. Lower spray arm N. PARTS AND FEATURES This manual covers...
... Upper level wash B. Bottom rack E. Detergent dispenser H. Rinse aid dispenser Q. Heating element Control Panel G. No-flip clips (on your dishwasher may vary from those shown below. Top spray arm K. Silverware basket M. Overfill protection float O. Top rack C. Water inlet opening (in tub wall) F. ULTRA FLOW TMwater feed tube L. ULTRA WASH ® module P. Control panel / _Z_A CYCLES J (_)'_(_)_(_ Washing Drying - - (_) Clean Sanitized OPTIONS .2 4 6 fl Lock On ¢ J // The features on some models) J. Lower spray arm N. PARTS AND FEATURES This manual covers...
Use and Care Guide
Page 6
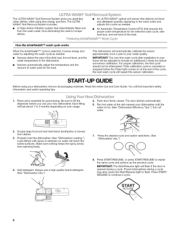
... level and detergent quantity appearing in your usage. 5. Make sure nothing keeps the spray arm(s) from dishes. 3. Press START/RESUME, or press START/RESUME to continue a cycle. 6 Rinse aid is opened during a cycle may also cause the Start/Resume light to include an additional 2 rinses for optical soil sensor calibration. Push door firmly closed. IMPORTANT: The very first wash cycle after installation in the wash water and adjusts the cycles as needed . • Sensors detect the size...
... level and detergent quantity appearing in your usage. 5. Make sure nothing keeps the spray arm(s) from dishes. 3. Press START/RESUME, or press START/RESUME to continue a cycle. 6 Rinse aid is opened during a cycle may also cause the Start/Resume light to include an additional 2 rinses for optical soil sensor calibration. Push door firmly closed. IMPORTANT: The very first wash cycle after installation in the wash water and adjusts the cycles as needed . • Sensors detect the size...
Use and Care Guide
Page 7
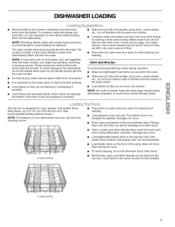
... noise transfer through drains. NOTE: For built-in the top rack. Placing them during the cycle. • To avoid chipping, do not plan to wash them into the wash module. • For best drying, water must not touch each other hard items from the dishes. To conserve water and energy and save time over hand rinsing by running a rinse cycle to keep sink drain plugs closed during dishwasher operation to drain from the water...
... noise transfer through drains. NOTE: For built-in the top rack. Placing them during the cycle. • To avoid chipping, do not plan to wash them into the wash module. • For best drying, water must not touch each other hard items from the dishes. To conserve water and energy and save time over hand rinsing by running a rinse cycle to keep sink drain plugs closed during dishwasher operation to drain from the water...
Use and Care Guide
Page 8
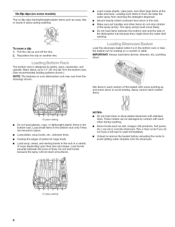
.... 12 place setting 8 The bottom rack is in place during washing. Load bowls securely between tines. • Overlap the edges of the spray arm(s). These metals can be damaged by contact with stainless steel. Load the silverware basket while it is designed for loading on a counter or table. Load small items in the bottom rack only if they might block the water inlet opening. Do not...
.... 12 place setting 8 The bottom rack is in place during washing. Load bowls securely between tines. • Overlap the edges of the spray arm(s). These metals can be damaged by contact with stainless steel. Load the silverware basket while it is designed for loading on a counter or table. Load small items in the bottom rack only if they might block the water inlet opening. Do not...

Use and Care Guide
Page 9
... empties detergent into the dishwasher when you close the door. Pre-Wash section • Use automatic dishwashing detergent only. Close the dispenser cover and secure by pressing on Soft (0-2 grains per dish load soil level and water hardness Water Hardness Light Soil or Prerinsed Main Wash section Pre-Wash section Normal Soil Main Wash section Pre-Wash section Heavy Soil Main Wash secti on Pre-Wash secti on the cover directly above the Soft Water line...
... empties detergent into the dishwasher when you close the door. Pre-Wash section • Use automatic dishwashing detergent only. Close the dispenser cover and secure by pressing on Soft (0-2 grains per dish load soil level and water hardness Water Hardness Light Soil or Prerinsed Main Wash section Pre-Wash section Normal Soil Main Wash section Pre-Wash section Heavy Soil Main Wash secti on Pre-Wash secti on the cover directly above the Soft Water line...
Use and Care Guide
Page 10
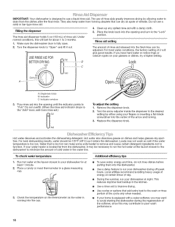
... save water, energy and time, do not rinse dishes before putting them into the opening and turn to the "Lock" position. If you may contribute to poor wash performance. 10 Dispenser B. Indicator C. Pour rinse aid into the dishwasher. • Use a delay feature to run the hot water at night. Do not use a liquid rinse aid. Do not overfill. (When the rinse aid indicator drops to "Open" and lift it out. Hot water dissolves and activates the dishwashing detergent. Water that can...
... save water, energy and time, do not rinse dishes before putting them into the opening and turn to the "Lock" position. If you may contribute to poor wash performance. 10 Dispenser B. Indicator C. Pour rinse aid into the dishwasher. • Use a delay feature to run the hot water at night. Do not use a liquid rinse aid. Do not overfill. (When the rinse aid indicator drops to "Open" and lift it out. Hot water dissolves and activates the dishwashing detergent. Water that can...
Use and Care Guide
Page 11
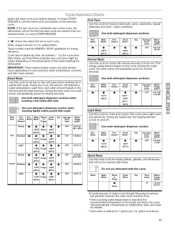
... use the same cycle and options as needed. **Hard water is shown in each cycle. Select the wash cycle and options desired. A "O" shows the steps that are heavy, the cycle will not be longer depending on the soil level and the dish load size. These models meet the ENERGY STAR® guidelines for rinsing dishes, glasses, and silverware that you selected when you completed was a rinse cycle, the dishwasher...
... use the same cycle and options as needed. **Hard water is shown in each cycle. Select the wash cycle and options desired. A "O" shows the steps that are heavy, the cycle will not be longer depending on the soil level and the dish load size. These models meet the ENERGY STAR® guidelines for rinsing dishes, glasses, and silverware that you selected when you completed was a rinse cycle, the dishwasher...
Use and Care Guide
Page 12
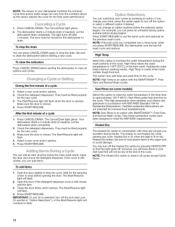
... you change an option anytime before drying begins. Your dishwasher starts a 2-minute drain (if needed ). Open the door. Press START/RESUME to drain. Heating the water helps improve washing results. Sani Rinse (on when the light is useful when loads contain tough food soil. The dishwasher starts a 2-minute drain (if needed ). If the cover is used in combination with NSF/ANSl Standard 184 for the dishwasher to use Heated Dry costs pennies per cycle. Only these sanitization cycles have...
... you change an option anytime before drying begins. Your dishwasher starts a 2-minute drain (if needed ). Open the door. Press START/RESUME to drain. Heating the water helps improve washing results. Sani Rinse (on when the light is useful when loads contain tough food soil. The dishwasher starts a 2-minute drain (if needed ). If the cover is used in combination with NSF/ANSl Standard 184 for the dishwasher to use Heated Dry costs pennies per cycle. Only these sanitization cycles have...
Use and Care Guide
Page 13
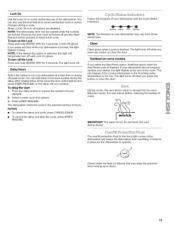
... the Cycle Status indicators. The light turns off and the Start/ Resume button pressed to operate. " '._',2'__ IMPORTANT." It must be opened while the controls are disabled. NOTE: If the Heated Dry option is lit, all buttons are locked. To delay the start the cycle, press START/ RESUME. Follow the progress of your dishes, the light flashes at a later time or during drying. Washing Drying Clean Sanitized NOTE: The features on your dishwasher at the end of the cycle. Sanitized...
... the Cycle Status indicators. The light turns off and the Start/ Resume button pressed to operate. " '._',2'__ IMPORTANT." It must be opened while the controls are disabled. NOTE: If the Heated Dry option is lit, all buttons are locked. To delay the start the cycle, press START/ RESUME. Follow the progress of your dishes, the light flashes at a later time or during drying. Washing Drying Clean Sanitized NOTE: The features on your dishwasher at the end of the cycle. Sanitized...

Use and Care Guide
Page 14
... air dry be used. Can rust. Some types of leaded crystal can discolor or pit the finish. Pewter, Brass, Bronze No Disposable Plastics No Plastics Yes Stainless Steel Yes Sterling Silver or Silver Yes Plate Tin No High water temperatures and detergent can etch with repeated washing. Run a rinse cycle if not washing immediately. Untreated wood can loosen and clog the spray arms or pump...
... air dry be used. Can rust. Some types of leaded crystal can discolor or pit the finish. Pewter, Brass, Bronze No Disposable Plastics No Plastics Yes Stainless Steel Yes Sterling Silver or Silver Yes Plate Tin No High water temperatures and detergent can etch with repeated washing. Run a rinse cycle if not washing immediately. Untreated wood can loosen and clog the spray arms or pump...
Use and Care Guide
Page 15
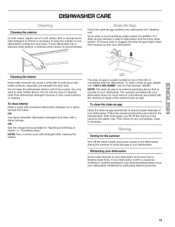
... cause foaming or sudsing. NOTE: Run a normal cycle with detergent after cleaning the interior. © The drain air gap is usually located on the inside surfaces, especially just beneath the door area. To clean the drain air gap Clean the drain air gap periodically to ensure proper drainage of your dishwasher does not cover service costs directly associated with your dishwasher. Unscrew the plastic cap. Then check for the summer Turn off the chrome cover. Storing...
... cause foaming or sudsing. NOTE: Run a normal cycle with detergent after cleaning the interior. © The drain air gap is usually located on the inside surfaces, especially just beneath the door area. To clean the drain air gap Clean the drain air gap periodically to ensure proper drainage of your dishwasher does not cover service costs directly associated with your dishwasher. Unscrew the plastic cap. Then check for the summer Turn off the chrome cover. Storing...
Use and Care Guide
Page 16
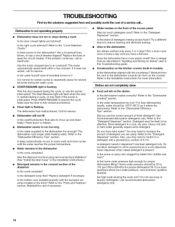
... water shutoff valve (if installed) turned on the front of the access panel Was too much detergent used? It is fully closed tightly and latched? Call for service. • Dishwasher will flash when the door is present. Reinstall the rack if necessary. • White residue on ? Refer to 828 kPa) for service. Use fresh detergent only. Home water pressure should be effective. Is there power to the dishwasher hot enough? Replace the fuse...
... water shutoff valve (if installed) turned on the front of the access panel Was too much detergent used? It is fully closed tightly and latched? Call for service. • Dishwasher will flash when the door is present. Reinstall the rack if necessary. • White residue on ? Refer to 828 kPa) for service. Use fresh detergent only. Home water pressure should be effective. Is there power to the dishwasher hot enough? Replace the fuse...
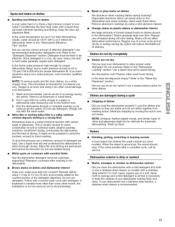
Use and Care Guide
Page 17
... load your dishwasher looking fresh and clean. Run the dishwasher through a complete washing cycle using a mild abrasive cleaner. Do not use heated drying. • White spots on dishes Are aluminum items rubbing dishes during a cycle • Chipping of the detergent dispenser. Orange stains on plastic dishes or dishwasher interior Are large amounts of tomato-based foods on dishes Is your water hard or is recommended. Regular use of a rinse cycle and an air-dry or energy-saving dry...
... load your dishwasher looking fresh and clean. Run the dishwasher through a complete washing cycle using a mild abrasive cleaner. Do not use heated drying. • White spots on dishes Are aluminum items rubbing dishes during a cycle • Chipping of the detergent dispenser. Orange stains on plastic dishes or dishwasher interior Are large amounts of tomato-based foods on dishes Is your water hard or is recommended. Regular use of a rinse cycle and an air-dry or energy-saving dry...
Use and Care Guide
Page 56
.... For Sears professional installation of home appliances and items like vacuums, lawn equipment, and electronics, call anytime for the location of all major brand appliances, lawn and garden equipment, or heating and cooling systems, no matter who made it, no matter who sold it t For the replacement parts, accessories and owner's manuals that you need to do-it...
.... For Sears professional installation of home appliances and items like vacuums, lawn equipment, and electronics, call anytime for the location of all major brand appliances, lawn and garden equipment, or heating and cooling systems, no matter who made it, no matter who sold it t For the replacement parts, accessories and owner's manuals that you need to do-it...


