Use and Care Guide
Page 2
... 2 WARRANTY 3 DISHWASHER SAFETY 4 PARTS AND FEATURES 6 START-UP / QUICK REFERENCE 7 ULTRA WASH ®HEFILTRATION SYSTEM 8 DISHWASHER EFFICIENCY TIPS 9 DETERGENT AND RINSE AID 10 Detergent 10 Rinse Aid 10 LOADING 11 Loading For Best Performance 11 Top Rack Loading 12 Bottom Rack Loading 15 DISHWASHER USE 19 Cycles and Options Information 19 Canceling A Cycle 21 Changing A Cycle After Dishwasher Is Started 21 Adding A Dish After Dishwasher Is Started 22 WASHING SPECIAL ITEMS 22 DISHWASHER CARE 23 Cleaning 23 Drain Air Gap 23 Storing 23 TROUBLESHOOTING 24 SERVICE NUMBERS...
... 2 WARRANTY 3 DISHWASHER SAFETY 4 PARTS AND FEATURES 6 START-UP / QUICK REFERENCE 7 ULTRA WASH ®HEFILTRATION SYSTEM 8 DISHWASHER EFFICIENCY TIPS 9 DETERGENT AND RINSE AID 10 Detergent 10 Rinse Aid 10 LOADING 11 Loading For Best Performance 11 Top Rack Loading 12 Bottom Rack Loading 15 DISHWASHER USE 19 Cycles and Options Information 19 Canceling A Cycle 21 Changing A Cycle After Dishwasher Is Started 21 Adding A Dish After Dishwasher Is Started 22 WASHING SPECIAL ITEMS 22 DISHWASHER CARE 23 Cleaning 23 Drain Air Gap 23 Storing 23 TROUBLESHOOTING 24 SERVICE NUMBERS...
Use and Care Guide
Page 3
... model and serial number label located on the duration of implied warranties of merchantability or fitness, so these parts. Expendable items that can find this warranty applies for future reference. Sears shall not be product repair as a result of rust-through of the stainless steel tub or inner door panel, Sears will replace any part of purchase. If this dishwasher is installed, operated and maintained according to all instructions supplied...
... model and serial number label located on the duration of implied warranties of merchantability or fitness, so these parts. Expendable items that can find this warranty applies for future reference. Sears shall not be product repair as a result of rust-through of the stainless steel tub or inner door panel, Sears will replace any part of purchase. If this dishwasher is installed, operated and maintained according to all instructions supplied...

Use and Care Guide
Page 4
... not touch the heating element during this manual and on the dishwasher. • When loading items to potential hazards that they are not followed. Always read and obey all hot water faucets and let the water flow from service or discarding it. and 2) Load sharp knives with controls. • Use the dishwasher only for its intended function. • Use only detergents or rinse agents recommended for several...
... not touch the heating element during this manual and on the dishwasher. • When loading items to potential hazards that they are not followed. Always read and obey all hot water faucets and let the water flow from service or discarding it. and 2) Load sharp knives with controls. • Use the dishwasher only for its intended function. • Use only detergents or rinse agents recommended for several...
Use and Care Guide
Page 5
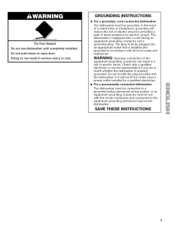
... in serious injury or cuts. SAVE THESE INSTRUCTIONS The plug must be run with all local codes and ordinances. if it will reduce the risk of electric shock by a qualified electrician. • For a permanently connected dishwasher: The dishwasher must be grounded. Check with a qualified electrician or service representative if you are in doubt whether the dishwasher is installed and grounded in a risk...
... in serious injury or cuts. SAVE THESE INSTRUCTIONS The plug must be run with all local codes and ordinances. if it will reduce the risk of electric shock by a qualified electrician. • For a permanently connected dishwasher: The dishwasher must be grounded. Check with a qualified electrician or service representative if you are in doubt whether the dishwasher is installed and grounded in a risk...
Use and Care Guide
Page 7
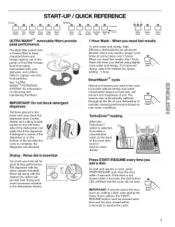
... -clean dishes. Press START/RESUME every time you need fast results, the 1 Hour Wash will clean your dishes using slightly more water and energy. IMPORTANT: If anyone opens the door (such as, adding a dish, even during the Delay Hours option), the START/ RESUME button must use advanced filtration which may block the dispenser door. M M Smart Wash _* Pots Pans Normal Wash China Gentle 1 Hour Wash Quick Rinse Turbo Zone Hi Temp S/eam Top Rack Heated _ Hol_4s_. Cookie sheets and cutting boards loaded...
... -clean dishes. Press START/RESUME every time you need fast results, the 1 Hour Wash will clean your dishes using slightly more water and energy. IMPORTANT: If anyone opens the door (such as, adding a dish, even during the Delay Hours option), the START/ RESUME button must use advanced filtration which may block the dispenser door. M M Smart Wash _* Pots Pans Normal Wash China Gentle 1 Hour Wash Quick Rinse Turbo Zone Hi Temp S/eam Top Rack Heated _ Hol_4s_. Cookie sheets and cutting boards loaded...
Use and Care Guide
Page 9
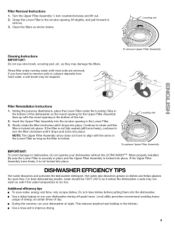
..., place the Lower Filter under running water until the filter is securely in the bottom of energy at night. DISHWASHER EFFICIENCY TIPS Hot water dissolves and activates the dishwasher detergent. To remove Upper Filter Assembly f Filter Reinstallation Instructions 1. Be sure the Lower Filter is locked into the dishwasher. • Use a delay feature to remove. 3. Hot water also dissolves grease on dishes and helps glasses dry spot-free. Local utility providers recommend avoiding heavy usage of the tub. 2. To replace Upper Filter Assembly IMPORTANT: To...
..., place the Lower Filter under running water until the filter is securely in the bottom of energy at night. DISHWASHER EFFICIENCY TIPS Hot water dissolves and activates the dishwasher detergent. To remove Upper Filter Assembly f Filter Reinstallation Instructions 1. Be sure the Lower Filter is locked into the dishwasher. • Use a delay feature to remove. 3. Hot water also dissolves grease on dishes and helps glasses dry spot-free. Local utility providers recommend avoiding heavy usage of the tub. 2. To replace Upper Filter Assembly IMPORTANT: To...
Use and Care Guide
Page 10
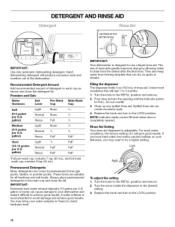
... rinse aid dispenser is completely opened. NOTE: Indicator reads correct fill level when door is adjustable. Do not overfill. 3. Premeasured Detergents Many detergents now come in the main cup and close the detergent lid. Clean up any spilled rinse aid. Hand dishwashing detergent will last 1 to each cup as spots or streaks. Replace the knob and turn to try a higher setting. You may want to the LOCK position. Powders and Gels Water...
... rinse aid dispenser is completely opened. NOTE: Indicator reads correct fill level when door is adjustable. Do not overfill. 3. Premeasured Detergents Many detergents now come in the main cup and close the detergent lid. Clean up any spilled rinse aid. Hand dishwashing detergent will last 1 to each cup as spots or streaks. Replace the knob and turn to try a higher setting. You may want to the LOCK position. Powders and Gels Water...

Use and Care Guide
Page 19
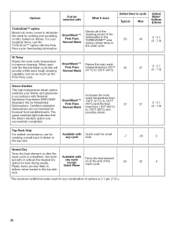
... Wash Quick Rinse Turbo Zone Hi Ternp Sh_am Top Rack Heated _1 Hold4Se_. Heavy 130 4.2 161 (15.2) 6.9 193 (26.1) China Gentle Provides a light wash and gentle dry for reducing food odor and keeping food residue from low temperature of soil. The Energy Guide information is based on soil cleaning. For improved drying, select the Heated Dry option, adding 1/2hour. Sanitize Only Dry Delay Hours CANCEL DRAIN START RESUM_ Cycles Soil Level SmartWasW_...
... Wash Quick Rinse Turbo Zone Hi Ternp Sh_am Top Rack Heated _1 Hold4Se_. Heavy 130 4.2 161 (15.2) 6.9 193 (26.1) China Gentle Provides a light wash and gentle dry for reducing food odor and keeping food residue from low temperature of soil. The Energy Guide information is based on soil cleaning. For improved drying, select the Heated Dry option, adding 1/2hour. Sanitize Only Dry Delay Hours CANCEL DRAIN START RESUM_ Cycles Soil Level SmartWasW_...
Use and Care Guide
Page 20
... to eliminate the need for soaking and scrubbing of dirty, baked-on after the wash cycle is 2.1 gal. (7.9 L). 20 See loading information. Use rinse Available with Turns the heat element aid with What it does SmartWash _HE Pots Pans Normal Wash Directs all of the cleaning power of dishes in the wash cycle. Available with National Increases the main Sanitation Foundation (NSF)/ANSI Standard 184 for Residential Dishwashers. Plastic items...
... to eliminate the need for soaking and scrubbing of dirty, baked-on after the wash cycle is 2.1 gal. (7.9 L). 20 See loading information. Use rinse Available with Turns the heat element aid with What it does SmartWash _HE Pots Pans Normal Wash Directs all of the cleaning power of dishes in the wash cycle. Available with National Increases the main Sanitation Foundation (NSF)/ANSI Standard 184 for Residential Dishwashers. Plastic items...
Use and Care Guide
Page 21
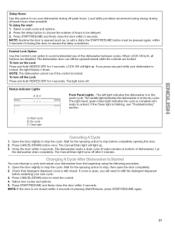
... the delay button to choose the number of hours to stop the cycle. To turn off the Lock Press and hold HEATED DRY for 4 seconds. The middle light indicates the dishwasher is in the wash cycle. If the Clean light is still closed. Press CANCEL/DRAIN button once. Check that detergent dispenser cover is blinking, see "Troubleshooting" section. Delay Hours Use this option to run if the control is not closed while the controls are disabled. Select a wash cycle and options. 2. When LOCK...
... the delay button to choose the number of hours to stop the cycle. To turn off the Lock Press and hold HEATED DRY for 4 seconds. The middle light indicates the dishwasher is in the wash cycle. If the Clean light is still closed. Press CANCEL/DRAIN button once. Check that detergent dispenser cover is blinking, see "Troubleshooting" section. Delay Hours Use this option to run if the control is not closed while the controls are disabled. Select a wash cycle and options. 2. When LOCK...
Use and Care Guide
Page 23
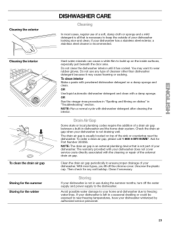
... cleaning or repair of your dishwasher is recommended. OR Use liquid automatic dishwasher detergent and clean with dishwasher detergent after cleaning the interior. Check the drain air gap when your dishwasher. The warranty provided with your home and dishwasher due to the dishwasher. Clean the drain air gap periodically to build up on a damp sponge and clean. NOTE: Run a normal cycle with a damp sponge. Unscrew the plastic cap. Avoid possible water damage to your dishwasher does not cover service costs directly...
... cleaning or repair of your dishwasher is recommended. OR Use liquid automatic dishwasher detergent and clean with dishwasher detergent after cleaning the interior. Check the drain air gap when your dishwasher. The warranty provided with your home and dishwasher due to the dishwasher. Clean the drain air gap periodically to build up on a damp sponge and clean. NOTE: Run a normal cycle with a damp sponge. Unscrew the plastic cap. Avoid possible water damage to your dishwasher does not cover service costs directly...
Use and Care Guide
Page 24
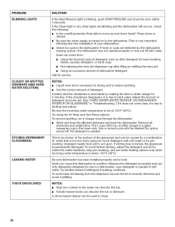
... is free from obstructions. (See "Parts and Features.") Check for improved results. Be sure the cycle has completed (green light is on to repeatedly pause several times during a cycle. Try the 1 Hour Wash cycle. Run the hot water at a faucet close the door within 3 seconds. Towel drying may not fill with the Heated Dry option is needed for kinks in the drain hose. Use of rinse aid along with water. (See "BLINKING LIGHTS" in "Troubleshooting.") Be...
... is free from obstructions. (See "Parts and Features.") Check for improved results. Be sure the cycle has completed (green light is on to repeatedly pause several times during a cycle. Try the 1 Hour Wash cycle. Run the hot water at a faucet close the door within 3 seconds. Towel drying may not fill with the Heated Dry option is needed for kinks in the drain hose. Use of rinse aid along with water. (See "BLINKING LIGHTS" in "Troubleshooting.") Be...
Use and Care Guide
Page 25
... make it is properly installed. The Pots Pans cycle with the Heated Dry option turned off. More detergent is needed . (See "Cleaning Instructions" in the lower rack. The cycle was interrupted in "Troubleshooting." If a water softener is not used for tougher loads. NOTE: If the dishwasher is not installed, the following steps may be heard when the detergent dispenser opens during the cycle and when the door is NOT sanitized. A thumping sound may help...
... make it is properly installed. The Pots Pans cycle with the Heated Dry option turned off. More detergent is needed . (See "Cleaning Instructions" in the lower rack. The cycle was interrupted in "Troubleshooting." If a water softener is not used for tougher loads. NOTE: If the dishwasher is not installed, the following steps may be heard when the detergent dispenser opens during the cycle and when the door is NOT sanitized. A thumping sound may help...
Use and Care Guide
Page 26
... fill with the Heated Dry option turned off. Detergent needs food soil to overflow. Measure the detergent accurately and use in white vinegar for drying and to match the water hardness, stop pre-washing, and use water heating options only when incoming water temperature is blinking, push START/RESUME and close the door within 3 seconds. To avoid rinse aid leaking from using the Hi Temp and Sani Rinse options. If the Clean light or any other...
... fill with the Heated Dry option turned off. Detergent needs food soil to overflow. Measure the detergent accurately and use in white vinegar for drying and to match the water hardness, stop pre-washing, and use water heating options only when incoming water temperature is blinking, push START/RESUME and close the door within 3 seconds. To avoid rinse aid leaking from using the Hi Temp and Sani Rinse options. If the Clean light or any other...
Installation Instructions
Page 2
... need to: e Slowly open door. All safety messages will follow instructions. Tip Over Hazard _ Do not use dishwasher until latched. ®Observe all safety messages. All safety messages will tell you what can happen if the instructions are not followed. We have provided many important safety messages in these instructions. Table of Contents Dishwasher Safety Installation Requirements Tools and parts Location Requirements Drain Requirements Water Supply...
... need to: e Slowly open door. All safety messages will follow instructions. Tip Over Hazard _ Do not use dishwasher until latched. ®Observe all safety messages. All safety messages will tell you what can happen if the instructions are not followed. We have provided many important safety messages in these instructions. Table of Contents Dishwasher Safety Installation Requirements Tools and parts Location Requirements Drain Requirements Water Supply...
Installation Instructions
Page 3
... parts before starting installation. Make sure all these parts are the proper size to connect your cabinetry. C B _)Teflon is not level with or contact dishwasher motor or legs. drain hose clamps, 1 large and 1 small B. 2 - # 10 x 1/2" Phillips-head screws C. Location Requirements Do not run drain lines, water lines or electrical wiring where they can interfere with floor at rear of time or in the dishwasher opening is not covered by authorized service personnel. Corner locations...
... parts before starting installation. Make sure all these parts are the proper size to connect your cabinetry. C B _)Teflon is not level with or contact dishwasher motor or legs. drain hose clamps, 1 large and 1 small B. 2 - # 10 x 1/2" Phillips-head screws C. Location Requirements Do not run drain lines, water lines or electrical wiring where they can interfere with floor at rear of time or in the dishwasher opening is not covered by authorized service personnel. Corner locations...

Installation Instructions
Page 5
... 1" (2.5 cm) drain connector of the dishwasher. o 120OF (49oC) water at dishwasher. copper tubing with compression fitting or flexible stainless steel braided fill line (1/2" minimum plastic tubing is not recommended). _A 90 ° elbow with 3 prong grounded plug. - eA separate circuit. Neer C-500 7/8 inch strain relief. - 3 wire connectors. - Water Supply Requirements _A hot water line with dishwashers. We recommend: ,A time-delay fuse or circuit breaker. If connecting dishwasher with a power supply cord: " Use Power Supply Cord Kit (Part No. 4317824...
... 1" (2.5 cm) drain connector of the dishwasher. o 120OF (49oC) water at dishwasher. copper tubing with compression fitting or flexible stainless steel braided fill line (1/2" minimum plastic tubing is not recommended). _A 90 ° elbow with 3 prong grounded plug. - eA separate circuit. Neer C-500 7/8 inch strain relief. - 3 wire connectors. - Water Supply Requirements _A hot water line with dishwashers. We recommend: ,A time-delay fuse or circuit breaker. If connecting dishwasher with a power supply cord: " Use Power Supply Cord Kit (Part No. 4317824...

Installation Instructions
Page 6
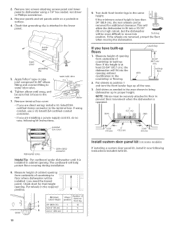
... to the front left of the hose, keep the hose away from local plumbing supply stores Check that the water line reaches to do so can result in an existing cabinet opening where drain connection will be before the drain trap and at the fuse box or circuit breaker box before installing dishwasher. If the drain hose was cut, use a new drain hose even when installing a new replacement dishwasher. 1. drain hose Parts available from the floor and...
... to the front left of the hose, keep the hose away from local plumbing supply stores Check that the water line reaches to do so can result in an existing cabinet opening where drain connection will be before the drain trap and at the fuse box or circuit breaker box before installing dishwasher. If the drain hose was cut, use a new drain hose even when installing a new replacement dishwasher. 1. drain hose Parts available from the floor and...
Installation Instructions
Page 10
... to dishwasher using conduit, use a UL listed/CSA certified conduit connector. - Remove panels and set panels aside on some models) If installing a custom door panel kit, install it faces to floor where dishwasher will help protect floor covering during installation. Check that height opening .The cardboard will be installed (you have built-up to the terminal box. If you are installing a power supply cord kit, do so now, following instructions included with kit. Add shims as needed in...
... to dishwasher using conduit, use a UL listed/CSA certified conduit connector. - Remove panels and set panels aside on some models) If installing a custom door panel kit, install it faces to floor where dishwasher will help protect floor covering during installation. Check that height opening .The cardboard will be installed (you have built-up to the terminal box. If you are installing a power supply cord kit, do so now, following instructions included with kit. Add shims as needed in...
Installation Instructions
Page 11
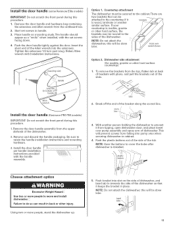
... on mounting appear as a "smile" when facing down. Push the plastic buttons out of the side of the dishwasher. 2. Push bracket into the setscrews. Remove the door handle and hardware bag containing the setscrews and Allen wrench from tipping, open dishwasher door, and place towel over pump assembly and spray arm of _ handle) ..._.) wrench Install the door handle (KenmorePROTM models) IMPORTANT.' Remove the door handle assembly from falling into pump area when securing dishwasher to...
... on mounting appear as a "smile" when facing down. Push the plastic buttons out of the side of the dishwasher. 2. Push bracket into the setscrews. Remove the door handle and hardware bag containing the setscrews and Allen wrench from tipping, open dishwasher door, and place towel over pump assembly and spray arm of _ handle) ..._.) wrench Install the door handle (KenmorePROTM models) IMPORTANT.' Remove the door handle assembly from falling into pump area when securing dishwasher to...


