
User Manual
Page 10
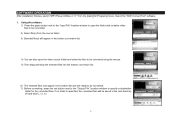
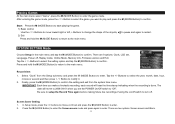
.... 6) The selected files now appear in the root directory of hard disk C, i.e. C:\ 9 Select the "AMV Convert Tool" software. 1. SOFTWARE OPERATION After installation finishes, launch "MP3 Player Utilities 4.13 " from the source folder. 3) Selected file(s) will be saved in the bottom list and are ready to be converted. 7) Before converting, press the... next to the "Input File" location window to open the folder that contains video files to be converted. 2) Select file(s) from the [start]-[All Programs] menu.
.... 6) The selected files now appear in the root directory of hard disk C, i.e. C:\ 9 Select the "AMV Convert Tool" software. 1. SOFTWARE OPERATION After installation finishes, launch "MP3 Player Utilities 4.13 " from the source folder. 3) Selected file(s) will be saved in the bottom list and are ready to be converted. 7) Before converting, press the... next to the "Input File" location window to open the folder that contains video files to be converted. 2) Select file(s) from the [start]-[All Programs] menu.
User Manual
Page 13
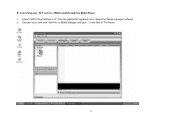
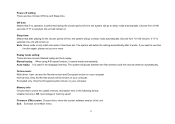
Launch "MP3 Player Utilities 4.13 " from the [start]-[All Programs] menu. Select the "Media manager" software. 2. Choose "voice" and click "Add File" in Media Manager and type *.* in the field of "File Name". 12 Converting your .ACT voice to .WAV format through the Media Player 1. B.
Launch "MP3 Player Utilities 4.13 " from the [start]-[All Programs] menu. Select the "Media manager" software. 2. Choose "voice" and click "Add File" in Media Manager and type *.* in the field of "File Name". 12 Converting your .ACT voice to .WAV format through the Media Player 1. B.
User Manual
Page 29
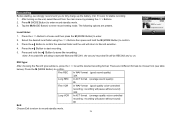
... VOR In WAV format (good quality voice-controlled recording : recording will pause without sound) 8K Exit: Choose Exit to return to choose from the main menu by pressing the < / > Buttons. 2. Press the ►▌ Button to save the recording. Select the desired local folder using the < / > Buttons then press and hold...
... VOR In WAV format (good quality voice-controlled recording : recording will pause without sound) 8K Exit: Choose Exit to return to choose from the main menu by pressing the < / > Buttons. 2. Press the ►▌ Button to save the recording. Select the desired local folder using the < / > Buttons then press and hold...
User Manual
Page 30
... Repeat One, Folder, Repeat Folder, Repeat All, Random and Intro. Buttons. 4. When recording playback starts, choose Replay by pressing the < / > Buttons. Choose from the main menu by pressing the and then the M (MODE Button) to replay the selection between markers A and B. 4. There are present. Press the M (MODE Button) to the previous... enter. 1. Now "A" starts to confirm. Press the M (MODE Button) to blink in the screen. 2. Press the ►▌ Button to start to the main menu. "A-B" stops flashing and now it to flash for a new replay selection, just press
... Repeat One, Folder, Repeat Folder, Repeat All, Random and Intro. Buttons. 4. When recording playback starts, choose Replay by pressing the < / > Buttons. Choose from the main menu by pressing the and then the M (MODE Button) to replay the selection between markers A and B. 4. There are present. Press the M (MODE Button) to the previous... enter. 1. Now "A" starts to confirm. Press the M (MODE Button) to blink in the screen. 2. Press the ►▌ Button to start to the main menu. "A-B" stops flashing and now it to flash for a new replay selection, just press
User Manual
Page 32
... second and then press < / > Button to confirm. Finally, press the M (MODE Button) to confirm. Screen Saver Setting 1. SYSTEM SETTING Mode Choose Setup in the main menu and tap the M (MODE Button) to confirm the setting and exit from the Setup submenu and press the M (MODE Button) to the main... options: Screen savers and Black. 31 Press and hold the M (MODE Button) to return to enter the game mode. Select "Clock" from the system time menu. IMPORTANT: Each time you make a live recordings if using the on/off switch to confirm. In Setup mode, press the buttons to choose LCD set...
... second and then press < / > Button to confirm. Finally, press the M (MODE Button) to confirm. Screen Saver Setting 1. SYSTEM SETTING Mode Choose Setup in the main menu and tap the M (MODE Button) to confirm the setting and exit from the Setup submenu and press the M (MODE Button) to the main... options: Screen savers and Black. 31 Press and hold the M (MODE Button) to return to enter the game mode. Select "Clock" from the system time menu. IMPORTANT: Each time you make a live recordings if using the on/off switch to confirm. In Setup mode, press the buttons to choose LCD set...
User Manual
Page 34
... computer. Normal only: Only the Normal section will remain on . Choose from 10-120 minutes. If "0" is selected, the unit will go to the Main menu. 33 The system will delete the setting automatically after playing for the chosen period of time, the system will remain on . Online mode: Multi driver...
... computer. Normal only: Only the Normal section will remain on . Choose from 10-120 minutes. If "0" is selected, the unit will go to the Main menu. 33 The system will delete the setting automatically after playing for the chosen period of time, the system will remain on . Online mode: Multi driver...