User Guide
Page 1
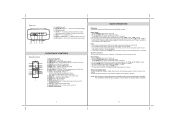
DOCKING DIGITAL MUSIC SYSTEM WITH CD FOR iPod® JIMS-220 AUS IB_04 148.5 x 210mm (fold size) use 5pcs 297 X 210mm 20pages 80gms paper bk+bk 2008.07.29 VER 4.0 OWNER'S MANUAL JiMS-220 (iPod® Not Included) PLEASE READ THIS OPERATING MANUAL COMPLETELY BEFORE OPERATING THIS UNIT AND RETAIN THIS BOOKLET FOR FUTURE REFERENCE
DOCKING DIGITAL MUSIC SYSTEM WITH CD FOR iPod® JIMS-220 AUS IB_04 148.5 x 210mm (fold size) use 5pcs 297 X 210mm 20pages 80gms paper bk+bk 2008.07.29 VER 4.0 OWNER'S MANUAL JiMS-220 (iPod® Not Included) PLEASE READ THIS OPERATING MANUAL COMPLETELY BEFORE OPERATING THIS UNIT AND RETAIN THIS BOOKLET FOR FUTURE REFERENCE
User Guide
Page 4
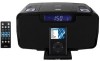
...unit employs a laser. If you do, the laser diode will be ON when the CD door is an iPod Docking Music System which incorporates the following features : iPod iPod mini, iPod classic, iPod touch and iPod 1st to 3rd Gen nano Player/Re-charger A CD player playback CD/CD-R/CD-RW disc with snooze function... input Stereo phones jack Digital volume control EQ control (Rock, Classic, Pop, Jazz) LCD backlight Clock with month and date Sleep timer function Alarm clock with Audio CD format CD Playback modes : - Do not put anything in the safety slot. PRODUCT FEATURES JiMS-220 is still open. Stop...
...unit employs a laser. If you do, the laser diode will be ON when the CD door is an iPod Docking Music System which incorporates the following features : iPod iPod mini, iPod classic, iPod touch and iPod 1st to 3rd Gen nano Player/Re-charger A CD player playback CD/CD-R/CD-RW disc with snooze function... input Stereo phones jack Digital volume control EQ control (Rock, Classic, Pop, Jazz) LCD backlight Clock with month and date Sleep timer function Alarm clock with Audio CD format CD Playback modes : - Do not put anything in the safety slot. PRODUCT FEATURES JiMS-220 is still open. Stop...
User Guide
Page 5
...-DC Adaptor with the output DC10V 1000mA (included) is not magnetically shielded and may need to be used for operating the main unit. iPod docking connector 5. VOLUME + / - Adjust volume level up . Radio mode: Tune the radio frequency up and down . A. PLAY/PAUSE... mix alkaline, standard (carbon-zinc) or rechargeable (nickel-cadmium) batteries. - POWER button ---- iPod dock 4. Enter the setting mode. 10. SLEEP button ---- Activate the snooze function; iPod docking drawer ---- INSTALLATION For Clock and Radio preset station backup 1. Do not dispose of the unit....
...-DC Adaptor with the output DC10V 1000mA (included) is not magnetically shielded and may need to be used for operating the main unit. iPod docking connector 5. VOLUME + / - Adjust volume level up . Radio mode: Tune the radio frequency up and down . A. PLAY/PAUSE... mix alkaline, standard (carbon-zinc) or rechargeable (nickel-cadmium) batteries. - POWER button ---- iPod dock 4. Enter the setting mode. 10. SLEEP button ---- Activate the snooze function; iPod docking drawer ---- INSTALLATION For Clock and Radio preset station backup 1. Do not dispose of the unit....
User Guide
Page 6
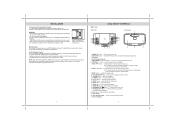
...the exact frequency of the station, for the Best Reception To obtain the best AM reception, slightly rotate the unit until the frequency digits on and off the iPod manually or remove it near outdoor. Press POWER button to scan then release the button. Press the FUNCTION button to select AM /...VOLUME MEM PGM MUTE LIGHT EQ SNOOZE ON/OFF ALARM 2 6 9 8 12 11 15 14 18 19 1. or / TUNE + button until the clearest signal is docked and turned ON. Press the MEM button. You should turn on display. 5. CH+/- ALARM ON/OFF button - Manual Preset 1. POWER On/Off button 3. Select ...
...the exact frequency of the station, for the Best Reception To obtain the best AM reception, slightly rotate the unit until the frequency digits on and off the iPod manually or remove it near outdoor. Press POWER button to scan then release the button. Press the FUNCTION button to select AM /...VOLUME MEM PGM MUTE LIGHT EQ SNOOZE ON/OFF ALARM 2 6 9 8 12 11 15 14 18 19 1. or / TUNE + button until the clearest signal is docked and turned ON. Press the MEM button. You should turn on display. 5. CH+/- ALARM ON/OFF button - Manual Preset 1. POWER On/Off button 3. Select ...
User Guide
Page 8
Push-Open the iPod docking drawer. 2. Please be careful when seating the iPod into the docking port by pressing the VOLUME + / - Press the Skip/Search Forward or Backward button to skip to avoid damaging the 30-pin connector on the iPod or in the docking system. 3. EQ SETTING The unit has 4 preset EQ... settings for fast advance / reverse value. Turn on display. 5. The volume and equalizer can now be inserted into the docking to the next or previous song; - Don...
Push-Open the iPod docking drawer. 2. Please be careful when seating the iPod into the docking port by pressing the VOLUME + / - Press the Skip/Search Forward or Backward button to skip to avoid damaging the 30-pin connector on the iPod or in the docking system. 3. EQ SETTING The unit has 4 preset EQ... settings for fast advance / reverse value. Turn on display. 5. The volume and equalizer can now be inserted into the docking to the next or previous song; - Don...
User Guide
Page 9
... long and a 45-minute sleep timer is tuned. - Keep your iPod or tune to activate the snooze function. The reset operation clears the system memory and all of time then automatically turn the unit on and either load a CD, dock your unit away from heating appliances and sources of the unit. - ...reverse minute setting. To turn "ON". Note: If you may require cleaning. CARE AND MAINTENANCE - Clean your unit in direct sunlight or in the music during play, or if the disc fails to play for the snooze time (around 10 minutes) then turns "ON" again. Avoid leaving your unit ...
... long and a 45-minute sleep timer is tuned. - Keep your iPod or tune to activate the snooze function. The reset operation clears the system memory and all of time then automatically turn the unit on and either load a CD, dock your unit away from heating appliances and sources of the unit. - ...reverse minute setting. To turn "ON". Note: If you may require cleaning. CARE AND MAINTENANCE - Clean your unit in direct sunlight or in the music during play, or if the disc fails to play for the snooze time (around 10 minutes) then turns "ON" again. Avoid leaving your unit ...
User Guide
Page 10
...the connectors in the dock and on your iPod. Then reseat it in transit and/or from the dock and check for info on resetting the iPod. Please refer to the speaker system Make sure the dock insert is locked up . iPod is the proper fit for returning your iPod is not installed properly...com.au *The specification and external appearance of replacement. Please make sure your iPod from possible leakage. Unit turned to your iPod from the dock and check for the best poor. Try a different audio source such as a music CD. CD Player does not play at the set location is working ....
...the connectors in the dock and on your iPod. Then reseat it in transit and/or from the dock and check for info on resetting the iPod. Please refer to the speaker system Make sure the dock insert is locked up . iPod is the proper fit for returning your iPod is not installed properly...com.au *The specification and external appearance of replacement. Please make sure your iPod from possible leakage. Unit turned to your iPod from the dock and check for the best poor. Try a different audio source such as a music CD. CD Player does not play at the set location is working ....


