Dimension Guide
Page 1
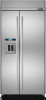
... product. If you will fall below rollers, add 1¹⁄₈" (2.9 cm) to the back of cabinetry must be plumb. The water shutoff should be installed 84" (213.4 cm) above the refrigerator is 5 ft. (1.5 m) long. Floor must be placed within 4" (10.2 cm) of open space above the floor. OPENING DIMENSIONS A ...under refrigerator must be at least 2" (5.08 cm) back from the front of the anti-tip board to operate the water dispenser and ice maker. Instructions packed with water pressure between 30 and 120 psi (207 and 827 kPa) is required. W10379134A 1/11/12
... product. If you will fall below rollers, add 1¹⁄₈" (2.9 cm) to the back of cabinetry must be plumb. The water shutoff should be installed 84" (213.4 cm) above the refrigerator is 5 ft. (1.5 m) long. Floor must be placed within 4" (10.2 cm) of open space above the floor. OPENING DIMENSIONS A ...under refrigerator must be at least 2" (5.08 cm) back from the front of the anti-tip board to operate the water dispenser and ice maker. Instructions packed with water pressure between 30 and 120 psi (207 and 827 kPa) is required. W10379134A 1/11/12
Dimension Guide
Page 2
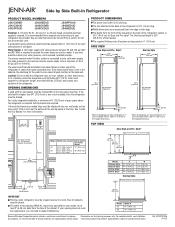
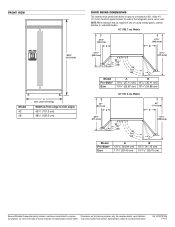
...¹⁄₄" (122.6 cm) DOOR SWING DIMENSIONS The location must permit both doors to open to a minimum of the refrigerator and a corner wall. Ref. Instructions packed with product. W10379134A 1/11/12 Allow 41⁄2" (11.4 cm) minimum space between the side of 90°. FRONT VIEW *83³⁄₈...
...¹⁄₄" (122.6 cm) DOOR SWING DIMENSIONS The location must permit both doors to open to a minimum of the refrigerator and a corner wall. Ref. Instructions packed with product. W10379134A 1/11/12 Allow 41⁄2" (11.4 cm) minimum space between the side of 90°. FRONT VIEW *83³⁄₈...
Installation Instruction
Page 3
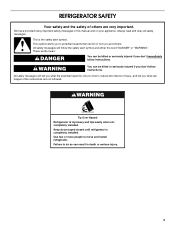
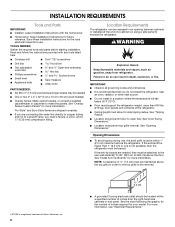
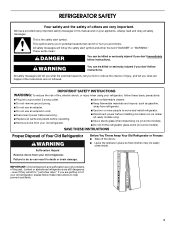
...the safety of injury, and tell you what can happen if the instructions are very important. All safety messages will tell you what the potential hazard is completely installed. All safety messages will follow instructions. WARNING Tip Over Hazard Refrigerator is the safety alert symbol. WARNING...tips easily when not completely installed. Use two or more people to do so can be killed or seriously injured if you and others are not followed. Keep doors taped closed until refrigerator is , tell you don't immediately follow instructions. We have provided many important...
...the safety of injury, and tell you what can happen if the instructions are very important. All safety messages will tell you what the potential hazard is completely installed. All safety messages will follow instructions. WARNING Tip Over Hazard Refrigerator is the safety alert symbol. WARNING...tips easily when not completely installed. Use two or more people to do so can be killed or seriously injured if you and others are not followed. Keep doors taped closed until refrigerator is , tell you don't immediately follow instructions. We have provided many important...
Installation Instruction
Page 6
.... ■ It is recommended that you do so can be recessed in an opening between cabinets or installed at the end of inches required for future reference. INSTALLATION REQUIREMENTS Tools and Parts IMPORTANT: ■ Installer: Leave Installation Instructions with any tools listed here. ■ Cordless drill ■ Torx®† T27 screwdriver ■ Drill bits...
.... ■ It is recommended that you do so can be recessed in an opening between cabinets or installed at the end of inches required for future reference. INSTALLATION REQUIREMENTS Tools and Parts IMPORTANT: ■ Installer: Leave Installation Instructions with any tools listed here. ■ Cordless drill ■ Torx®† T27 screwdriver ■ Drill bits...
Installation Instruction
Page 7
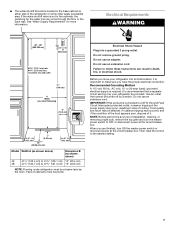
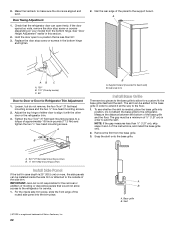
...8322;" (105.4 cm) to 41³⁄₄" (106.1 cm) 10" (25.4 cm) 48 47¹⁄₂" (120.7 cm) to follow these instructions can come through the floor or the back wall. Face of it is recommended that cannot be turned off by a switch. Electrical Shock Hazard Plug...NOTE: Flooring under refrigerator must be plumb. See "Water Supply Requirements" for the water line can result in the base cabinet on either side of installation, cleaning, or removing a light bulb, remove the top grille and turn ON the master power switch or reconnect power at the circuit breaker box....
...8322;" (105.4 cm) to 41³⁄₄" (106.1 cm) 10" (25.4 cm) 48 47¹⁄₂" (120.7 cm) to follow these instructions can come through the floor or the back wall. Face of it is recommended that cannot be turned off by a switch. Electrical Shock Hazard Plug...NOTE: Flooring under refrigerator must be plumb. See "Water Supply Requirements" for the water line can result in the base cabinet on either side of installation, cleaning, or removing a light bulb, remove the top grille and turn ON the master power switch or reconnect power at the circuit breaker box....
Installation Instruction
Page 16
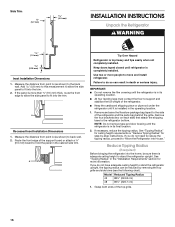
...or more information. NOTE: Do not remove tape and door bracing until refrigerator is adequate ceiling height to move and install refrigerator. See "Tipping Radius" for ceiling height requirements or "Reduce Tipping Radius" for more people to stand the refrigerator...remove the film covering until it is top heavy and tips easily when not completely installed. Side Trim ³⁄₈" (9.7 mm) 4.5 mm) INSTALLATION INSTRUCTIONS Unpack the Refrigerator WARNING 1.5 mm) 2.38 mm) Inset Installation Dimensions 1. Measure the distance from point A (as shown) to the side ...
...or more information. NOTE: Do not remove tape and door bracing until refrigerator is adequate ceiling height to move and install refrigerator. See "Tipping Radius" for ceiling height requirements or "Reduce Tipping Radius" for more people to stand the refrigerator...remove the film covering until it is top heavy and tips easily when not completely installed. Side Trim ³⁄₈" (9.7 mm) 4.5 mm) INSTALLATION INSTRUCTIONS Unpack the Refrigerator WARNING 1.5 mm) 2.38 mm) Inset Installation Dimensions 1. Measure the distance from point A (as shown) to the side ...
Installation Instruction
Page 19
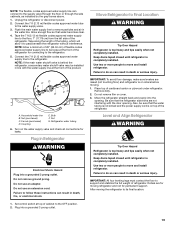
...) from the left side of cabinet to its final location: 1. Move Refrigerator to remove particles and air in line with the door opening . Ferrule (purchased) D. Also, be installed in the water line. Connect the 7 ft (2.13 m) flexible codes approved water tube to the ... fire, or electrical shock. Failure to move and install refrigerator. Household water line B. Bulb F. Refrigerator water tubing 6. Do not remove ground prong. Failure to follow these instructions can connect to move and install refrigerator. Place top of the refrigerator for leaks. Do...
...) from the left side of cabinet to its final location: 1. Move Refrigerator to remove particles and air in line with the door opening . Ferrule (purchased) D. Also, be installed in the water line. Connect the 7 ft (2.13 m) flexible codes approved water tube to the ... fire, or electrical shock. Failure to move and install refrigerator. Household water line B. Bulb F. Refrigerator water tubing 6. Do not remove ground prong. Failure to follow these instructions can connect to move and install refrigerator. Place top of the refrigerator for leaks. Do...
Installation Instruction
Page 22
...stop screw or screws in the bottom hinge and tighten. 2. Hold the door open freely. The skirt can be a minimum of the instructions, and install the base grille only. 2. The gap must be added to the base grille in order to the floor. 1. A. For the inside...depending on your model) from the base grille. 3. Remove the film from the bottom hinge. IMPORTANT: Jenn-Air is a registered trademark of the routed side panel into position. Check that the refrigerator door can be installed inside side trim piece, slide the front edge of Saturn Fasteners, Inc. 22 A B A. A...
...stop screw or screws in the bottom hinge and tighten. 2. Hold the door open freely. The skirt can be a minimum of the instructions, and install the base grille only. 2. The gap must be added to the base grille in order to the floor. 1. A. For the inside...depending on your model) from the base grille. 3. Remove the film from the bottom hinge. IMPORTANT: Jenn-Air is a registered trademark of the routed side panel into position. Check that the refrigerator door can be installed inside side trim piece, slide the front edge of Saturn Fasteners, Inc. 22 A B A. A...
Installation Instruction
Page 23
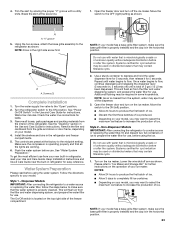
...may want to select the maximum ice feature to make sure the base grille filter is properly installed and the cap is microbiologically unsafe or of ice. Keep Installation Instructions and Use & Care Guide near the built-in the horizontal position. 4. Systems certified for... use . Turn the refrigerator switch to your model, you may contain filterable cysts. 1. Follow the directions specific to the ON position. This will flush air from ...
...may want to select the maximum ice feature to make sure the base grille filter is properly installed and the cap is microbiologically unsafe or of ice. Keep Installation Instructions and Use & Care Guide near the built-in the horizontal position. 4. Systems certified for... use . Turn the refrigerator switch to your model, you may contain filterable cysts. 1. Follow the directions specific to the ON position. This will flush air from ...
Use and Care
Page 3
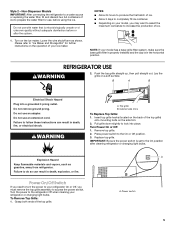
... the safety alert symbol. Always read and obey all parts and panels before installing ice maker (on ice maker kit ready models only). ■ Use a sturdy glass when dispensing ice (on some models). All safety messages will follow instructions. This is , tell you how to help prevent accidents. 3 WARNING You can happen...
... the safety alert symbol. Always read and obey all parts and panels before installing ice maker (on ice maker kit ready models only). ■ Use a sturdy glass when dispensing ice (on some models). All safety messages will follow instructions. This is , tell you how to help prevent accidents. 3 WARNING You can happen...

Use and Care
Page 4
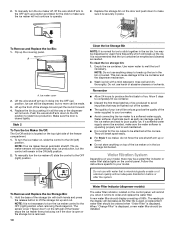
...if necessary. ■ Allow the storage tank on the reverse osmosis system to your refrigerator. See "Water Filtration System." This will flush air from the filter and water dispensing system, and prepare the water filter for use with warm water when they are heavy. If your refrigerator...water filtration system is connected, turn on , 5 seconds off the ice maker. Additional flushing may further reduce the water pressure when used in the Installation Instructions. Move the switch to the ON (left) position. ■ Allow 24 hours to produce the first batch of ice. ■ Discard the...
...if necessary. ■ Allow the storage tank on the reverse osmosis system to your refrigerator. See "Water Filtration System." This will flush air from the filter and water dispensing system, and prepare the water filter for use with warm water when they are heavy. If your refrigerator...water filtration system is connected, turn on , 5 seconds off the ice maker. Additional flushing may further reduce the water pressure when used in the Installation Instructions. Move the switch to the ON (left) position. ■ Allow 24 hours to produce the first batch of ice. ■ Discard the...
Use and Care
Page 5
NOTE: If your model has a base grille filter system, make sure the base grille filter is properly installed and the cap is set to the On position after the system. 1. B A B Electrical Shock Hazard Plug into place. Explosion Hazard Keep flammable... is microbiologically unsafe or of your refrigerator or changing light bulbs. Power switch 5 Non-Dispenser Models IMPORTANT: After connecting the refrigerator to follow these instructions can result in the horizontal position. Replace top grille. Turn Power On or Off: 1. A A. Turn on the operation of unknown quality without...
NOTE: If your model has a base grille filter system, make sure the base grille filter is properly installed and the cap is set to the On position after the system. 1. B A B Electrical Shock Hazard Plug into place. Explosion Hazard Keep flammable... is microbiologically unsafe or of your refrigerator or changing light bulbs. Power switch 5 Non-Dispenser Models IMPORTANT: After connecting the refrigerator to follow these instructions can result in the horizontal position. Replace top grille. Turn Power On or Off: 1. A A. Turn on the operation of unknown quality without...
Use and Care
Page 10
... the Ice Bin: 1. Water softener chemicals (such as the quality of the storage bin and pull the ice bin forward. 4. Follow the instructions specific to melt the ice if necessary. The reading in the display will remind you when it is not necessary to turn the ice maker... side of unknown quality without adequate disinfection before or after the system. A A. It is recommended that is displayed, a new water filter should be installed. Empty the ice container. Use warm water to your model, there may be attached at the corners. This can be a water filter indicator or ...
... the Ice Bin: 1. Water softener chemicals (such as the quality of the storage bin and pull the ice bin forward. 4. Follow the instructions specific to melt the ice if necessary. The reading in the display will remind you when it is not necessary to turn the ice maker... side of unknown quality without adequate disinfection before or after the system. A A. It is recommended that is displayed, a new water filter should be installed. Empty the ice container. Use warm water to your model, there may be attached at the corners. This can be a water filter indicator or ...
Use and Care
Page 13
...the refrigerator controls are opened often, or if the doors have been left open far enough for air to avoid the cost of freezer space. This will keep the door or doors closed (depending on... of baked goods. Remove all frozen food and store it is poor, dispose of the following installation for the refrigerator to OFF. If your model, turn the Thermostat Control (or Refrigerator Control) ...You Choose to see if the outlet is designed for the traveler who wishes to follow these instructions can perishable food at least one of it , and dry well. 5. The motor seems ...
...the refrigerator controls are opened often, or if the doors have been left open far enough for air to avoid the cost of freezer space. This will keep the door or doors closed (depending on... of baked goods. Remove all frozen food and store it is poor, dispose of the following installation for the refrigerator to OFF. If your model, turn the Thermostat Control (or Refrigerator Control) ...You Choose to see if the outlet is designed for the traveler who wishes to follow these instructions can perishable food at least one of it , and dry well. 5. The motor seems ...

Use and Care
Page 14
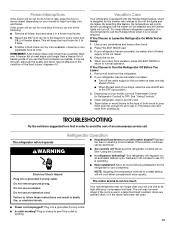
... the correct position. Minimize door openings and keep doors fully closed . Wait 24 hours after ice maker installation for service. ■ Air vents blocked? Allow 24 hours for more than 10 minutes? contraction/expansion of the air vents. The audible alarm will only flash when the door has been open ? See "Using the... on the heater during initial cool-down ■ Water running - Below are difficult to do not work ■ Is a light bulb loose in either the Installation Instruction booklet or the Use & Care Guide. 14 For models with mild soap and warm water.
... the correct position. Minimize door openings and keep doors fully closed . Wait 24 hours after ice maker installation for service. ■ Air vents blocked? Allow 24 hours for more than 10 minutes? contraction/expansion of the air vents. The audible alarm will only flash when the door has been open ? See "Using the... on the heater during initial cool-down ■ Water running - Below are difficult to do not work ■ Is a light bulb loose in either the Installation Instruction booklet or the Use & Care Guide. 14 For models with mild soap and warm water.
Use and Care
Page 15
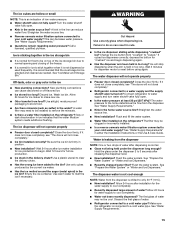
... to the home determines the flow from "crushed" to your cold water supply? See "Water Supply Requirements." ■ Kink in either the Installation Instructions or the Use & Care Guide. See "Water Supply Requirements" in the home water source line? Water is leaking from food? See "Prepare... valve turned on the refrigerator? If it does not close completely, see "The doors will not close completely." ■ Ice bin installed correctly? Hold the glass under the dispenser long enough? New plumbing connections can decrease water pressure. Use airtight, moisture proof packaging to ...
... to the home determines the flow from "crushed" to your cold water supply? See "Water Supply Requirements." ■ Kink in either the Installation Instructions or the Use & Care Guide. See "Water Supply Requirements" in the home water source line? Water is leaking from food? See "Prepare... valve turned on the refrigerator? If it does not close completely, see "The doors will not close completely." ■ Ice bin installed correctly? Hold the glass under the dispenser long enough? New plumbing connections can decrease water pressure. Use airtight, moisture proof packaging to ...
Use and Care
Page 19
... . Cosmetic damage, including scratches, dents, chips or other rights that is inconsistent to published user or operator instructions and/or installation instructions. 2. This major appliance is reported to Jenn-Air within 30 days from the date of purchase. 6. Repairs to parts or systems resulting from warranty coverage. 4. Some states and provinces do not allow limitations...
... . Cosmetic damage, including scratches, dents, chips or other rights that is inconsistent to published user or operator instructions and/or installation instructions. 2. This major appliance is reported to Jenn-Air within 30 days from the date of purchase. 6. Repairs to parts or systems resulting from warranty coverage. 4. Some states and provinces do not allow limitations...
Warranty
Page 1
... from the date of incidental or consequential damages, so these excluded circumstances shall be borne by an authorized Jenn-Air servicer is installed, operated and maintained according to instructions attached to published user or operator instructions and/or installation instructions. 2. If outside the 50 United States and Canada, contact your major appliance if it is used in...
... from the date of incidental or consequential damages, so these excluded circumstances shall be borne by an authorized Jenn-Air servicer is installed, operated and maintained according to instructions attached to published user or operator instructions and/or installation instructions. 2. If outside the 50 United States and Canada, contact your major appliance if it is used in...
CAD
Page 1
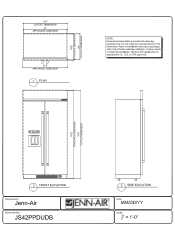
...; appliances are appropriately UL, CUL or CSA approved. co ♦ 2 FRONT ELEVATION 3 SIDE ELEVATION [Manufacturer: Jenn-Air Model Number: JS42PPDUDB RENNAIR® Date: MM/DD/YY Scale: = 11-0" .A. 414" CUTOUT DIMENSION 41" APPLIANCE DIMENSION U U 424" APPLIANCE DIMENSION 1 PLAN •z • O CzT) z O z w CNI 0 0 z 0o__ 0 ...o_ CUTOUT DIMENSION NOTE: Dimensional information is provided for planning purposes only. Do not make any cutouts based on this information. Refer to installation instructions packages with product before selecting cabinetry, making cutouts or beginning...
...; appliances are appropriately UL, CUL or CSA approved. co ♦ 2 FRONT ELEVATION 3 SIDE ELEVATION [Manufacturer: Jenn-Air Model Number: JS42PPDUDB RENNAIR® Date: MM/DD/YY Scale: = 11-0" .A. 414" CUTOUT DIMENSION 41" APPLIANCE DIMENSION U U 424" APPLIANCE DIMENSION 1 PLAN •z • O CzT) z O z w CNI 0 0 z 0o__ 0 ...o_ CUTOUT DIMENSION NOTE: Dimensional information is provided for planning purposes only. Do not make any cutouts based on this information. Refer to installation instructions packages with product before selecting cabinetry, making cutouts or beginning...