Jenn-Air JJW2424HL1 Support and Manuals
Get Help and Manuals for this Jenn-Air item

View All Support Options Below
Free Jenn-Air JJW2424HL1 manuals!
Problems with Jenn-Air JJW2424HL1?
Ask a Question
Free Jenn-Air JJW2424HL1 manuals!
Problems with Jenn-Air JJW2424HL1?
Ask a Question
Popular Jenn-Air JJW2424HL1 Manual Pages
Warranty - Page 1
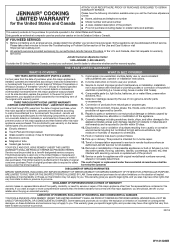
... this limitation may not apply to review the Troubleshooting or Problem Solver section of this major appliance and that prevent function of the Use and Care Guide or visit https://jennair.custhelp.com.
2. Damage from state to state or province to product failure.
12. Repairs to parts or systems to correct product damage or defects...
Installation Instructions - Page 5

...part of conduit provided is properly grounded. This oven must be provided.
■■ If the house has aluminum wiring, follow the instructions provided for it is recommended that a qualified electrical installer... with local codes.
A
A. Model/serial number plate
5 Electrical Requirements
If codes permit and a separate ground wire is used, it here.
■■ Models rated 3.6 ...
Installation Instructions - Page 6

...Remove and set the oven ...parts from inside the oven. 6.
Use 12 gauge copper wire.
Remove Oven Door
IMPORTANT: Use both sides. This oven is present. 4. Remove junction box cover if it will shut.
4. Failure to move and install...installation. Electrical Shock Hazard
Disconnect power before servicing. UL Listed or CSA Approved conduit connector
5. INSTALLATION INSTRUCTIONS...
Installation Instructions - Page 8

... insert into
cabinet.
4.
Push against seal area of the Use and Care Guide or contact the dealer from whom you purchased your oven.
8 Move the ...Install the oven racks. 7. A 3. Install the bottom oven trim using the two 4 x 25 mm selftapping screws provided. Open the oven door. On some models, the display panel will light briefly, and "PF" should hear a "click" as the door is set...
Owners Manual - Page 3

...When Opening Door - I Proper Installation - Smother fire or flame or...Servicing - All safety messages will follow instructions. I Placement of Oven Racks - Do not repair or replace any part of injury, and tell you and others are not followed. Flammable materials should not be stored in desired location while oven is in this manual and on any part of the oven unless specifically...
Owners Manual - Page 4

...manual cooking programs can be set, options can be adjusted, and instructions, preparation, and tips can be accessed.
Allows you to explore various features and options of service and set... USE
Feature Guide
These instructions cover several different models. Refer to explore the different options and features. Home Favorites
Light Settings
CANCEL
KEYPAD Settings
Home
Favorites Light...
Owners Manual - Page 5

... kind of food. Used to cook premade frozen food, such as biscuits, or to set a Manual Cooking Function, follow these steps.
1.
Used to speed up the defrosting of food on...pizza, pastries, french fries, and bread. Used for specific food types. Place food in food poisoning or sickness.
3. Follow the instructions on the packaging. Press the Oven Cancel keypad when ...
Owners Manual - Page 7

...). 4.
NOTE: The display screen will remain set after power up to exit Demo Mode: To Exit Demo Mode: 1. Manually input the time to functions and customization options ...■■ Service and Support: Displays model number, Customer Support contact info, and Diagnostics.
■■ Store Demo Mode: Select Store Demo Mode to the original factory default settings. Scroll and ...
Owners Manual - Page 9

...part out of its four sensing points and rigid support, it across the shelf guides, making sure that the runners can be removed.
■■ To refit the shelf guides...guide on the same level. Fitting the Sliding Runners (if present)
Remove the shelf guides from the oven and remove the plastic from the After-sales Service...seating. Sliding Runners (on some models)
Food Probe
Use for cooking ...
Owners Manual - Page 10

...prior to insert food. Only one -rack baking.
Higher temperatures will begin at lower broil settings. This ensures that impact preheat times include room temperature, oven temperature, and the number ...and off as needed to maintain the proper temperature.
10
On lower settings, the broil element will cycle on the model, if the oven door is recommended to insert food. Control panel B....
Owners Manual - Page 11

...the Self Cleaning cycle. Select type of some models, the temperature probe from the oven because it...temperatures, burning soil to right.
3.
Failure to follow these instructions can result. An increase in the oven may take a...not begin the cleaning process. Touch the Settings keypad.
2. Select the Self Clean icon.
3. Select START to set a delayed Self Cleaning cycle.
IMPORTANT: ...
Owners Manual - Page 12

... rack guides will help them slide.
Use a screwdriver to the Customer Service section at www.jennair.com. Push firmly until it snaps
into position. 7. General Cleaning
IMPORTANT: Before cleaning, make sure the oven is cool and the controls are turned off and the oven is cool. Always follow label instructions on some models)
Food...
Owners Manual - Page 13

...problem continues, call for service. Scroll up to preheating can help you need further assistance or more time. Power failure: On some models...Run additional Clean cycles. TROUBLESHOOTING
First try the solutions ... all cycles require preheating. See cycle instructions for contact information. The function has... the "Settings" section. The oven door is increased. Error code (display shows...
Dimension Guide - Page 3

.... The junction box should be located 3" (7.6 cm) maximum below the support surface. e
e
B
C*
G
g
g
I
Bopttom of countertop (min.)
25⁄8
6.7
I
Power Supply Location
UNDER COUNTER INSTALLATION
BACK VIEW
IMPORTANT: Dimensional specifications are appropriately UL, CUL or CSA approved.
STANDARD INSTALLATION JJW2424HM - 237⁄16 X 231⁄2 X 227⁄16 (Depth...
Dimension Guide - Page 4

...conduit provided is for serviceability. The length of 8
JENNAIR® SMALL SINGLE WALL OVEN - Drill a 1" (2.5 cm) minimum diameter hole in an upper corner of the support surface for access to F floor for JJW2424HM and JJW2424HL
Power Supply Location
UNDER COUNTER INSTALLATION
TOP VIEW
BACK VIEW
W11311039B Installation Instructions: W11260094 FLUSH INSTALLATION REQUIREMENTS A 22½...
Jenn-Air JJW2424HL1 Reviews
We have not received any reviews for Jenn-Air yet.