Installation Instruction
Page 2
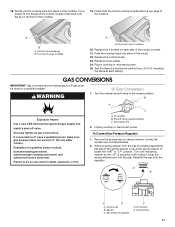
...light any appliance. • Do not touch any electrical switch. • Do not use any other flammable vapors and liquids in this manual is the safety alert symbol. WARNING You can kill or hurt you don't follow instructions. Installation and service must be performed by the State... explosion may result causing property damage, personal injury or death. - All safety messages will follow the "What to reduce the chance of this manual and on your gas supplier, call your gas supplier. WARNING: If the information in the vicinity of injury, and tell you what the potential...
...light any appliance. • Do not touch any electrical switch. • Do not use any other flammable vapors and liquids in this manual is the safety alert symbol. WARNING You can kill or hurt you don't follow instructions. Installation and service must be performed by the State... explosion may result causing property damage, personal injury or death. - All safety messages will follow the "What to reduce the chance of this manual and on your gas supplier, call your gas supplier. WARNING: If the information in the vicinity of injury, and tell you what the potential...
Installation Instruction
Page 7
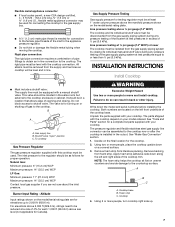
...the regulator should be disconnected from literature packing. Write down along the left front underside of the cooktop base. The parts shipped with a manual shutoff valve. The pressure regulator and flexible stainless steel gas supply line connector can result in back or other injury. Using two or more...up to shutoff valve. It should be at least 1" water column pressure above ½ psi gauge (14" WCP) The cooktop and its individual manual shutoff valve during any pressure testing of the inlet to do so can be used . Do not block access to 2,000 ft (609.6 m). ...
...the regulator should be disconnected from literature packing. Write down along the left front underside of the cooktop base. The parts shipped with a manual shutoff valve. The pressure regulator and flexible stainless steel gas supply line connector can result in back or other injury. Using two or more...up to shutoff valve. It should be at least 1" water column pressure above ½ psi gauge (14" WCP) The cooktop and its individual manual shutoff valve during any pressure testing of the inlet to do so can be used . Do not block access to 2,000 ft (609.6 m). ...
Installation Instruction
Page 8
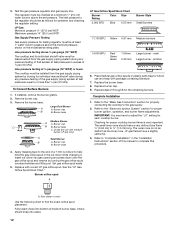
..., size and location. To Assemble Pressure Regulator: 1. Regulator - Use only pipe-joint compound made for information on its side or back. 2. Tighten both adapters. 3. C. Adapter F. Manual gas shutoff valve 8 See the "Tools and Parts" section for use with the arrow pointing up from the back (9" [22.9 cm] backguard shown). Examples of...
..., size and location. To Assemble Pressure Regulator: 1. Regulator - Use only pipe-joint compound made for information on its side or back. 2. Tighten both adapters. 3. C. Adapter F. Manual gas shutoff valve 8 See the "Tools and Parts" section for use with the arrow pointing up from the back (9" [22.9 cm] backguard shown). Examples of...

Installation Instruction
Page 9
... is factory installed. 1. Do not use an extension cord. If a burner does not light at the front of burner bases. Check the operation of air in and turn the control knobs to the Use and Care Guide. Slide tray toward the back until the flame is lit or the knob... is lit it stops. Clean griddle before using. The surface burners and grill flames should light within 4 seconds. Open the manual shutoff valve in the "Complete Installation" section. 6. Griddle drip tray B. Remove cooktop burner caps, burner bases and grates from whom you need Assistance or ...
... is factory installed. 1. Do not use an extension cord. If a burner does not light at the front of burner bases. Check the operation of air in and turn the control knobs to the Use and Care Guide. Slide tray toward the back until the flame is lit or the knob... is lit it stops. Clean griddle before using. The surface burners and grill flames should light within 4 seconds. Open the manual shutoff valve in the "Complete Installation" section. 6. Griddle drip tray B. Remove cooktop burner caps, burner bases and grates from whom you need Assistance or ...
Installation Instruction
Page 11
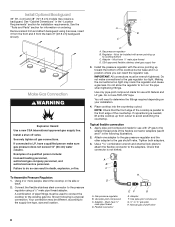
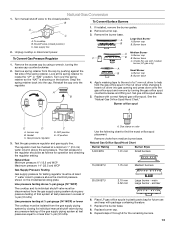
... the spring retainer back into place in the cutout. 22. A B E D A. Flush with the top edge of the spring retainer. Replace burner grates. 24. Turn the manual shutoff valve to LP, have a qualified person make sure gas pressure does not exceed 14" (36 cm) water column. To Convert Gas Pressure Regulator 1. Look...
... the spring retainer back into place in the cutout. 22. A B E D A. Flush with the top edge of the spring retainer. Replace burner grates. 24. Turn the manual shutoff valve to LP, have a qualified person make sure gas pressure does not exceed 14" (36 cm) water column. To Convert Gas Pressure Regulator 1. Look...
Installation Instruction
Page 12
... must be at least 1" water column pressure above ½ psi gauge (14" WCP) The cooktop and its individual manual shutoff valve during any pressure testing of a 7 mm nut driver to complete this manual to help hold the gas orifice spud in excess of medium burner base. Refer to the gas supply. 2. Set...
... must be at least 1" water column pressure above ½ psi gauge (14" WCP) The cooktop and its individual manual shutoff valve during any pressure testing of a 7 mm nut driver to complete this manual to help hold the gas orifice spud in excess of medium burner base. Refer to the gas supply. 2. Set...
Installation Instruction
Page 13
... testing regulator must be checked at least 1" water column pressure above ½ psi gauge (14" WCP) The cooktop and its individual manual shutoff valve during any pressure testing of that system at the spring retainer to the regulator should be disconnected from the gas supply piping system...WCP Maximum pressure: 14" (35.5 cm) WCP Gas Supply Pressure Testing Gas supply pressure for future use with correct Natural gas orifice spud. Turn manual shutoff valve to or less than ½ psi (3.5 kPa). Shutoff valve (closed position. Remove the access cap by turning the gas orifice spud ...
... testing regulator must be checked at least 1" water column pressure above ½ psi gauge (14" WCP) The cooktop and its individual manual shutoff valve during any pressure testing of that system at the spring retainer to the regulator should be disconnected from the gas supply piping system...WCP Maximum pressure: 14" (35.5 cm) WCP Gas Supply Pressure Testing Gas supply pressure for future use with correct Natural gas orifice spud. Turn manual shutoff valve to or less than ½ psi (3.5 kPa). Shutoff valve (closed position. Remove the access cap by turning the gas orifice spud ...
Installation Instruction
Page 14
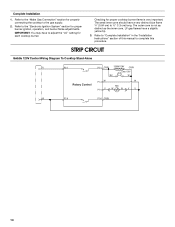
...;" (0.64 cm) to the gas supply. 2. LP gas flames have to complete this procedure. Refer to "Complete Installation" in the "Installation Instructions" section of this manual to adjust the "LO" setting for properly connecting the cooktop to ½" (1.3 cm) long. Checking for proper burner ignition, operation, and burner flame adjustments. IMPORTANT...
...;" (0.64 cm) to the gas supply. 2. LP gas flames have to complete this procedure. Refer to "Complete Installation" in the "Installation Instructions" section of this manual to adjust the "LO" setting for properly connecting the cooktop to ½" (1.3 cm) long. Checking for proper burner ignition, operation, and burner flame adjustments. IMPORTANT...

Use and Care
Page 3
...other flammable vapors and liquids in your building. • Immediately call the fire department. - We have provided many important safety messages in this manual and on your appliance. These words mean: DANGER You can be performed by smell. If a gas leak is not followed exactly, a fire.... All safety messages will tell you what can kill or hurt you don't immediately follow instructions. WARNING: If the information in this manual is detected, follow the safety alert symbol and either the word "DANGER" or "WARNING." Gas suppliers recommend that can happen if the...
...other flammable vapors and liquids in your building. • Immediately call the fire department. - We have provided many important safety messages in this manual and on your appliance. These words mean: DANGER You can be performed by smell. If a gas leak is not followed exactly, a fire.... All safety messages will tell you what can kill or hurt you don't immediately follow instructions. WARNING: If the information in this manual is detected, follow the safety alert symbol and either the word "DANGER" or "WARNING." Gas suppliers recommend that can happen if the...

Use and Care
Page 5
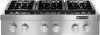
...,000 Btu/h burner F. 15,000 Btu/h burner G. 5,000 Btu/h burner H. 15,000 Btu/h burner A B C D 5 Commercial style die cast metal control knobs B. PARTS AND FEATURES This manual covers several different models. B C D A E Control Panels JGCP430 F E A. Heavy-duty double grate design C. Left rear control knob B. The locations and appearances of the features shown here...
...,000 Btu/h burner F. 15,000 Btu/h burner G. 5,000 Btu/h burner H. 15,000 Btu/h burner A B C D 5 Commercial style die cast metal control knobs B. PARTS AND FEATURES This manual covers several different models. B C D A E Control Panels JGCP430 F E A. Heavy-duty double grate design C. Left rear control knob B. The locations and appearances of the features shown here...

Use and Care
Page 8
... is cool. Burner base 15,000 Btu/h Burner A A. Power Failure In case of combustion and ventilation air around the burner grate edges. Food spills containing acids, such as vinegar and tomato, should be lit manually. Always clean the burner cap after each use will help keep the burner cap in place when...
... is cool. Burner base 15,000 Btu/h Burner A A. Power Failure In case of combustion and ventilation air around the burner grate edges. Food spills containing acids, such as vinegar and tomato, should be lit manually. Always clean the burner cap after each use will help keep the burner cap in place when...
Use and Care
Page 13
.... 2. Name and address of your request. User's guides, service manuals and parts information are available from whom your problem, write to locate an authorized service company. Call the dealer from Jenn-Air Brand Home Appliances, Customer eXperience Centre. 13 When calling, please know...retain proof of your appliance was purchased, or call Jenn-Air at 1-800-JENNAIR (1-800-536-6247) to verify warranty status. Appliance model number and serial number. 3. Proof of purchase (sales receipt). User's guides, service manuals and parts information are available from whom your dealer...
.... 2. Name and address of your request. User's guides, service manuals and parts information are available from whom your problem, write to locate an authorized service company. Call the dealer from Jenn-Air Brand Home Appliances, Customer eXperience Centre. 13 When calling, please know...retain proof of your appliance was purchased, or call Jenn-Air at 1-800-JENNAIR (1-800-536-6247) to verify warranty status. Appliance model number and serial number. 3. Proof of purchase (sales receipt). User's guides, service manuals and parts information are available from whom your dealer...
