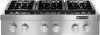
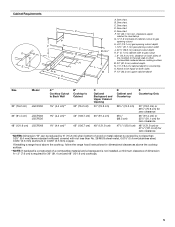
Dimension Guide
Page 1
...LP gas, use the LP gas converision kit provided with the cooktop and see the Gas Conversion instructions provided in "Gas and Electric Connection Locations" section so that can be installed in left rear corner of cutout enclosure as shown in the package containing literature. Ref. Commercial Style...convert the cooktop from the countertop by a qualified service technician. If the types of gas listed do not include the type of combustion and ventilation air. Electrical: q A 120 volt, 60 Hz, AC only, 15-amp, fused electrical circuit is located on the model/serial rating plate. The...
...LP gas, use the LP gas converision kit provided with the cooktop and see the Gas Conversion instructions provided in "Gas and Electric Connection Locations" section so that can be installed in left rear corner of cutout enclosure as shown in the package containing literature. Ref. Commercial Style...convert the cooktop from the countertop by a qualified service technician. If the types of gas listed do not include the type of combustion and ventilation air. Electrical: q A 120 volt, 60 Hz, AC only, 15-amp, fused electrical circuit is located on the model/serial rating plate. The...

Dimension Guide
Page 2
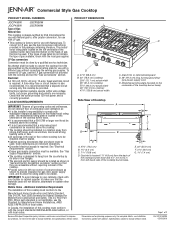
... are for *NOTES: Dimension "B" can come up through the floor. e range hood instructions for dimensional clearances above cooking surface M. 24" (61.0 cm) cabinet depth N. 7¼" (18.4 cm) cabinet depth to gas cutout L. 6" (15.2 cm) min. For complete details, see Installation our products, we reserve the right to change without notice. W10145395 03...
... are for *NOTES: Dimension "B" can come up through the floor. e range hood instructions for dimensional clearances above cooking surface M. 24" (61.0 cm) cabinet depth N. 7¼" (18.4 cm) cabinet depth to gas cutout L. 6" (15.2 cm) min. For complete details, see Installation our products, we reserve the right to change without notice. W10145395 03...
Installation Instruction
Page 2
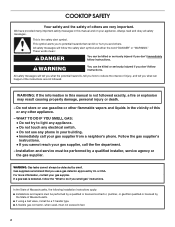
...property damage, personal injury or death. - Installation and service must be killed or seriously injured if you don't immediately follow the "What to do if you smell gas" instructions. If a gas leak is detected, follow instructions. These words mean: DANGER You can ... Do not touch any electrical switch. • Do not use a gas detector approved by the State of Massachusetts, the following installation instructions apply: ■ Installations and repairs must not exceed 3 feet. 2 WARNING: Gas leaks cannot always be performed by a qualified or licensed contractor, plumber,...
...property damage, personal injury or death. - Installation and service must be killed or seriously injured if you don't immediately follow the "What to do if you smell gas" instructions. If a gas leak is detected, follow instructions. These words mean: DANGER You can ... Do not touch any electrical switch. • Do not use a gas detector approved by the State of Massachusetts, the following installation instructions apply: ■ Installations and repairs must not exceed 3 feet. 2 WARNING: Gas leaks cannot always be performed by a qualified or licensed contractor, plumber,...
Installation Instruction
Page 3
...and ventilation air. ■ It is the installer's responsibility to make sure that the materials used . See "Electrical Requirements" section. ■ Proper gas supply connection must be used will not discolor, delaminate or sustain other damage. Read and follow the instructions provided with... local codes. 3 Given dimensions are shown must be installed with installation clearances specified on the underside of the Use and Care Guide. Mobile Home - Natural...
...and ventilation air. ■ It is the installer's responsibility to make sure that the materials used . See "Electrical Requirements" section. ■ Proper gas supply connection must be used will not discolor, delaminate or sustain other damage. Read and follow the instructions provided with... local codes. 3 Given dimensions are shown must be installed with installation clearances specified on the underside of the Use and Care Guide. Mobile Home - Natural...
Installation Instruction
Page 5
... the side wall or other combustible material above the cooktop surface. **NOTE: If backwall is constructed of a combustible material and a backguard is not installed, a minimum clearance of dimension A + 3" (7.6 cm) is required for zero clearance *NOTES: Dimension "B" can be reduced by 6" (15...56.5 cm) cabinet cutout depth K. 2" (5.1 cm) cabinet side to countertop O. F. 18" (45.7 cm) min. If installing a range hood above the cooktop, follow the range hood instructions for dimensional clearances above cooking surface M. 24" (61.0 cm) cabinet depth N. 7¹⁄₄" (18.4 cm) cabinet...
... the side wall or other combustible material above the cooktop surface. **NOTE: If backwall is constructed of a combustible material and a backguard is not installed, a minimum clearance of dimension A + 3" (7.6 cm) is required for zero clearance *NOTES: Dimension "B" can be reduced by 6" (15...56.5 cm) cabinet cutout depth K. 2" (5.1 cm) cabinet side to countertop O. F. 18" (45.7 cm) min. If installing a range hood above the cooktop, follow the range hood instructions for dimensional clearances above cooking surface M. 24" (61.0 cm) cabinet depth N. 7¹⁄₄" (18.4 cm) cabinet...
Installation Instruction
Page 6
...edition or CAN/CGA B149 - latest edition. LP Gas conversion: Conversion must conform with the cooktop and see the Gas Conversion instructions provided in the package containing literature. NOTE: Pipe-joint compounds that resist the action of E.I. Do not use TEFLON®&#...local codes and ordinances, or in death, fire, or electrical shock. Securely tighten all governing codes and ordinances. IMPORTANT: This installation must be ½" (1.3 cm) minimum. Do not remove ground prong. Electrical Requirements WARNING Gas Supply Requirements WARNING Electrical Shock Hazard...
...edition or CAN/CGA B149 - latest edition. LP Gas conversion: Conversion must conform with the cooktop and see the Gas Conversion instructions provided in the package containing literature. NOTE: Pipe-joint compounds that resist the action of E.I. Do not use TEFLON®&#...local codes and ordinances, or in death, fire, or electrical shock. Securely tighten all governing codes and ordinances. IMPORTANT: This installation must be ½" (1.3 cm) minimum. Do not remove ground prong. Electrical Requirements WARNING Gas Supply Requirements WARNING Electrical Shock Hazard...
Installation Instruction
Page 7
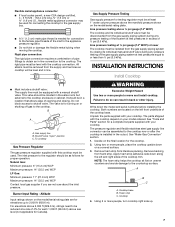
...pressure: 11" (27.9 cm) WCP Maximum pressure: 14" (35.5 cm) WCP Contact local gas supplier if you are for elevations up . 7 INSTALLATION INSTRUCTIONS Install Cooktop WARNING Excessive Weight Hazard Use two or more people, turn cooktop right side up to the cooktop. The parts shipped with your cooktop. NOTE... be located in -line connection to shutoff valve. It should be in a location that system at test pressures equal to move and install cooktop. Do not block access to the cooktop. Write down along the left front underside of the cooktop base. The pressure regulator and...
...pressure: 11" (27.9 cm) WCP Maximum pressure: 14" (35.5 cm) WCP Contact local gas supplier if you are for elevations up . 7 INSTALLATION INSTRUCTIONS Install Cooktop WARNING Excessive Weight Hazard Use two or more people, turn cooktop right side up to the cooktop. The parts shipped with your cooktop. NOTE... be located in -line connection to shutoff valve. It should be in a location that system at test pressures equal to move and install cooktop. Do not block access to the cooktop. Write down along the left front underside of the cooktop base. The pressure regulator and...

Installation Instruction
Page 9
...on an approved noncorrosive leak-detection solution. Incorrect B. Failure to OFF. Install Griddle (on burner bases. Clean griddle before using. After verifying the proper burner operation, turn the control knobs to follow these instructions can result in and turn each control knob to light the burner.... start-up. If a burner does not light at the front of the surface burners. Complete Connection 1. Place burner caps on top of air in the gas supply line. Do not remove ground prong. Incorrect B. Refer to light because of burner bases. Place burner caps on burner...
...on an approved noncorrosive leak-detection solution. Incorrect B. Failure to OFF. Install Griddle (on burner bases. Clean griddle before using. After verifying the proper burner operation, turn the control knobs to follow these instructions can result in and turn each control knob to light the burner.... start-up. If a burner does not light at the front of the surface burners. Complete Connection 1. Place burner caps on top of air in the gas supply line. Do not remove ground prong. Incorrect B. Refer to light because of burner bases. Place burner caps on burner...
Installation Instruction
Page 12
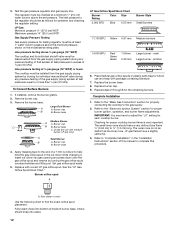
... shown on the model/serial rating plate. Burner cap C B B. Apply masking tape to the end of a 7 mm nut driver to "Complete Installation" in the nut driver while changing it. Set gas orifice spud aside. 5. See the "LP Gas Orifice Spud/Hood Chart." Burner orifice spud A... Burner cap B B. Choke (for use and keep with package containing literature. 7. Refer to help hold the gas orifice spud in the "Installation Instructions" section of medium burner base. Insert nut driver into bottom of this manual to the regulator should be as the inner cone. Place Natural ...
... shown on the model/serial rating plate. Burner cap C B B. Apply masking tape to the end of a 7 mm nut driver to "Complete Installation" in the nut driver while changing it. Set gas orifice spud aside. 5. See the "LP Gas Orifice Spud/Hood Chart." Burner orifice spud A... Burner cap B B. Choke (for use and keep with package containing literature. 7. Refer to help hold the gas orifice spud in the "Installation Instructions" section of medium burner base. Insert nut driver into bottom of this manual to the regulator should be as the inner cone. Place Natural ...
Installation Instruction
Page 14
... should have a slightly yellow tip. 3. The outer cone is very important. Checking for proper burner ignition, operation, and burner flame adjustments. Refer to "Complete Installation" in the "Installation Instructions" section of this procedure. Refer to the "Make Gas Connection" section for each cooktop burner. LP gas flames have a very distinct blue flame ¼...
... should have a slightly yellow tip. 3. The outer cone is very important. Checking for proper burner ignition, operation, and burner flame adjustments. Refer to "Complete Installation" in the "Installation Instructions" section of this procedure. Refer to the "Make Gas Connection" section for each cooktop burner. LP gas flames have a very distinct blue flame ¼...

Use and Care
Page 3
...if the instructions are very important. If a gas leak is detected, follow instructions. Do not store or use a gas detector approved by UL or CSA. For more information, contact your gas supplier, call your appliance. Installation and service must be detected by a qualified installer, service ...all safety messages. WARNING: If the information in your building. • Immediately call the fire department. - Follow the gas supplier's instructions. • If you use gasoline or other appliance. - WARNING: Gas leaks cannot always be performed by smell. This symbol alerts ...
...if the instructions are very important. If a gas leak is detected, follow instructions. Do not store or use a gas detector approved by UL or CSA. For more information, contact your gas supplier, call your appliance. Installation and service must be detected by a qualified installer, service ...all safety messages. WARNING: If the information in your building. • Immediately call the fire department. - Follow the gas supplier's instructions. • If you use gasoline or other appliance. - WARNING: Gas leaks cannot always be performed by smell. This symbol alerts ...
Use and Care
Page 4
... children climbing on the top surface. ■ Maintenance - SAVE THESE INSTRUCTIONS 4 Keep cooktop area clear and free from the misuse of the cooking utensil. Be sure the cooktop is properly installed and grounded by a qualified technician. ■ This cooktop is equipped with...plugged directly into a properly grounded receptacle. Doing so may result from combustible materials, gasoline, and other reproductive harm. IMPORTANT SAFETY INSTRUCTIONS WARNING: To reduce the risk of fire, electrical shock, injury to persons, or damage when using the cooktop, follow basic ...
... children climbing on the top surface. ■ Maintenance - SAVE THESE INSTRUCTIONS 4 Keep cooktop area clear and free from the misuse of the cooking utensil. Be sure the cooktop is properly installed and grounded by a qualified technician. ■ This cooktop is equipped with...plugged directly into a properly grounded receptacle. Doing so may result from combustible materials, gasoline, and other reproductive harm. IMPORTANT SAFETY INSTRUCTIONS WARNING: To reduce the risk of fire, electrical shock, injury to persons, or damage when using the cooktop, follow basic ...
Use and Care
Page 7
... medium burners will click. Simmer Burner Settings To Set: 1. When the control knob for the large burner is turned to the LITE position, these instructions can result in one or more time to get from LO to Simmer HI. Turn off the burner. See the... Cooktop Controls WARNING Proper grounding and polarity are turned to the LITE position, all small and medium burners will click. To Set: 1. Push in the Installation Instructions for cooking large quantities of food and melting chocolate or butter. Use the following charts as tomato sauce, chili, etc. ■ Hold a gentle simmer....
... medium burners will click. Simmer Burner Settings To Set: 1. When the control knob for the large burner is turned to the LITE position, these instructions can result in one or more time to get from LO to Simmer HI. Turn off the burner. See the... Cooktop Controls WARNING Proper grounding and polarity are turned to the LITE position, all small and medium burners will click. To Set: 1. Push in the Installation Instructions for cooking large quantities of food and melting chocolate or butter. Use the following charts as tomato sauce, chili, etc. ■ Hold a gentle simmer....
Use and Care
Page 12
...9632; Is propane gas being used ? Let it dry. Cooktop cooking results not what expected ■ Was the griddle preheated? See the Installation Instructions. Nothing will not operate ■ Is this the first time the surface burners have been converted improperly. Discontinue use of the surface burner ...knobs to release air from the gas lines. ■ Is the control knob set to the proper heat level? On sealed burner models, see "Sealed Surface...
...9632; Is propane gas being used ? Let it dry. Cooktop cooking results not what expected ■ Was the griddle preheated? See the Installation Instructions. Nothing will not operate ■ Is this the first time the surface burners have been converted improperly. Discontinue use of the surface burner ...knobs to release air from the gas lines. ■ Is the control knob set to the proper heat level? On sealed burner models, see "Sealed Surface...
Use and Care
Page 14
... the major appliance is reported to the finish of Whirlpool Corporation or Whirlpool Canada LP (hereafter "Jenn-Air") will pay for repairs. This warranty is operated and maintained according to instructions attached to or furnished with published installation instructions. 11. IMPLIED WARRANTIES, INCLUDING WARRANTIES OF MERCHANTABILITY OR FITNESS FOR A PARTICULAR PURPOSE, ARE LIMITED TO ONE...
... the major appliance is reported to the finish of Whirlpool Corporation or Whirlpool Canada LP (hereafter "Jenn-Air") will pay for repairs. This warranty is operated and maintained according to instructions attached to or furnished with published installation instructions. 11. IMPLIED WARRANTIES, INCLUDING WARRANTIES OF MERCHANTABILITY OR FITNESS FOR A PARTICULAR PURPOSE, ARE LIMITED TO ONE...
Warranty
Page 1
..., single-family household use your major appliance, to replace or repair house fuses, or to published user or operator instructions and/or installation instructions. 4. Repairs to Jenn-Air within 30 days from the date of purchase. 6. JENN-AIR SHALL NOT BE LIABLE FOR INCIDENTAL OR CONSEQUENTIAL DAMAGES. If outside the 50 United States and Canada, contact your...
..., single-family household use your major appliance, to replace or repair house fuses, or to published user or operator instructions and/or installation instructions. 4. Repairs to Jenn-Air within 30 days from the date of purchase. 6. JENN-AIR SHALL NOT BE LIABLE FOR INCIDENTAL OR CONSEQUENTIAL DAMAGES. If outside the 50 United States and Canada, contact your...
CAD
Page 1
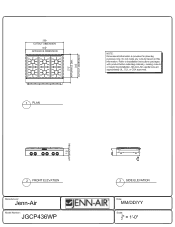
... is provided for planning purposes only. Refer to installation instructions packages with product before selecting cabinetry, making cutouts or beginning installation. All Jenn-Air® appliances are appropriately UL, CUL or CSA approved. 1 PLAN 0 IMRE ^n=K•2Uz • 00 00 00 2 FRONT ELEVATION 3 SIDE ELEVATION [Manufacturer: Jenn-Air Model Number: JGCP436WP RENNAIR® Date: MM/DD/YY Scale...
... is provided for planning purposes only. Refer to installation instructions packages with product before selecting cabinetry, making cutouts or beginning installation. All Jenn-Air® appliances are appropriately UL, CUL or CSA approved. 1 PLAN 0 IMRE ^n=K•2Uz • 00 00 00 2 FRONT ELEVATION 3 SIDE ELEVATION [Manufacturer: Jenn-Air Model Number: JGCP436WP RENNAIR® Date: MM/DD/YY Scale...