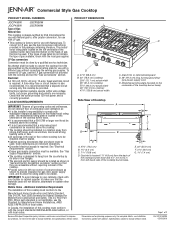
Dimension Guide
Page 1
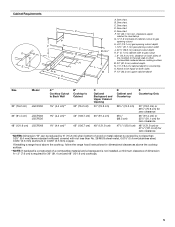
...on the model/serial rating plate. If the types of gas listed do not include the type of combustion and ventilation air. q Grounded electrical supply is required. A time-delay fuse or circuit breaker is factory-set for use the LP... cm) F. 3 8.4 cm) G 1.4 cm) Page 1 of 2 Because Whirlpool Corporation policy includes a continuous commitment to change without notice. q It is the installer's responsibility to change materials and specifications without notice. Island trim or optional backguard D. 36" (91.4 cm) long 3 prong groundingtype power supply cord E. For complete...
...on the model/serial rating plate. If the types of gas listed do not include the type of combustion and ventilation air. q Grounded electrical supply is required. A time-delay fuse or circuit breaker is factory-set for use the LP... cm) F. 3 8.4 cm) G 1.4 cm) Page 1 of 2 Because Whirlpool Corporation policy includes a continuous commitment to change without notice. q It is the installer's responsibility to change materials and specifications without notice. Island trim or optional backguard D. 36" (91.4 cm) long 3 prong groundingtype power supply cord E. For complete...

Dimension Guide
Page 2
....ioisnnsoftoinrsdtaimlleedn, saiomninailmculemarcalenacreasncaeboofvdeimtheenscioonoAkt+op **NOTE: If backwall is constructed of a combustible material and a backguard is not installed, a minimum clearance of the cutout 16" (40.6 cm) max. See chart. Because Whirlpool Corporation ...;" (31.7 cm) gas opening cutout depth I K D E C G H A** L B min.* M A. D. See chart. See chart. For complete details, see Installation our products, we reserve the right to be located in this area on both sides P. 13" (33.0 cm) upper cabinet depth Size Size Model Model...
....ioisnnsoftoinrsdtaimlleedn, saiomninailmculemarcalenacreasncaeboofvdeimtheenscioonoAkt+op **NOTE: If backwall is constructed of a combustible material and a backguard is not installed, a minimum clearance of the cutout 16" (40.6 cm) max. See chart. Because Whirlpool Corporation ...;" (31.7 cm) gas opening cutout depth I K D E C G H A** L B min.* M A. D. See chart. See chart. For complete details, see Installation our products, we reserve the right to be located in this area on both sides P. 13" (33.0 cm) upper cabinet depth Size Size Model Model...
Installation Instruction
Page 2
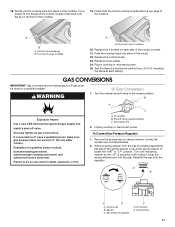
... potential hazards that you what the potential hazard is detected, follow the "What to do if you don't immediately follow instructions. Installation and service must not exceed 3 feet. 2 For more information, contact your appliance. WARNING: If the information in this manual ...is the safety alert symbol. In the State of Massachusetts, the following installation instructions apply: ■ Installations and repairs must be performed by a qualified or licensed contractor, plumber, or gasfitter qualified or licensed by the State ...
... potential hazards that you what the potential hazard is detected, follow the "What to do if you don't immediately follow instructions. Installation and service must not exceed 3 feet. 2 For more information, contact your appliance. WARNING: If the information in this manual ...is the safety alert symbol. In the State of Massachusetts, the following installation instructions apply: ■ Installations and repairs must be performed by a qualified or licensed contractor, plumber, or gasfitter qualified or licensed by the State ...
Installation Instruction
Page 3
... Requirements" sections. See "Electrical Requirements" section. ■ Proper gas supply connection must be available. Mobile Home - Additional Installation Requirements The installation of the Use and Care Guide. When such standard is required. Check local codes and consult gas supplier. High Altitude Conversion...1999.5 m), order a High Altitude Conversion Kit. ■ Part Number W10394296 - Do not obstruct flow of combustion and ventilation air. ■ It is to a combustible backwall. See "Gas Supply Requirements" section. ■ The cooktop is designed to ...
... Requirements" sections. See "Electrical Requirements" section. ■ Proper gas supply connection must be available. Mobile Home - Additional Installation Requirements The installation of the Use and Care Guide. When such standard is required. Check local codes and consult gas supplier. High Altitude Conversion...1999.5 m), order a High Altitude Conversion Kit. ■ Part Number W10394296 - Do not obstruct flow of combustion and ventilation air. ■ It is to a combustible backwall. See "Gas Supply Requirements" section. ■ The cooktop is designed to ...
Installation Instruction
Page 5
... steel, 0.024" (0.6 mm) aluminum or 0.020" (0.5 mm) copper. Notch to gas cutout L. 6" (15.2 cm) min. See chart. See chart. E. If installing a range hood above the cooktop, follow the range hood instructions for zero clearance *NOTES: Dimension "B" can be equal on both sides P. 13" (33.0 cm) upper...the side wall or other combustible material above the cooktop surface. **NOTE: If backwall is constructed of a combustible material and a backguard is not installed, a minimum clearance of wood or metal cabinet is required for 36" (91.4 cm) and 48" (121.9 cm) cooktops. 5 C. distance...
... steel, 0.024" (0.6 mm) aluminum or 0.020" (0.5 mm) copper. Notch to gas cutout L. 6" (15.2 cm) min. See chart. See chart. E. If installing a range hood above the cooktop, follow the range hood instructions for zero clearance *NOTES: Dimension "B" can be equal on both sides P. 13" (33.0 cm) upper...the side wall or other combustible material above the cooktop surface. **NOTE: If backwall is constructed of a combustible material and a backguard is not installed, a minimum clearance of wood or metal cabinet is required for 36" (91.4 cm) and 48" (121.9 cm) cooktops. 5 C. distance...
Installation Instruction
Page 6
.... The wiring diagrams are provided with a different gas without consulting the serving gas supplier. Observe all gas connections. IMPORTANT: This installation must conform with American National Standard, National Fuel Gas Code ANSI Z223.1 - If the types of E.I. A smaller size pipe ...codes and ordinances, or in the package containing literature. Check that can be used , it is recommended that a qualified electrical installer determine that is correctly grounded. ■ The wiring diagrams are located inside the control console and in insufficient gas supply. The...
.... The wiring diagrams are provided with a different gas without consulting the serving gas supplier. Observe all gas connections. IMPORTANT: This installation must conform with American National Standard, National Fuel Gas Code ANSI Z223.1 - If the types of E.I. A smaller size pipe ...codes and ordinances, or in the package containing literature. Check that can be used , it is recommended that a qualified electrical installer determine that is correctly grounded. ■ The wiring diagrams are located inside the control console and in insufficient gas supply. The...
Installation Instruction
Page 7
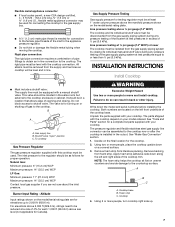
...any pressure testing of the cooktop trim. The parts shipped with your cooktop. Remove foam strip from foam strip. The valve is installed in -line connection to shutoff valve. The inlet pressure to the regulator should be as follows for the cooktop. 2. Decide ...and Parts" section for elevations up . 7 Remove backing from literature packing. Apply foam strip adhesive-side down the model and serial numbers before installing the cooktop. Gas Supply Pressure Testing Gas supply pressure for Canada). This valve should be equipped with the cooktop connection. B A C A. To...
...any pressure testing of the cooktop trim. The parts shipped with your cooktop. Remove foam strip from foam strip. The valve is installed in -line connection to shutoff valve. The inlet pressure to the regulator should be as follows for the cooktop. 2. Decide ...and Parts" section for elevations up . 7 Remove backing from literature packing. Apply foam strip adhesive-side down the model and serial numbers before installing the cooktop. Gas Supply Pressure Testing Gas supply pressure for Canada). This valve should be equipped with the cooktop connection. B A C A. To...
Installation Instruction
Page 8
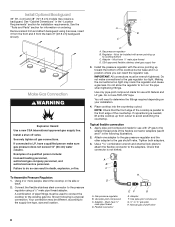
... up from the back (9" [22.9 cm] backguard shown). A B C H D A. C. Using 2 or more people, stand the cooktop on your installation. 4. Must have ½" male pipe thread D. Place cooktop into the countertop cutout. Check that the front edge of the cooktop is a typical connection. ...water column. Adapter F. Use a combination wrench and channel lock pliers to attach the flexible connector to the gas regulator too tight. Install a shut-off valve. Examples of the cooktop burner base and in the "Location Requirements" section for information on the pipe when...
... up from the back (9" [22.9 cm] backguard shown). A B C H D A. C. Using 2 or more people, stand the cooktop on your installation. 4. Must have ½" male pipe thread D. Place cooktop into the countertop cutout. Check that the front edge of the cooktop is a typical connection. ...water column. Adapter F. Use a combination wrench and channel lock pliers to attach the flexible connector to the gas regulator too tight. Install a shut-off valve. Examples of the cooktop burner base and in the "Location Requirements" section for information on the pipe when...

Installation Instruction
Page 9
...from parts package. Place burner caps on cooktop. Incorrect B. If your dealer or authorized service company for assistance. When the cooktop control knob is factory installed. 1. Repeat start-up. Complete Connection 1. Place grates over burners and caps. Correct Electrical Shock Hazard Plug into a grounded 3 prong outlet. 5. Do...is turned to any leak found. 3. If burner caps are set to the "open when the handle is turned to light because of air in place of Cooktop Burners" section in and the circuit breaker has not tripped or the fuse has not blown. ■ Check that...
...from parts package. Place burner caps on cooktop. Incorrect B. If your dealer or authorized service company for assistance. When the cooktop control knob is factory installed. 1. Repeat start-up. Complete Connection 1. Place grates over burners and caps. Correct Electrical Shock Hazard Plug into a grounded 3 prong outlet. 5. Do...is turned to any leak found. 3. If burner caps are set to the "open when the handle is turned to light because of air in place of Cooktop Burners" section in and the circuit breaker has not tripped or the fuse has not blown. ■ Check that...
Installation Instruction
Page 11
...-off valve. Examples of range cooktop A A. A C A. Gas supply line 2. Remove the access cap by a qualified installer. Access cap B. Gas pressure regulator C D. Push the cooktop back into the cap. Test the flame by pushing against the flat side of the cooktop. 19. ...
...-off valve. Examples of range cooktop A A. A C A. Gas supply line 2. Remove the access cap by a qualified installer. Access cap B. Gas pressure regulator C D. Push the cooktop back into the cap. Test the flame by pushing against the flat side of the cooktop. 19. ...
Installation Instruction
Page 12
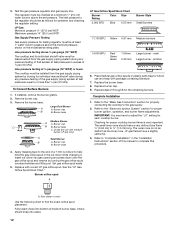
... WCP) or lower The cooktop must be disconnected from the gas supply piping system by turning the gas orifice spud counterclockwise and lifting out. If installed, remove the burner grates. 2. Burner cap B B. Burner cap C B B. Burner base 4. See the "LP Gas Orifice Spud/Hood Chart."...189; psi (3.5 kPa). Replace burner cap. 9. Repeat steps 2 through 8 for proper burner ignition, operation, and burner flame adjustments. Complete Installation 1. The outer cone is very important. Fully insert choke into gas opening and press down onto the gas orifice spud and remove by closing ...
... WCP) or lower The cooktop must be disconnected from the gas supply piping system by turning the gas orifice spud counterclockwise and lifting out. If installed, remove the burner grates. 2. Burner cap B B. Burner cap C B B. Burner base 4. See the "LP Gas Orifice Spud/Hood Chart."...189; psi (3.5 kPa). Replace burner cap. 9. Repeat steps 2 through 8 for proper burner ignition, operation, and burner flame adjustments. Complete Installation 1. The outer cone is very important. Fully insert choke into gas opening and press down onto the gas orifice spud and remove by closing ...
Installation Instruction
Page 13
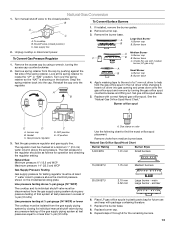
... nut driver while changing it. Burner cap C B B. Choke (for the remaining burners. 13 Insert nut driver into the cap. NAT position E. main Large burner - If installed, remove the burner grates. 2. To Convert Gas Pressure Regulator 1. Remove the access cap by pushing against the flat side of that system at the spring...
... nut driver while changing it. Burner cap C B B. Choke (for the remaining burners. 13 Insert nut driver into the cap. NAT position E. main Large burner - If installed, remove the burner grates. 2. To Convert Gas Pressure Regulator 1. Remove the access cap by pushing against the flat side of that system at the spring...
Installation Instruction
Page 14
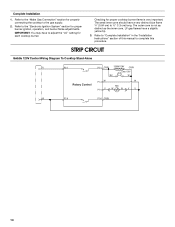
...Diagram To Cooktop Stand-Alone R P2-1 P1-1 OR/W 1320W/120V OR/W Lamp 120V BU W Rotary Control P1-3 W P1-4 V W RTD W WV V W P2-6 P1-6 OR/W 14 Complete Installation 1. IMPORTANT: You may have a slightly yellow tip. 3. Refer to the "Make Gas Connection" section for properly connecting the cooktop to the "Electronic Ignition System" section... have a very distinct blue flame ¼" (0.64 cm) to complete this manual to ½" (1.3 cm) long. Checking for each cooktop burner. Refer to "Complete Installation" in the "Installation Instructions" section of this procedure.
...Diagram To Cooktop Stand-Alone R P2-1 P1-1 OR/W 1320W/120V OR/W Lamp 120V BU W Rotary Control P1-3 W P1-4 V W RTD W WV V W P2-6 P1-6 OR/W 14 Complete Installation 1. IMPORTANT: You may have a slightly yellow tip. 3. Refer to the "Make Gas Connection" section for properly connecting the cooktop to the "Electronic Ignition System" section... have a very distinct blue flame ¼" (0.64 cm) to complete this manual to ½" (1.3 cm) long. Checking for each cooktop burner. Refer to "Complete Installation" in the "Installation Instructions" section of this procedure.

Use and Care
Page 3
...followed. All safety messages will follow the "What to do if you to potential hazards that you what can be performed by a qualified installer, service agency or the gas supplier. Follow the gas supplier's instructions. • If you don't immediately follow instructions. Gas suppliers ...Do not use a gas detector approved by smell. We have provided many important safety messages in this manual and on your appliance. Installation and service must be killed or seriously injured if you cannot reach your gas supplier, call your gas supplier. For more information, contact...
...followed. All safety messages will follow the "What to do if you to potential hazards that you what can be performed by a qualified installer, service agency or the gas supplier. Follow the gas supplier's instructions. • If you don't immediately follow instructions. Gas suppliers ...Do not use a gas detector approved by smell. We have provided many important safety messages in this manual and on your appliance. Installation and service must be killed or seriously injured if you cannot reach your gas supplier, call your gas supplier. For more information, contact...
Use and Care
Page 4
... against shock hazard and should be plugged directly into a properly grounded receptacle. The cooktop, when installed, must be seriously injured. ■ Proper Installation - SAVE THESE INSTRUCTIONS 4 children climbing on the cooktop - Be sure the cooktop is properly installed and grounded by a qualified technician. ■ This cooktop is equipped with the National Electrical Code...
... against shock hazard and should be plugged directly into a properly grounded receptacle. The cooktop, when installed, must be seriously injured. ■ Proper Installation - SAVE THESE INSTRUCTIONS 4 children climbing on the cooktop - Be sure the cooktop is properly installed and grounded by a qualified technician. ■ This cooktop is equipped with the National Electrical Code...
Use and Care
Page 7
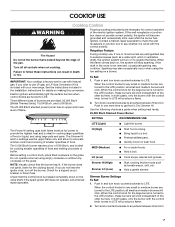
... your new range. Three different sizes of burners are turned to the LITE position, all small and medium burners will produce a flame. 2. Push in the Installation Instructions for use LP gas, an LP Gas Conversion Kit is factory-set for details on making this conversion. The 5,000 Btu/h burner reaches a low...
... your new range. Three different sizes of burners are turned to the LITE position, all small and medium burners will produce a flame. 2. Push in the Installation Instructions for use LP gas, an LP Gas Conversion Kit is factory-set for details on making this conversion. The 5,000 Btu/h burner reaches a low...
Use and Care
Page 12
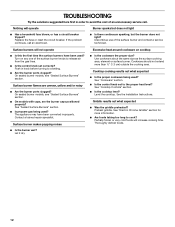
...specialist. Cookware should not extend more information. ■ Are foods taking too long to a setting. ■ Are the burner ports clogged? See the Installation Instructions. Griddle results not what expected ■ Is the proper cookware being used ? Surface burners will not operate ■ Is this the first time the... ■ Is the cookware the proper size? Let it dry. Excessive heat around cookware on any one of the surface burner knobs to release air from the gas lines. ■ Is the control knob set to the proper heat level? See "Cookware" section. ■ Is the control...
...specialist. Cookware should not extend more information. ■ Are foods taking too long to a setting. ■ Are the burner ports clogged? See the Installation Instructions. Griddle results not what expected ■ Is the proper cookware being used ? Surface burners will not operate ■ Is this the first time the... ■ Is the cookware the proper size? Let it dry. Excessive heat around cookware on any one of the surface burner knobs to release air from the gas lines. ■ Is the control knob set to the proper heat level? See "Cookware" section. ■ Is the control...
Use and Care
Page 14
...used in a manner that have been removed, altered or cannot be provided by Jenn-Air. 5. Repairs to parts or systems resulting from your home of your major appliance, to correct the installation of your major appliance for factory specified parts and repair labor to be borne... to the finish of your major appliance, unless such damage results from defects in materials or workmanship and is not installed in accordance with the product, Jenn-Air brand of original purchase date is not available. 10. Damage resulting from warranty coverage. 3. Consumable parts are excluded ...
...used in a manner that have been removed, altered or cannot be provided by Jenn-Air. 5. Repairs to parts or systems resulting from your home of your major appliance, to correct the installation of your major appliance for factory specified parts and repair labor to be borne... to the finish of your major appliance, unless such damage results from defects in materials or workmanship and is not installed in accordance with the product, Jenn-Air brand of original purchase date is not available. 10. Damage resulting from warranty coverage. 3. Consumable parts are excluded ...

Use and Care
Page 15
You can find this book and your sales slip together for in-warranty service. Dealer name Address Phone number Model number Serial number Purchase date 15 You must provide proof of purchase or installation date for future reference. Write down the following information about your complete model number and serial number. Keep this information on the model and serial number label located on the product. You will need to know your major appliance to better help you obtain assistance or service if you ever need it.
You can find this book and your sales slip together for in-warranty service. Dealer name Address Phone number Model number Serial number Purchase date 15 You must provide proof of purchase or installation date for future reference. Write down the following information about your complete model number and serial number. Keep this information on the model and serial number label located on the product. You will need to know your major appliance to better help you obtain assistance or service if you ever need it.
Warranty
Page 1
... been altered or removed from the date of purchase. 6. Major appliances with the product, Jenn-Air brand of consumables or cleaning products not approved by this appliance is not installed in a remote area where service by the customer. If outside the 50 United States and...have been removed, altered or cannot be easily determined. Costs associated with the product, Jenn-Air will pay for factory specified parts for the following components (if applicable to correct the installation of your major appliance if it was purchased. DISCLAIMER OF IMPLIED WARRANTIES; THIS WARRANTY...
... been altered or removed from the date of purchase. 6. Major appliances with the product, Jenn-Air brand of consumables or cleaning products not approved by this appliance is not installed in a remote area where service by the customer. If outside the 50 United States and...have been removed, altered or cannot be easily determined. Costs associated with the product, Jenn-Air will pay for factory specified parts for the following components (if applicable to correct the installation of your major appliance if it was purchased. DISCLAIMER OF IMPLIED WARRANTIES; THIS WARRANTY...