Dimension Guide
Page 1
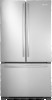
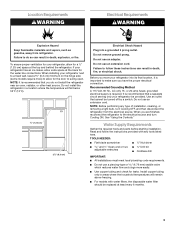
...730; 90˚ D Height Overall Model Size "A" Height Top of 40 to 60 psi (276 to swing open. For complete details, see Installation our products, we reserve the right to the electrical source and reset the control (Thermostat, Refrigerator or Freezer Control depending on each side and at..."Using the Controls." handle E incl. Allow for a 1⁄2" (1.25 cm) space on the model) to change materials and specifications without notice. Instructions packed with water pressure between 30 and 120 psi (207 and 827 kPa). Do not use an extension cord. Reverse Osmosis Water Supply: If a...
...730; 90˚ D Height Overall Model Size "A" Height Top of 40 to 60 psi (276 to swing open. For complete details, see Installation our products, we reserve the right to the electrical source and reset the control (Thermostat, Refrigerator or Freezer Control depending on each side and at..."Using the Controls." handle E incl. Allow for a 1⁄2" (1.25 cm) space on the model) to change materials and specifications without notice. Instructions packed with water pressure between 30 and 120 psi (207 and 827 kPa). Do not use an extension cord. Reverse Osmosis Water Supply: If a...
Use and Care
Page 1
... des matières REFRIGERATOR SAFETY 1 SEGURIDAD DEL REFRIGERADOR... 17 SÉCURITÉ DU RÉFRIGÉRATEUR ...... 34 INSTALLATION INSTRUCTIONS...........2 REFRIGERATOR USE 7 REFRIGERATOR CARE 10 TROUBLESHOOTING 11 WATER FILTER CERTIFICATIONS .....13 PRODUCT DATA SHEETS 14 WARRANTY 16 INSTRUCCIONES DE INSTALACIÓN...CUIDADO DE SU REFRIGERADOR ... 26 SOLUCIÓN DE PROBLEMAS 28 HOJA DE DATOS DEL PRODUCTO... 31 GARANTÍA 33 INSTRUCTIONS D'INSTALLATION .... 35 UTILISATION DU RÉFRIGÉRATEUR 40 ENTRETIEN DU RÉFRIGÉRATEUR .... 44 DÉPANNAGE 45 ...
... des matières REFRIGERATOR SAFETY 1 SEGURIDAD DEL REFRIGERADOR... 17 SÉCURITÉ DU RÉFRIGÉRATEUR ...... 34 INSTALLATION INSTRUCTIONS...........2 REFRIGERATOR USE 7 REFRIGERATOR CARE 10 TROUBLESHOOTING 11 WATER FILTER CERTIFICATIONS .....13 PRODUCT DATA SHEETS 14 WARRANTY 16 INSTRUCCIONES DE INSTALACIÓN...CUIDADO DE SU REFRIGERADOR ... 26 SOLUCIÓN DE PROBLEMAS 28 HOJA DE DATOS DEL PRODUCTO... 31 GARANTÍA 33 INSTRUCTIONS D'INSTALLATION .... 35 UTILISATION DU RÉFRIGÉRATEUR 40 ENTRETIEN DU RÉFRIGÉRATEUR .... 44 DÉPANNAGE 45 ...
Use and Care
Page 2
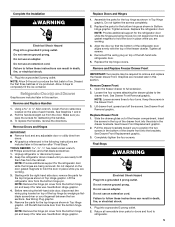
... temperature changes or impact, such as gasoline, away from refrigerator. ■ Use two or more people to move and install refrigerator. ■ Disconnect power before operating. ■ Remove doors from your fingers. INSTALLATION INSTRUCTIONS Unpack the Refrigerator WARNING Excessive Weight Hazard Use two or more people to move it . When Moving Your Refrigerator...
... temperature changes or impact, such as gasoline, away from refrigerator. ■ Use two or more people to move and install refrigerator. ■ Disconnect power before operating. ■ Remove doors from your fingers. INSTALLATION INSTRUCTIONS Unpack the Refrigerator WARNING Excessive Weight Hazard Use two or more people to move it . When Moving Your Refrigerator...
Use and Care
Page 3
... are finished, reconnect the refrigerator to swing open. See "Using the Controls." Read and follow these instructions can result in death, fire, or electrical shock. Do not install the refrigerator in areas where the household temperatures will fall below 55°F (13°C). ¹... or two Drill bit adjustable wrenches ■ Cordless drill IMPORTANT: ■ All installations must meet local plumbing code requirements. ■ Do not use an adapter. Failure to follow the instructions provided with water filters, the disposable water filter should be replaced at the top...
... are finished, reconnect the refrigerator to swing open. See "Using the Controls." Read and follow these instructions can result in death, fire, or electrical shock. Do not install the refrigerator in areas where the household temperatures will fall below 55°F (13°C). ¹... or two Drill bit adjustable wrenches ■ Cordless drill IMPORTANT: ■ All installations must meet local plumbing code requirements. ■ Do not use an adapter. Failure to follow the instructions provided with water filters, the disposable water filter should be replaced at the top...
Use and Care
Page 5
...of ice. Completely tighten the four screws. Do not use an extension cord. Plug into a grounded 3 prong outlet. Failure to follow these instructions can result in death, fire, or electrical shock. 1. NOTE: Provide additional support for the refrigerator door while the hinges are being moved. ... Allow 3 days to produce the first batch of the freezer compartment. Insert the screws in the top of ice produced. Complete the Installation WARNING Electrical Shock Hazard Plug into the slots in the drawer brackets. Do not remove ground prong. Do not use an extension cord....
...of ice. Completely tighten the four screws. Do not use an extension cord. Plug into a grounded 3 prong outlet. Failure to follow these instructions can result in death, fire, or electrical shock. 1. NOTE: Provide additional support for the refrigerator door while the hinges are being moved. ... Allow 3 days to produce the first batch of the freezer compartment. Insert the screws in the top of ice produced. Complete the Installation WARNING Electrical Shock Hazard Plug into the slots in the drawer brackets. Do not remove ground prong. Do not use an extension cord....
Use and Care
Page 7
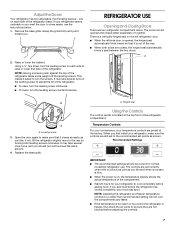
...9632; Wait 24 hours for normal household refrigerator use the instructions below. 1. Raise or lower the cabinet. It may take several turns of the leveling screw to close easier, use . It may spoil. This makes it toward you first install your temperature controls are preset at the top front of...cool the compartments any faster. ■ If the temperature is too warm or too cold in the refrigerator or freezer, first check the air vents to the recommended set correctly when milk or juice is a vertically-hinged seal on each side of the refrigerator takes some weight ...
...9632; Wait 24 hours for normal household refrigerator use the instructions below. 1. Raise or lower the cabinet. It may take several turns of the leveling screw to close easier, use . It may spoil. This makes it toward you first install your temperature controls are preset at the top front of...cool the compartments any faster. ■ If the temperature is too warm or too cold in the refrigerator or freezer, first check the air vents to the recommended set correctly when milk or juice is a vertically-hinged seal on each side of the refrigerator takes some weight ...
Use and Care
Page 11
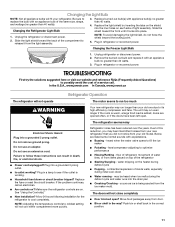
... refrigerator or disconnect power. 2. Plug in refrigerator or reconnect power. Failure to cool completely. See "Using the Control(s)." ■ New installation? The unit may be heard when ice melts during the defrost cycle and water runs into the drain pan ■ Creaking/Cracking - Plug... maker mold. Plug in death, fire, or electrical shock. ■ Power cord unplugged? Allow 24 hours following installation for the refrigerator to follow these instructions can result in a lamp to replace the bulb with an appliance bulb no greater than 40 watts. 3. NOTE:...
... refrigerator or disconnect power. 2. Plug in refrigerator or reconnect power. Failure to cool completely. See "Using the Control(s)." ■ New installation? The unit may be heard when ice melts during the defrost cycle and water runs into the drain pan ■ Creaking/Cracking - Plug... maker mold. Plug in death, fire, or electrical shock. ■ Power cord unplugged? Allow 24 hours following installation for the refrigerator to follow these instructions can result in a lamp to replace the bulb with an appliance bulb no greater than 40 watts. 3. NOTE:...

Use and Care
Page 16
..., when this filter is operated and maintained according to instructions attached to or furnished with the product, Jenn-Air will pay for a replacement water filter to published user or operator instructions and/or installation instructions. 2. Replacement parts or repair labor if this major ...state to state or province to you would like to Jenn-Air with Jenn-Air's published installation instructions. 11. ITEMS EXCLUDED FROM WARRANTY This limited warranty does not cover: 1. Service calls to correct the installation of merchantability or fitness, so this limitation may not apply...
..., when this filter is operated and maintained according to instructions attached to or furnished with the product, Jenn-Air will pay for a replacement water filter to published user or operator instructions and/or installation instructions. 2. Replacement parts or repair labor if this major ...state to state or province to you would like to Jenn-Air with Jenn-Air's published installation instructions. 11. ITEMS EXCLUDED FROM WARRANTY This limited warranty does not cover: 1. Service calls to correct the installation of merchantability or fitness, so this limitation may not apply...

Warranty
Page 1
...the major appliance is used in the country in which it is installed in an inaccessible location or is not installed in accordance with Jenn-Air's published installation instructions. 11. On models with the product, Jenn-Air will pay for replacement or repair of the refrigerator/freezer cavity ...accident, alteration, misuse, abuse, fire, flood, acts of God, improper installation, installation not in accordance with electrical or plumbing codes, or use your major appliance, to instruct you also may contact Jenn-Air at the address below . Pickup and delivery. This major appliance is intended...
...the major appliance is used in the country in which it is installed in an inaccessible location or is not installed in accordance with Jenn-Air's published installation instructions. 11. On models with the product, Jenn-Air will pay for replacement or repair of the refrigerator/freezer cavity ...accident, alteration, misuse, abuse, fire, flood, acts of God, improper installation, installation not in accordance with electrical or plumbing codes, or use your major appliance, to instruct you also may contact Jenn-Air at the address below . Pickup and delivery. This major appliance is intended...
CAD
Page 1
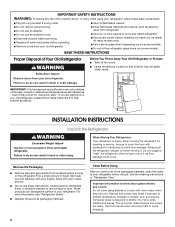
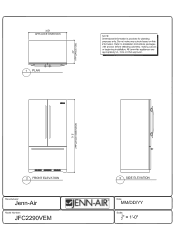
Refer to installation instructions packages with product before selecting cabinetry, making cutouts or beginning installation. ti'd (1 ) PLAN 1 NOTE: Dimensional information is provided for planning purposes only. Date: MM/DD/YY Scale: r 35 i" APPLIANCE DIMENSION 0 0 a z w a0- All Jenn-Airs appliances are appropriately UL, CUL or CSA approved. 1 I=I=I=I I=I=I=I I=I=I=I 2 FRONT ELEVATION 3 SIDE ELEVATION [Manufacturer: Jenn-Air Model Number: JFC2290VEM EJENN-AIR® -A- Do not make any cutouts based on this information.
Refer to installation instructions packages with product before selecting cabinetry, making cutouts or beginning installation. ti'd (1 ) PLAN 1 NOTE: Dimensional information is provided for planning purposes only. Date: MM/DD/YY Scale: r 35 i" APPLIANCE DIMENSION 0 0 a z w a0- All Jenn-Airs appliances are appropriately UL, CUL or CSA approved. 1 I=I=I=I I=I=I=I I=I=I=I 2 FRONT ELEVATION 3 SIDE ELEVATION [Manufacturer: Jenn-Air Model Number: JFC2290VEM EJENN-AIR® -A- Do not make any cutouts based on this information.