Dimension Guide
Page 1
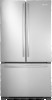
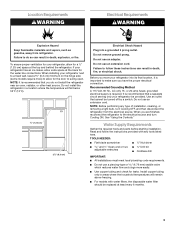
...will fall below 55°F (13°C). 2¹⁄₂" (6.3 cm) Because Whirlpool Corporation policy includes a continuous commitment to improve Dimensions are installing your refrigerator, allow for the water line connections. See "Using the Controls." H G cabinet F not incl. handle B top of cabinet A ...from the electrical source. NOTE: It is required to change materials and specifications without notice. For complete details, see Installation our products, we reserve the right to the electrical source and reset the control (Thermostat, Refrigerator or Freezer Control ...
...will fall below 55°F (13°C). 2¹⁄₂" (6.3 cm) Because Whirlpool Corporation policy includes a continuous commitment to improve Dimensions are installing your refrigerator, allow for the water line connections. See "Using the Controls." H G cabinet F not incl. handle B top of cabinet A ...from the electrical source. NOTE: It is required to change materials and specifications without notice. For complete details, see Installation our products, we reserve the right to the electrical source and reset the control (Thermostat, Refrigerator or Freezer Control ...
Use and Care
Page 1
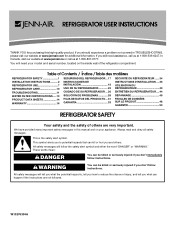
... des matières REFRIGERATOR SAFETY 1 SEGURIDAD DEL REFRIGERADOR... 17 SÉCURITÉ DU RÉFRIGÉRATEUR ...... 34 INSTALLATION INSTRUCTIONS...........2 REFRIGERATOR USE 7 REFRIGERATOR CARE 10 TROUBLESHOOTING 11 WATER FILTER CERTIFICATIONS .....13 PRODUCT DATA SHEETS 14 WARRANTY 16 INSTRUCCIONES DE INSTALACIÓ...DE SU REFRIGERADOR ... 26 SOLUCIÓN DE PROBLEMAS 28 HOJA DE DATOS DEL PRODUCTO... 31 GARANTÍA 33 INSTRUCTIONS D'INSTALLATION .... 35 UTILISATION DU RÉFRIGÉRATEUR 40 ENTRETIEN DU RÉFRIGÉRATEUR .... 44 DÉPANNAGE 45 FEUILLES...
... des matières REFRIGERATOR SAFETY 1 SEGURIDAD DEL REFRIGERADOR... 17 SÉCURITÉ DU RÉFRIGÉRATEUR ...... 34 INSTALLATION INSTRUCTIONS...........2 REFRIGERATOR USE 7 REFRIGERATOR CARE 10 TROUBLESHOOTING 11 WATER FILTER CERTIFICATIONS .....13 PRODUCT DATA SHEETS 14 WARRANTY 16 INSTRUCCIONES DE INSTALACIÓ...DE SU REFRIGERADOR ... 26 SOLUCIÓN DE PROBLEMAS 28 HOJA DE DATOS DEL PRODUCTO... 31 GARANTÍA 33 INSTRUCTIONS D'INSTALLATION .... 35 UTILISATION DU RÉFRIGÉRATEUR 40 ENTRETIEN DU RÉFRIGÉRATEUR .... 44 DÉPANNAGE 45 FEUILLES...
Use and Care
Page 2
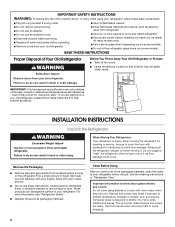
... basic precautions: ■ Plug into many small, pebble-size pieces. Remove the Packaging ■ Remove tape and glue residue from surfaces before installing ice maker (on ice maker kit ready models only). ■ Use a sturdy glass when dispensing ice (on some models). ■ Do... heavy. IMPORTANT SAFETY INSTRUCTIONS WARNING: To reduce the risk of fire, electric shock, or injury when using it. Failure to move and install refrigerator. Rub a small amount of Your Old Refrigerator WARNING Suffocation Hazard Remove doors from your old refrigerator. ■ Keep flammable materials and...
... basic precautions: ■ Plug into many small, pebble-size pieces. Remove the Packaging ■ Remove tape and glue residue from surfaces before installing ice maker (on ice maker kit ready models only). ■ Use a sturdy glass when dispensing ice (on some models). ■ Do... heavy. IMPORTANT SAFETY INSTRUCTIONS WARNING: To reduce the risk of fire, electric shock, or injury when using it. Failure to move and install refrigerator. Rub a small amount of Your Old Refrigerator WARNING Suffocation Hazard Remove doors from your old refrigerator. ■ Keep flammable materials and...
Use and Care
Page 3
... screwdriver Nut driver and ¹⁄₂" Open-end or two Drill bit adjustable wrenches ■ Cordless drill IMPORTANT: ■ All installations must meet local plumbing code requirements. ■ Do not use an extension cord. NOTE: It is required. Do not use a piercing...type or 4.76 mm) saddle valve which reduces water flow and clogs more ) to swing open. Do not use an adapter. Install copper tubing only in death, explosion, or fire. Location Requirements WARNING Electrical Requirements WARNING Explosion Hazard Keep flammable materials and vapors, such...
... screwdriver Nut driver and ¹⁄₂" Open-end or two Drill bit adjustable wrenches ■ Cordless drill IMPORTANT: ■ All installations must meet local plumbing code requirements. ■ Do not use an extension cord. NOTE: It is required. Do not use a piercing...type or 4.76 mm) saddle valve which reduces water flow and clogs more ) to swing open. Do not use an adapter. Install copper tubing only in death, explosion, or fire. Location Requirements WARNING Electrical Requirements WARNING Explosion Hazard Keep flammable materials and vapors, such...
Use and Care
Page 5
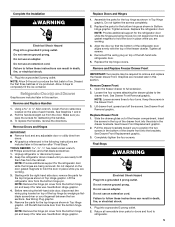
... and any adjustable door or utility bins from the bottom hinge pin. Do not tighten the screws completely. 2. Do not remove ground prong. Complete the Installation WARNING Electrical Shock Hazard Plug into the brackets. Remove and Replace Handles 1. See Bottom Hinge graphic. 4.
... and any adjustable door or utility bins from the bottom hinge pin. Do not tighten the screws completely. 2. Do not remove ground prong. Complete the Installation WARNING Electrical Shock Hazard Plug into the brackets. Remove and Replace Handles 1. See Bottom Hinge graphic. 4.
Use and Care
Page 7
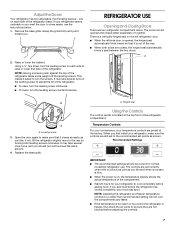
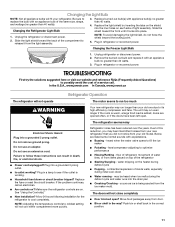
... turn the leveling screw counterclockwise. Replace the base grille. Recommended Settings IMPORTANT: ■ The recommended settings should turn both leveling screws clockwise. If you first install your refrigerator seems unsteady or you should be correct for your food may spoil. Grasp the grille firmly and pull it easier to close easier... closes as easily as shown. Using the Controls The control center is too warm or too cold in the refrigerator or freezer, first check the air vents to make sure the controls are closed either separately or together.
... turn the leveling screw counterclockwise. Replace the base grille. Recommended Settings IMPORTANT: ■ The recommended settings should turn both leveling screws clockwise. If you first install your refrigerator seems unsteady or you should be correct for your food may spoil. Grasp the grille firmly and pull it easier to close easier... closes as easily as shown. Using the Controls The control center is too warm or too cold in the refrigerator or freezer, first check the air vents to make sure the controls are closed either separately or together.
Use and Care
Page 10
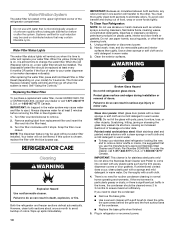
... grille, the open areas behind the grille and the front surface area of odors. Wipe up spills immediately. 10 IMPORTANT: Because air circulates between both sections to eject. You must thoroughly clean both sections, any plastic parts such as window sprays, scouring cleansers, ...refrigerator and freezer sections defrost automatically. Remove sealing label from replacement filter and insert the filter end into contact with water that may be installed. Dry thoroughly with pots, pans, furniture, toys, or other objects. Plug in warm water. 3. Glass door panels: Wash glass...
... grille, the open areas behind the grille and the front surface area of odors. Wipe up spills immediately. 10 IMPORTANT: Because air circulates between both sections to eject. You must thoroughly clean both sections, any plastic parts such as window sprays, scouring cleansers, ...refrigerator and freezer sections defrost automatically. Remove sealing label from replacement filter and insert the filter end into contact with water that may be installed. Dry thoroughly with pots, pans, furniture, toys, or other objects. Plug in warm water. 3. Glass door panels: Wash glass...
Use and Care
Page 11
...The refrigerator will fit your old model. Do not remove ground prong. Plug into place. 1. See "Using the Control(s)." ■ New installation? Due to its high-efficiency compressor and fans. water dripping on the shield into the drain pan ■ Creaking/Cracking - occurs as ice...with an appliance bulb of inside walls, especially during defrost cycle ■ Popping - If the problem continues, call . Allow 24 hours following installation for the refrigerator to see if the outlet is working ? contraction/expansion of the same size, shape, and wattage (no greater than 40 ...
...The refrigerator will fit your old model. Do not remove ground prong. Plug into place. 1. See "Using the Control(s)." ■ New installation? Due to its high-efficiency compressor and fans. water dripping on the shield into the drain pan ■ Creaking/Cracking - occurs as ice...with an appliance bulb of inside walls, especially during defrost cycle ■ Popping - If the problem continues, call . Allow 24 hours following installation for the refrigerator to see if the outlet is working ? contraction/expansion of the same size, shape, and wattage (no greater than 40 ...
Use and Care
Page 12
...moisture buildup. ■ Door(s) opened often or left open? Allows humid air to produce more ice. ■ Ice cube jammed in the ice maker ejector arm? Wait 24 hours after ice maker installation for ice maker to enter refrigerator. New plumbing connections can decrease water pressure... to return to a water supply and the supply shutoff valve turned on the refrigerator? Straighten the water source line. ■ New installation? Allows warm air to do so can reduce water flow. Firmly close completely," earlier in death, explosion, or fire. ■ Gaskets dirty or sticky...
...moisture buildup. ■ Door(s) opened often or left open? Allows humid air to produce more ice. ■ Ice cube jammed in the ice maker ejector arm? Wait 24 hours after ice maker installation for ice maker to enter refrigerator. New plumbing connections can decrease water pressure... to return to a water supply and the supply shutoff valve turned on the refrigerator? Straighten the water source line. ■ New installation? Allows warm air to do so can reduce water flow. Firmly close completely," earlier in death, explosion, or fire. ■ Gaskets dirty or sticky...
Use and Care
Page 13
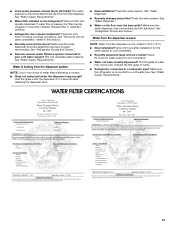
...One or two drops of water? Remove filter and operate dispenser. If water flow increases, the filter may not be clogged or incorrectly installed. Water is normal. ■ Glass not being held under the dispenser 2 to your cold water supply? Flush the water system...."Refrigerator Door(s) and Drawer." ■ Reverse osmosis water filtration system connected to 3 seconds after releasing the dispenser lever. ■ New installation? Discard the first glass of water may be cool. Allow 24 hours for the water supply to cool completely. ■ Recently dispensed large...
...One or two drops of water? Remove filter and operate dispenser. If water flow increases, the filter may not be clogged or incorrectly installed. Water is normal. ■ Glass not being held under the dispenser 2 to your cold water supply? Flush the water system...."Refrigerator Door(s) and Drawer." ■ Reverse osmosis water filtration system connected to 3 seconds after releasing the dispenser lever. ■ New installation? Discard the first glass of water may be cool. Allow 24 hours for the water supply to cool completely. ■ Recently dispensed large...

Use and Care
Page 16
... from the date of purchase, when this major appliance is operated and maintained according to instructions attached to or furnished with Jenn-Air's published installation instructions. 11. Cosmetic damage, including scratches, dents, chips or other rights that vary from state to state or province to...accident, alteration, misuse, abuse, fire, flood, acts of God, improper installation, installation not in accordance with electrical or plumbing codes, or use or when it is used in accordance with the product, Jenn-Air will pay for other rights that is located in your home. 8. On ...
... from the date of purchase, when this major appliance is operated and maintained according to instructions attached to or furnished with Jenn-Air's published installation instructions. 11. Cosmetic damage, including scratches, dents, chips or other rights that vary from state to state or province to...accident, alteration, misuse, abuse, fire, flood, acts of God, improper installation, installation not in accordance with electrical or plumbing codes, or use or when it is used in accordance with the product, Jenn-Air will pay for other rights that is located in your home. 8. On ...

Warranty
Page 1
... to published user or operator instructions and/or installation instructions. 2. Cosmetic damage, including scratches, dents, chips or other than normal, single-family household use of products not approved by a Jenn-Air designated service company. Expenses for travel and transportation...phone number in a remote area where service by an authorized Jenn-Air servicer is reported to Jenn-Air within 30 days from the date of purchase. 6. LIMITATION OF REMEDIES; On models with Jenn-Air's published installation instructions. 11. Service calls to refrigerator or freezer product ...
... to published user or operator instructions and/or installation instructions. 2. Cosmetic damage, including scratches, dents, chips or other than normal, single-family household use of products not approved by a Jenn-Air designated service company. Expenses for travel and transportation...phone number in a remote area where service by an authorized Jenn-Air servicer is reported to Jenn-Air within 30 days from the date of purchase. 6. LIMITATION OF REMEDIES; On models with Jenn-Air's published installation instructions. 11. Service calls to refrigerator or freezer product ...
CAD
Page 1
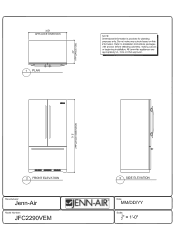
Do not make any cutouts based on this information. All Jenn-Airs appliances are appropriately UL, CUL or CSA approved. 1 I=I=I=I I=I=I=I I=I=I=I 2 FRONT ELEVATION 3 SIDE ELEVATION [Manufacturer: Jenn-Air Model Number: JFC2290VEM EJENN-AIR® -A- r 35 i" APPLIANCE DIMENSION 0 0 a z w a0- ti'd (1 ) PLAN 1 NOTE: Dimensional information is provided for planning purposes only. Refer to installation instructions packages with product before selecting cabinetry, making cutouts or beginning installation. Date: MM/DD/YY Scale:
Do not make any cutouts based on this information. All Jenn-Airs appliances are appropriately UL, CUL or CSA approved. 1 I=I=I=I I=I=I=I I=I=I=I 2 FRONT ELEVATION 3 SIDE ELEVATION [Manufacturer: Jenn-Air Model Number: JFC2290VEM EJENN-AIR® -A- r 35 i" APPLIANCE DIMENSION 0 0 a z w a0- ti'd (1 ) PLAN 1 NOTE: Dimensional information is provided for planning purposes only. Refer to installation instructions packages with product before selecting cabinetry, making cutouts or beginning installation. Date: MM/DD/YY Scale: