Instructions
Page 8
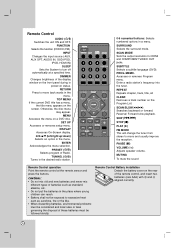
.... REPEAT Repeats chapter, track, title, all CLEAR Removes a track number on status. FUNCTION Selects the function (DVD/CD, FM) INPUT Changes the input source ( AUX, AUX OPT, AUDIO IN, OSD IPOD, IPOD, HDMI IN) SLEEP Sets the System to move back wards in the menu. SET UP Accesses or removes setup menu. PROG./MEMO...
.... REPEAT Repeats chapter, track, title, all CLEAR Removes a track number on status. FUNCTION Selects the function (DVD/CD, FM) INPUT Changes the input source ( AUX, AUX OPT, AUDIO IN, OSD IPOD, IPOD, HDMI IN) SLEEP Sets the System to move back wards in the menu. SET UP Accesses or removes setup menu. PROG./MEMO...
Instructions
Page 9
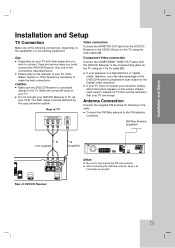
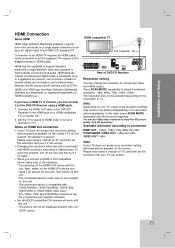
... existing equipment. Caution: Make sure the DVD/CD Receiver is a high-definition or "digital ready" television, you could be distorted by the copy protection system. Rear of the connections described below. Tips: Depending on your TV, VCR, Stereo System or other equipment you wish to connect...you may take advantage of TV COMPONENT VIDEO / PROGRESSIVE SCAN INPUT Y VIDEO INPUT Video connection Connect the MONITOR OUT jack from the DVD/CD Receiver to TV via your TV can accept. Select the correct AV input on your resolution setting, abnormal picture appears on the TV...
... existing equipment. Caution: Make sure the DVD/CD Receiver is a high-definition or "digital ready" television, you could be distorted by the copy protection system. Rear of the connections described below. Tips: Depending on your TV, VCR, Stereo System or other equipment you wish to connect...you may take advantage of TV COMPONENT VIDEO / PROGRESSIVE SCAN INPUT Y VIDEO INPUT Video connection Connect the MONITOR OUT jack from the DVD/CD Receiver to TV via your TV can accept. Select the correct AV input on your resolution setting, abnormal picture appears on the TV...
Instructions
Page 10
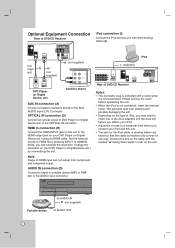
... and composite output. Set the external source to HDMI IN by connectiong the unit. Please remove the cover before you connect your DVD Player (or Digital Device etc.) by pressing INPUT. In HDMI IN mode, you station your iPod. • Adjust the volume to a moderate level before operationg the unit.... entering and possibly damaging the unit. • Depending on your DVD Player (or Digital Device etc.) using an HDMI cable. Portable device To AUDIO IN D (not supplied) To AUDIO OUT 7 HDMI In connection (H) Connect the HDMI INPUT jack on the unit to the HDMI output jack on the type...
... and composite output. Set the external source to HDMI IN by connectiong the unit. Please remove the cover before you connect your DVD Player (or Digital Device etc.) by pressing INPUT. In HDMI IN mode, you station your iPod. • Adjust the volume to a moderate level before operationg the unit.... entering and possibly damaging the unit. • Depending on your DVD Player (or Digital Device etc.) using an HDMI cable. Portable device To AUDIO IN D (not supplied) To AUDIO OUT 7 HDMI In connection (H) Connect the HDMI INPUT jack on the unit to the HDMI output jack on the type...
Instructions
Page 11
... (not supplied) H Rear of the resolution settings may not be displayed properly with 720X576i(480i), 720X576p(480p), 1280X720p, 1920X1080i or 1920X1080p video input. - Note: Depending on your TV can change the resolution for component video and HDMI output. Please read owner's manual for TV, and... then set the resolution that your TV, some of DVD/CD Receiver Resolution setting You can accept. 8 digital output to the HDMI jack on a HDMI compatible TV or monitor (H). 2. In this unit. - Notes on HDMI Out...
... (not supplied) H Rear of the resolution settings may not be displayed properly with 720X576i(480i), 720X576p(480p), 1280X720p, 1920X1080i or 1920X1080p video input. - Note: Depending on your TV can change the resolution for component video and HDMI output. Please read owner's manual for TV, and... then set the resolution that your TV, some of DVD/CD Receiver Resolution setting You can accept. 8 digital output to the HDMI jack on a HDMI compatible TV or monitor (H). 2. In this unit. - Notes on HDMI Out...

Instructions
Page 12
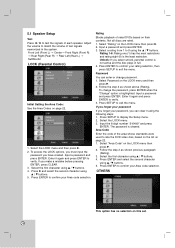
... wall due to avoid excessive output on a wall. Injury to personnel or damage to devices may result if the installed speakers interfere with low maximum input rating, adjust the volume carefully to incorrect installation or weakness in wall structure. • Care must be distorted and will lack base. • If you...terminal on the components: + to -. Front speaker (Right) Center speaker Rear speaker (Right surround) Subwoofer Front speaker (Left) Rear speaker (Left surround) 9 to + and - Speaker System Connection Connect the speakers using the supplied speaker cables.
... wall due to avoid excessive output on a wall. Injury to personnel or damage to devices may result if the installed speakers interfere with low maximum input rating, adjust the volume carefully to incorrect installation or weakness in wall structure. • Care must be distorted and will lack base. • If you...terminal on the components: + to -. Front speaker (Right) Center speaker Rear speaker (Right surround) Subwoofer Front speaker (Left) Rear speaker (Left surround) 9 to + and - Speaker System Connection Connect the speakers using the supplied speaker cables.
Instructions
Page 16
...one (1) has the most restrictions and rating eight (8) is not active and the disc plays in the system. Select the LOCK menu. 3. Press ENTER and select the second character using v / V buttons. 4....on page 22. 1. Press SETUP to confirm your password, you select unlock, parental control is the least restrictive. Input the 6-digit number "210499" and press ENTER. Select a rating from 1 to 8 using v / V buttons. 4. Select... 3. 5.1 Speaker Setup Test Press b / B to test the signals of rated DVDs based on their contents. Enter it again and press ENTER to exit the menu....
...one (1) has the most restrictions and rating eight (8) is not active and the disc plays in the system. Select the LOCK menu. 3. Press ENTER and select the second character using v / V buttons. 4....on page 22. 1. Press SETUP to confirm your password, you select unlock, parental control is the least restrictive. Input the 6-digit number "210499" and press ENTER. Select a rating from 1 to 8 using v / V buttons. 4. Select... 3. 5.1 Speaker Setup Test Press b / B to test the signals of rated DVDs based on their contents. Enter it again and press ENTER to exit the menu....

Instructions
Page 18
...Note: This receiver does not memorize the scene of files you entered. Input the required start playing at 1.5 times speed. Last Scene Memory DVD This receiver memorizes the last scene from the selected time. 1.5 times speed playback DVD You can select which menu of a disc if you load a disc ...you would like to play at any button and then operate the unit. "BX1.5" appears on the disc: 1. Press v / V to right. Then input the correct numbers. 4. Mixed disc - During playback, press PLAY(B) to play by pressing MENU. 15 To cancel the Screen Saver, press any chosen time...
...Note: This receiver does not memorize the scene of files you entered. Input the required start playing at 1.5 times speed. Last Scene Memory DVD This receiver memorizes the last scene from the selected time. 1.5 times speed playback DVD You can select which menu of a disc if you load a disc ...you would like to play at any button and then operate the unit. "BX1.5" appears on the disc: 1. Press v / V to right. Then input the correct numbers. 4. Mixed disc - During playback, press PLAY(B) to play by pressing MENU. 15 To cancel the Screen Saver, press any chosen time...
Instructions
Page 22
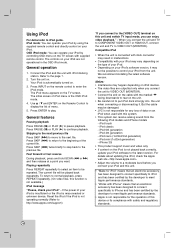
.... iPod mode: You can enjoy video playback." - Press INPUT on your iPod. • Depending on the Remote Control to display the list of this unit...of data on . 3. The iPod menu appears on this device or its compliance with this system. • This system can operate your iPod is insufficient or the iPod is not responsible for the operation of ... in the OSD iPod mode. When you want. Notes: • Interference may not be damaged. • JVC is misconnected or unknown device. iPod classic - iPod nano (1st/2nd/3nd generation) - For details about updating...
.... iPod mode: You can enjoy video playback." - Press INPUT on your iPod. • Depending on the Remote Control to display the list of this unit...of data on . 3. The iPod menu appears on this device or its compliance with this system. • This system can operate your iPod is insufficient or the iPod is not responsible for the operation of ... in the OSD iPod mode. When you want. Notes: • Interference may not be damaged. • JVC is misconnected or unknown device. iPod classic - iPod nano (1st/2nd/3nd generation) - For details about updating...
Instructions
Page 24
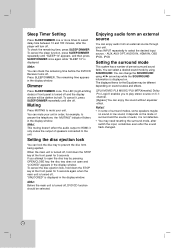
... panel for 5 seconds If you to mute your unit. AUX, AUX OPT, AUDIO IN, HDMI IN, OSD IPOD, IPOD Setting the surround mode This system has a number of speakers connected to answer the telephone, the "MUTING" indicator flickers in the display window. Notes: • In some of surround modes...DIMMER once again while "SLEEP 10" is turned off . To cancel it is turned off , DVD/CD function should be darken by using b /B arrow key while the SOURROUND information is turned off . Press INPUT repeatedly to prevent the disc form being ejected. You can mute your unit. Press SLEEP/DIMMER. ...
... panel for 5 seconds If you to mute your unit. AUX, AUX OPT, AUDIO IN, HDMI IN, OSD IPOD, IPOD Setting the surround mode This system has a number of speakers connected to answer the telephone, the "MUTING" indicator flickers in the display window. Notes: • In some of surround modes...DIMMER once again while "SLEEP 10" is turned off . To cancel it is turned off , DVD/CD function should be darken by using b /B arrow key while the SOURROUND information is turned off . Press INPUT repeatedly to prevent the disc form being ejected. You can mute your unit. Press SLEEP/DIMMER. ...
Instructions
Page 26
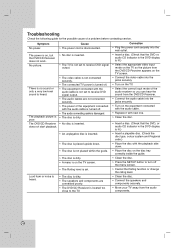
...one. • Clean the disc. • Insert a disc. (Check that the DVD or, audio CD indicator in the DVD display is lit.) • An unplayable disc is inserted. • Insert a playable disc. (Check the disc type, colour system and Regional code.) • The disc is placed upside down . • The ...dirty. does not start playback. • Insert a disc. (Check that the DVD, or audio CD indicator in the DVD display is lit.) • Select the appropriate video input mode on the TV so the picture from the DVD/CD Receiver appears on the TV screen. • Connect the video cable into ...
...one. • Clean the disc. • Insert a disc. (Check that the DVD or, audio CD indicator in the DVD display is lit.) • An unplayable disc is inserted. • Insert a playable disc. (Check the disc type, colour system and Regional code.) • The disc is placed upside down . • The ...dirty. does not start playback. • Insert a disc. (Check that the DVD, or audio CD indicator in the DVD display is lit.) • Select the appropriate video input mode on the TV so the picture from the DVD/CD Receiver appears on the TV screen. • Connect the video cable into ...

Instructions
Page 28
...CD/DVD Tuner FM Power supply Power consumption Net Weight External dimensions (W x H x D) Operating conditions Operating humidity Laser Video system Frequency response (audio) Signal-to-noise ratio (audio) Dynamic range (audio) Harmonic distortion (audio) Video output COMPONENT VIDEO OUT HDMI OUT Tuning Range Intermediate Frequency Signal-to change without notice. 25 Input ...Noise Ratio Frequency Response Stereo mode Surround mode (* Depending on the sound mode settings and the source, there may be no sound output.) Inputs Outputs Type Impedance Frequency Response Sound Pressure Level Rated...
...CD/DVD Tuner FM Power supply Power consumption Net Weight External dimensions (W x H x D) Operating conditions Operating humidity Laser Video system Frequency response (audio) Signal-to-noise ratio (audio) Dynamic range (audio) Harmonic distortion (audio) Video output COMPONENT VIDEO OUT HDMI OUT Tuning Range Intermediate Frequency Signal-to change without notice. 25 Input ...Noise Ratio Frequency Response Stereo mode Surround mode (* Depending on the sound mode settings and the source, there may be no sound output.) Inputs Outputs Type Impedance Frequency Response Sound Pressure Level Rated...