Instructions
Page 1
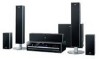
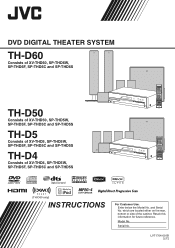
DVD DIGITAL THEATER SYSTEM TH-D60 Consists of XV-THD60, SP-THD6W, SP-THD6F, SP-THD6C and SP-THD6S TH-D50 Consists of XV-THD50, SP-THD5W, SP-THD5F, SP-THD5C and SP-THD5S TH-D5 Consists of XV-THD5, SP-THD5W, SP-THD5F, SP-THD5C and SP-THD5S TH-D4 Consists of the cabinet. and Serial No. Serial No. Model No. Retain this information for future reference. which are located either on the rear, bottom or side of XV-THD4, SP-THD5W, SP-THD5F, SP-THD5C and SP-THD5S (TH-D60 only) INSTRUCTIONS For Customer Use: Enter below the Model No. LVT1704-001B [J,C]
DVD DIGITAL THEATER SYSTEM TH-D60 Consists of XV-THD60, SP-THD6W, SP-THD6F, SP-THD6C and SP-THD6S TH-D50 Consists of XV-THD50, SP-THD5W, SP-THD5F, SP-THD5C and SP-THD5S TH-D5 Consists of XV-THD5, SP-THD5W, SP-THD5F, SP-THD5C and SP-THD5S TH-D4 Consists of the cabinet. and Serial No. Serial No. Model No. Retain this information for future reference. which are located either on the rear, bottom or side of XV-THD4, SP-THD5W, SP-THD5F, SP-THD5C and SP-THD5S (TH-D60 only) INSTRUCTIONS For Customer Use: Enter below the Model No. LVT1704-001B [J,C]
Instructions
Page 3
...or invisible class 1M laser radiation when open. leave all servicing to which can be determined by JVC could void the user's authority to part 15 of the following measures: Reorient or relocate the...;couteurs ou du casque d'écoute peut entraîner une perte auditive. TH-D60: 30.7 kg/68 lbs TH-D50/TH-D5/TH-D4: 23.7 kg/53 lbs G-2 Increase the separation between the equipment and ... circuit different from earphones or headphones can radiate radio frequency energy and, if not installed and used in a particular installation. Do not stare into an outlet on , the user is no user...
...or invisible class 1M laser radiation when open. leave all servicing to which can be determined by JVC could void the user's authority to part 15 of the following measures: Reorient or relocate the...;couteurs ou du casque d'écoute peut entraîner une perte auditive. TH-D60: 30.7 kg/68 lbs TH-D50/TH-D5/TH-D4: 23.7 kg/53 lbs G-2 Increase the separation between the equipment and ... circuit different from earphones or headphones can radiate radio frequency energy and, if not installed and used in a particular installation. Do not stare into an outlet on , the user is no user...

Instructions
Page 4
...for the function/ operation Caution for the function/operation Note for the function/operation Tip for the function/operation Icons for System operations Operations from the center unit Operations from the remote control The function can be operated from the TV screen 21...How to -understand. Table of contents Before using this manual • Illustrations and button names of the TH-D60 are mainly used for explanation. • The following icons and illustrations are used to make the explanations simple and easy-to read this System 2 Playable discs/devices/files 3 Playable disc ...
...for the function/ operation Caution for the function/operation Note for the function/operation Tip for the function/operation Icons for System operations Operations from the center unit Operations from the remote control The function can be operated from the TV screen 21...How to -understand. Table of contents Before using this manual • Illustrations and button names of the TH-D60 are mainly used for explanation. • The following icons and illustrations are used to make the explanations simple and easy-to read this System 2 Playable discs/devices/files 3 Playable disc ...
Instructions
Page 5
... amount of chemically-coated cloths. • If the System is not magnetically shielded. If this System Precautions There are no user-serviceable parts inside the System, turn off the TV's main power switch or unplug it near a heating device. Before using the speakers • Place the speakers and subwoofer on...and/ or blow out the speakers. Turn off the power and remove the plug from original sources. To clean the System • Use a soft cloth. Using the System in moist or dusty locations. • If water gets inside . DO NOT install the speakers on installing the...
... amount of chemically-coated cloths. • If the System is not magnetically shielded. If this System Precautions There are no user-serviceable parts inside the System, turn off the TV's main power switch or unplug it near a heating device. Before using the speakers • Place the speakers and subwoofer on...and/ or blow out the speakers. Turn off the power and remove the plug from original sources. To clean the System • Use a soft cloth. Using the System in moist or dusty locations. • If water gets inside . DO NOT install the speakers on installing the...

Instructions
Page 6
... "multi-session" discs (up to the NTSC signal and output. This system can play back DVD Video discs whose rating exceeds 5 V/500 mA. 3 Playable digital devices JVC bears no responsibility for any loss of DVD Video DVD Video players and DVD Video discs have their characteristics. can play correctly... also can be recognized or played back correctly due to their own Region Code numbers. Some discs/devices/files may not be used with PAL system. For details about updating your iPod software to play "packet write" discs. Playable disc types Type of disc DVD Video DVD Audio ...
... "multi-session" discs (up to the NTSC signal and output. This system can play back DVD Video discs whose rating exceeds 5 V/500 mA. 3 Playable digital devices JVC bears no responsibility for any loss of DVD Video DVD Video players and DVD Video discs have their characteristics. can play correctly... also can be recognized or played back correctly due to their own Region Code numbers. Some discs/devices/files may not be used with PAL system. For details about updating your iPod software to play "packet write" discs. Playable disc types Type of disc DVD Video DVD Audio ...

Instructions
Page 8
...1) • Batteries (x 2) • FM antenna (x 1) • AM loop antenna (x 1) • Composite video cord (x 1) • Connector for iPod (x 1) - TH-D60/TH-D50: Docking station for iPod - On the center unit: On the speaker: Speaker cord Speaker cord • Connect the black cords to the r terminals. •... expose batteries to each speaker. Connecting the speaker cords Connect the speaker cords both batteries. TH-D5/TH-D4: Connection cable for iPod (x 1) Stand for the System, use speakers of the same speaker impedance (SPEAKER IMPEDANCE) indicated on the rear of the remote ...
...1) • Batteries (x 2) • FM antenna (x 1) • AM loop antenna (x 1) • Composite video cord (x 1) • Connector for iPod (x 1) - TH-D60/TH-D50: Docking station for iPod - On the center unit: On the speaker: Speaker cord Speaker cord • Connect the black cords to the r terminals. •... expose batteries to each speaker. Connecting the speaker cords Connect the speaker cords both batteries. TH-D5/TH-D4: Connection cable for iPod (x 1) Stand for the System, use speakers of the same speaker impedance (SPEAKER IMPEDANCE) indicated on the rear of the remote ...
Instructions
Page 9
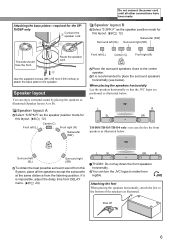
... from DELAY menu. ( 24) L SL SR R TH-D60: Do not lay down the front speakers horizontally. Ex.: TV L R SL SR TH-D50/TH-D5/TH-D4 only: you can turn the JVC logos to the bottom of the speakers as illustrated below . Use the supplied screws (M5 x 85 mm/3-3/8 inches) to... illustrated. Route the speaker cord. When placing the speakers horizontally Lay the speakers horizontally so that the JVC logos are positioned as the speaker position mode for this System, place all other connections have been made. Peel off 6 Attaching the feet When placing the speakers ...
... from DELAY menu. ( 24) L SL SR R TH-D60: Do not lay down the front speakers horizontally. Ex.: TV L R SL SR TH-D50/TH-D5/TH-D4 only: you can turn the JVC logos to the bottom of the speakers as illustrated below . Use the supplied screws (M5 x 85 mm/3-3/8 inches) to... illustrated. Route the speaker cord. When placing the speakers horizontally Lay the speakers horizontally so that the JVC logos are positioned as the speaker position mode for this System, place all other connections have been made. Peel off 6 Attaching the feet When placing the speakers ...
Instructions
Page 10
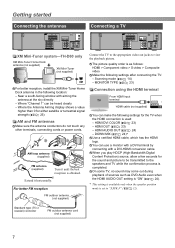
... Connecting the antennas Connecting a TV XM Mini-Tuner system-TH-D60 only XM Mini-Tuner Home Dock antenna (not supplied) XM Mini-Tuner (not supplied) For better reception, install the XM Mini-Tuner Home Dock antenna in the following settings for the TV when the HDMI connection is used: - Extend it until the best reception is...
... Connecting the antennas Connecting a TV XM Mini-Tuner system-TH-D60 only XM Mini-Tuner Home Dock antenna (not supplied) XM Mini-Tuner (not supplied) For better reception, install the XM Mini-Tuner Home Dock antenna in the following settings for the TV when the HDMI connection is used: - Extend it until the best reception is...
Instructions
Page 11
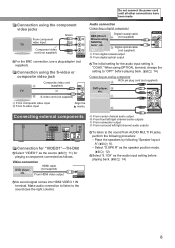
...) Satellite) tuner, etc. HDMI cable (not supplied) From HDMI video output No sound signal comes into HDMI VIDEO 1 IN terminal. Connection using OPTICAL terminal, change the setting to "OPT" before playing back. ( 14) 8 Digital optical cable (not supplied) A From digital coaxial .... S-video cord (not supplied) A From Composite video input B From S-video input Align the 5 marks. Connecting external components , Connection for "VIDEO1"-TH-D60 Select "VIDEO1" as the source ( 11) for the audio input setting is "COAX." A From center channel audio output B From front left/right ...
...) Satellite) tuner, etc. HDMI cable (not supplied) From HDMI video output No sound signal comes into HDMI VIDEO 1 IN terminal. Connection using OPTICAL terminal, change the setting to "OPT" before playing back. ( 14) 8 Digital optical cable (not supplied) A From digital coaxial .... S-video cord (not supplied) A From Composite video input B From S-video input Align the 5 marks. Connecting external components , Connection for "VIDEO1"-TH-D60 Select "VIDEO1" as the source ( 11) for the audio input setting is "COAX." A From center channel audio output B From front left/right ...
Instructions
Page 12
... From audio output Select "2CH" as the audio input setting before playing back. ( 14) Connecting the AC power cord Plug in the System only after all other connections have been completed. RCA pin plug cord (not supplied) From audio output Select "2CH" as follows. Digital optical...the 5 marks. * Connect an external component with the same kind of cable as the one used to "COAX" before playing back. ( 14) Connecting an analog component VCR, etc. Connection for "VIDEO2"-TH-D60 Select "VIDEO2" as the source ( 11) for playing a component connected as the audio input ...
... From audio output Select "2CH" as the audio input setting before playing back. ( 14) Connecting the AC power cord Plug in the System only after all other connections have been completed. RCA pin plug cord (not supplied) From audio output Select "2CH" as follows. Digital optical...the 5 marks. * Connect an external component with the same kind of cable as the one used to "COAX" before playing back. ( 14) Connecting an analog component VCR, etc. Connection for "VIDEO2"-TH-D60 Select "VIDEO2" as the source ( 11) for playing a component connected as the audio input ...
Instructions
Page 13
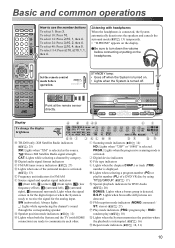
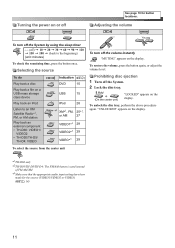
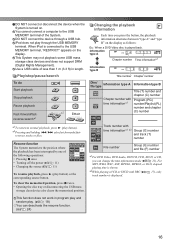
.... STANDBY lamp: • Goes off . Basic and common operations How to receive the signal for the digital input or when the System is selected as the source. : Shows XM Satellite Radio signal strength. Listening with HDMI connection) are detected. B.S.P: Lights when browsable ... surround): Light when the signal comes in for the analog input. Display To change the display brightness A TH-D60 only: XM Satellite Radio indicators ( 25) XM: Lights when "XM" is ready to use the number buttons To select 3: Press 3. To select 14: Press h10, 1, then 4. B Digital ...
.... STANDBY lamp: • Goes off . Basic and common operations How to receive the signal for the digital input or when the System is selected as the source. : Shows XM Satellite Radio signal strength. Listening with HDMI connection) are detected. B.S.P: Lights when browsable ... surround): Light when the signal comes in for the analog input. Display To change the display brightness A TH-D60 only: XM Satellite Radio indicators ( 25) XM: Lights when "XM" is ready to use the number buttons To select 3: Press 3. To select 14: Press h10, 1, then 4. B Digital ...
Instructions
Page 14
...volume To turn off the volume instantly "MUTING" appears on the display. "UNLOCKED" appears on the display. *1TH-D60 only *2TH-D50/TH-D5/TH-D4: The FM/AM button is used instead of FM/AM/XM. *3Make sure that the appropriate audio input setting have been made for button locations. To... back an external component • TH-D60: VIDEO1/ VIDEO2 • TH-D50/TH-D5/ TH-D4: VIDEO Indication DVD 15 USB 15 IPod 28 *2 XM*1, FM, 25*1, or AM 27 VIDEO1*3 29 VIDEO2*3 29 VIDEO*3 29 To select the source from the center unit To turn off the System by using the sleep timer - - (off...
...volume To turn off the volume instantly "MUTING" appears on the display. "UNLOCKED" appears on the display. *1TH-D60 only *2TH-D50/TH-D5/TH-D4: The FM/AM button is used instead of FM/AM/XM. *3Make sure that the appropriate audio input setting have been made for button locations. To... back an external component • TH-D60: VIDEO1/ VIDEO2 • TH-D50/TH-D5/ TH-D4: VIDEO Indication DVD 15 USB 15 IPod 28 *2 XM*1, FM, 25*1, or AM 27 VIDEO1*3 29 VIDEO2*3 29 VIDEO*3 29 To select the source from the center unit To turn off the System by using the sleep timer - - (off...
Instructions
Page 16
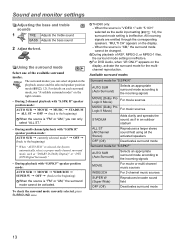
...mode* = OFF = (back to the beginning) * When "AUTO SUR" is selected, the System automatically selects a proper multi-channel surround mode, such as if in an outdoor stadium ALL ST (All ... modes Surround mode for the multichannel reproduction. During playback of the available surround modes. Using the surround mode Select one of ASF, MPEG-2, or MPEG-1 files, the surround ...through the corresponding speakers. To check the surround mode currently selected, press SURROUND once. TH-D60 only: - When the source is ineffective. Sound and monitor settings Adjusting the bass ...
...mode* = OFF = (back to the beginning) * When "AUTO SUR" is selected, the System automatically selects a proper multi-channel surround mode, such as if in an outdoor stadium ALL ST (All ... modes Surround mode for the multichannel reproduction. During playback of the available surround modes. Using the surround mode Select one of ASF, MPEG-2, or MPEG-1 files, the surround ...through the corresponding speakers. To check the surround mode currently selected, press SURROUND once. TH-D60 only: - When the source is ineffective. Sound and monitor settings Adjusting the bass ...
Instructions
Page 17
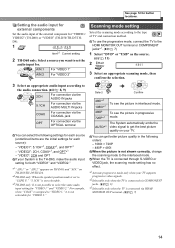
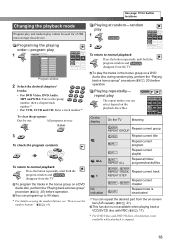
To use the progressive mode, connect the TV to the HDMI MONITOR OUT terminal or COMPONENT jacks*1. ( 7) 1 Select "DVD... can get the best picture quality on your System is the TH-D60, make the audio input setting for both "VIDEO1" and "VIDEO2." *1"AIN.1" or "AIN.2" appears on TH-D50/TH-D5/TH-D4. *2TH-D60 only: When the speaker position mode is set...get better picture quality in progressive 720P*3 mode. See page 12 for "VIDEO1/ VIDEO2" (TH-D60) or "VIDEO" (TH-D50/TH-D5/THD4). 1 Item*1 Current setting 2 TH-D60 only: Select a source you want to set to the type of TV and connection method....
To use the progressive mode, connect the TV to the HDMI MONITOR OUT terminal or COMPONENT jacks*1. ( 7) 1 Select "DVD... can get the best picture quality on your System is the TH-D60, make the audio input setting for both "VIDEO1" and "VIDEO2." *1"AIN.1" or "AIN.2" appears on TH-D50/TH-D5/TH-D4. *2TH-D60 only: When the speaker position mode is set...get better picture quality in progressive 720P*3 mode. See page 12 for "VIDEO1/ VIDEO2" (TH-D60) or "VIDEO" (TH-D50/TH-D5/THD4). 1 Item*1 Current setting 2 TH-D60 only: Select a source you want to set to the type of TV and connection method....
Instructions
Page 19
...type B" on the display as follows: Ex.: When a DVD Video disc is turned on the display. reverses tracks or files. Resume function The System memorizes the position where the playback has been interrupted by one of less than 1 m (3.3 ft) in program play and random play button). *... played back. iPod does not play button) or the corresponding source button. This System may not playback some USB mass storage class devices and does not support DRM (Digital Rights Management). Use a USB cable of the following operations: • Pressing 7 once • Turning off the power ( 11) ...
...type B" on the display as follows: Ex.: When a DVD Video disc is turned on the display. reverses tracks or files. Resume function The System memorizes the position where the playback has been interrupted by one of less than 1 m (3.3 ft) in program play and random play button). *... played back. iPod does not play button) or the corresponding source button. This System may not playback some USB mass storage class devices and does not support DRM (Digital Rights Management). Use a USB cable of the following operations: • Pressing 7 once • Turning off the power ( 11) ...
Instructions
Page 20
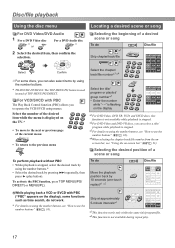
... *2For DVD Video and DVD VR discs, you can also select items by using the number buttons. * TH-D50/TH-D5/TH-D4: The TOP MENU/PG button is used instead of a scene or song To do not work. * For details on using the number buttons.* • Select the desired track by 10 seconds (one-... is stopped. *3For details on - Select the number of the desired item while the menu is not available during repeat play button). Disc/file playback Using the disc menu Locating a desired scene or song For DVD Video/DVD Audio 1 For a DVD Video disc * or For a DVD Audio disc * 2 Select the...
... *2For DVD Video and DVD VR discs, you can also select items by using the number buttons. * TH-D50/TH-D5/TH-D4: The TOP MENU/PG button is used instead of a scene or song To do not work. * For details on using the number buttons.* • Select the desired track by 10 seconds (one-... is stopped. *3For details on - Select the number of the desired item while the menu is not available during repeat play button). Disc/file playback Using the disc menu Locating a desired scene or song For DVD Video/DVD Audio 1 For a DVD Video disc * or For a DVD Audio disc * 2 Select the...
Instructions
Page 21
...during random play 1 2 To return to normal playback Press the button repeatedly until both the program window and disappear from the on using the number buttons, see "How to normal playback Press the button repeatedly until both the program window and disappear from the TV. ...on a DVD Audio disc, perform the "Playing back a bonus group" procedure ( 20) before operation. Playing repeatedly- * repeat play cannot be used for button locations. To clear the programs One by one All programs at random-random play 1 Programing the playing order-program play , perform the ...
...during random play 1 2 To return to normal playback Press the button repeatedly until both the program window and disappear from the on using the number buttons, see "How to normal playback Press the button repeatedly until both the program window and disappear from the TV. ...on a DVD Audio disc, perform the "Playing back a bonus group" procedure ( 20) before operation. Playing repeatedly- * repeat play cannot be used for button locations. To clear the programs One by one All programs at random-random play 1 Programing the playing order-program play , perform the ...

Instructions
Page 22
... and DVD Audio, reverse slow-motion is also available by pressing ( SLOW repeatedly. *2To zoom in JPEG files, pause the playback first. *3On some files, using cursor (3/2/K/5) cannot move the zoomed-in area.
... and DVD Audio, reverse slow-motion is also available by pressing ( SLOW repeatedly. *2To zoom in JPEG files, pause the playback first. *3On some files, using cursor (3/2/K/5) cannot move the zoomed-in area.
Instructions
Page 24
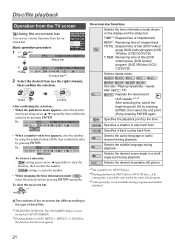
... this, select the beginning point (A) by pressing ENTER, then select the end point (B) by pressing ENTER again. Specifies a track to play is used instead of CAT/ON SCREEN. *2During playback of the on the display and the status bar. TIME*3: Elapsed time of chapter/track REM*3: Remaining time... of title (DVD Video)/ group (DVD Audio)/program (DVD VR)/disc (VCD/CD/SVCD) T.REM: Remaining time of discs/files. *1TH-D50/TH-D5/TH-D4: The ON SCREEN button is not available during playback. Selects the desired scene angle in a multiangle part during playback. Ex.: To correct a ...
... this, select the beginning point (A) by pressing ENTER, then select the end point (B) by pressing ENTER again. Specifies a track to play is used instead of CAT/ON SCREEN. *2During playback of the on the display and the status bar. TIME*3: Elapsed time of chapter/track REM*3: Remaining time... of title (DVD Video)/ group (DVD Audio)/program (DVD VR)/disc (VCD/CD/SVCD) T.REM: Remaining time of discs/files. *1TH-D50/TH-D5/TH-D4: The ON SCREEN button is not available during playback. Selects the desired scene angle in a multiangle part during playback. Ex.: To correct a ...
Instructions
Page 25
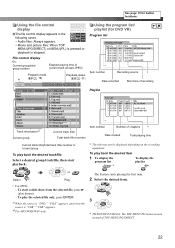
...Playback mode *1 ( 18) Playback status ( 31) Using the program list/ playlist (for button locations. Play 2 Select the desired item. • For JPEG: - Using the file control display The file control display appears in ... and when the source is "USB," "USB" appears. *2For MP3/WMA/WAV only. 3 * TH-D50/TH-D5/TH-D4: The TOP MENU/PG button is stopped. See page 15 for DVD VR) Program list Item number... 1 To display the program list * To display the playlist Select or The System starts playing the first item. Movie and picture files: When TOP MENU(/PG/DIRECT) or MENU...
...Playback mode *1 ( 18) Playback status ( 31) Using the program list/ playlist (for button locations. Play 2 Select the desired item. • For JPEG: - Using the file control display The file control display appears in ... and when the source is "USB," "USB" appears. *2For MP3/WMA/WAV only. 3 * TH-D50/TH-D5/TH-D4: The TOP MENU/PG button is stopped. See page 15 for DVD VR) Program list Item number... 1 To display the program list * To display the playlist Select or The System starts playing the first item. Movie and picture files: When TOP MENU(/PG/DIRECT) or MENU...


